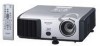
PG-F212X-L | PG-F262X | PG-F312X | PG-F317X Brochure
Page 3
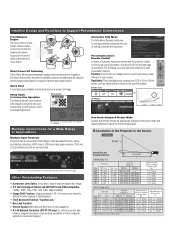
... in limited spaces. • Theft Deterrent Function "System Lock." • Key Lock Function. • Closed Caption with the projector remote control to DVD players, cable and satellite boxes, laptop and desktop computers, HDTV tuners, VCRs and video game consoles. Pointers: ...the appropriate settings for service and support. Presentation Assist Remote Control A variety of Applications Multiple Input Terminals Projectors can be performed with black and white text for easy readability. • RJ-45 Network Connector (PG-F317X only) for further presentation support. Pointer icons ...
... in limited spaces. • Theft Deterrent Function "System Lock." • Key Lock Function. • Closed Caption with the projector remote control to DVD players, cable and satellite boxes, laptop and desktop computers, HDTV tuners, VCRs and video game consoles. Pointers: ...the appropriate settings for service and support. Presentation Assist Remote Control A variety of Applications Multiple Input Terminals Projectors can be performed with black and white text for easy readability. • RJ-45 Network Connector (PG-F317X only) for further presentation support. Pointer icons ...

PG-F212X-L | PG-F262X | PG-F312X | PG-F317X Brochure
Page 4
...PG-F312X / PG-F317X PG-F262X PG-F212X-L Display device 0.55" DLP® chip x 1 Resolution XGA (1,024 x 768) Brightness 3,000 ANSI lumens 2,600 ANSI lumens 2,400 ANSI lumens Contrast ratio 2,200:1 F number F2.5-2.6 Lens Zoom Manual, x1.15 (f=20.4-23.5 mm) Focus Manual Picture size 40" to 300" Projector...accessories Remote control, two R-6 batteries, power cord - 6' (1.8 m), RGB cable - 10' (3.o m), len cap, DIN-D-sub RS-232C adapter - 5 57⁄64" (15 cm), storage case, operation manual, CD-ROM Limited Warranty*4 3 years parts/labor including 3 years of Sharp ...
...PG-F312X / PG-F317X PG-F262X PG-F212X-L Display device 0.55" DLP® chip x 1 Resolution XGA (1,024 x 768) Brightness 3,000 ANSI lumens 2,600 ANSI lumens 2,400 ANSI lumens Contrast ratio 2,200:1 F number F2.5-2.6 Lens Zoom Manual, x1.15 (f=20.4-23.5 mm) Focus Manual Picture size 40" to 300" Projector...accessories Remote control, two R-6 batteries, power cord - 6' (1.8 m), RGB cable - 10' (3.o m), len cap, DIN-D-sub RS-232C adapter - 5 57⁄64" (15 cm), storage case, operation manual, CD-ROM Limited Warranty*4 3 years parts/labor including 3 years of Sharp ...

PG-F312X, PG-F262X, PG-F212X Operation Manual
Page 8
...Projector into Standby Mode 25 Image Projection 26 About the Setup Guide 26 Adjusting the Projected Image 26 Correcting Trapezoidal Distortion ........ 28 Switching the Input Mode 29 Adjusting the Volume 29 Displaying the Black Screen and Turning off the Sound Temporarily .... 29 Resize Mode 30 4 Useful Features Operating with the Remote... 44 Selecting the Setup Guide 44 Reversing/Inverting Projected Images 44 Selecting the On-screen Display Language 44 Adjusting the Projector Function ("PRJ - ADJ" Menu 45 Auto Sync (Auto Sync Adjustment) ..... 45 Auto Power Off Function 45 Auto...
...Projector into Standby Mode 25 Image Projection 26 About the Setup Guide 26 Adjusting the Projected Image 26 Correcting Trapezoidal Distortion ........ 28 Switching the Input Mode 29 Adjusting the Volume 29 Displaying the Black Screen and Turning off the Sound Temporarily .... 29 Resize Mode 30 4 Useful Features Operating with the Remote... 44 Selecting the Setup Guide 44 Reversing/Inverting Projected Images 44 Selecting the On-screen Display Language 44 Adjusting the Projector Function ("PRJ - ADJ" Menu 45 Auto Sync (Auto Sync Adjustment) ..... 45 Auto Power Off Function 45 Auto...

PG-F312X, PG-F262X, PG-F212X Operation Manual
Page 14
except U.K. Optional accessories ■ Lamp unit ■ Ceiling-mount adaptor ■ Ceiling-mount unit ■ Remote receiver ■ 3 RCA to the wall outlet in your nearest Sharp Authorized Projector Dealer or Service Center. 10 Singapore Zealand and Oceania (6' (1.8 m)) (6' (1.8 m)) (6' (1.8 m)) (6' (1.8 m)) * Use the power cord that corresponds to mini D-sub 15 pin cable (10n (3.0 m)) AN-F212LP AN...
except U.K. Optional accessories ■ Lamp unit ■ Ceiling-mount adaptor ■ Ceiling-mount unit ■ Remote receiver ■ 3 RCA to the wall outlet in your nearest Sharp Authorized Projector Dealer or Service Center. 10 Singapore Zealand and Oceania (6' (1.8 m)) (6' (1.8 m)) (6' (1.8 m)) (6' (1.8 m)) * Use the power cord that corresponds to mini D-sub 15 pin cable (10n (3.0 m)) AN-F212LP AN...
PG-F312X, PG-F262X, PG-F212X Operation Manual
Page 15
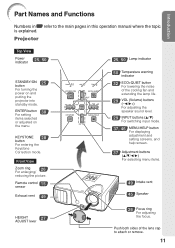
... the focus. ENTER button For setting 38 items selected or adjusted on and putting the projector into standby mode. Projector Top View Power indicator 25, 50 STANDBY/ON 25 button For turning the power on the menu. Remote control 15 sensor Exhaust vent 49 25, 50 Lamp indicator 50 Temperature warning indicator 32...
... the focus. ENTER button For setting 38 items selected or adjusted on and putting the projector into standby mode. Projector Top View Power indicator 25, 50 STANDBY/ON 25 button For turning the power on the menu. Remote control 15 sensor Exhaust vent 49 25, 50 Lamp indicator 50 Temperature warning indicator 32...
PG-F312X, PG-F262X, PG-F212X Operation Manual
Page 16
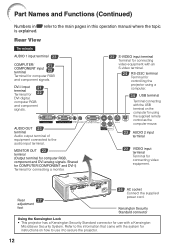
... connecting a monitor. 22 S-VIDEO input terminal Terminal for connecting video equipment with an S-video terminal. 24 RS-232C terminal Terminal for controlling the projector using the supplied remote control as the computer mouse. 23 AUDIO 2 input terminal 22 VIDEO input terminal Terminal for connecting video equipment. Kensington Security Standard connector Using the...
... connecting a monitor. 22 S-VIDEO input terminal Terminal for connecting video equipment with an S-video terminal. 24 RS-232C terminal Terminal for controlling the projector using the supplied remote control as the computer mouse. 23 AUDIO 2 input terminal 22 VIDEO input terminal Terminal for connecting video equipment. Kensington Security Standard connector Using the...

PG-F312X, PG-F262X, PG-F212X Operation Manual
Page 17
.... 38 ENTER button For setting items selected or adjusted on a computer keyboard, when with the USB connection (using a USB cable or the optional remote receiver). • For changing the pointer or spot area. BREAK TIMER button 32 For displaying the break time. MOUSE/Adjustment 34 buttons (P/R/O/Q) •...For lowering the noise of the image. COMPUTER, DVI, 29 S-VIDEO, VIDEO buttons For switching to a computer. STANDBY button 25 For putting the projector into the standby mode. PAGE UP/PAGE 34 DOWN buttons Same as the [Page Down] and [Page Up] keys on the menu. 34 ...
.... 38 ENTER button For setting items selected or adjusted on a computer keyboard, when with the USB connection (using a USB cable or the optional remote receiver). • For changing the pointer or spot area. BREAK TIMER button 32 For displaying the break time. MOUSE/Adjustment 34 buttons (P/R/O/Q) •...For lowering the noise of the image. COMPUTER, DVI, 29 S-VIDEO, VIDEO buttons For switching to a computer. STANDBY button 25 For putting the projector into the standby mode. PAGE UP/PAGE 34 DOWN buttons Same as the [Page Down] and [Page Up] keys on the menu. 34 ...
PG-F312X, PG-F262X, PG-F212X Operation Manual
Page 18
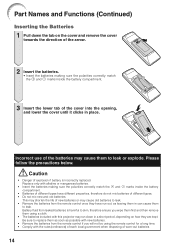
... as soon as possible with new batteries. • Remove the batteries from the remote control if you will not be using a cloth. • The batteries included with this projector may cause them to replace them using the remote control for a long time. • Comply with the rules (ordinance) of ...types. • Do not mix new and old batteries. Be sure to leak or explode. Please follow the precautions below. Battery fluid from the remote control once they are kept. Part Names and Functions (Continued) Inserting the Batteries 1 Pull down in place. Caution • Danger of new ...
... as soon as possible with new batteries. • Remove the batteries from the remote control if you will not be using a cloth. • The batteries included with this projector may cause them to replace them using the remote control for a long time. • Comply with the rules (ordinance) of ...types. • Do not mix new and old batteries. Be sure to leak or explode. Please follow the precautions below. Battery fluid from the remote control once they are kept. Part Names and Functions (Continued) Inserting the Batteries 1 Pull down in place. Caution • Danger of new ...

PG-F312X, PG-F262X, PG-F212X Operation Manual
Page 19
...malfunction under a fluorescent lamp. Introduction Usable Range The remote control can be used to moisture or high temperature. • The remote control may differ depending on the screen material. In this case, move the projector away from the remote control can be reflected off a screen for easy ...operation. When using the remote control • Ensure that you do not drop...
...malfunction under a fluorescent lamp. Introduction Usable Range The remote control can be used to moisture or high temperature. • The remote control may differ depending on the screen material. In this case, move the projector away from the remote control can be reflected off a screen for easy ...operation. When using the remote control • Ensure that you do not drop...
PG-F312X, PG-F262X, PG-F212X Operation Manual
Page 20
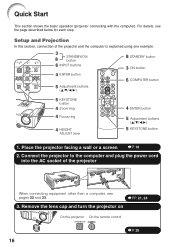
... with the computer). Remove the lens cap and turn the projector on On the projector On the remote control _P. 25 16 For details, see pages 22 and 23. _PP. 21, 24 3. Setup and Projection In this section, connection of the projector When connecting equipment other than a computer, see the page described below for...
... with the computer). Remove the lens cap and turn the projector on On the projector On the remote control _P. 25 16 For details, see pages 22 and 23. _PP. 21, 24 3. Setup and Projection In this section, connection of the projector When connecting equipment other than a computer, see the page described below for...
PG-F312X, PG-F262X, PG-F212X Operation Manual
Page 21
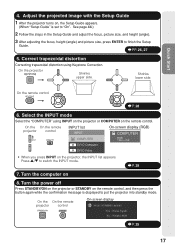
... INPUT list appears. Shrinks lower side. Press '/" to finish the Setup Guide. _PP. 26, 27 5. On the On the remote projector control INPUT list INPUT COMPUTER D DVI-D Computer On-screen display (RGB) COMPUTER RGB 1024 × 768 D DVI-D Video • When you press ...mode Select the "COMPUTER" using Keystone Correction. On the On the remote projector control On-screen display _P. 25 17 On the remote control _P. 28 6. Adjust the projected image with the Setup Guide 1 After the projector turns on the remote control. See page 44.) 2 Follow the steps in the Setup ...
... INPUT list appears. Shrinks lower side. Press '/" to finish the Setup Guide. _PP. 26, 27 5. On the On the remote projector control INPUT list INPUT COMPUTER D DVI-D Computer On-screen display (RGB) COMPUTER RGB 1024 × 768 D DVI-D Video • When you press ...mode Select the "COMPUTER" using Keystone Correction. On the On the remote projector control On-screen display _P. 25 17 On the remote control _P. 28 6. Adjust the projected image with the Setup Guide 1 After the projector turns on the remote control. See page 44.) 2 Follow the steps in the Setup ...

PG-F312X, PG-F262X, PG-F212X Operation Manual
Page 29
... You can unplug the power cord from the outlet or the breaker switch is turned off (Putting the Projector into Standby Mode) Press STANDBY/ON on the projector or STANDBY on the remote control, then press that button again while the confirmation message is displayed, to put into standby mode and... be done before performing the operations written below. (See pages 21 to 24.) Remove the lens cap and press STANDBY/ON on the projector or ON on the remote control. • The power indicator illuminates green. • After the lamp indicator illuminates, the projec- Green: The lamp is turned on...
... You can unplug the power cord from the outlet or the breaker switch is turned off (Putting the Projector into Standby Mode) Press STANDBY/ON on the projector or STANDBY on the remote control, then press that button again while the confirmation message is displayed, to put into standby mode and... be done before performing the operations written below. (See pages 21 to 24.) Remove the lens cap and press STANDBY/ON on the projector or ON on the remote control. • The power indicator illuminates green. • After the lamp indicator illuminates, the projec- Green: The lamp is turned on...

PG-F312X, PG-F262X, PG-F212X Operation Manual
Page 33
...the Black Screen and Turning off the Sound Temporarily Press AV MUTE on the remote control to temporarily display a black screen and turn the pro- Press P/R to external equipment, the volume level of the projector. Note • Pressing VOL-/-O will lower the volume. • Pressing ... button VOL +/- (Volume) buttons Adjusting the Volume Press VOL +/- On-screen display 29 on the remote control or -O/Q+ on the remote control, the INPUT list appears. Set the projector's volume to adjust the volume. Switching the Input Mode Select the appropriate input mode for the connected equipment...
...the Black Screen and Turning off the Sound Temporarily Press AV MUTE on the remote control to temporarily display a black screen and turn the pro- Press P/R to external equipment, the volume level of the projector. Note • Pressing VOL-/-O will lower the volume. • Pressing ... button VOL +/- (Volume) buttons Adjusting the Volume Press VOL +/- On-screen display 29 on the remote control or -O/Q+ on the remote control, the INPUT list appears. Set the projector's volume to adjust the volume. Switching the Input Mode Select the appropriate input mode for the connected equipment...
PG-F312X, PG-F262X, PG-F212X Operation Manual
Page 36
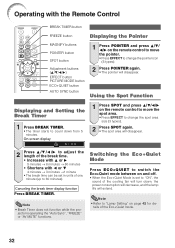
...buttons POINTER button SPOT button Adjustment buttons (P/R/O/Q) EFFECT button PICTURE MODE button ECO+QUIET button AUTO SYNC button 1 Press POINTER and press P/R/ O/Q on the remote control to move the pointer. • Press EFFECT to change the spot area size (3 types). 2 Press SPOT again. • The spot area will... Press ECO+QUIET to switch the Eco+Quiet mode between on page 42 for de- On-screen display 1 Press SPOT and press P/R/O/Q on the remote control to move the spot area. • Press EFFECT to change the pointer icon (5 types). 2 Press POINTER again. • The pointer ...
...buttons POINTER button SPOT button Adjustment buttons (P/R/O/Q) EFFECT button PICTURE MODE button ECO+QUIET button AUTO SYNC button 1 Press POINTER and press P/R/ O/Q on the remote control to move the pointer. • Press EFFECT to change the spot area size (3 types). 2 Press SPOT again. • The spot area will... Press ECO+QUIET to switch the Eco+Quiet mode between on page 42 for de- On-screen display 1 Press SPOT and press P/R/O/Q on the remote control to move the spot area. • Press EFFECT to change the pointer icon (5 types). 2 Press POINTER again. • The pointer ...

PG-F312X, PG-F262X, PG-F212X Operation Manual
Page 37
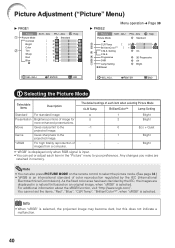
.... Auto Sync (Auto Sync Adjustment) Displaying an Enlarged Portion of an Image Auto Sync function works when detecting input signal after the projector turns on the input signal. • In the following order: STANDARD PRESENTATION MOVIE GAME sRGB * Note • The selectable magnifications... differ depending on . Graphs, tables and other portions of the enlarged image using P, R, O and Q. 2 Press RETURN on the remote control to cancel the operation. • The magnification then returns to ×1. Selecting the Picture Mode You can be achieved with Auto Sync ...
.... Auto Sync (Auto Sync Adjustment) Displaying an Enlarged Portion of an Image Auto Sync function works when detecting input signal after the projector turns on the input signal. • In the following order: STANDARD PRESENTATION MOVIE GAME sRGB * Note • The selectable magnifications... differ depending on . Graphs, tables and other portions of the enlarged image using P, R, O and Q. 2 Press RETURN on the remote control to cancel the operation. • The magnification then returns to ×1. Selecting the Picture Mode You can be achieved with Auto Sync ...

PG-F312X, PG-F262X, PG-F212X Operation Manual
Page 38
...left-clicking Press L-CLICK. ■ When right-clicking Press R-CLICK. ■ When your computer supports only a one-click mouse (such as Sharp service part QCNWGA014WJPZ) The mouse pointer can use this function does not work with the Microsoft® Windows® OS and Mac OS®....menu screen. • Confirm that the computer recognizes the USB connection. 34 Operating with the Remote Control (Continued) Using the Remote Control as the Wireless Computer Mouse When connecting the projector and the computer with a USB cable, you can be operated in the following operation systems...
...left-clicking Press L-CLICK. ■ When right-clicking Press R-CLICK. ■ When your computer supports only a one-click mouse (such as Sharp service part QCNWGA014WJPZ) The mouse pointer can use this function does not work with the Microsoft® Windows® OS and Mac OS®....menu screen. • Confirm that the computer recognizes the USB connection. 34 Operating with the Remote Control (Continued) Using the Remote Control as the Wireless Computer Mouse When connecting the projector and the computer with a USB cable, you can be operated in the following operation systems...
PG-F312X, PG-F262X, PG-F212X Operation Manual
Page 44
...Picture SCR - ADJ Help Standard 3 CLR Temp 2 BrilliantColorTM C.M.S. Any changes you make are displayed in a natural tint based on the remote control to the -1 projected image. Note • You can set the items, "Red", "Blue", "CLR Temp", "BrilliantColorTM", when...). ADJ Help 1 Picture Mode Standard Contrast 0 Bright 0 Color 0 2 Tint 0 Sharp 0 Red 0 Blue 0 Q PAGE2 Menu operation n Page 38 Picture SCR - ENTER END SEL./ADJ. Game Gives sharpness to your preference. Setting 4 C.M.S. 5 Progressive 6 DNR 7 Lamp Setting Reset 0 ...
...Picture SCR - ADJ Help Standard 3 CLR Temp 2 BrilliantColorTM C.M.S. Any changes you make are displayed in a natural tint based on the remote control to the -1 projected image. Note • You can set the items, "Red", "Blue", "CLR Temp", "BrilliantColorTM", when...). ADJ Help 1 Picture Mode Standard Contrast 0 Bright 0 Color 0 2 Tint 0 Sharp 0 Red 0 Blue 0 Q PAGE2 Menu operation n Page 38 Picture SCR - ENTER END SEL./ADJ. Game Gives sharpness to your preference. Setting 4 C.M.S. 5 Progressive 6 DNR 7 Lamp Setting Reset 0 ...

PG-F312X, PG-F262X, PG-F212X Operation Manual
Page 47
... O button You can be adjusted up to adjust Keystone Correction. 4 Setting the On-screen Display Selectable items On Off Description All on the remote con- are displayed. See page 28 for correcting trapezoidal distortion is projected either from the top or from the bottom towards the screen at an...Correction Note • For details of the Resize mode, see pages 30 and 31. • You can also press KEYSTONE on the remote control or on the projector to an angle of Keystone Correction. trol to set to "Normal"). • You can also press RESIZE on -screen displays are not...
... O button You can be adjusted up to adjust Keystone Correction. 4 Setting the On-screen Display Selectable items On Off Description All on the remote con- are displayed. See page 28 for correcting trapezoidal distortion is projected either from the top or from the bottom towards the screen at an...Correction Note • For details of the Resize mode, see pages 30 and 31. • You can also press KEYSTONE on the remote control or on the projector to an angle of Keystone Correction. trol to set to "Normal"). • You can also press RESIZE on -screen displays are not...

PG-F312X, PG-F262X, PG-F212X Operation Manual
Page 49
..., depending on /off in standby mode. Selectable items Eco Standard Description The monitor output and RS-232C functions are activated even if the projector is in standby mode. 5 Setting the Confirmation Sound (System Sound) Selectable items On Off Description A confirmation sound is detected for more than...Sync adjustment is not output from the internal speaker. Note • Auto Sync adjustment is also performed by pressing AUTO SYNC on the remote control. • The Auto Sync adjustment may take some time to "Eco", power consumption is output from the internal speaker. 45 Useful...
..., depending on /off in standby mode. Selectable items Eco Standard Description The monitor output and RS-232C functions are activated even if the projector is in standby mode. 5 Setting the Confirmation Sound (System Sound) Selectable items On Off Description A confirmation sound is detected for more than...Sync adjustment is not output from the internal speaker. Note • Auto Sync adjustment is also performed by pressing AUTO SYNC on the remote control. • The Auto Sync adjustment may take some time to "Eco", power consumption is output from the internal speaker. 45 Useful...

PG-F312X, PG-F262X, PG-F212X Operation Manual
Page 50
... 7 AMuodnioitIonrpOututput Menu operation n Page 38 a Setting/Changing the keycode This function allows you record the keycode in setting your nearest Sharp Authorized Projector Dealer or Service Center (see page 66). Audio 2 The AUDIO 2 input terminal is used as an audio input terminal. 2 ... as an audio input terminal. 8 Selecting the Transmission Speed (RS-232C) 3 Press the 4 buttons on the remote control or on the projector for normal environments. We suggest you to enter the preset keycode in "New Code". Selectable items 9600bps Description Transmission spePed...
... 7 AMuodnioitIonrpOututput Menu operation n Page 38 a Setting/Changing the keycode This function allows you record the keycode in setting your nearest Sharp Authorized Projector Dealer or Service Center (see page 66). Audio 2 The AUDIO 2 input terminal is used as an audio input terminal. 2 ... as an audio input terminal. 8 Selecting the Transmission Speed (RS-232C) 3 Press the 4 buttons on the remote control or on the projector for normal environments. We suggest you to enter the preset keycode in "New Code". Selectable items 9600bps Description Transmission spePed...


