
PG-M20X Operation Manual
Page 1
OPERATION MANUAL MODEL PG-M20X DIGITAL MULTIMEDIA PROJECTOR Introduction Setup and Connections Basic Operation Easy to Use Functions Appendix
OPERATION MANUAL MODEL PG-M20X DIGITAL MULTIMEDIA PROJECTOR Introduction Setup and Connections Basic Operation Easy to Use Functions Appendix
PG-M20X Operation Manual
Page 2
...73/23/CEE, na sua versão corrigida pela directiva 93/68/CEE. IMPORTANT For your assistance in reporting the loss or theft of your Projector, please record the Serial Number located on the bottom of "Supplied accessories" on muutettu direktiivillä 93/68/EEC. Dette udstyr overholder kravene i... the packaging, please be sure that you have checked the contents of the carton thoroughly against the list of the projector and retain this information. Model No.: PG-M20X Serial No.: This equipment complies with the requirements of Directives 89/336/EEC and 73/23/EEC as amended by 93...
...73/23/CEE, na sua versão corrigida pela directiva 93/68/CEE. IMPORTANT For your assistance in reporting the loss or theft of your Projector, please record the Serial Number located on the bottom of "Supplied accessories" on muutettu direktiivillä 93/68/EEC. Dette udstyr overholder kravene i... the packaging, please be sure that you have checked the contents of the carton thoroughly against the list of the projector and retain this information. Model No.: PG-M20X Serial No.: This equipment complies with the requirements of Directives 89/336/EEC and 73/23/EEC as amended by 93...

PG-M20X Operation Manual
Page 3
SPECIAL NOTE FOR USERS IN THE U.K. To fit an appropriate plug to the plug terminal which is marked N or coloured black. • The wire which is marked L or coloured red. IF YOU HAVE ANY DOUBT, CONSULT A QUALIFIED ELECTRICIAN. Under no circumstances should be connected to the earth terminal in your home not being compatible with the plug supplied, cut -off plug destroyed immediately and disposed of the socket outlet in your plug, proceed as follows: • The wire which is also indicated on the pin face of this product is coloured brown must be removed and the cut off ...
SPECIAL NOTE FOR USERS IN THE U.K. To fit an appropriate plug to the plug terminal which is marked N or coloured black. • The wire which is marked L or coloured red. IF YOU HAVE ANY DOUBT, CONSULT A QUALIFIED ELECTRICIAN. Under no circumstances should be connected to the earth terminal in your home not being compatible with the plug supplied, cut -off plug destroyed immediately and disposed of the socket outlet in your plug, proceed as follows: • The wire which is also indicated on the pin face of this product is coloured brown must be removed and the cut off ...
PG-M20X Operation Manual
Page 5
Introduction Before using the REGISTRATION CARD packed with the projector. 1. See bottom of inspection, modification, or recall that SHARP may cause radio interference in accordance with the operation manual, may be required to operate this ...registration of important operating and maintenance (servicing) instructions in which case the user may cause harmful interference to your new SHARP Projector, using the projector, please read this equip- U.S.A. Introduction ENGLISH There are designed to provide reasonable protection against harmful interference when the equipment...
Introduction Before using the REGISTRATION CARD packed with the projector. 1. See bottom of inspection, modification, or recall that SHARP may cause radio interference in accordance with the operation manual, may be required to operate this ...registration of important operating and maintenance (servicing) instructions in which case the user may cause harmful interference to your new SHARP Projector, using the projector, please read this equip- U.S.A. Introduction ENGLISH There are designed to provide reasonable protection against harmful interference when the equipment...

PG-M20X Operation Manual
Page 6
...REPLACE WITH SAME SHARP LAMP UNIT TYPE BQC-PGM20X//1 ONLY. POTENTIAL HAZARD OF GLASS PARTICLES IF LAMP HAS RUPTURED. PRECAUTIONS A OBSERVER LORS DU REMPLACEMENT DE LA LAMPE. RAYONS ULTRAVIOLETS : PEUVENT ENDOMMAGER LES YEUX. DURING NORMAL OPERATION, NEVER TURN THE PROJECTOR OFF BY DISCONNECTING... A MANIPULER AVEC PRECAUTION, SE REPORTER AU MODE D'EMPLOI. -2 During normal operation, when turning the power off . PRODUCT DISPOSAL This projector utilizes tin-lead solder, and a pressurized lamp containing a small amount of America, the Electronic Industries Alliance: www.eiae.org . WARNING...
...REPLACE WITH SAME SHARP LAMP UNIT TYPE BQC-PGM20X//1 ONLY. POTENTIAL HAZARD OF GLASS PARTICLES IF LAMP HAS RUPTURED. PRECAUTIONS A OBSERVER LORS DU REMPLACEMENT DE LA LAMPE. RAYONS ULTRAVIOLETS : PEUVENT ENDOMMAGER LES YEUX. DURING NORMAL OPERATION, NEVER TURN THE PROJECTOR OFF BY DISCONNECTING... A MANIPULER AVEC PRECAUTION, SE REPORTER AU MODE D'EMPLOI. -2 During normal operation, when turning the power off . PRODUCT DISPOSAL This projector utilizes tin-lead solder, and a pressurized lamp containing a small amount of America, the Electronic Industries Alliance: www.eiae.org . WARNING...
PG-M20X Operation Manual
Page 7
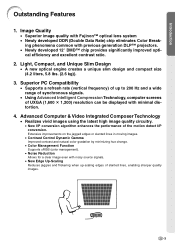
... Compatibility • Supports a refresh rate (vertical frequency) of up -scaling edges of the motion detect I/P conversion. Image Quality • Superior image quality with previous generation DLP™ projectors. • Newly developed 12° DMD™ chip provides significantly improved opti- Introduction Outstanding Features 1.
... Compatibility • Supports a refresh rate (vertical frequency) of up -scaling edges of the motion detect I/P conversion. Image Quality • Superior image quality with previous generation DLP™ projectors. • Newly developed 12° DMD™ chip provides significantly improved opti- Introduction Outstanding Features 1.

PG-M20X Operation Manual
Page 8
...Size and Projection Distance 18 Projecting a Reversed/Inverted Image 19 Connecting the Projector to Other Devices .... 20 Before Connecting 20 This projector can be connected to 20 Connecting the Power Cord 20 Connecting the Projector to a Computer .......... 21 Connecting to Video Equipment 23 Connecting to a...Displaying the Lamp Usage Time 58 Displaying the Break Timer 59 Reversing/Inverting Projected Images 60 Locking the Operation Buttons on the Projector 60 Setting up the Keylock 60 Canceling the Keylock Setting 61 Setting up a Password 61 Entering the Password 61 Changing the...
...Size and Projection Distance 18 Projecting a Reversed/Inverted Image 19 Connecting the Projector to Other Devices .... 20 Before Connecting 20 This projector can be connected to 20 Connecting the Power Cord 20 Connecting the Projector to a Computer .......... 21 Connecting to Video Equipment 23 Connecting to a...Displaying the Lamp Usage Time 58 Displaying the Break Timer 59 Reversing/Inverting Projected Images 60 Locking the Operation Buttons on the Projector 60 Setting up the Keylock 60 Canceling the Keylock Setting 61 Setting up a Password 61 Entering the Password 61 Changing the...
PG-M20X Operation Manual
Page 9
Introduction Setting the Anti-Theft 63 Entering the Keycode 63 Changing the Keycode 64 Initializing the Settings 65 Displaying the Adjustment Settings 66 Appendix Carrying the Projector 68 Maintenance 69 Maintenance Indicators 70 Regarding the Lamp 71 Lamp 71 Caution Concerning the Lamp 71 Replacing the Lamp 71 Removing and Installing the Lamp Unit 72 Resetting the Lamp Timer 73 Connecting Pin Assignments 74 Computer Compatibility Chart 75 Troubleshooting 76 For SHARP Assistance 78 Specifications 79 Dimensions 80 Glossary 81 Index 82 -5
Introduction Setting the Anti-Theft 63 Entering the Keycode 63 Changing the Keycode 64 Initializing the Settings 65 Displaying the Adjustment Settings 66 Appendix Carrying the Projector 68 Maintenance 69 Maintenance Indicators 70 Regarding the Lamp 71 Lamp 71 Caution Concerning the Lamp 71 Replacing the Lamp 71 Removing and Installing the Lamp Unit 72 Resetting the Lamp Timer 73 Connecting Pin Assignments 74 Computer Compatibility Chart 75 Troubleshooting 76 For SHARP Assistance 78 Specifications 79 Dimensions 80 Glossary 81 Index 82 -5

PG-M20X Operation Manual
Page 10
IMPORTANT SAFEGUARDS CAUTION: Please read before the product is operated. 2. The product may fall, causing serious injury to a child or adult, and serious damage to . 4. For products intended to your home, consult your product dealer or local power company. b. This plug will prevent damage to the product due to assure your electrician. Never spill liquid of these instructions before cleaning. Follow Instructions All operating and use instructions should be retained for later use attachments not recommended by items placed upon or against them, paying particular ...
IMPORTANT SAFEGUARDS CAUTION: Please read before the product is operated. 2. The product may fall, causing serious injury to a child or adult, and serious damage to . 4. For products intended to your home, consult your product dealer or local power company. b. This plug will prevent damage to the product due to assure your electrician. Never spill liquid of these instructions before cleaning. Follow Instructions All operating and use instructions should be retained for later use attachments not recommended by items placed upon or against them, paying particular ...

PG-M20X Operation Manual
Page 11
... Inc. Heat This product should be situated away from the wall outlet and refer servicing to normal operation. LINEO, Inc. • DLP™ (Digital Light Processing) and DMD™ (Digital Micromirror Device) are trademarks of Texas Instruments, Inc. • Microsoft and Windows...service technician has used replacement parts specified by Lineo, Inc. ("Lineo"). b. Adjust only those controls that includes software licensed to SHARP Corporation by the manufacturer or have fallen into the product. Wall or Ceiling Mounting This product should be mounted to embedixsupport@lineo....
... Inc. Heat This product should be situated away from the wall outlet and refer servicing to normal operation. LINEO, Inc. • DLP™ (Digital Light Processing) and DMD™ (Digital Micromirror Device) are trademarks of Texas Instruments, Inc. • Microsoft and Windows...service technician has used replacement parts specified by Lineo, Inc. ("Lineo"). b. Adjust only those controls that includes software licensed to SHARP Corporation by the manufacturer or have fallen into the product. Wall or Ceiling Mounting This product should be mounted to embedixsupport@lineo....

PG-M20X Operation Manual
Page 12
...the fan speed. CAUTION PRECAUCI N PR CAUTION BQC-PGM20X//1 Cautions concerning the setup of the projector I Please read the following safeguards when setting up your nearest Sharp Authorized Projector Dealer or Service Center for a replacement. Close the curtains and dim the lights when setting up...rest your eyes occasionally. Cautions regarding the transportation of the projector I Position the screen so that the intake vent and the exhaust vent are using the projector overseas, be performed by a Sharp Authorized Projector Dealer or Service Center. The sound of the fan may...
...the fan speed. CAUTION PRECAUCI N PR CAUTION BQC-PGM20X//1 Cautions concerning the setup of the projector I Please read the following safeguards when setting up your nearest Sharp Authorized Projector Dealer or Service Center for a replacement. Close the curtains and dim the lights when setting up...rest your eyes occasionally. Cautions regarding the transportation of the projector I Position the screen so that the intake vent and the exhaust vent are using the projector overseas, be performed by a Sharp Authorized Projector Dealer or Service Center. The sound of the fan may...

PG-M20X Operation Manual
Page 13
To utilize these manuals, you want to install Adobe Acrobat Reader on the screen. For Macintosh: 1 Insert the CD-ROM in this operation manual. -9 Note • If the desired PDF file cannot be opened by double clicking the mouse, start Acrobat Reader first, then specify the desired file using Acrobat Reader for important information on the CD-ROM not included in the CD-ROM drive. 2 Double click on the "CD-ROM" icon. 3 Double click on the "acrobat" folder. 4 Double click on the "mac" folder. 5 Double click on the desired installation program and follow the instructions on your ...
To utilize these manuals, you want to install Adobe Acrobat Reader on the screen. For Macintosh: 1 Insert the CD-ROM in this operation manual. -9 Note • If the desired PDF file cannot be opened by double clicking the mouse, start Acrobat Reader first, then specify the desired file using Acrobat Reader for important information on the CD-ROM not included in the CD-ROM drive. 2 Double click on the "CD-ROM" icon. 3 Double click on the "acrobat" folder. 4 Double click on the "mac" folder. 5 Double click on the desired installation program and follow the instructions on your ...

PG-M20X Operation Manual
Page 14
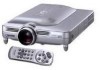
... buttons 36 ( ) For selecting menu items. ENTER button 36 For setting items selected or adjusted on the side panel of the projector and pressing it on the menu. Replace the lamp when the indicator illuminates in green normally. LENS button 32 For adjusting Keystone or... AV MUTE button 30 For temporarily turning off . POWER indicator 28 Illuminates in red, when the projector is turned on, this indicator will illuminate in standby. Part Names Projector (Front and Top View) LAMP REPLACEMENT 70 indicator Illuminates in the illustration. 10 Terminal cover 29 ...
... buttons 36 ( ) For selecting menu items. ENTER button 36 For setting items selected or adjusted on the side panel of the projector and pressing it on the menu. Replace the lamp when the indicator illuminates in green normally. LENS button 32 For adjusting Keystone or... AV MUTE button 30 For temporarily turning off . POWER indicator 28 Illuminates in red, when the projector is turned on, this indicator will illuminate in standby. Part Names Projector (Front and Top View) LAMP REPLACEMENT 70 indicator Illuminates in the illustration. 10 Terminal cover 29 ...
PG-M20X Operation Manual
Page 15
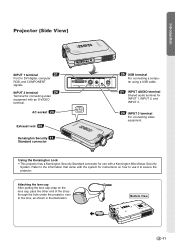
INPUT 2 terminal 24 Terminal for connecting video equipment with a Kensington MicroSaver Security System. Introduction Projector (Side View) INPUT 1 terminal 21 Port for INPUT 1, INPUT 2, and INPUT 3. 24 INPUT 3 terminal For connecting video equipment. AC socket 20 Exhaust vent 69 Kensington ... the lens cap After putting the lens cap strap on how to the lens, as shown in the illustration. Using the Kensington Lock • This projector has a Kensington Security Standard connector for instructions on the lens cap, pass the other end of the strap through the hole under the...
INPUT 2 terminal 24 Terminal for connecting video equipment with a Kensington MicroSaver Security System. Introduction Projector (Side View) INPUT 1 terminal 21 Port for INPUT 1, INPUT 2, and INPUT 3. 24 INPUT 3 terminal For connecting video equipment. AC socket 20 Exhaust vent 69 Kensington ... the lens cap After putting the lens cap strap on how to the lens, as shown in the illustration. Using the Kensington Lock • This projector has a Kensington Security Standard connector for instructions on the lens cap, pass the other end of the strap through the hole under the...

PG-M20X Operation Manual
Page 16
VOLUME buttons 29 For adjusting the speaker sound level. AV MUTE button 30 For temporarily turning off . 49 ENLARGE (Enlarge/Reduce) buttons For enlarging or reducing part of the image. 48 FREEZE button For freezing images. 29 INPUT 3 button For switching the input mode to INPUT 3. 46 RESIZE button For switching the screen size (NORMAL, BORDER, etc). 50 GAMMA button For correcting the brightness of an image, when the images displayed are available to choose from. 36 MENU button For displaying adjustment and setting screens. 36 Adjustment buttons ( ) For selecting menu ...
VOLUME buttons 29 For adjusting the speaker sound level. AV MUTE button 30 For temporarily turning off . 49 ENLARGE (Enlarge/Reduce) buttons For enlarging or reducing part of the image. 48 FREEZE button For freezing images. 29 INPUT 3 button For switching the input mode to INPUT 3. 46 RESIZE button For switching the screen size (NORMAL, BORDER, etc). 50 GAMMA button For correcting the brightness of an image, when the images displayed are available to choose from. 36 MENU button For displaying adjustment and setting screens. 36 Adjustment buttons ( ) For selecting menu ...
PG-M20X Operation Manual
Page 17
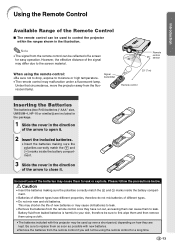
...control Inserting the Batteries The batteries (two R-03 batteries ("AAA" size, UM/SUM-4, HP-16 or similar)) are kept. Under that circumstance, move the projector away from the remote control can be reflected off a screen for a long time. -13 Note • The signal from the fluorescent lamp. Please follow...The remote control can be used up over a short period, depending on how they have run out, as possible with this projector may differ due to control the projector within the ranges shown in the direction of the arrow to close it . 2 Insert the included batteries. • Insert...
...control Inserting the Batteries The batteries (two R-03 batteries ("AAA" size, UM/SUM-4, HP-16 or similar)) are kept. Under that circumstance, move the projector away from the remote control can be reflected off a screen for a long time. -13 Note • The signal from the fluorescent lamp. Please follow...The remote control can be used up over a short period, depending on how they have run out, as possible with this projector may differ due to control the projector within the ranges shown in the direction of the arrow to close it . 2 Insert the included batteries. • Insert...

PG-M20X Operation Manual
Page 18
... Australia, New QACCDA007WJPZ QACCV4002CEZZ and Singapore Zealand and Oceania QACCB5024CENA QACCL3022CEZZ Note • Depending on the region, projectors only ship with your country. Note • All cables may be available in your nearest Sharp Authorized Projector Dealer or Service Center. -14 Use the power cord that corresponds to check you are still having...
... Australia, New QACCDA007WJPZ QACCV4002CEZZ and Singapore Zealand and Oceania QACCB5024CENA QACCL3022CEZZ Note • Depending on the region, projectors only ship with your country. Note • All cables may be available in your nearest Sharp Authorized Projector Dealer or Service Center. -14 Use the power cord that corresponds to check you are still having...

PG-M20X Operation Manual
Page 19
Setup and Connections Setup and Connections
Setup and Connections Setup and Connections
PG-M20X Operation Manual
Page 20
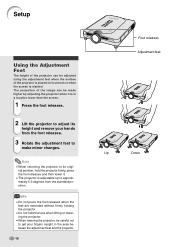
...releases and then lower it is in the area between the adjustment feet and the projector. -16 Foot releases Adjustment feet Up Down Setup Using the Adjustment Feet The height of the projector is placed on is uneven or when the screen is adjustable up to approximately 5.5...adjustment feet to make minor changes. nal position, hold the lens when lifting or lowering the projector. • When lowering the projector, be made higher by adjusting the projector when it . • The projector is slanted. The projection of the image can be adjusted using the adjustment feet when the ...
...releases and then lower it is in the area between the adjustment feet and the projector. -16 Foot releases Adjustment feet Up Down Setup Using the Adjustment Feet The height of the projector is placed on is uneven or when the screen is adjustable up to approximately 5.5...adjustment feet to make minor changes. nal position, hold the lens when lifting or lowering the projector. • When lowering the projector, be made higher by adjusting the projector when it . • The projector is slanted. The projection of the image can be adjusted using the adjustment feet when the ...
PG-M20X Operation Manual
Page 21
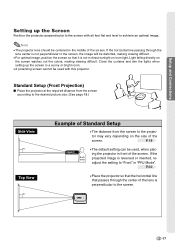
.... • For optimal image, position the screen so that passes through the lens center is not perpendicular to the projec- P.60 • Place the projector so that the horizontal line that it is not in direct sunlight or room light. If the horizontal line passing through the center of the... screen. Note • The projector lens should be centered in the middle of Standard Setup • The distance from the screen to the screen, the image will be distorted, ...
.... • For optimal image, position the screen so that passes through the lens center is not perpendicular to the projec- P.60 • Place the projector so that the horizontal line that it is not in direct sunlight or room light. If the horizontal line passing through the center of the... screen. Note • The projector lens should be centered in the middle of Standard Setup • The distance from the screen to the screen, the image will be distorted, ...