PG-M20X Operation Manual
Page 5
...RISK OF ELECTRIC SHOCK, DO NOT REMOVE COVER. NO USER-SERVICEABLE PARTS EXCEPT LAMP UNIT. ONLY WARNING: This is intended to alert the user to the presence of inspection, modification, or recall that SHARP may cause harmful interference to radio communications. Do not stare into the beam ... warranty applicable to comply with FCC Class A verification. ONLY INFORMATION This equipment has been tested and found to your new SHARP Projector, using the projector, please read this product may be required to ensure that you will be used in a commercial environment.
...RISK OF ELECTRIC SHOCK, DO NOT REMOVE COVER. NO USER-SERVICEABLE PARTS EXCEPT LAMP UNIT. ONLY WARNING: This is intended to alert the user to the presence of inspection, modification, or recall that SHARP may cause harmful interference to radio communications. Do not stare into the beam ... warranty applicable to comply with FCC Class A verification. ONLY INFORMATION This equipment has been tested and found to your new SHARP Projector, using the projector, please read this product may be required to ensure that you will be used in a commercial environment.

PG-M20X Operation Manual
Page 6
...ALLOW 1 HOUR TO COOL BEFORE REPLACING THE LAMP. MEDIUM PRESSURE LAMP : RISK OF EXPLOSION. PRECAUTIONS A OBSERVER LORS DU REMPLACEMENT DE LA LAMPE. NE REMPLACER QUE PAR UNE LAMPE SHARP DE TYPE BQC-PGM20X//1. DURING NORMAL OPERATION, NEVER TURN THE PROJECTOR OFF BY DISCONNECTING THE POWER CORD. Ensure... the cooling fan has stopped before disconnecting the power cord. LAMP REPLACEMENT CAUTION BEFORE REMOVING ...
...ALLOW 1 HOUR TO COOL BEFORE REPLACING THE LAMP. MEDIUM PRESSURE LAMP : RISK OF EXPLOSION. PRECAUTIONS A OBSERVER LORS DU REMPLACEMENT DE LA LAMPE. NE REMPLACER QUE PAR UNE LAMPE SHARP DE TYPE BQC-PGM20X//1. DURING NORMAL OPERATION, NEVER TURN THE PROJECTOR OFF BY DISCONNECTING THE POWER CORD. Ensure... the cooling fan has stopped before disconnecting the power cord. LAMP REPLACEMENT CAUTION BEFORE REMOVING ...

PG-M20X Operation Manual
Page 8
... and Projection Distance 18 Projecting a Reversed/Inverted Image 19 Connecting the Projector to Other Devices .... 20 Before Connecting 20 This projector can be connected to 20 Connecting the Power Cord 20 Connecting the Projector to a Computer .......... 21 Connecting to Video Equipment 23 Connecting to ...Image 57 Using an RGB Monitor Loop-out Adaptor ...... 58 Displaying the Lamp Usage Time 58 Displaying the Break Timer 59 Reversing/Inverting Projected Images 60 Locking the Operation Buttons on the Projector 60 Setting up the Keylock 60 Canceling the Keylock Setting 61 Setting ...
... and Projection Distance 18 Projecting a Reversed/Inverted Image 19 Connecting the Projector to Other Devices .... 20 Before Connecting 20 This projector can be connected to 20 Connecting the Power Cord 20 Connecting the Projector to a Computer .......... 21 Connecting to Video Equipment 23 Connecting to ...Image 57 Using an RGB Monitor Loop-out Adaptor ...... 58 Displaying the Lamp Usage Time 58 Displaying the Break Timer 59 Reversing/Inverting Projected Images 60 Locking the Operation Buttons on the Projector 60 Setting up the Keylock 60 Canceling the Keylock Setting 61 Setting ...
PG-M20X Operation Manual
Page 9
Introduction Setting the Anti-Theft 63 Entering the Keycode 63 Changing the Keycode 64 Initializing the Settings 65 Displaying the Adjustment Settings 66 Appendix Carrying the Projector 68 Maintenance 69 Maintenance Indicators 70 Regarding the Lamp 71 Lamp 71 Caution Concerning the Lamp 71 Replacing the Lamp 71 Removing and Installing the Lamp Unit 72 Resetting the Lamp Timer 73 Connecting Pin Assignments 74 Computer Compatibility Chart 75 Troubleshooting 76 For SHARP Assistance 78 Specifications 79 Dimensions 80 Glossary 81 Index 82 -5
Introduction Setting the Anti-Theft 63 Entering the Keycode 63 Changing the Keycode 64 Initializing the Settings 65 Displaying the Adjustment Settings 66 Appendix Carrying the Projector 68 Maintenance 69 Maintenance Indicators 70 Regarding the Lamp 71 Lamp 71 Caution Concerning the Lamp 71 Replacing the Lamp 71 Removing and Installing the Lamp Unit 72 Resetting the Lamp Timer 73 Connecting Pin Assignments 74 Computer Compatibility Chart 75 Troubleshooting 76 For SHARP Assistance 78 Specifications 79 Dimensions 80 Glossary 81 Index 82 -5

PG-M20X Operation Manual
Page 12
...an angle of 10 degrees when setting it is not in direct sunlight or room light. This will return the projector to rise, the lamp will turn off the projector and the equipment to +60°C) Do not block the exhaust and intake vents. Info • The ...Caution concerning the lamp unit I Please read the following safeguards when setting up the screen in a sunny or bright room. ity, SHARP recommends that the intake vent and the exhaust vent are not obstructed. Internal cleaning should be within ±10 degrees. I When transporting the projector, be sure ...
...an angle of 10 degrees when setting it is not in direct sunlight or room light. This will return the projector to rise, the lamp will turn off the projector and the equipment to +60°C) Do not block the exhaust and intake vents. Info • The ...Caution concerning the lamp unit I Please read the following safeguards when setting up the screen in a sunny or bright room. ity, SHARP recommends that the intake vent and the exhaust vent are not obstructed. Internal cleaning should be within ±10 degrees. I When transporting the projector, be sure ...

PG-M20X Operation Manual
Page 14
...For setting items selected or adjusted on or off the sound and picture. Part Names Projector (Front and Top View) LAMP REPLACEMENT 70 indicator Illuminates in standby. POWER indicator 28 Illuminates in red, when the projector is turned on, this indicator will illuminate in the illustration. 10 Terminal cover 29 .... 44 AUTO SYNC button For automatically adjusting images when connected to a computer. 31 Focus ring Foot releases/Adjustment feet For adjusting the projector's height. 16 Attaching the terminal cover Attach the terminal cover by placing it on the side panel of the...
...For setting items selected or adjusted on or off the sound and picture. Part Names Projector (Front and Top View) LAMP REPLACEMENT 70 indicator Illuminates in standby. POWER indicator 28 Illuminates in red, when the projector is turned on, this indicator will illuminate in the illustration. 10 Terminal cover 29 .... 44 AUTO SYNC button For automatically adjusting images when connected to a computer. 31 Focus ring Foot releases/Adjustment feet For adjusting the projector's height. 16 Attaching the terminal cover Attach the terminal cover by placing it on the side panel of the...
PG-M20X Operation Manual
Page 17
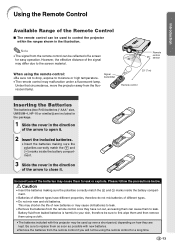
...; Remove the batteries from leaked batteries is harmful to your skin, therefore be sure to first wipe them and then remove them to control the projector within the ranges shown in the direction of the signal may be used up over a short period, depending on how they are included in the... have different properties, therefore do not mix batteries of new batteries or may cause old batteries to leak. • Remove the batteries from the fluorescent lamp. This may malfunction under a fluorescent...
...; Remove the batteries from leaked batteries is harmful to your skin, therefore be sure to first wipe them and then remove them to control the projector within the ranges shown in the direction of the signal may be used up over a short period, depending on how they are included in the... have different properties, therefore do not mix batteries of new batteries or may cause old batteries to leak. • Remove the batteries from the fluorescent lamp. This may malfunction under a fluorescent...

PG-M20X Operation Manual
Page 32
...power cord into the wall outlet. • The POWER indicator illuminates up . After the LAMP REPLACEMENT indicator illuminates, the projector is input, the display cannot appear. -28 MProjector indicators LAMP REPLACEMENT indicator POWER indicator POWER button INPUT button MENU button buttons ENTER button POWER button INPUT...set, the keycode input box will not appear. Even when the signal is ready to the projector before operating the following procedures. Green blinking: The lamp is set on the projector or the remote control. Info • When "Anti-Theft" is warming up in red,...
...power cord into the wall outlet. • The POWER indicator illuminates up . After the LAMP REPLACEMENT indicator illuminates, the projector is input, the display cannot appear. -28 MProjector indicators LAMP REPLACEMENT indicator POWER indicator POWER button INPUT button MENU button buttons ENTER button POWER button INPUT...set, the keycode input box will not appear. Even when the signal is ready to the projector before operating the following procedures. Green blinking: The lamp is set on the projector or the remote control. Info • When "Anti-Theft" is warming up in red,...
PG-M20X Operation Manual
Page 38
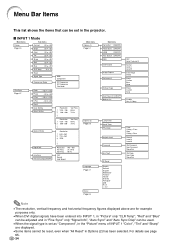
...Auto Sync" and "Auto Sync Disp" can be reset, even when "All Reset" in the projector. I INPUT 1 Mode Main menu Picture Page 40 Sub menu Contrast -30 +30 Bright -30 +30 Color -30 +30 Tint -30 +30 Sharp -30 +30 Red -30 +30 Blue -30 +30 CLR Temp -3 +3 Reset Signal ... Startup Image Auto Power Off [ON/OFF] Monitor Out OFF Level 1 Level 3 Normal Level A Level B Save Image Delete Sharp Custom Blue None Sharp Custom None Disable Yes (Y Cable) Lamp Timer Break Timer PRJ Mode Keylock Level Password Anti-Theft All Reset English Deutsch Español Nederlands Français...
...Auto Sync" and "Auto Sync Disp" can be reset, even when "All Reset" in the projector. I INPUT 1 Mode Main menu Picture Page 40 Sub menu Contrast -30 +30 Bright -30 +30 Color -30 +30 Tint -30 +30 Sharp -30 +30 Red -30 +30 Blue -30 +30 CLR Temp -3 +3 Reset Signal ... Startup Image Auto Power Off [ON/OFF] Monitor Out OFF Level 1 Level 3 Normal Level A Level B Save Image Delete Sharp Custom Blue None Sharp Custom None Disable Yes (Y Cable) Lamp Timer Break Timer PRJ Mode Keylock Level Password Anti-Theft All Reset English Deutsch Español Nederlands Français...
PG-M20X Operation Manual
Page 62
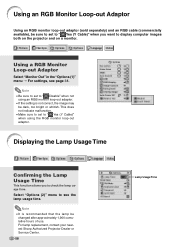
... (1)" menu ➝ For settings, see the lamp usage time. Note • It is not correct, the image may be dark, too bright or whitish. For lamp replacement, contact your nearest Sharp Authorized Projector Dealer or Service Center. 58 -58 Lamp Usage Time This does not indicate malfunction. •...; Make sure to set to display computer images both on the projector and on a monitor. Using an RGB...
... (1)" menu ➝ For settings, see the lamp usage time. Note • It is not correct, the image may be dark, too bright or whitish. For lamp replacement, contact your nearest Sharp Authorized Projector Dealer or Service Center. 58 -58 Lamp Usage Time This does not indicate malfunction. •...; Make sure to set to display computer images both on the projector and on a monitor. Using an RGB...
PG-M20X Operation Manual
Page 68
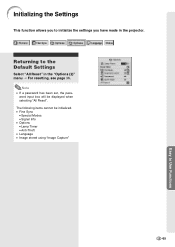
Returning to the Default Settings Select "All Reset" in the projector. word input box will be initialized. • Fine Sync • Special Modes • Signal Info • Options • Lamp Timer • Anti-Theft • Language • Image stored using "Image Capture" -65 Easy to Use Functions The following items cannot be displayed when selecting "All Reset". Note • If a password has been set, the pass- Initializing the Settings This function allows you to initialize the settings you have made in the "Options (2)" menu ➝ For resetting, see page 36.
Returning to the Default Settings Select "All Reset" in the projector. word input box will be initialized. • Fine Sync • Special Modes • Signal Info • Options • Lamp Timer • Anti-Theft • Language • Image stored using "Image Capture" -65 Easy to Use Functions The following items cannot be displayed when selecting "All Reset". Note • If a password has been set, the pass- Initializing the Settings This function allows you to initialize the settings you have made in the "Options (2)" menu ➝ For resetting, see page 36.

PG-M20X Operation Manual
Page 73
... break- • Take the projector to your nearest Sharp Authorized Projector Dealer or Service Center (see page 78) • Clogged air intake for repair or lamp replacement. • Please exercise care when replacing the lamp. After " " appears, be triggered, preventing the power from going on the projector indicate problems inside the projector in the power cord and...
... break- • Take the projector to your nearest Sharp Authorized Projector Dealer or Service Center (see page 78) • Clogged air intake for repair or lamp replacement. • Please exercise care when replacing the lamp. After " " appears, be triggered, preventing the power from going on the projector indicate problems inside the projector in the power cord and...

PG-M20X Operation Manual
Page 74
... use or when you contact your projector to burn or injury. • Wait at your nearest Sharp Authorized Projector Dealer or Service Center. I Should the lamp break, there is also a possibility that glass particles may indicate lamp failure. The lamp will be hot and touching it is... largely varies depending on the individual lamp and/or the condition and the frequency of the nearest Sharp Authorized Projector Dealer or Service Center, please call toll-free: 1-888-GO-SHARP (1-888-467-4277). I This projector utilizes a pressurized mercury lamp. Because the gas in the bulb...
... use or when you contact your projector to burn or injury. • Wait at your nearest Sharp Authorized Projector Dealer or Service Center. I Should the lamp break, there is also a possibility that glass particles may indicate lamp failure. The lamp will be hot and touching it is... largely varies depending on the individual lamp and/or the condition and the frequency of the nearest Sharp Authorized Projector Dealer or Service Center, please call toll-free: 1-888-GO-SHARP (1-888-467-4277). I This projector utilizes a pressurized mercury lamp. Because the gas in the bulb...

PG-M20X Operation Manual
Page 75
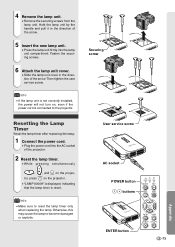
... • Wait until it has fully cooled down (about 1 hour). 3 Remove the lamp unit cover. • Turn over the projector, and loosen the user service screw that secures the lamp unit cover. Then slide the cover in the direction of the projector. • To avoid injury to yourself and damage to the... Do not remove other screws except for the lamp cover screws. • Please refer to the installation manual included with the lamp unit. 1 Press on the projector to remove the lamp unit by the handle. Be sure not to touch the glass surface of the lamp unit or the inside of the arrow. -72...
... • Wait until it has fully cooled down (about 1 hour). 3 Remove the lamp unit cover. • Turn over the projector, and loosen the user service screw that secures the lamp unit cover. Then slide the cover in the direction of the projector. • To avoid injury to yourself and damage to the... Do not remove other screws except for the lamp cover screws. • Please refer to the installation manual included with the lamp unit. 1 Press on the projector to remove the lamp unit by the handle. Be sure not to touch the glass surface of the lamp unit or the inside of the arrow. -72...
PG-M20X Operation Manual
Page 76
..., the power will not turn on the projector. • "LAMP 0000H" is displayed, indicating that the lamp timer is connected to reset the lamp timer only when replacing the lamp. Info • Make sure to the projector. Fasten the securing screws. 6 Attach the lamp unit cover. • Slide the lamp unit cover in the direction of the arrow...
..., the power will not turn on the projector. • "LAMP 0000H" is displayed, indicating that the lamp timer is connected to reset the lamp timer only when replacing the lamp. Info • Make sure to the projector. Fasten the securing screws. 6 Attach the lamp unit cover. • Slide the lamp unit cover in the direction of the arrow...

PG-M20X Operation Manual
Page 80
... level is set . on the projector do not work . • Change the input signal type setting. • The LAMP REPLACEMENT indicator is blinking in Pict is working • during Enlarge (More than double size) • a dot by dot screen resolution larger the panel resolution. Replace the lamp. • "Monitor Out" is...are locked. Page 60 40 72·73 58 58 40 - Problem Power cannot be turned on or off using the POWER button on the projector Picture is green on INPUT 1 COMPONENT Picture is pink (no green) on INPUT 1 RGB Picture is dark Picture is too bright and whitish ...
... level is set . on the projector do not work . • Change the input signal type setting. • The LAMP REPLACEMENT indicator is blinking in Pict is working • during Enlarge (More than double size) • a dot by dot screen resolution larger the panel resolution. Replace the lamp. • "Monitor Out" is...are locked. Page 60 40 72·73 58 58 40 - Problem Power cannot be turned on or off using the POWER button on the projector Picture is green on INPUT 1 COMPONENT Picture is pink (no green) on INPUT 1 RGB Picture is dark Picture is too bright and whitish ...

PG-M20X Operation Manual
Page 82
...), Lens cap strap, Terminal cover (attached), CD-ROM, Operation manual, Quick reference guides Replacement parts Lamp unit (Lamp/cage module) (BQC-PGM20X//1), Remote control (RRMCGA013WJSA), Two R-03 batteries ("AAA" size, UM/SUM...Lens 1-1.2 × zoom lens, F1.75-2.04, f = 28.0-33.5 mm Projection lamp High Intensity Discharge Lamp (HID Lamp), DC 210 W Component input signal 29-pin connector (INPUT1) DVI input signal: Digital ... the picture screen. of the unit. Specifications Product type Digital Multimedia Projector Model PG-M20X Video system NTSC 3.58/NTSC 4.43/PAL/PAL-M/PAL-N/PAL 60...
...), Lens cap strap, Terminal cover (attached), CD-ROM, Operation manual, Quick reference guides Replacement parts Lamp unit (Lamp/cage module) (BQC-PGM20X//1), Remote control (RRMCGA013WJSA), Two R-03 batteries ("AAA" size, UM/SUM...Lens 1-1.2 × zoom lens, F1.75-2.04, f = 28.0-33.5 mm Projection lamp High Intensity Discharge Lamp (HID Lamp), DC 210 W Component input signal 29-pin connector (INPUT1) DVI input signal: Digital ... the picture screen. of the unit. Specifications Product type Digital Multimedia Projector Model PG-M20X Video system NTSC 3.58/NTSC 4.43/PAL/PAL-M/PAL-N/PAL 60...


