PG-M20X Operation Manual
Page 9
Introduction Setting the Anti-Theft 63 Entering the Keycode 63 Changing the Keycode 64 Initializing the Settings 65 Displaying the Adjustment Settings 66 Appendix Carrying the Projector 68 Maintenance 69 Maintenance Indicators 70 Regarding the Lamp 71 Lamp 71 Caution Concerning the Lamp 71 Replacing the Lamp 71 Removing and Installing the Lamp Unit 72 Resetting the Lamp Timer 73 Connecting Pin Assignments 74 Computer Compatibility Chart 75 Troubleshooting 76 For SHARP Assistance 78 Specifications 79 Dimensions 80 Glossary 81 Index 82 -5
Introduction Setting the Anti-Theft 63 Entering the Keycode 63 Changing the Keycode 64 Initializing the Settings 65 Displaying the Adjustment Settings 66 Appendix Carrying the Projector 68 Maintenance 69 Maintenance Indicators 70 Regarding the Lamp 71 Lamp 71 Caution Concerning the Lamp 71 Replacing the Lamp 71 Removing and Installing the Lamp Unit 72 Resetting the Lamp Timer 73 Connecting Pin Assignments 74 Computer Compatibility Chart 75 Troubleshooting 76 For SHARP Assistance 78 Specifications 79 Dimensions 80 Glossary 81 Index 82 -5

PG-M20X Operation Manual
Page 32
... signal is warming up in green. Image Projection Basic Procedure Connect the required external equipment to illuminate. After the LAMP REPLACEMENT indicator illuminates, the projector is ready. Green: The lamp is ready to the procedure on page 30. 1 Plug the power cord into the wall outlet. •... The POWER indicator illuminates up . If you want to change the on-screen display to another language, reset the language according to start operation. Red: The lamp should be replaced. • If the power is set, the keycode input box will...
... signal is warming up in green. Image Projection Basic Procedure Connect the required external equipment to illuminate. After the LAMP REPLACEMENT indicator illuminates, the projector is ready. Green: The lamp is ready to the procedure on page 30. 1 Plug the power cord into the wall outlet. •... The POWER indicator illuminates up . If you want to change the on-screen display to another language, reset the language according to start operation. Red: The lamp should be replaced. • If the power is set, the keycode input box will...

PG-M20X Operation Manual
Page 37
Press to reset the image. Digital Shift Setting For easier viewing, this function shifts the entire image projected on the respective page. -33 UNDO button Press to move ... I Video Digital Noise Reduction (DNR) System page 54 • For details, see page 47. Basic Operation Easy to move the projected image downwards. Press to reset the image. • The Digital Shift function works with BORDER, STRETCH or SMART STRETCH screen. Press to Use Functions I Setting the Video Signal page 55...
Press to reset the image. Digital Shift Setting For easier viewing, this function shifts the entire image projected on the respective page. -33 UNDO button Press to move ... I Video Digital Noise Reduction (DNR) System page 54 • For details, see page 47. Basic Operation Easy to move the projected image downwards. Press to reset the image. • The Digital Shift function works with BORDER, STRETCH or SMART STRETCH screen. Press to Use Functions I Setting the Video Signal page 55...
PG-M20X Operation Manual
Page 38
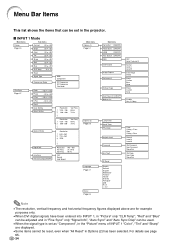
...+30 Color -30 +30 Tint -30 +30 Sharp -30 +30 Red -30 +30 Blue -30 +30 CLR Temp -3 +3 Reset Signal Type Progressive Mode Fine Sync Page 42 Clock ... H-Pos -150 +150 V-Pos -60 +60 Reset Save Setting Select Setting Special Modes Signal Info Auto ...Image Delete Sharp Custom Blue None Sharp Custom None Disable Yes (Y Cable) Lamp Timer Break Timer PRJ Mode Keylock Level Password Anti-Theft All Reset English Deutsch...as "Component", in the "Picture" menu of INPUT 1 "Color", "Tint" and "Sharp" are for example purposes only. • When DVI digital signals have been entered into ...
...+30 Color -30 +30 Tint -30 +30 Sharp -30 +30 Red -30 +30 Blue -30 +30 CLR Temp -3 +3 Reset Signal Type Progressive Mode Fine Sync Page 42 Clock ... H-Pos -150 +150 V-Pos -60 +60 Reset Save Setting Select Setting Special Modes Signal Info Auto ...Image Delete Sharp Custom Blue None Sharp Custom None Disable Yes (Y Cable) Lamp Timer Break Timer PRJ Mode Keylock Level Password Anti-Theft All Reset English Deutsch...as "Component", in the "Picture" menu of INPUT 1 "Color", "Tint" and "Sharp" are for example purposes only. • When DVI digital signals have been entered into ...

PG-M20X Operation Manual
Page 39
...3 Mode Main menu Picture Page 40 Sub menu Contrast -30 +30 Bright -30 +30 Color -30 +30 Tint -30 +30 Sharp -30 +30 Red -30 +30 Blue -30 +30 CLR Temp -3 +3 Reset Progressive Mode 2D Progressive 3D Progressive Film Mode Options (1) Page 52 Power Save [ON/OFF] Auto Search [ON/OFF] DNR... Blue None Sharp Custom None Main menu Options (2) Page 58 Sub menu Lamp Timer Break Timer PRJ Mode Language Page 31 Keylock Level Password Anti-Theft All Reset English Deutsch Español Nederlands Français Italiano Svenska Português Status Page 66 Front Ceiling + Front Rear ...
...3 Mode Main menu Picture Page 40 Sub menu Contrast -30 +30 Bright -30 +30 Color -30 +30 Tint -30 +30 Sharp -30 +30 Red -30 +30 Blue -30 +30 CLR Temp -3 +3 Reset Progressive Mode 2D Progressive 3D Progressive Film Mode Options (1) Page 52 Power Save [ON/OFF] Auto Search [ON/OFF] DNR... Blue None Sharp Custom None Main menu Options (2) Page 58 Sub menu Lamp Timer Break Timer PRJ Mode Language Page 31 Keylock Level Password Anti-Theft All Reset English Deutsch Español Nederlands Français Italiano Svenska Português Status Page 66 Front Ceiling + Front Rear ...
PG-M20X Operation Manual
Page 44
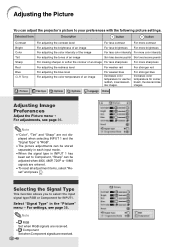
... 480P, 720P or 1080I signals are received. -40 Select "Signal Type" in INPUT 1 has been set to Component, "Sharp" can adjust the projector's picture to select the input signal type RGB or Component for INPUT1. Adjusting Image Preferences Adjust the Picture menu➝ For ... when RGB signals are received. • Component Set when Component signals are entered. • To reset all adjustment items, select "Reset" and press . Note • "Color", "Tint" and "Sharp" are not dis- Selecting the Signal Type This function allows you to your preferences with the following ...
... 480P, 720P or 1080I signals are received. -40 Select "Signal Type" in INPUT 1 has been set to Component, "Sharp" can adjust the projector's picture to select the input signal type RGB or Component for INPUT1. Adjusting Image Preferences Adjust the Picture menu➝ For ... when RGB signals are received. • Component Set when Component signals are entered. • To reset all adjustment items, select "Reset" and press . Note • "Color", "Tint" and "Sharp" are not dis- Selecting the Signal Type This function allows you to your preferences with the following ...

PG-M20X Operation Manual
Page 65
... set at the same time, the password will be set by the user to prevent adjustments to change "PRJ Mode", "Keylock Level", "AntiTheft" and "All Reset" settings. -61 Note • When a password is set, you need to enter the password to certain settings on the "Options (2)" menu. Setting up a Password A password...
... set at the same time, the password will be set by the user to prevent adjustments to change "PRJ Mode", "Keylock Level", "AntiTheft" and "All Reset" settings. -61 Note • When a password is set, you need to enter the password to certain settings on the "Options (2)" menu. Setting up a Password A password...

PG-M20X Operation Manual
Page 67
...you do not want to original factory condition (password and keycode reset). If you lose or forget your projector to them to restore the projector to set , the keycode inputting section appears after the power is turned on the projector are used for setting the keycode. Changing the Keycode •... • If you can change the keycode. You may need to contact your nearest Sharp Authorized Projector Dealer or Service Center (see page 38. 1 Press the buttons on the remote control or the projector to enter the preset 4-digit keycode in "Old Code". 2 Press any button you ...
...you do not want to original factory condition (password and keycode reset). If you lose or forget your projector to them to restore the projector to set , the keycode inputting section appears after the power is turned on the projector are used for setting the keycode. Changing the Keycode •... • If you can change the keycode. You may need to contact your nearest Sharp Authorized Projector Dealer or Service Center (see page 38. 1 Press the buttons on the remote control or the projector to enter the preset 4-digit keycode in "Old Code". 2 Press any button you ...
PG-M20X Operation Manual
Page 68
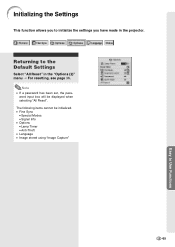
Returning to Use Functions Note • If a password has been set, the pass- The following items cannot be displayed when selecting "All Reset". word input box will be initialized. • Fine Sync • Special Modes • Signal Info • Options • Lamp Timer • Anti-Theft • Language • Image stored using "Image Capture" -65 Easy to the Default Settings Select "All Reset" in the projector. Initializing the Settings This function allows you to initialize the settings you have made in the "Options (2)" menu ➝ For resetting, see page 36.
Returning to Use Functions Note • If a password has been set, the pass- The following items cannot be displayed when selecting "All Reset". word input box will be initialized. • Fine Sync • Special Modes • Signal Info • Options • Lamp Timer • Anti-Theft • Language • Image stored using "Image Capture" -65 Easy to the Default Settings Select "All Reset" in the projector. Initializing the Settings This function allows you to initialize the settings you have made in the "Options (2)" menu ➝ For resetting, see page 36.
PG-M20X Operation Manual
Page 76
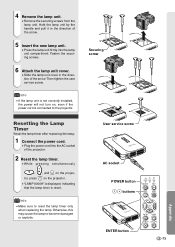
... installed, the power will not turn on the projector. • "LAMP 0000H" is displayed, indicating that the lamp timer is connected to the projector. Otherwise, this may cause the lamp to reset the lamp timer only when replacing the lamp....lamp unit. • Press the lamp unit firmly into the AC socket of the arrow. Securing screw Resetting the Lamp Timer Reset the lamp timer after replacing the lamp. 1 Connect the power cord. • Plug the power cord... handle and pull it in the direction of the projector. 2 Reset the lamp timer. •While pressing simultaneously , , and on the...
... installed, the power will not turn on the projector. • "LAMP 0000H" is displayed, indicating that the lamp timer is connected to the projector. Otherwise, this may cause the lamp to reset the lamp timer only when replacing the lamp....lamp unit. • Press the lamp unit firmly into the AC socket of the arrow. Securing screw Resetting the Lamp Timer Reset the lamp timer after replacing the lamp. 1 Connect the power cord. • Plug the power cord... handle and pull it in the direction of the projector. 2 Reset the lamp timer. •While pressing simultaneously , , and on the...
PG-M20X Operation Manual
Page 85
Index 2D Progressive 41 3D Progressive 41 AC socket 20 Adjustment buttons 36 Adjustment feet 16 All Reset 65 Anti-Theft 63 Aspect ratio 47 Auto Power Off 52 Auto Search 53 Auto Sync adjustment 44 AUTO SYNC button 44 Auto Sync Display ...
Index 2D Progressive 41 3D Progressive 41 AC socket 20 Adjustment buttons 36 Adjustment feet 16 All Reset 65 Anti-Theft 63 Aspect ratio 47 Auto Power Off 52 Auto Search 53 Auto Sync adjustment 44 AUTO SYNC button 44 Auto Sync Display ...


