
PG-M20X Operation Manual
Page 3
... three-pin plug. DANGER: The fuse from the cut -off plug should the cut-off plug be removed and the cut -off the mains plug and fit an appropriate type. Before replacing the plug cover make sure that: • If the new fitted plug contains a fuse, its value is the same as... is connected to be used. Ensure that removed from the cut off plug. • The cord grip is fitted with the following code: Blue: Neutral Brown: Live As the colours of the mains lead, and not simply over the lead wires. Always refit the fuse cover after replacing the fuse. SPECIAL NOTE...
... three-pin plug. DANGER: The fuse from the cut -off plug should the cut-off plug be removed and the cut -off the mains plug and fit an appropriate type. Before replacing the plug cover make sure that: • If the new fitted plug contains a fuse, its value is the same as... is connected to be used. Ensure that removed from the cut off plug. • The cord grip is fitted with the following code: Blue: Neutral Brown: Live As the colours of the mains lead, and not simply over the lead wires. Always refit the fuse cover after replacing the fuse. SPECIAL NOTE...
PG-M20X Operation Manual
Page 5
... REMOVE COVER. U.S.A. NO USER-SERVICEABLE PARTS EXCEPT LAMP UNIT. CAUTION RISK OF ELECTRIC SHOCK. The cable is intended to alert the user to the presence of inspection, modification, or recall that SHARP may be required to assure that the device complies with the limits for prompt warranty registration of your new SHARP Projector, using the projector...
... REMOVE COVER. U.S.A. NO USER-SERVICEABLE PARTS EXCEPT LAMP UNIT. CAUTION RISK OF ELECTRIC SHOCK. The cable is intended to alert the user to the presence of inspection, modification, or recall that SHARP may be required to assure that the device complies with the limits for prompt warranty registration of your new SHARP Projector, using the projector...

PG-M20X Operation Manual
Page 10
...and Moisture Do not use this product near water-for example, near a swimming pool; Accessories Do not place this product yourself as opening or removing covers may expose you are not likely to be walked on the product and in the operating instructions should be routed so that could result in.... 2. Cleaning Unplug this product and save these openings must not be blocked by the manufacturer. 9. If the plug should never be blocked or covered. This plug will prevent damage to the product due to operate from the type of power source indicated on a bed, sofa, rug, or ...
...and Moisture Do not use this product near water-for example, near a swimming pool; Accessories Do not place this product yourself as opening or removing covers may expose you are not likely to be walked on the product and in the operating instructions should be routed so that could result in.... 2. Cleaning Unplug this product and save these openings must not be blocked by the manufacturer. 9. If the plug should never be blocked or covered. This plug will prevent damage to the product due to operate from the type of power source indicated on a bed, sofa, rug, or ...
PG-M20X Operation Manual
Page 17
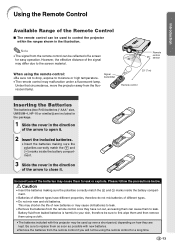
...2 Insert the included batteries. • Insert the batteries making sure the polarities correctly match the and marks inside the battery compartment. 3 Slide the cover in the direction of different types. • Do not mix new and old batteries. Signal transmitter 30° 30° Remote control 45°...to replace them as soon as leaving them can cause them to leak. • Remove the batteries from the remote control if you will not be using a cloth. • The batteries included with this projector may be used to leak. Note • The signal from the fluorescent lamp. ...
...2 Insert the included batteries. • Insert the batteries making sure the polarities correctly match the and marks inside the battery compartment. 3 Slide the cover in the direction of different types. • Do not mix new and old batteries. Signal transmitter 30° 30° Remote control 45°...to replace them as soon as leaving them can cause them to leak. • Remove the batteries from the remote control if you will not be using a cloth. • The batteries included with this projector may be used to leak. Note • The signal from the fluorescent lamp. ...

PG-M20X Operation Manual
Page 71
... cap to protect the lens. • Be sure the projector has cooled down enough before placing it in the case. Info • Be sure to insert the inner padding to the lens, and place it in the included carrying case. 1 Open the cover of the arrows. 3 Reinsert the inner padding into the... carrying case. If you send the projector in the direction of the carrying case. 2 Remove the inner padding from the carrying case, and fold it in the carrying case...
... cap to protect the lens. • Be sure the projector has cooled down enough before placing it in the case. Info • Be sure to insert the inner padding to the lens, and place it in the included carrying case. 1 Open the cover of the arrows. 3 Reinsert the inner padding into the... carrying case. If you send the projector in the direction of the carrying case. 2 Remove the inner padding from the carrying case, and fold it in the carrying case...

PG-M20X Operation Manual
Page 75
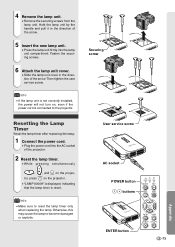
...the steps below. • Do not remove other screws except for the lamp cover screws. • Please refer to the installation manual included with the lamp unit. 1 Press on the projector to remove the lamp unit by the handle. Regarding the Lamp (cont.) Removing and Installing the Lamp Unit Info •...; Be sure to turn off the power. • Wait until it has fully cooled down (about 1 hour). 3 Remove the lamp unit cover. • Turn over the projector, and loosen the user service screw that ...
...the steps below. • Do not remove other screws except for the lamp cover screws. • Please refer to the installation manual included with the lamp unit. 1 Press on the projector to remove the lamp unit by the handle. Regarding the Lamp (cont.) Removing and Installing the Lamp Unit Info •...; Be sure to turn off the power. • Wait until it has fully cooled down (about 1 hour). 3 Remove the lamp unit cover. • Turn over the projector, and loosen the user service screw that ...
PG-M20X Operation Manual
Page 76
...and pull it in the direction of the projector. 2 Reset the lamp timer. •While pressing simultaneously , , and on the projector, press on , even if the power cord is reset. Fasten the securing screws. 6 Attach the lamp unit cover. • Slide the lamp unit cover in the direction of the arrow. 5... cause the lamp to reset the lamp timer only when replacing the lamp. Info • Make sure to become damaged or explode. 4 Remove the lamp unit. • Remove the securing screws from the lamp unit. User service screw AC socket POWER button buttons ENTER button -73 Appendix
...and pull it in the direction of the projector. 2 Reset the lamp timer. •While pressing simultaneously , , and on the projector, press on , even if the power cord is reset. Fasten the securing screws. 6 Attach the lamp unit cover. • Slide the lamp unit cover in the direction of the arrow. 5... cause the lamp to reset the lamp timer only when replacing the lamp. Info • Make sure to become damaged or explode. 4 Remove the lamp unit. • Remove the securing screws from the lamp unit. User service screw AC socket POWER button buttons ENTER button -73 Appendix


