

Operation Manual
Page 1
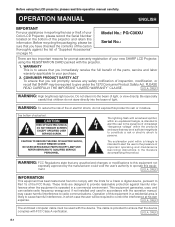
OPERATION MANUAL MODEL PG-C30XU LCD PROJECTOR Important Information Setup & Connections Operation Useful Features Maintenance & Troubleshooting Appendix
OPERATION MANUAL MODEL PG-C30XU LCD PROJECTOR Important Information Setup & Connections Operation Useful Features Maintenance & Troubleshooting Appendix
Operation Manual
Page 2
... user to persons. Before recycling the packaging, please be required to provide reasonable protection against the list of "Supplied Accessories" on the bottom of your new SHARP LCD Projector, using the LCD projector, please read this information. WARRANTY This is provided to ensure that you have checked the contents of light. ONLY WARNING: High brightness light source. See bottom of light, or view directly. REFER SERVICING TO QUALIFIED SERVICE...
... user to persons. Before recycling the packaging, please be required to provide reasonable protection against the list of "Supplied Accessories" on the bottom of your new SHARP LCD Projector, using the LCD projector, please read this information. WARRANTY This is provided to ensure that you have checked the contents of light. ONLY WARNING: High brightness light source. See bottom of light, or view directly. REFER SERVICING TO QUALIFIED SERVICE...
Operation Manual
Page 3
... incorporated into this LCD Projector, observe the following basic rules for its installation, use and servicing. Retain Instructions The safety and operating instructions should be retained for long periods of time, unplug it from the type of power supply to service this product on the product. 17. Follow Instructions All operating and use attachments not recommended by the product manufacturer as opening or removing covers may touch dangerous...
... incorporated into this LCD Projector, observe the following basic rules for its installation, use and servicing. Retain Instructions The safety and operating instructions should be retained for long periods of time, unplug it from the type of power supply to service this product on the product. 17. Follow Instructions All operating and use attachments not recommended by the product manufacturer as opening or removing covers may touch dangerous...
Operation Manual
Page 5
... Signal Type 27 I/P Conversion 28 Audio Adjustments 28 Computer Image Adjustments (INPUT 1 or 2 mode only 29 Adjusting the Computer Image 29 Saving and Selecting Adjustment Settings ... 30 Special Mode Adjustment 31 Checking the Input Signal 31 Auto Sync Adjustment 32 Auto Sync Display Function 32 Maintenance & Troubleshooting Air Filter Maintenance 46 Lamp/Maintenance Indicators 47 Replacing the Projection Lamp 48 Using the Kensington Lock 49 Troubleshooting 49 Appendix Optional Lenses 50 Transporting the Projector 50 Connection Pin Assignments 51 RS-232C Port Specifications...
... Signal Type 27 I/P Conversion 28 Audio Adjustments 28 Computer Image Adjustments (INPUT 1 or 2 mode only 29 Adjusting the Computer Image 29 Saving and Selecting Adjustment Settings ... 30 Special Mode Adjustment 31 Checking the Input Signal 31 Auto Sync Adjustment 32 Auto Sync Display Function 32 Maintenance & Troubleshooting Air Filter Maintenance 46 Lamp/Maintenance Indicators 47 Replacing the Projection Lamp 48 Using the Kensington Lock 49 Troubleshooting 49 Appendix Optional Lenses 50 Transporting the Projector 50 Connection Pin Assignments 51 RS-232C Port Specifications...
Operation Manual
Page 6
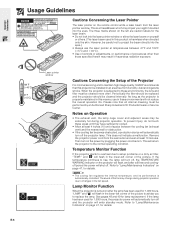
...;C). • Use of controls or adjustments, or performance of the picture to advise you to maintain high image quality, SHARP recommends that all internal cleaning must be installed in this projector be cleaned more often. See pages 48 and 49 for details. • The cooling fan regulates the internal temperature, and its performance is subjected to setup problems or a dirty air filter, "TEMP." The sound of the fan may result...
...;C). • Use of controls or adjustments, or performance of the picture to advise you to maintain high image quality, SHARP recommends that all internal cleaning must be installed in this projector be cleaned more often. See pages 48 and 49 for details. • The cooling fan regulates the internal temperature, and its performance is subjected to setup problems or a dirty air filter, "TEMP." The sound of the fan may result...
Operation Manual
Page 7
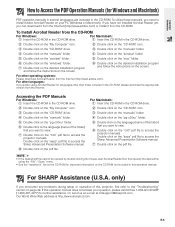
... click on the "mac" folder. 6 Double click on the "windows" folder. 7 Double click on the desired installation program and follow the instructions on the screen. 6 Double click on the desired installation program and follow the instructions on the "c30" pdf file to access the projector manuals. If this operation manual. If you have not installed Acrobat Reader yet, you want to view. 6 Double click...
... click on the "mac" folder. 6 Double click on the "windows" folder. 7 Double click on the desired installation program and follow the instructions on the screen. 6 Double click on the desired installation program and follow the instructions on the "c30" pdf file to access the projector manuals. If this operation manual. If you have not installed Acrobat Reader yet, you want to view. 6 Double click...
Operation Manual
Page 15
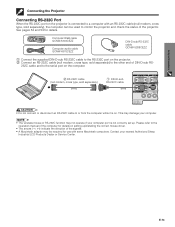
... details on setting up . Setup & Connections Connecting the Projector Connecting RS-232C Port When the RS-232C port on the projector is connected to a computer with an RS-232C cable (null modem, cross type, sold separately), the computer can be used to control the projector and check the status of the signals. • A Macintosh adaptor may not operate if your nearest Authorized Sharp Industrial LCD Products Dealer or Service Center. Please...
... details on setting up . Setup & Connections Connecting the Projector Connecting RS-232C Port When the RS-232C port on the projector is connected to a computer with an RS-232C cable (null modem, cross type, sold separately), the computer can be used to control the projector and check the status of the signals. • A Macintosh adaptor may not operate if your nearest Authorized Sharp Industrial LCD Products Dealer or Service Center. Please...

Operation Manual
Page 17
.... When the power is ready. E-16 The POWER indicator lights up red and the projector enters standby mode. • If the bottom filter cover is not securely installed, the POWER indicator flashes. 2 Press Power ON. • The flashing green LAMP REPLACEMENT indicator shows that the lamp is unpacked and turned on for the first time, a slight odor may take a short while before proceeding. This odor will soon disappear with use. Green: Lamp is on the remote control. (See...
.... When the power is ready. E-16 The POWER indicator lights up red and the projector enters standby mode. • If the bottom filter cover is not securely installed, the POWER indicator flashes. 2 Press Power ON. • The flashing green LAMP REPLACEMENT indicator shows that the lamp is unpacked and turned on for the first time, a slight odor may take a short while before proceeding. This odor will soon disappear with use. Green: Lamp is on the remote control. (See...

Operation Manual
Page 18
... POWER indicator and the LAMP REPLACEMENT indicator light green. • The POWER indicator flashes if the bottom filter cover is being received, "NO SIGNAL" will run for about 90 seconds. The projector will be displayed. Press MUTE again to temporarily turn the sound back on the screen becomes clear. Press INPUT again to select the desired input mode. Operation EXAMPLE 5 f f 6 7 8 6 7 8 5 INPUT 1 Mode INPUT 2 Mode INPUT 3 (VIDEO) Mode 5 Press INPUT to change the mode. • When no signal is pressed twice, the POWER indicator will light up red...
... POWER indicator and the LAMP REPLACEMENT indicator light green. • The POWER indicator flashes if the bottom filter cover is being received, "NO SIGNAL" will run for about 90 seconds. The projector will be displayed. Press MUTE again to temporarily turn the sound back on the screen becomes clear. Press INPUT again to select the desired input mode. Operation EXAMPLE 5 f f 6 7 8 6 7 8 5 INPUT 1 Mode INPUT 2 Mode INPUT 3 (VIDEO) Mode 5 Press INPUT to change the mode. • When no signal is pressed twice, the POWER indicator will light up red...

Operation Manual
Page 19
... indicate the distance of the screen. Close the curtains and dim the lights when setting up the Screen Position the projector perpendicular to the screen with all feet flat and level to the 3 bottom of the image (H) (inches) • There is an error of the screen. Standard Setup (Front Projection) X Place the projector at the required distance from the lens center to achieve an optimal image. E-18 Picture size...
... indicate the distance of the screen. Close the curtains and dim the lights when setting up the Screen Position the projector perpendicular to the screen with all feet flat and level to the 3 bottom of the image (H) (inches) • There is an error of the screen. Standard Setup (Front Projection) X Place the projector at the required distance from the lens center to achieve an optimal image. E-18 Picture size...
Operation Manual
Page 23
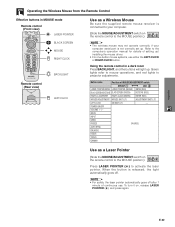
...) - To turn it on MOUSE ADJ. Operation Operating the Wireless Mouse from the Remote Control Effective buttons in a dark room Press BACKLIGHT, and the buttons will light up / installing the mouse driver. • For one-button mouse systems, use . E-22 Green lights refer to mouse operations, and red lights to projector adjustments. POWER ON/OFF VOLUME MUTE INPUT UNDO FREEZE ON (RED) AUTO SYNC ENLARGE RESIZE TOOLS GAMMA Use as a Wireless Mouse Be sure the supplied remote mouse receiver...
...) - To turn it on MOUSE ADJ. Operation Operating the Wireless Mouse from the Remote Control Effective buttons in a dark room Press BACKLIGHT, and the buttons will light up / installing the mouse driver. • For one-button mouse systems, use . E-22 Green lights refer to mouse operations, and red lights to projector adjustments. POWER ON/OFF VOLUME MUTE INPUT UNDO FREEZE ON (RED) AUTO SYNC ENLARGE RESIZE TOOLS GAMMA Use as a Wireless Mouse Be sure the supplied remote mouse receiver...

Operation Manual
Page 33
... from the GUI, press MENU. on the remote control to the ADJ. E-32 Computer Image Adjustments (INPUT 1 or 2 mode Only) Projector Remote control 1, 5 2, 3, 4 AUTO SYNC button (GUI) On-screen Display Auto Sync Adjustment • Used to automatically adjust a computer image. • Auto Sync adjustment can be achieved with Auto Sync adjustment, use manual adjustments. (See page 29.) During Auto Sync adjustment, the On-screen Display changes as shown on the left. • Auto Sync adjustment may take some time to complete, depending on the image of the computer connected to the...
... from the GUI, press MENU. on the remote control to the ADJ. E-32 Computer Image Adjustments (INPUT 1 or 2 mode Only) Projector Remote control 1, 5 2, 3, 4 AUTO SYNC button (GUI) On-screen Display Auto Sync Adjustment • Used to automatically adjust a computer image. • Auto Sync adjustment can be achieved with Auto Sync adjustment, use manual adjustments. (See page 29.) During Auto Sync adjustment, the On-screen Display changes as shown on the left. • Auto Sync adjustment may take some time to complete, depending on the image of the computer connected to the...

Operation Manual
Page 44
Red Green Blue Yellow Orange White Black Projector Remote control 2, 4 3 1, 5 When selecting Sharp default image Displaying the Break Time (Slide the MOUSE/ADJUSTMENT switch MOUSE ADJ. on the screen. 2 Press to select " " in the menu window. 3 Press ENTER to start counting down the break time. 4 Press ∂ to increase or ƒ to decrease the break time. 5 Press TOOLS to return to normal screen. • The break time is displayed against the background image selected in "Selecting a Startup...
Red Green Blue Yellow Orange White Black Projector Remote control 2, 4 3 1, 5 When selecting Sharp default image Displaying the Break Time (Slide the MOUSE/ADJUSTMENT switch MOUSE ADJ. on the screen. 2 Press to select " " in the menu window. 3 Press ENTER to start counting down the break time. 4 Press ∂ to increase or ƒ to decrease the break time. 5 Press TOOLS to return to normal screen. • The break time is displayed against the background image selected in "Selecting a Startup...

Operation Manual
Page 47
... the filter frame. 6 Replace the filter cover. Bottom View Air filters (not removable) Air filter Cleaning and replacing the bottom air filter 1 Unplug the power cord. 2 Remove the bottom filter cover. 3 Remove the air filter. The power will not turn on unless it out of the filter cover into the filter cover opening and press the filter cover into position. Place the air filter underneath the tabs on the end of the filter cover. Tab Maintenance & Troubleshooting • Be sure the filter cover is correctly installed. Cleaning the bottom air filters (not removable...
... the filter frame. 6 Replace the filter cover. Bottom View Air filters (not removable) Air filter Cleaning and replacing the bottom air filter 1 Unplug the power cord. 2 Remove the bottom filter cover. 3 Remove the air filter. The power will not turn on unless it out of the filter cover into the filter cover opening and press the filter cover into position. Place the air filter underneath the tabs on the end of the filter cover. Tab Maintenance & Troubleshooting • Be sure the filter cover is correctly installed. Cleaning the bottom air filters (not removable...
Operation Manual
Page 48
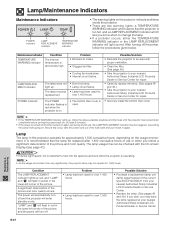
...) of the picture and color quality occurs. LAMP REPLACEMENT indicator POWER indicator The lamp does not light up red. Problem • Lamp has been used for over 1,400 hours. • Lamp has been used for repair. • Securely install the bottom filter cover. E-47 The POWER indicator flashes in again. CAUTION • Intense light hazard. Maintenance Indicator Condition TEMPERATURE WARNING indicator The internal temperature is open. Maintenance & Troubleshooting • If the TEMPERATURE WARNING indicator lights up red, and "LAMP" and " " will turn off the...
...) of the picture and color quality occurs. LAMP REPLACEMENT indicator POWER indicator The lamp does not light up red. Problem • Lamp has been used for over 1,400 hours. • Lamp has been used for repair. • Securely install the bottom filter cover. E-47 The POWER indicator flashes in again. CAUTION • Intense light hazard. Maintenance Indicator Condition TEMPERATURE WARNING indicator The internal temperature is open. Maintenance & Troubleshooting • If the TEMPERATURE WARNING indicator lights up red, and "LAMP" and " " will turn off the...
Operation Manual
Page 49
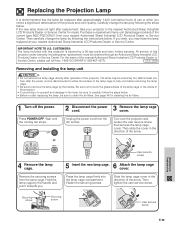
... following the instructions below. Securing screw Securing screw User service screw Maintenance & Troubleshooting E-48 ONLY Removing and installing the lamp unit CAUTION • Do not remove the lamp cage directly after approximately 1,400 cumulative hours of use or when you may be replaced after operation of the projector. • To avoid injury to yourself and damage to the lamp, be sure to clean the air filters. Unplug the power cord from the lamp cage...
... following the instructions below. Securing screw Securing screw User service screw Maintenance & Troubleshooting E-48 ONLY Removing and installing the lamp unit CAUTION • Do not remove the lamp cage directly after approximately 1,400 cumulative hours of use or when you may be replaced after operation of the projector. • To avoid injury to yourself and damage to the lamp, be sure to clean the air filters. Unplug the power cord from the lamp cage...

Operation Manual
Page 50
...; "Color" and "Tint" adjustments are set to minimum position. (See page 26.) • On-screen Display ("BLACK SCREEN") is heard. Picture noise appears. 480P images do not appear. Plug the power cord into the wall outlet. • The bottom filter cover is not securely installed. • Selected input is wrong. (See page 17.) • Cables incorrectly connected to rear panel of the projector. (See pages 11-15.) • Remote control...
...; "Color" and "Tint" adjustments are set to minimum position. (See page 26.) • On-screen Display ("BLACK SCREEN") is heard. Picture noise appears. 480P images do not appear. Plug the power cord into the wall outlet. • The bottom filter cover is not securely installed. • Selected input is wrong. (See page 17.) • Cables incorrectly connected to rear panel of the projector. (See pages 11-15.) • Remote control...

Operation Manual
Page 53
... displaying the On-screen Display. If the projector receives a command other than one code is being sent, send each adjustment menu and checking the status with the On-screen Display. Computer RABR _מ1 0 → ← Projector OK CONTROL ITEM POWER SETTING INPUT SWITCHING INPUT CHECK VOLUME ADJUSTMENT KEYSTONE ADJUSTMENT DIGITAL SHIFT COMMAND PARAMETER C1 C2 C3 C4 P1 P2 P3 P4 CONTROL CONTENTS P O W R _ _ _ 0 POWER OFF (STANDBY) P O W R _ _ _ 1 POWER ON I R G B _ _ _ 1 INPUT1 I R G B _ _ _ 2 INPUT2 I V E D _ _ _ 1 INPUT3 (VIDEO) I C H K _ _ _ 0 INPUT CHECK...
... displaying the On-screen Display. If the projector receives a command other than one code is being sent, send each adjustment menu and checking the status with the On-screen Display. Computer RABR _מ1 0 → ← Projector OK CONTROL ITEM POWER SETTING INPUT SWITCHING INPUT CHECK VOLUME ADJUSTMENT KEYSTONE ADJUSTMENT DIGITAL SHIFT COMMAND PARAMETER C1 C2 C3 C4 P1 P2 P3 P4 CONTROL CONTENTS P O W R _ _ _ 0 POWER OFF (STANDBY) P O W R _ _ _ 1 POWER ON I R G B _ _ _ 1 INPUT1 I R G B _ _ _ 2 INPUT2 I V E D _ _ _ 1 INPUT3 (VIDEO) I C H K _ _ _ 0 INPUT CHECK...
Operation Manual
Page 56
... Remote mouse receiver, Extra air filter, Lens cap (attached), CD-ROM, LCD projector operation manual, LCD projector quick reference, Sharp Advanced Presentation Software operation manual Replacement parts Lamp unit (Lamp/cage module) (BQC-PGC30XU/1), Remote control (RRMCG1579CESA), AA size batteries, Power cord (QACCU5013CEZZ), Computer RGB cable (QCNW-5304CEZZ), Computer audio cable (QCNW-4870CEZZ), PS/2 mouse control cable (QCNW-5113CEZZ), USB mouse control cable (QCNW-5680CEZZ), DIN-D-sub RS-232C cable (QCNW-5276CEZZ), Remote mouse receiver (RUNTK0673CEZZ), Air filter (PFILD0076CEZZ), Lens...
... Remote mouse receiver, Extra air filter, Lens cap (attached), CD-ROM, LCD projector operation manual, LCD projector quick reference, Sharp Advanced Presentation Software operation manual Replacement parts Lamp unit (Lamp/cage module) (BQC-PGC30XU/1), Remote control (RRMCG1579CESA), AA size batteries, Power cord (QACCU5013CEZZ), Computer RGB cable (QCNW-5304CEZZ), Computer audio cable (QCNW-4870CEZZ), PS/2 mouse control cable (QCNW-5113CEZZ), USB mouse control cable (QCNW-5680CEZZ), DIN-D-sub RS-232C cable (QCNW-5276CEZZ), Remote mouse receiver (RUNTK0673CEZZ), Air filter (PFILD0076CEZZ), Lens...

Operation Manual
Page 63
...-screen display language 25 OUTPUT port for INPUT 1, 2 7 P PDF 6 Phase 29 Picture adjustments 26 POWER buttons 16 Power cord 11 POWER indicator 16 Presentation tools 43 PS/2 mouse control cable 15 R Rear projection 19 Remote control 21 Remote control sensor 21 Remote control signal transmitter 8 Remote mouse receiver 15 RESIZE button 36 RIGHT-CLICK button 22 RS-232C port 14 S Speaker 7 Startup image 38 Status function 44 S-VIDEO INPUT terminal 13 Sync 32 Sync on green 51 T TEMPERATURE WARNING indicator 47 TOOLS button 43 U UNDO button 20 USB mouse control cable 15...
...-screen display language 25 OUTPUT port for INPUT 1, 2 7 P PDF 6 Phase 29 Picture adjustments 26 POWER buttons 16 Power cord 11 POWER indicator 16 Presentation tools 43 PS/2 mouse control cable 15 R Rear projection 19 Remote control 21 Remote control sensor 21 Remote control signal transmitter 8 Remote mouse receiver 15 RESIZE button 36 RIGHT-CLICK button 22 RS-232C port 14 S Speaker 7 Startup image 38 Status function 44 S-VIDEO INPUT terminal 13 Sync 32 Sync on green 51 T TEMPERATURE WARNING indicator 47 TOOLS button 43 U UNDO button 20 USB mouse control cable 15...


