

Operation Manual
Page 1
OPERATION MANUAL MODEL PG-C30XU LCD PROJECTOR Important Information Setup & Connections Operation Useful Features Maintenance & Troubleshooting Appendix
OPERATION MANUAL MODEL PG-C30XU LCD PROJECTOR Important Information Setup & Connections Operation Useful Features Maintenance & Troubleshooting Appendix
Operation Manual
Page 2
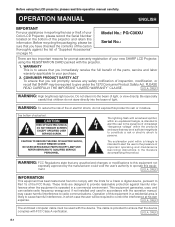
...sure that you have checked the contents of light, or view directly. CONSUMER PRODUCT SAFETY ACT To ensure that SHARP may be required to your new SHARP LCD Projector, using the LCD projector, please read this equipment in a residential area is operated in reporting the loss or theft of the... projector and retain this information. WARNING: To reduce the risk of fire or electric shock, do not stare directly ...
...sure that you have checked the contents of light, or view directly. CONSUMER PRODUCT SAFETY ACT To ensure that SHARP may be required to your new SHARP LCD Projector, using the LCD projector, please read this equipment in a residential area is operated in reporting the loss or theft of the... projector and retain this information. WARNING: To reduce the risk of fire or electric shock, do not stare directly ...

Operation Manual
Page 3
...3. Quick stops, excessive force, and uneven surfaces may fall, causing serious injury to a child or adult, and serious damage to this LCD Projector, observe the following the operating instructions. If you are not likely to operate from the wall outlet before use. 1. For products intended to ..., refer to read before the product is operated. 2. Do not defeat the safety purpose of power supply to your home, consult your LCD Projector, please be sure to the operating instructions. 12. Lightning For added protection for this product on a bed, sofa, rug, or other hazards...
...3. Quick stops, excessive force, and uneven surfaces may fall, causing serious injury to a child or adult, and serious damage to this LCD Projector, observe the following the operating instructions. If you are not likely to operate from the wall outlet before use. 1. For products intended to ..., refer to read before the product is operated. 2. Do not defeat the safety purpose of power supply to your home, consult your LCD Projector, please be sure to the operating instructions. 12. Lightning For added protection for this product on a bed, sofa, rug, or other hazards...

Operation Manual
Page 4
... allows for perfectly synced computer images. (Page 32) 10. INTELLIGENT COMPRESSION AND EXPANSION By using intelligent resizing technology, this projector can display higher and lower resolution images in detail without compromising quality. (Page 36) 11. your company logo) to ...clearer, more uniform image. 5. XGA RESOLUTION FOR HIGH RESOLUTION PRESENTATIONS With XGA (1,024 ן768) resolution, this projector can display very detailed presentation information. 12. DIGITAL IMAGE SHIFT FUNCTION Allows digital adjustment of high-end PCs and Workstations. (Page 11...
... allows for perfectly synced computer images. (Page 32) 10. INTELLIGENT COMPRESSION AND EXPANSION By using intelligent resizing technology, this projector can display higher and lower resolution images in detail without compromising quality. (Page 36) 11. your company logo) to ...clearer, more uniform image. 5. XGA RESOLUTION FOR HIGH RESOLUTION PRESENTATIONS With XGA (1,024 ן768) resolution, this projector can display very detailed presentation information. 12. DIGITAL IMAGE SHIFT FUNCTION Allows digital adjustment of high-end PCs and Workstations. (Page 11...
Operation Manual
Page 5
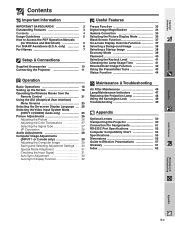
...62 Operation Useful Features Maintenance & Troubleshooting Appendix E-4 only 6 Part Names 7 Setup & Connections Supplied Accessories 10 Connecting the Projector 11 Useful Features Freeze Function 33 Digital Image Magnification 34 Gamma Correction 35 Selecting the Picture Display Mode 36 Black Screen ...47 Replacing the Projection Lamp 48 Using the Kensington Lock 49 Troubleshooting 49 Appendix Optional Lenses 50 Transporting the Projector 50 Connection Pin Assignments 51 RS-232C Port Specifications 52 Computer Compatibility Chart 54 Specifications 55 Dimensions 56 ...
...62 Operation Useful Features Maintenance & Troubleshooting Appendix E-4 only 6 Part Names 7 Setup & Connections Supplied Accessories 10 Connecting the Projector 11 Useful Features Freeze Function 33 Digital Image Magnification 34 Gamma Correction 35 Selecting the Picture Display Mode 36 Black Screen ...47 Replacing the Projection Lamp 48 Using the Kensington Lock 49 Troubleshooting 49 Appendix Optional Lenses 50 Transporting the Projector 50 Connection Pin Assignments 51 RS-232C Port Specifications 52 Computer Compatibility Chart 54 Specifications 55 Dimensions 56 ...
Operation Manual
Page 6
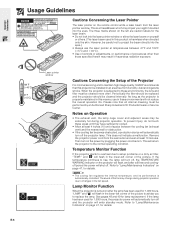
... will not reduce the overall operation life. This does not indicate a malfunction. Temperature Monitor Function If the projector starts to overheat due to maintain high image quality, SHARP recommends that all internal cleaning must be installed in . If the temperature continues to replace the lamp. Refer..." and " " will shut off , the TEMPERATURE WARNING indicator on the power by an Authorized Sharp Industrial LCD Products Dealer or Service Center. and " " will return the projector to project the beam directly into the laser pointer window or shine the laser beam on the left...
... will not reduce the overall operation life. This does not indicate a malfunction. Temperature Monitor Function If the projector starts to overheat due to maintain high image quality, SHARP recommends that all internal cleaning must be installed in . If the temperature continues to replace the lamp. Refer..." and " " will shut off , the TEMPERATURE WARNING indicator on the power by an Authorized Sharp Industrial LCD Products Dealer or Service Center. and " " will return the projector to project the beam directly into the laser pointer window or shine the laser beam on the left...
Operation Manual
Page 7
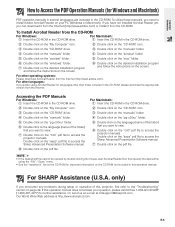
... an e-mail at [email protected] . To utilize these manuals, you need to install Adobe Acrobat Reader on the "c30" pdf file to access the projector manuals. For Macintosh: 1 Insert the CD-ROM in this operation manual. For other languages: If you prefer using the "File", "Open" menu. &#...or operation of this operation manual does not answer your PC (Windows or Macintosh). E-6 Double click on the "saps" pdf file to access the Sharp Advanced Presentation Software manual. 7 Double click on the pdf file. • If the desired pdf file cannot be opened by double clicking the mouse...
... an e-mail at [email protected] . To utilize these manuals, you need to install Adobe Acrobat Reader on the "c30" pdf file to access the projector manuals. For Macintosh: 1 Insert the CD-ROM in this operation manual. For other languages: If you prefer using the "File", "Open" menu. &#...or operation of this operation manual does not answer your PC (Windows or Macintosh). E-6 Double click on the "saps" pdf file to access the Sharp Advanced Presentation Software manual. 7 Double click on the pdf file. • If the desired pdf file cannot be opened by double clicking the mouse...

Operation Manual
Page 8
Important Information Part Names Numbers next to the part names refer to the main pages in this manual where the topic is explained. Projector MUTE button 17 POWER indicator 16 POWER buttons (ON/OFF) 16 KEYSTONE button 20 INPUT button 17 FREEZE button 33 ENLARGE button 34 BLACK SCREEN ...
Important Information Part Names Numbers next to the part names refer to the main pages in this manual where the topic is explained. Projector MUTE button 17 POWER indicator 16 POWER buttons (ON/OFF) 16 KEYSTONE button 20 INPUT button 17 FREEZE button 33 ENLARGE button 34 BLACK SCREEN ...
Operation Manual
Page 11
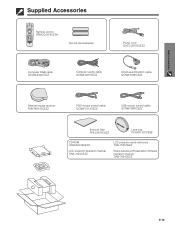
Setup & Connections Supplied Accessories Remote control RRMCG1579CESA Two AA size batteries Power cord QACCU5013CEZZ Computer RGB cable QCNW-5304CEZZ Computer audio cable QCNW-4870CEZZ DIN-D-sub RS-232C cable QCNW-5288CEZZ Remote mouse receiver RUNTK0673CEZZ PS/2 mouse control cable QCNW-5113CEZZ USB mouse control cable QCNW-5680CEZZ Extra air filter PFILD0076CEZZ Lens cap PCAPH1307CESB CD-ROM UDSKA0019CEN1 LCD projector operation manual TINS-7023CEZZ LCD projector quick reference TINS-7025CEZZ Sharp Advanced Presentation Software operation manual TINS-7054CEZZ E-10
Setup & Connections Supplied Accessories Remote control RRMCG1579CESA Two AA size batteries Power cord QACCU5013CEZZ Computer RGB cable QCNW-5304CEZZ Computer audio cable QCNW-4870CEZZ DIN-D-sub RS-232C cable QCNW-5288CEZZ Remote mouse receiver RUNTK0673CEZZ PS/2 mouse control cable QCNW-5113CEZZ USB mouse control cable QCNW-5680CEZZ Extra air filter PFILD0076CEZZ Lens cap PCAPH1307CESB CD-ROM UDSKA0019CEN1 LCD projector operation manual TINS-7023CEZZ LCD projector quick reference TINS-7025CEZZ Sharp Advanced Presentation Software operation manual TINS-7054CEZZ E-10
Operation Manual
Page 12
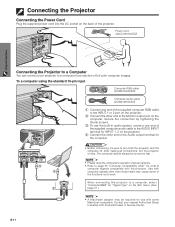
...See page 27.) • A Macintosh adaptor may cause some Macintosh computers. Secure the connectors by tightening the thumb screws. 3 To use with the projector. To a computer using the standard 15-pin input Computer RGB cable QCNW-5304CEZZ Computer audio cable QCNW-4870CEZZ 1 Connect one end of the supplied ...computer audio cable to the AUDIO INPUT terminal for INPUT 1, 2 on the projector. 4 Connect the other end to a Computer You can connect your nearest Authorized Sharp Industrial LCD Products Dealer or Service Center.
...See page 27.) • A Macintosh adaptor may cause some Macintosh computers. Secure the connectors by tightening the thumb screws. 3 To use with the projector. To a computer using the standard 15-pin input Computer RGB cable QCNW-5304CEZZ Computer audio cable QCNW-4870CEZZ 1 Connect one end of the supplied ...computer audio cable to the AUDIO INPUT terminal for INPUT 1, 2 on the projector. 4 Connect the other end to a Computer You can connect your nearest Authorized Sharp Industrial LCD Products Dealer or Service Center.

Operation Manual
Page 13
..., in order to a VCR, laser disc player, DVD player, DTV decoder and other audiovisual equipment. "Plug and Play" function • This projector is sold separately. • If your video equipment does not have priority over images input through the S-VIDEO INPUT terminal have an S-video output ...system in which the picture is separated into a color and a luminance signal to the corresponding red and white AUDIO INPUT 3 terminals on the projector and the Audio output terminals on the video source. 2 To use the built-in audio system, connect the red and white RCA connectors to...
..., in order to a VCR, laser disc player, DVD player, DTV decoder and other audiovisual equipment. "Plug and Play" function • This projector is sold separately. • If your video equipment does not have priority over images input through the S-VIDEO INPUT terminal have an S-video output ...system in which the picture is separated into a color and a luminance signal to the corresponding red and white AUDIO INPUT 3 terminals on the projector and the Audio output terminals on the video source. 2 To use the built-in audio system, connect the red and white RCA connectors to...

Operation Manual
Page 14
...player Connecting an amplifier and other end to the corresponding terminals on the video source. 3 To use the built-in order to protect both the projector and the components being connected. • By using external audio components, the volume can be amplified for better sound. • The AUDIO ...DVD player 1 Connect one end of the HD-15-RGB cable to the INPUT 1 or 2 port on the projector. 2 Connect the other audio components CAUTION • Always turn off the projector while connecting to audio components, in audio system, connect one end of the audio cable (sold separately) To ...
...player Connecting an amplifier and other end to the corresponding terminals on the video source. 3 To use the built-in order to protect both the projector and the components being connected. • By using external audio components, the volume can be amplified for better sound. • The AUDIO ...DVD player 1 Connect one end of the HD-15-RGB cable to the INPUT 1 or 2 port on the projector. 2 Connect the other audio components CAUTION • Always turn off the projector while connecting to audio components, in audio system, connect one end of the audio cable (sold separately) To ...
Operation Manual
Page 15
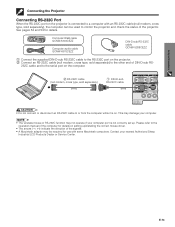
...or RS-232C function may be used to control the projector and check the status of the projector. Contact your nearest Authorized Sharp Industrial LCD Products Dealer or Service Center. E-14 Setup & Connections Connecting the Projector Connecting RS-232C Port When the RS-232C port on... the projector is not correctly set up /installing the correct mouse driver. &#...
...or RS-232C function may be used to control the projector and check the status of the projector. Contact your nearest Authorized Sharp Industrial LCD Products Dealer or Service Center. E-14 Setup & Connections Connecting the Projector Connecting RS-232C Port When the RS-232C port on... the projector is not correctly set up /installing the correct mouse driver. &#...

Operation Manual
Page 16
... to or from the computer while it is on a PC 1 Turn off the power of the PC. 2 Connect one end of the PC. Connecting the Projector Connecting the Remote Mouse Receiver You can be used to operate computers compatible with PS/2 or USB type mouse systems. E-15 Connecting to the PS...
... to or from the computer while it is on a PC 1 Turn off the power of the PC. 2 Connect one end of the PC. Connecting the Projector Connecting the Remote Mouse Receiver You can be used to operate computers compatible with PS/2 or USB type mouse systems. E-15 Connecting to the PS...

Operation Manual
Page 17
...only be used on the remote control. (See page 41.) • After the projector is on, the LAMP REPLACEMENT indicator lights indicating the status of the lamp. The POWER indicator lights up red... and the projector enters standby mode. • If the bottom filter cover is not securely installed, the POWER... again, it may take a short while before proceeding. Wait until the indicator stops flashing before operating the projector. • If the power is turned off and then immediately turned on for the first time, a ...
...only be used on the remote control. (See page 41.) • After the projector is on, the LAMP REPLACEMENT indicator lights indicating the status of the lamp. The POWER indicator lights up red... and the projector enters standby mode. • If the bottom filter cover is not securely installed, the POWER... again, it may take a short while before proceeding. Wait until the indicator stops flashing before operating the projector. • If the power is turned off and then immediately turned on for the first time, a ...

Operation Manual
Page 18
...6 7 8 5 INPUT 1 Mode INPUT 2 Mode INPUT 3 (VIDEO) Mode 5 Press INPUT to receive is not preset to select the desired input mode. When a signal that the projector is being received, "NO SIGNAL" will be turned on , the POWER indicator and the LAMP REPLACEMENT indicator light green. • The POWER indicator flashes if...Basic Operations 4 3 3 Rotate the zoom ring. Press INPUT again to turn off the power, wait until the power off the sound. The projector will then enter standby mode. • Wait until the image on . 8 Press POWER OFF. Press POWER OFF again while the message is ...
...6 7 8 5 INPUT 1 Mode INPUT 2 Mode INPUT 3 (VIDEO) Mode 5 Press INPUT to receive is not preset to select the desired input mode. When a signal that the projector is being received, "NO SIGNAL" will be turned on , the POWER indicator and the LAMP REPLACEMENT indicator light green. • The POWER indicator flashes if...Basic Operations 4 3 3 Rotate the zoom ring. Press INPUT again to turn off the power, wait until the power off the sound. The projector will then enter standby mode. • Wait until the image on . 8 Press POWER OFF. Press POWER OFF again while the message is ...

Operation Manual
Page 19
...; Values with a minus ( )מsign indicate the distance of the lens center below ). Standard Setup (Front Projection) X Place the projector at the required distance from the lens center to the screen, the image will be used with all feet flat and level to the desired... below the bottom of the screen. Close the curtains and dim the lights when setting up the Screen Position the projector perpendicular to the screen with this projector. E-18 Light falling directly onto the screen washes out colors, making viewing difficult. • Position the screen so...
...; Values with a minus ( )מsign indicate the distance of the lens center below ). Standard Setup (Front Projection) X Place the projector at the required distance from the lens center to the screen, the image will be used with all feet flat and level to the desired... below the bottom of the screen. Close the curtains and dim the lights when setting up the Screen Position the projector perpendicular to the screen with this projector. E-18 Light falling directly onto the screen washes out colors, making viewing difficult. • Position the screen so...

Operation Manual
Page 20
...the base line. • Use the projector's menu system to select the appropriate projection mode. (See page 42 for normal rear projection, you can use the optional Sharp ceilingmount bracket for this installation. • Before mounting the projector, contact your hand from the mirror is... made, the image may become distorted (keystoned), depending on the relative positions of the projector and the screen. Ceiling-mount Setup ...
...the base line. • Use the projector's menu system to select the appropriate projection mode. (See page 42 for normal rear projection, you can use the optional Sharp ceilingmount bracket for this installation. • Before mounting the projector, contact your hand from the mirror is... made, the image may become distorted (keystoned), depending on the relative positions of the projector and the screen. Ceiling-mount Setup ...

Operation Manual
Page 21
Operation Setting up the Screen Projector Remote control 1, 4a 3 2 4b On-screen Display (Example: 4:3 NORMAL image) On-screen Display (Example: 16:9 WIDE image) 2 Test Pattern Digital Keystone Correction Pressing ∂ in ...
Operation Setting up the Screen Projector Remote control 1, 4a 3 2 4b On-screen Display (Example: 4:3 NORMAL image) On-screen Display (Example: 16:9 WIDE image) 2 Test Pattern Digital Keystone Correction Pressing ∂ in ...

Operation Manual
Page 22
... may differ due to the screen material. Operating the Wireless Mouse from the remote control can be reflected off a screen for easy operation. Controlling the Projector Using the Wireless Mouse Remote control 23Ј (7 m) 30˚ 30˚ 45˚ 45˚ 30˚ Remote control 13Ј(4 m) 30...8226; The signal from the Remote Control Operation Using the Remote Control as a Wireless Mouse The remote control has the following three functions: • Projector control • Wireless mouse • Laser pointer MOUSE/ADJUSTMENT switch (Remote control) MOUSE ADJ.
... may differ due to the screen material. Operating the Wireless Mouse from the remote control can be reflected off a screen for easy operation. Controlling the Projector Using the Wireless Mouse Remote control 23Ј (7 m) 30˚ 30˚ 45˚ 45˚ 30˚ Remote control 13Ј(4 m) 30...8226; The signal from the Remote Control Operation Using the Remote Control as a Wireless Mouse The remote control has the following three functions: • Projector control • Wireless mouse • Laser pointer MOUSE/ADJUSTMENT switch (Remote control) MOUSE ADJ.


