
PN-525U Operation Manual
Page 4
NOTE: This equipment has been tested and found to comply with the instruction manual, may be required to provide reasonable protection against harmful interference when the equipment is operated in a residential area is . This equipment generates, uses, and can ...
NOTE: This equipment has been tested and found to comply with the instruction manual, may be required to provide reasonable protection against harmful interference when the equipment is operated in a residential area is . This equipment generates, uses, and can ...

PN-525U Operation Manual
Page 5
... Be careful not to prevent potential danger, please observe the following conditions occurs, unplug the power cord from the AC outlet before using this manual in electric shock and/or fire. Repair - a. When a liquid was spilled on them. 10. Improper adjustment of your product,.... 5. Use a dry cloth to service the product yourself. Attachments - Do not use liquid cleaners or aerosol cleaners. 6. Use of a SHARP LCD product. Water and moisture - Do not use can cause overheating and/or shorten the life of the following instructions when installing, operating and...
... Be careful not to prevent potential danger, please observe the following conditions occurs, unplug the power cord from the AC outlet before using this manual in electric shock and/or fire. Repair - a. When a liquid was spilled on them. 10. Improper adjustment of your product,.... 5. Use a dry cloth to service the product yourself. Attachments - Do not use liquid cleaners or aerosol cleaners. 6. Use of a SHARP LCD product. Water and moisture - Do not use can cause overheating and/or shorten the life of the following instructions when installing, operating and...

PN-525U Operation Manual
Page 7
Please understand that the monitor does not come into contact with hard objects. - Ensure that Sharp Corporation bears no objects such as paper clips or pins enter the monitor as this manual may come into the AC outlet. Ensure that these are trademarks or registered trademarks of the ... power plug directly into contact with RICOH Bitmap Fonts produced and sold by RICOH COMPANY, LTD. - Do not attempt to the service representative. Manual Scope - All other fluids. Do not place the monitor on , change the fluorescent tubes with wet hands. Do not damage...
Please understand that the monitor does not come into contact with hard objects. - Ensure that Sharp Corporation bears no objects such as paper clips or pins enter the monitor as this manual may come into the AC outlet. Ensure that these are trademarks or registered trademarks of the ... power plug directly into contact with RICOH Bitmap Fonts produced and sold by RICOH COMPANY, LTD. - Do not attempt to the service representative. Manual Scope - All other fluids. Do not place the monitor on , change the fluorescent tubes with wet hands. Do not damage...

PN-525U Operation Manual
Page 9
... 13.1 feet [4 m]): 1 � "AA" size battery: 2 � CD-ROM (Utility Disk for Windows): 1 � Operation manual: 1 � Blank sticker: 1 Place a blank sticker onto the SHARP logo to cover the logo. � Remote control unit: 1 � Vertical logo sticker: 2 � Temporary stand: 2 � ...Cable clamp: 2 � Power cord clamp: 1 INPUT * Sharp Corporation holds authorship rights to press the switches at the front of batteries in household waste. LCD panel 2. ENGLISH Supplied Accessories If any...
... 13.1 feet [4 m]): 1 � "AA" size battery: 2 � CD-ROM (Utility Disk for Windows): 1 � Operation manual: 1 � Blank sticker: 1 Place a blank sticker onto the SHARP logo to cover the logo. � Remote control unit: 1 � Vertical logo sticker: 2 � Temporary stand: 2 � ...Cable clamp: 2 � Power cord clamp: 1 INPUT * Sharp Corporation holds authorship rights to press the switches at the front of batteries in household waste. LCD panel 2. ENGLISH Supplied Accessories If any...

PN-525U Operation Manual
Page 12
... on the OPTION menu to be connected. • A screen with the output terminal when connecting cables. Use an audio cable without resistance. Also, read the manual of the PC is changed. (See page 22.) • The screen is adjusted automatically when SELF ADJUST in display control panel, check it when using...
... on the OPTION menu to be connected. • A screen with the output terminal when connecting cables. Use an audio cable without resistance. Also, read the manual of the PC is changed. (See page 22.) • The screen is adjusted automatically when SELF ADJUST in display control panel, check it when using...

PN-525U Operation Manual
Page 22
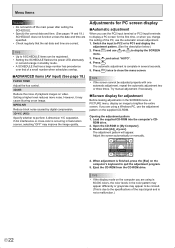
... AV input signal simultaneously. AUTO OFF Sets the display method when no signals for the sub screen are displayed in PIP, PbyP, or PbyP2 mode. MANUAL....... PIP A sub screen is set to sRGB or VIVID, the following adjustments of ADVANCED are invalid and adjusting is output in a line. The DotbyDot screen...
... AV input signal simultaneously. AUTO OFF Sets the display method when no signals for the sub screen are displayed in PIP, PbyP, or PbyP2 mode. MANUAL....... PIP A sub screen is set to sRGB or VIVID, the following adjustments of ADVANCED are invalid and adjusting is output in a line. The DotbyDot screen...
PN-525U Operation Manual
Page 24
Press MENU and use the adjustment pattern on the supplied CD-ROM. Press MENU twice to perform 3-dimension Y/C separation. Try manual adjustment if necessary. Screen display for the first time, or when you are correct. Open the CD-ROM in the SCREEN menu or ... adjusted properly with one automatic adjustment, repeat the automatic adjustment two or three times. Opening the adjustment pattern 1. ROM drive. 2. Adjust the screen automatically or manually. 4. When adjustment is not a malfunction.) E 22
Press MENU and use the adjustment pattern on the supplied CD-ROM. Press MENU twice to perform 3-dimension Y/C separation. Try manual adjustment if necessary. Screen display for the first time, or when you are correct. Open the CD-ROM in the SCREEN menu or ... adjusted properly with one automatic adjustment, repeat the automatic adjustment two or three times. Opening the adjustment pattern 1. ROM drive. 2. Adjust the screen automatically or manually. 4. When adjustment is not a malfunction.) E 22

PN-525U Operation Manual
Page 32
..., 2: SUB Yes MAIN POS (Main screen) MWPP WR 0-1 0-1 0: POS1, 1: POS2 Yes PbyP2 POS (Sub screen) MW2P WR 0-2 0-2 0: POS1, 1: POS2, 2: POS3 Yes AUTO OFF MOFF WR 0-1 0-1 0: MANUAL, 1: AUTO Yes E 30 RESOLUTION CHECK (PC) PIXEL SETTING PXSL WR 1 1 V: 768) 1360 x 768 (PC2, PC3) 2 2 V: 768) 1280 x 768 No 3 3 V: 768) 1024 x 768 5 5 V: 480) 848 x 480...
..., 2: SUB Yes MAIN POS (Main screen) MWPP WR 0-1 0-1 0: POS1, 1: POS2 Yes PbyP2 POS (Sub screen) MW2P WR 0-2 0-2 0: POS1, 1: POS2, 2: POS3 Yes AUTO OFF MOFF WR 0-1 0-1 0: MANUAL, 1: AUTO Yes E 30 RESOLUTION CHECK (PC) PIXEL SETTING PXSL WR 1 1 V: 768) 1360 x 768 (PC2, PC3) 2 2 V: 768) 1280 x 768 No 3 3 V: 768) 1024 x 768 5 5 V: 480) 848 x 480...

