

XG-C55X Operation Manual
Page 5
... FCC Rules. ONLY WARNING: High brightness light source. DO NOT REMOVE SCREWS EXCEPT SPECIFIED USER SERVICE SCREWS. NO USER-SERVICEABLE PARTS EXCEPT LAMP UNIT. This equipment generates, uses, and can radiate radio frequency energy and, if not installed and used with the device. U.S.A. Introduction ENGLISH There are designed to provide reasonable protection against harmful interference when the equipment is provided to ensure that SHARP may cause harmful...
... FCC Rules. ONLY WARNING: High brightness light source. DO NOT REMOVE SCREWS EXCEPT SPECIFIED USER SERVICE SCREWS. NO USER-SERVICEABLE PARTS EXCEPT LAMP UNIT. This equipment generates, uses, and can radiate radio frequency energy and, if not installed and used with the device. U.S.A. Introduction ENGLISH There are designed to provide reasonable protection against harmful interference when the equipment is provided to ensure that SHARP may cause harmful...

XG-C55X Operation Manual
Page 6
... the standby mode. This will help you check the setup procedure. FAILURE TO OBSERVE THIS WILL RESULT IN PREMATURE LAMP FAILURE. LAMP REPLACEMENT CAUTION BEFORE REMOVING THE SCREW, DISCONNECT POWER CORD. UV RADIATION : CAN CAUSE EYE DAMAGE. This SHARP projector uses an LCD (Liquid Crystal Display) panel. As with any high technology electronic equipment such as shown in the United States of the projector as large screen TVs, video systems and video cameras, there are located...
... the standby mode. This will help you check the setup procedure. FAILURE TO OBSERVE THIS WILL RESULT IN PREMATURE LAMP FAILURE. LAMP REPLACEMENT CAUTION BEFORE REMOVING THE SCREW, DISCONNECT POWER CORD. UV RADIATION : CAN CAUSE EYE DAMAGE. This SHARP projector uses an LCD (Liquid Crystal Display) panel. As with any high technology electronic equipment such as shown in the United States of the projector as large screen TVs, video systems and video cameras, there are located...

XG-C55X Operation Manual
Page 7
...; Simple lens replacement Using an easy access lens cover and a new bayonet mount configuration, the optional lens can be easily installed. 3. Simple & Easy Operation • Color coded terminals, automatic signal search and graphical menu system insure easy set-up -scaling edges of the projector. -3 Extensive improvements on Green and Composite Sync signals for use with a wide variety of high-end PCs and Workstations. • Using Advanced Intelligent Compression Technology, computer screens of lightness, chromatic...
...; Simple lens replacement Using an easy access lens cover and a new bayonet mount configuration, the optional lens can be easily installed. 3. Simple & Easy Operation • Color coded terminals, automatic signal search and graphical menu system insure easy set-up -scaling edges of the projector. -3 Extensive improvements on Green and Composite Sync signals for use with a wide variety of high-end PCs and Workstations. • Using Advanced Intelligent Compression Technology, computer screens of lightness, chromatic...

XG-C55X Operation Manual
Page 8
...the On-screen Display Language 36 Turning the Power off 37 Correcting Trapezoidal Distortion (Keystone Correction 38 Setting with the Menus Menu Bar Items 40 Using the Menu Screen 42 Menu Selections (Adjustments 42 Menu Selections (Settings 44 -4 Adjusting the Picture 46 Adjusting Image Preferences 46 Selecting the Signal Type 46 Progressive Mode 47 Adjusting Computer Images 48 Computer Image Adjustment 48 Saving Adjustment Settings 48 Selecting Adjustment Settings 49 Special Mode Settings 49 Checking the Input Signal 49 Auto Sync Adjustment 50 Auto Sync Display Function 50...
...the On-screen Display Language 36 Turning the Power off 37 Correcting Trapezoidal Distortion (Keystone Correction 38 Setting with the Menus Menu Bar Items 40 Using the Menu Screen 42 Menu Selections (Adjustments 42 Menu Selections (Settings 44 -4 Adjusting the Picture 46 Adjusting Image Preferences 46 Selecting the Signal Type 46 Progressive Mode 47 Adjusting Computer Images 48 Computer Image Adjustment 48 Saving Adjustment Settings 48 Selecting Adjustment Settings 49 Special Mode Settings 49 Checking the Input Signal 49 Auto Sync Adjustment 50 Auto Sync Display Function 50...

XG-C55X Operation Manual
Page 12
... Projector Dealer or Service Center. Caution concerning the lamp unit I If the projector starts to overheat due to rise, the lamp will turn on the screen washes out the colors, making viewing difficult. Internal cleaning should be sure not to subject it is subjected to maintain high image qual- I The operating temperature for long hours will blink in the fan speed. I Continuously watching the screen for the projector is automatically controlled...
... Projector Dealer or Service Center. Caution concerning the lamp unit I If the projector starts to overheat due to rise, the lamp will turn on the screen washes out the colors, making viewing difficult. Internal cleaning should be sure not to subject it is subjected to maintain high image qual- I The operating temperature for long hours will blink in the fan speed. I Continuously watching the screen for the projector is automatically controlled...

XG-C55X Operation Manual
Page 14
... the indicator illuminates red. STANDBY 35 INPUT button For switching input mode 1, 2, 3 or 4. 38 KEYSTONE button For adjusting Keystone or Digital Shift setting. 50 AUTO SYNC button For automatically adjusting images when connected to the default settings. HEIGHT ADJUST 25 button Adjustment foot 25 Carrying handle -10 Attaching and removing the lens cap • Press on the two buttons of the lens cap and attach it from the lens. 26 Zoom knob 26 Focus ring 80 Intake vent 13 Remote control sensor 81 Air filter/cooling fan...
... the indicator illuminates red. STANDBY 35 INPUT button For switching input mode 1, 2, 3 or 4. 38 KEYSTONE button For adjusting Keystone or Digital Shift setting. 50 AUTO SYNC button For automatically adjusting images when connected to the default settings. HEIGHT ADJUST 25 button Adjustment foot 25 Carrying handle -10 Attaching and removing the lens cap • Press on the two buttons of the lens cap and attach it from the lens. 26 Zoom knob 26 Focus ring 80 Intake vent 13 Remote control sensor 81 Air filter/cooling fan...

XG-C55X Operation Manual
Page 16
... BREAK TIMER button For displaying the break timer. ENLARGE (Enlarge/Reduce) 55 buttons For enlarging or reducing part of the room. Four gamma modes are hard to choose from. AUTO SYNC button 50 For automatically adjusting images when connected to the default settings. VOLUME buttons 35 For adjusting the speaker sound level. 34 ON button For turning the power on. 42 MENU button For displaying adjustment and setting screens. 42 Adjustment buttons For selecting menu items. 57 PinP button For displaying dual pictures...
... BREAK TIMER button For displaying the break timer. ENLARGE (Enlarge/Reduce) 55 buttons For enlarging or reducing part of the room. Four gamma modes are hard to choose from. AUTO SYNC button 50 For automatically adjusting images when connected to the default settings. VOLUME buttons 35 For adjusting the speaker sound level. 34 ON button For turning the power on. 42 MENU button For displaying adjustment and setting screens. 42 Adjustment buttons For selecting menu items. 57 PinP button For displaying dual pictures...

XG-C55X Operation Manual
Page 27
... control cannot be used due to the range or positioning of the projector (rear projection, etc.), connect a ø3.5 mm stereo or mono minijack cable (commercially available or available as Sharp service part QCNWGA013WJPZ) from the remote control. Supplied accessory RGB cable Optional cable Computer RGB cable AN-C10BM (32'10" (10.0 m)) To RGB input terminal RGB cable (sold separately). 2 In the "Options(1)" menu, se- To utilize this projector. Connections and Setup Connecting...
... control cannot be used due to the range or positioning of the projector (rear projection, etc.), connect a ø3.5 mm stereo or mono minijack cable (commercially available or available as Sharp service part QCNWGA013WJPZ) from the remote control. Supplied accessory RGB cable Optional cable Computer RGB cable AN-C10BM (32'10" (10.0 m)) To RGB input terminal RGB cable (sold separately). 2 In the "Options(1)" menu, se- To utilize this projector. Connections and Setup Connecting...

XG-C55X Operation Manual
Page 31
... or inverted, readjust the setting to the screen. -27 Note • The projector lens should be distorted, making viewing difficult. Light falling directly on the lens. (Refer to the lens installation manual when attaching a lens.) Throw Distance I Place the projector at the required distance from the screen according to the desired picture size. (See page 28.) Side View 90° Top View 90° Example of Standard Setup • The distance from Sharp...
... or inverted, readjust the setting to the screen. -27 Note • The projector lens should be distorted, making viewing difficult. Light falling directly on the lens. (Refer to the lens installation manual when attaching a lens.) Throw Distance I Place the projector at the required distance from the screen according to the desired picture size. (See page 28.) Side View 90° Top View 90° Example of Standard Setup • The distance from Sharp...

XG-C55X Operation Manual
Page 38
... signal is input, the display will appear. • Enter the keycode. If you want to change the on the remote control. • The power indicator illuminates green. Red: The lamp should be replaced. • If the projector is put into the wall outlet. • The power indicator illuminates red, and the projector enters the standby mode. 2 ON Press on the projector or on -screen display to another language, reset the language according to start operation. Image Projection...
... signal is input, the display will appear. • Enter the keycode. If you want to change the on the remote control. • The power indicator illuminates green. Red: The lamp should be replaced. • If the projector is put into the wall outlet. • The power indicator illuminates red, and the projector enters the standby mode. 2 ON Press on the projector or on -screen display to another language, reset the language according to start operation. Image Projection...

XG-C55X Operation Manual
Page 45
... Tint -30 +30 Sharp -30 +30 Red -30 +30 Blue -30 +30 CLR Temp -3 +3 Reset Progressive Mode 2D Progressive 3D Progressive Film Mode Color Selected Target Lightness -30 +30 Chroma -30 +30 Hue -30 +30 Reset (This Color) Reset (All Colors) View Settings Standard Custom 1 Custom 3 [R] Red [Y] Yellow [G] Green [C] Cyan [B] Blue [M] Magenta Audio Out Speaker [ON/OFF] Auto Search [ON/OFF] DNR OSD Display Video System Background Startup Image Economy Mode FAO VAO OFF Level...
... Tint -30 +30 Sharp -30 +30 Red -30 +30 Blue -30 +30 CLR Temp -3 +3 Reset Progressive Mode 2D Progressive 3D Progressive Film Mode Color Selected Target Lightness -30 +30 Chroma -30 +30 Hue -30 +30 Reset (This Color) Reset (All Colors) View Settings Standard Custom 1 Custom 3 [R] Red [Y] Yellow [G] Green [C] Cyan [B] Blue [M] Magenta Audio Out Speaker [ON/OFF] Auto Search [ON/OFF] DNR OSD Display Video System Background Startup Image Economy Mode FAO VAO OFF Level...
XG-C55X Operation Manual
Page 79
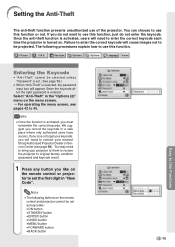
..." is selected, the password input box will cause images not to be set the first digit in "New Code". You may need to bring your projector to them to restore the projector to use of the projector. Note • The following procedures explain how to original factory condition (password and keycode reset). 1 Press any button you like on the remote control and projector cannot be projected. Info • Once...
..." is selected, the password input box will cause images not to be set the first digit in "New Code". You may need to bring your projector to them to restore the projector to use of the projector. Note • The following procedures explain how to original factory condition (password and keycode reset). 1 Press any button you like on the remote control and projector cannot be projected. Info • Once...

XG-C55X Operation Manual
Page 87
... indicator Normal Abnormal Temperature warning indicator Off Red on/ Standby Condition The internal temperature is warming up or shutting down Sharp Authorized Projector Dealer • Internal circuit failure or Service Center (see page 96) • Clogged air intake for repair. Power Green on/ indicator Red on Red blinks The power indicator blinks in red when the projector is on. • Securely install the covers. • The filter cover, lamp unit cover or lens cover is open. • If the power indicator blinks even when the filter cover is securely installed...
... indicator Normal Abnormal Temperature warning indicator Off Red on/ Standby Condition The internal temperature is warming up or shutting down Sharp Authorized Projector Dealer • Internal circuit failure or Service Center (see page 96) • Clogged air intake for repair. Power Green on/ indicator Red on Red blinks The power indicator blinks in red when the projector is on. • Securely install the covers. • The filter cover, lamp unit cover or lens cover is open. • If the power indicator blinks even when the filter cover is securely installed...

XG-C55X Operation Manual
Page 89
... of usage time. Replacing the Lamp Caution • Do not remove the lamp unit immediately after replacement, take your nearest Sharp Authorized Projector Dealer or Service Center. If you wish, you notice a significant deterioration in the picture and color quality. I This projector utilizes a pressurized mercury lamp. All service of exposure to the gas, consult with a new one hour after the power cord is also a possibility that failure can lead...
... of usage time. Replacing the Lamp Caution • Do not remove the lamp unit immediately after replacement, take your nearest Sharp Authorized Projector Dealer or Service Center. If you wish, you notice a significant deterioration in the picture and color quality. I This projector utilizes a pressurized mercury lamp. All service of exposure to the gas, consult with a new one hour after the power cord is also a possibility that failure can lead...

XG-C55X Operation Manual
Page 91
... correctly installed, the power will not turn on the projector. • "LAMP 100%" is displayed, indicating that the lamp timer is connected to become damaged or explode. If you reset the lamp timer and continue to use the same lamp, this may cause the lamp to the projector. Hold the lamp unit by the handle and pull it clicks in the direction of the arrow. 6 Insert the new lamp unit...
... correctly installed, the power will not turn on the projector. • "LAMP 100%" is displayed, indicating that the lamp timer is connected to become damaged or explode. If you reset the lamp timer and continue to use the same lamp, this may cause the lamp to the projector. Hold the lamp unit by the handle and pull it clicks in the direction of the arrow. 6 Insert the new lamp unit...

XG-C55X Operation Manual
Page 93
... commands other than menu display commands, it will be returned and this model will indicate STANDBY mode. Therefore, confirm the values by connecting an RS-232C serial control cable (cross type, sold separately) to the projector. (See page 22 for connection.) Communication conditions Set the serial port settings of the computer to match that time, if the "POWR_ _ _1" command is being sent, send each adjustment menu and checking the values with the "POWER...
... commands other than menu display commands, it will be returned and this model will indicate STANDBY mode. Therefore, confirm the values by connecting an RS-232C serial control cable (cross type, sold separately) to the projector. (See page 22 for connection.) Communication conditions Set the serial port settings of the computer to match that time, if the "POWR_ _ _1" command is being sent, send each adjustment menu and checking the values with the "POWER...

XG-C55X Operation Manual
Page 99
... mode using RS-232C commands from a computer during standby. If the Keylock level is pink (no green) on the projector. Picture is set . Picture is dark. A response code cannot be received when the projector was attempted to Level A, only the INPUT and VOLUME buttons are functional. • Change the input signal type setting. • The lamp indicator is set to be turned on or put into the standby mode using the ON or STANDBY button on INPUT...
... mode using RS-232C commands from a computer during standby. If the Keylock level is pink (no green) on the projector. Picture is set . Picture is dark. A response code cannot be received when the projector was attempted to Level A, only the INPUT and VOLUME buttons are functional. • Change the input signal type setting. • The lamp indicator is set to be turned on or put into the standby mode using the ON or STANDBY button on INPUT...
XG-C55X Operation Manual
Page 100
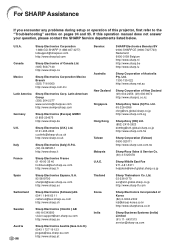
... http://www.sharp.net.au New Zealand Sharp Corporation of Canada Ltd. (905) 568-7140 http://www.sharp.ca Mexico Sharp Electronics Corporation Mexico Branch (525) 716-9000 http://www.sharp.com.mx Latin America Sharp Electronics Corp. For SHARP Assistance If you encounter any problems during setup or operation of this operation manual does not answer your question, please contact the SHARP Service departments...
... http://www.sharp.net.au New Zealand Sharp Corporation of Canada Ltd. (905) 568-7140 http://www.sharp.ca Mexico Sharp Electronics Corporation Mexico Branch (525) 716-9000 http://www.sharp.com.mx Latin America Sharp Electronics Corp. For SHARP Assistance If you encounter any problems during setup or operation of this operation manual does not answer your question, please contact the SHARP Service departments...

XG-C55X Operation Manual
Page 101
...m), Power cord for U.K., Hong Kong and Singapore (6', 1.8 m), Power cord for Australia, New Zealand and Oceania (6', 1.8 m), RGB cable (9'10", 3 m), USB cable (3'3", 1 m), DIN-D-sub RS-232C adaptor (5 57⁄64", 15 cm), Remote receiver, Extra air filter, Lens cap (attached), Projector manual and technical reference CD-ROM, Sharp Advanced Presentation Software CD-ROM, Sharp Advanced Presentation Software quick installation guide, Quick guide label, Operation manual Replacement parts Lamp unit (Lamp/cage module) (BQC-XGC55X//1), Remote control (RRMCGA176WJSA), Two R-6 batteries ("AA" size, UM...
...m), Power cord for U.K., Hong Kong and Singapore (6', 1.8 m), Power cord for Australia, New Zealand and Oceania (6', 1.8 m), RGB cable (9'10", 3 m), USB cable (3'3", 1 m), DIN-D-sub RS-232C adaptor (5 57⁄64", 15 cm), Remote receiver, Extra air filter, Lens cap (attached), Projector manual and technical reference CD-ROM, Sharp Advanced Presentation Software CD-ROM, Sharp Advanced Presentation Software quick installation guide, Quick guide label, Operation manual Replacement parts Lamp unit (Lamp/cage module) (BQC-XGC55X//1), Remote control (RRMCGA176WJSA), Two R-6 batteries ("AA" size, UM...

XG-C55X Operation Manual
Page 104
... KEYSTONE button 38 Keystone correction 38 Lamp 85 Lamp indicator 83 Lamp Life 70 Lens cap 10 Lightness 61 MENU button 42 MUTE button 36 NORMAL 52 ON button 34 Optional cables 14 OSD Display 65 OUTPUT (INPUT 1, 2) terminal 69 Password 73 PDF 9 Phase 48 Pict in Pict 57 PinP button 57 Power cord 17 Power indicator 34 Power Save 69 PRJ mode 71 Progressive Mode 47 Remote control 12 Remote control sensor 13 Remote receiver 24 Replacing the lamp 85 RESIZE button 52 Reversing/Inverting Projected Images...
... KEYSTONE button 38 Keystone correction 38 Lamp 85 Lamp indicator 83 Lamp Life 70 Lens cap 10 Lightness 61 MENU button 42 MUTE button 36 NORMAL 52 ON button 34 Optional cables 14 OSD Display 65 OUTPUT (INPUT 1, 2) terminal 69 Password 73 PDF 9 Phase 48 Pict in Pict 57 PinP button 57 Power cord 17 Power indicator 34 Power Save 69 PRJ mode 71 Progressive Mode 47 Remote control 12 Remote control sensor 13 Remote receiver 24 Replacing the lamp 85 RESIZE button 52 Reversing/Inverting Projected Images...


