XG-MB70X Operation Manual
Page 6
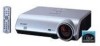
...DURING SERVICING. LAMPE A HAUTE PRESSION : RISQUE D'EXPLOSION. REPARATEUR : SE PROTEGER LES YEUX ET LA PEAU DES RADIATIONS LORS DES REPARATIONS. This SHARP projector uses a DMD panel. FAILURE TO OBSERVE THIS WILL RESULT IN PREMATURE LAMP FAILURE. ALLOW 1 HOUR TO COOL BEFORE REPLACING THE LAMP. SEE ...button on the projector or on page 66. HIGH PRESSURE LAMP : RISK OF EXPLOSION. DANGER POTENTIEL DE PARTICULES DE VERRE EN CAS D'ECLATEMENT DE LA LAMPE. Caution Concerning Lamp Replacement See "Replacing the Lamp" on the remote control. NE REMPLACER QUE PAR UNE LAMPE SHARP DE MOD&#...
...DURING SERVICING. LAMPE A HAUTE PRESSION : RISQUE D'EXPLOSION. REPARATEUR : SE PROTEGER LES YEUX ET LA PEAU DES RADIATIONS LORS DES REPARATIONS. This SHARP projector uses a DMD panel. FAILURE TO OBSERVE THIS WILL RESULT IN PREMATURE LAMP FAILURE. ALLOW 1 HOUR TO COOL BEFORE REPLACING THE LAMP. SEE ...button on the projector or on page 66. HIGH PRESSURE LAMP : RISK OF EXPLOSION. DANGER POTENTIEL DE PARTICULES DE VERRE EN CAS D'ECLATEMENT DE LA LAMPE. Caution Concerning Lamp Replacement See "Replacing the Lamp" on the remote control. NE REMPLACER QUE PAR UNE LAMPE SHARP DE MOD&#...
XG-MB70X Operation Manual
Page 8
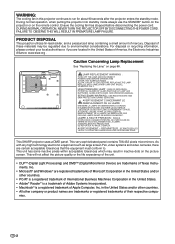
...6 How to Access the PDF Operation Manuals ... 9 Accessories 10 Part Names and Functions 11 Using the Remote Control 15 Usable Range 15 Inserting the Batteries 15 Quick Start Quick Start 16 Setup Storing the Projector 18 How to Use the Storage Case 18 Using Basic Operation Turning the... Connectable Main Equipment 21 Samples of Cables for Connection 22 Connecting to a Computer 23 Using the Remote Control as the Wireless Computer Mouse 24 Connecting to Video Equipment 25 Controlling the Projector by a Computer ... 27 Connecting to a Monitor with RGB Input Terminal 28 Connecting to an ...
...6 How to Access the PDF Operation Manuals ... 9 Accessories 10 Part Names and Functions 11 Using the Remote Control 15 Usable Range 15 Inserting the Batteries 15 Quick Start Quick Start 16 Setup Storing the Projector 18 How to Use the Storage Case 18 Using Basic Operation Turning the... Connectable Main Equipment 21 Samples of Cables for Connection 22 Connecting to a Computer 23 Using the Remote Control as the Wireless Computer Mouse 24 Connecting to Video Equipment 25 Controlling the Projector by a Computer ... 27 Connecting to a Monitor with RGB Input Terminal 28 Connecting to an ...

XG-MB70X Operation Manual
Page 14
... and technical reference CD-ROM UDSKAA052WJZZ "QUICK GUIDE" label TLABZA717WJZZ Optional accessories ■ 3 RCA to the wall outlet in your nearest Sharp Authorized Projector Dealer or Service Center. -10 Accessories Supplied accessories Remote control RRMCGA313WJSA Two R-03 batteries ("AAA" size, UM/SUM-4, HP-16 or similar) Power cord* (1) (2) (3) (4) For U.S., Canada, etc. (6' (1.8 m)) QACCDA010WJPZ For Europe...
... and technical reference CD-ROM UDSKAA052WJZZ "QUICK GUIDE" label TLABZA717WJZZ Optional accessories ■ 3 RCA to the wall outlet in your nearest Sharp Authorized Projector Dealer or Service Center. -10 Accessories Supplied accessories Remote control RRMCGA313WJSA Two R-03 batteries ("AAA" size, UM/SUM-4, HP-16 or similar) Power cord* (1) (2) (3) (4) For U.S., Canada, etc. (6' (1.8 m)) QACCDA010WJPZ For Europe...
XG-MB70X Operation Manual
Page 15
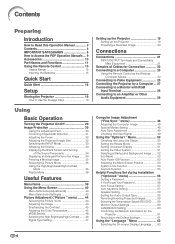
... For turning the power on the menu. STANDBY button 29 For putting the projector into position. • Removing the lens cap Pull the lens cap directly outward. -11 KEYSTONE button 31 For entering the Keystone Correction mode. Remote control sensor 15 Auto focus sensor Auto focus may not function normally if there is...
... For turning the power on the menu. STANDBY button 29 For putting the projector into position. • Removing the lens cap Pull the lens cap directly outward. -11 KEYSTONE button 31 For entering the Keystone Correction mode. Remote control sensor 15 Auto focus sensor Auto focus may not function normally if there is...

XG-MB70X Operation Manual
Page 17
...Terminal for computer RGB and component signals. 26 INPUT 3 terminal Terminal for connecting video equipment. 26 INPUT 4 terminal Terminal for controlling the projector using a computer via network. This is explained. Refer to the information that came with the system for connecting a monitor. INPUT...Projector (Rear View) Terminals Refer to internal temperature changes. AUDIO OUTPUT terminal 28 Audio output terminal of the cooling fan may change during operation in this operation manual where the topic is normal operation and does not indicate a malfunction. 15 Remote control ...
...Terminal for computer RGB and component signals. 26 INPUT 3 terminal Terminal for connecting video equipment. 26 INPUT 4 terminal Terminal for controlling the projector using a computer via network. This is explained. Refer to the information that came with the system for connecting a monitor. INPUT...Projector (Rear View) Terminals Refer to internal temperature changes. AUDIO OUTPUT terminal 28 Audio output terminal of the cooling fan may change during operation in this operation manual where the topic is normal operation and does not indicate a malfunction. 15 Remote control ...

XG-MB70X Operation Manual
Page 18
ENLARGE (Enlarge/Reduce) 34 buttons For enlarging/reducing part of luminous material that is explained. Remote Control STANDBY button 29 For putting the projector into focus. 35 IRIS button For switching "High Brightness" mode or "High Contrast" mode. 40 MENU button For displaying adjustment... 24·40 R-CLICK/UNDO button • For the Right click when connecting the projector USB terminal to the computer with USB cable. • For setting items selected or adjusted on the remote control, except the MOUSE/Adjustment button, are made of the image. Visibility will recharge the ...
ENLARGE (Enlarge/Reduce) 34 buttons For enlarging/reducing part of luminous material that is explained. Remote Control STANDBY button 29 For putting the projector into focus. 35 IRIS button For switching "High Brightness" mode or "High Contrast" mode. 40 MENU button For displaying adjustment... 24·40 R-CLICK/UNDO button • For the Right click when connecting the projector USB terminal to the computer with USB cable. • For setting items selected or adjusted on the remote control, except the MOUSE/Adjustment button, are made of the image. Visibility will recharge the ...

XG-MB70X Operation Manual
Page 19
...9650; mark on the cover and slide it clicks into place. Battery fluid from the remote control if you will not be reflected off a screen for a long time. -15 In this projector may cause them to leak or explode. Please follow the precautions below. Caution •...case, move the projector away from the remote control can cause them to leak. Ensure to replace them using the remote control for easy operation. Note • The signal from the fluorescent lamp. When using the remote control: • Ensure not to drop, expose to control the projector within the ranges...
...9650; mark on the cover and slide it clicks into place. Battery fluid from the remote control if you will not be reflected off a screen for a long time. -15 In this projector may cause them to leak or explode. Please follow the precautions below. Caution •...case, move the projector away from the remote control can cause them to leak. Ensure to replace them using the remote control for easy operation. Note • The signal from the fluorescent lamp. When using the remote control: • Ensure not to drop, expose to control the projector within the ranges...

XG-MB70X Operation Manual
Page 20
... 23, 29 3. Place the projector facing a screen 6 INPUT 1 button Page 19 2. Remove the lens cap and turn the projector on On the projector On the remote control Page 29 -16 Quick Start This section shows the basic operation (projector connecting with the computer). Setup and... Projection In this section, connection of the projector When connecting equipment other than the...
... 23, 29 3. Place the projector facing a screen 6 INPUT 1 button Page 19 2. Remove the lens cap and turn the projector on On the projector On the remote control Page 29 -16 Quick Start This section shows the basic operation (projector connecting with the computer). Setup and... Projection In this section, connection of the projector When connecting equipment other than the...
XG-MB70X Operation Manual
Page 21
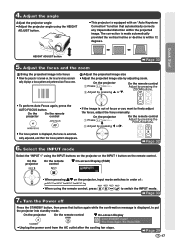
... trapezoidal distortion within 12 degrees. On the remote control Adjust by adjusting zoom. Adjust the angle Adjust the projector angle • Adjust the projector angle using the INPUT buttons on the projector or the INPUT 1 button on the remote control. cally displays a focus pattern and performs ... |. • The focus pattern is displayed, the focus is displayed, to put the projector into focus • When the projector is within the projected image. On the projector On the remote control " On-screen Display • Unplug the power cord from the AC outlet after the ...
... trapezoidal distortion within 12 degrees. On the remote control Adjust by adjusting zoom. Adjust the angle Adjust the projector angle • Adjust the projector angle using the INPUT buttons on the projector or the INPUT 1 button on the remote control. cally displays a focus pattern and performs ... |. • The focus pattern is displayed, the focus is displayed, to put the projector into focus • When the projector is within the projected image. On the projector On the remote control " On-screen Display • Unplug the power cord from the AC outlet after the ...

XG-MB70X Operation Manual
Page 27
... the computer is switched to the external output. After making connections. The projector and a VESA DDC com- Contact your nearest Macintosh Dealer. • Depending on the computer you can use the remote control as Sharp service part QCNWGA038WJPZ) USB cable Connect to not work. • A... Macintosh adaptor may cause some of this projector operates only when used in conjunction with computer signals other devices. Refer...
... the computer is switched to the external output. After making connections. The projector and a VESA DDC com- Contact your nearest Macintosh Dealer. • Depending on the computer you can use the remote control as Sharp service part QCNWGA038WJPZ) USB cable Connect to not work. • A... Macintosh adaptor may cause some of this projector operates only when used in conjunction with computer signals other devices. Refer...

XG-MB70X Operation Manual
Page 28
L-CLICK button -24 R-CLICK button Note • You cannot use the remote control as the computer mouse. The mouse pointer can use this function when displaying the menu screen. • Confirm that the computer recognizes the USB connection....is displayed when signals having a higher resolution than XGA are being input and you have common function. L-CLICK and R-CLICK have set "Dot By Dot" as Macintosh) Press or . Connecting to a Computer Using the Remote Control as the Wireless Computer Mouse When connecting the projector and the computer with the supplied RGB cable and...
L-CLICK button -24 R-CLICK button Note • You cannot use the remote control as the computer mouse. The mouse pointer can use this function when displaying the menu screen. • Confirm that the computer recognizes the USB connection....is displayed when signals having a higher resolution than XGA are being input and you have common function. L-CLICK and R-CLICK have set "Dot By Dot" as Macintosh) Press or . Connecting to a Computer Using the Remote Control as the Wireless Computer Mouse When connecting the projector and the computer with the supplied RGB cable and...

XG-MB70X Operation Manual
Page 33
... Standby Mode) ▼On-screen Display 1 Press on the projector or on the projector, a slight flickering of the lamp. Turning the Projector On/Off Connecting the Power Cord Plug the supplied power cord into the AC socket on the remote control. • The power indicator illuminates green. • After the lamp indicator illuminates, the projec...
... Standby Mode) ▼On-screen Display 1 Press on the projector or on the projector, a slight flickering of the lamp. Turning the Projector On/Off Connecting the Power Cord Plug the supplied power cord into the AC socket on the remote control. • The power indicator illuminates green. • After the lamp indicator illuminates, the projec...

XG-MB70X Operation Manual
Page 35
...adjusted in the lateral direction. • You can be ad- Note • When not using the following procedure. 1 Press on the projector. KEYSTONE button ENTER button MOUSE/Adjustment button ('/"/\/|) UNDO button "On-screen Display (Keystone Correction mode) Basic Operation Manual Keystone Correction When you... the Key- The screen can also adjust the Keystone Correction using the Auto Keystone Correction function, you can also use on the remote control to "OFF". stone Correction. • You can also be set up to an angle of approximately ±35 degrees and ...
...adjusted in the lateral direction. • You can be ad- Note • When not using the following procedure. 1 Press on the projector. KEYSTONE button ENTER button MOUSE/Adjustment button ('/"/\/|) UNDO button "On-screen Display (Keystone Correction mode) Basic Operation Manual Keystone Correction When you... the Key- The screen can also adjust the Keystone Correction using the Auto Keystone Correction function, you can also use on the remote control to "OFF". stone Correction. • You can also be set up to an angle of approximately ±35 degrees and ...

XG-MB70X Operation Manual
Page 36
... Auto Focus function using the Auto Focus function, set "Auto Focus" on the projector, you want to adjust the focus automatically depends on the auto focus sensor. on . on the remote control Adjust by pressing the FOCUS buttons. ZOOM/FOCUS button Adjustment buttons ('/"/\/|) AUTO FOCUS...FOCUS button • When not using the following procedure. Press on the projector or on the remote control. • The focus is adjusted automatically after which the focus pattern is turned on the remote control Adjust by pressing the ZOOM buttons. -32 Note • Manually adjusting ...
... Auto Focus function using the Auto Focus function, set "Auto Focus" on the projector, you want to adjust the focus automatically depends on the auto focus sensor. on . on the remote control Adjust by pressing the FOCUS buttons. ZOOM/FOCUS button Adjustment buttons ('/"/\/|) AUTO FOCUS...FOCUS button • When not using the following procedure. Press on the projector or on the remote control. • The focus is adjusted automatically after which the focus pattern is turned on the remote control Adjust by pressing the ZOOM buttons. -32 Note • Manually adjusting ...

XG-MB70X Operation Manual
Page 37
...equipment. Note • Pressing Pressing or \ will raise the volume. Press , , or on the remote control to select the input mode. • When pressing ' or " on the projector, input mode switches in order of INPUT Mode (Example) INPUT 1/2 mode Using RGB Using Component INPUT ... INPUT 4 mode Using S-Video ➝➝ ➝ ➝➝ ➝ Basic Operation Adjusting the Volume Press \/| on the projector or VOL / on the remote control to ad- When a signal that sends RGB sig- (RGB/ nals or component signals con- INPUT buttons "On-screen Display of :...
...equipment. Note • Pressing Pressing or \ will raise the volume. Press , , or on the remote control to select the input mode. • When pressing ' or " on the projector, input mode switches in order of INPUT Mode (Example) INPUT 1/2 mode Using RGB Using Component INPUT ... INPUT 4 mode Using S-Video ➝➝ ➝ ➝➝ ➝ Basic Operation Adjusting the Volume Press \/| on the projector or VOL / on the remote control to ad- When a signal that sends RGB sig- (RGB/ nals or component signals con- INPUT buttons "On-screen Display of :...

XG-MB70X Operation Manual
Page 38
...; Pressing or enlarges or reduces the projected image. Note In the following cases, the image will turn the projected image and sound back on the remote control to ×1. Note ×1 ×2 ×3 ×4 ×9 ×16 ×36 ×64 • You can be enlarged. ...INPUT mode. • When has been pressed. • When the input signal is helpful when providing more detailed explanations. 1 Press on the remote control to cancel the operation. • The magnification then returns to temporarily display a black screen and turn off the Sound Temporarily Press on . ...
...; Pressing or enlarges or reduces the projected image. Note In the following cases, the image will turn the projected image and sound back on the remote control to ×1. Note ×1 ×2 ×3 ×4 ×9 ×16 ×36 ×64 • You can be enlarged. ...INPUT mode. • When has been pressed. • When the input signal is helpful when providing more detailed explanations. 1 Press on the remote control to cancel the operation. • The magnification then returns to temporarily display a black screen and turn off the Sound Temporarily Press on . ...

XG-MB70X Operation Manual
Page 39
... the OSD menu (see page 46). Note • This function can also be accessed from the OSD menu (see page 44). Press on the remote control. • The mode is frozen. 2 Press again to return to the "Standard" mode. • This function can select the suitable picture mode... such as movie or video game. FREEZE button PICTURE MODE button IRIS button -35 Basic Operation Freezing a Moving Image 1 Press on the remote control. • The projected image is switched between "High Brightness" mode and "High Contrast" mode. Switching the High Brightness / High Contrast Mode This ...
... the OSD menu (see page 46). Note • This function can also be accessed from the OSD menu (see page 44). Press on the remote control. • The mode is frozen. 2 Press again to return to the "Standard" mode. • This function can select the suitable picture mode... such as movie or video game. FREEZE button PICTURE MODE button IRIS button -35 Basic Operation Freezing a Moving Image 1 Press on the remote control. • The projected image is switched between "High Brightness" mode and "High Contrast" mode. Switching the High Brightness / High Contrast Mode This ...

XG-MB70X Operation Manual
Page 40
...Resolution higher than XGA are being input, you can move the image so that it appears entirely within the panel by using the adjustment buttons ('/"/\/|) on the input signal, you can also be projected. : Area where the signals are off screen. Depending on the remote control. (However, this... does not apply when you have set "DOT BY DOT" and signals having a higher resolution than XGA 4:3 aspect ratio * * SXGA (1280 × 1024) 5:4 aspect ratio * 1280 ×...
...Resolution higher than XGA are being input, you can move the image so that it appears entirely within the panel by using the adjustment buttons ('/"/\/|) on the input signal, you can also be projected. : Area where the signals are off screen. Depending on the remote control. (However, this... does not apply when you have set "DOT BY DOT" and signals having a higher resolution than XGA 4:3 aspect ratio * * SXGA (1280 × 1024) 5:4 aspect ratio * 1280 ×...
XG-MB70X Operation Manual
Page 48
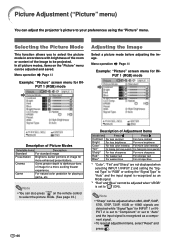
...8226; You can also press on the "Picture" menu can be projected. Note • "Sharp" can be adjusted when 480I, 480P, 540P, 576I, 576P, 720P, 1035I or 1080I ... is recognized as a component signal. • To reset all picture modes, items on the remote control to select the picture mode. (See page 35.) -44 Description of Adjustment Items Selectable items Press...to your preferences using the "Picture" menu. Picture Adjustment ("Picture" menu) You can adjust the projector's picture to darker portions of image for a more enhanced presentations. Menu operation Page 40 Example:...
...8226; You can also press on the "Picture" menu can be projected. Note • "Sharp" can be adjusted when 480I, 480P, 540P, 576I, 576P, 720P, 1035I or 1080I ... is recognized as a component signal. • To reset all picture modes, items on the remote control to select the picture mode. (See page 35.) -44 Description of Adjustment Items Selectable items Press...to your preferences using the "Picture" menu. Picture Adjustment ("Picture" menu) You can adjust the projector's picture to darker portions of image for a more enhanced presentations. Menu operation Page 40 Example:...

XG-MB70X Operation Manual
Page 50
... button on the "Picture" menu, when "sRGB" is set to " " (ON). • You cannot set the items, "Red", "Blue", "CLR Temp", "Bright Boost" on the remote control. Description of IRIS Settings Selectable items Description High Brightness High brightness is given priority over high contrast. High Contrast High contrast is given priority over...
... button on the "Picture" menu, when "sRGB" is set to " " (ON). • You cannot set the items, "Red", "Blue", "CLR Temp", "Bright Boost" on the remote control. Description of IRIS Settings Selectable items Description High Brightness High brightness is given priority over high contrast. High Contrast High contrast is given priority over...


