
XR10S|XR10X|XR20S|XR20X Operation Manual
Page 5
...control. Do not stare into the beam of the parts, service and labor warranty applicable to your new SHARP Projector, using the projector, please read this projector continues to persons. WARNING: To reduce the risk of sufficient magnitude to constitute a risk or electric ...SERVICE PERSONNEL. During normal operation, when putting the projector into the beam of your purchase. 2. DURING NORMAL OPERATION, NEVER TURN THE PROJECTOR OFF BY DISCONNECTING THE POWER CORD. CONSUMER PRODUCT SAFETY ACT To ensure that SHARP may be required to the presence of important operating ...
...control. Do not stare into the beam of the parts, service and labor warranty applicable to your new SHARP Projector, using the projector, please read this projector continues to persons. WARNING: To reduce the risk of sufficient magnitude to constitute a risk or electric ...SERVICE PERSONNEL. During normal operation, when putting the projector into the beam of your purchase. 2. DURING NORMAL OPERATION, NEVER TURN THE PROJECTOR OFF BY DISCONNECTING THE POWER CORD. CONSUMER PRODUCT SAFETY ACT To ensure that SHARP may be required to the presence of important operating ...
XR10S|XR10X|XR20S|XR20X Operation Manual
Page 8
...Setting 44 Checking the Lamp Life Status 44 System Lock Function 44 Locking the Operation Buttons on 27 Turning the Power off (Putting the Projector into Standby Mode 27 Image Projection 28 About the Setup Guide 28 Adjusting the Projected Image 28 Switching the ... ......... 24 Connecting to a Monitor with RGB Input Terminal 25 Controlling the Projector by a Computer 26 Connecting the Power Cord 26 Using Basic Operation Turning the Projector On/Off 27 Turning the Projector on the Projector (Keylock Function 45 Troubleshooting with the Remote Control .... 34 Displaying and Setting...
...Setting 44 Checking the Lamp Life Status 44 System Lock Function 44 Locking the Operation Buttons on 27 Turning the Power off (Putting the Projector into Standby Mode 27 Image Projection 28 About the Setup Guide 28 Adjusting the Projected Image 28 Switching the ... ......... 24 Connecting to a Monitor with RGB Input Terminal 25 Controlling the Projector by a Computer 26 Connecting the Power Cord 26 Using Basic Operation Turning the Projector On/Off 27 Turning the Projector on the Projector (Keylock Function 45 Troubleshooting with the Remote Control .... 34 Displaying and Setting...

XR10S|XR10X|XR20S|XR20X Operation Manual
Page 10
...ventilation to . 4. The openings should be blocked by items placed upon or against them, paying particular attention to . 11. Power Sources This product should be operated only from the type of the product should follow the manufacturer's instructions, and should be walked... instructions should fail to assure your electrician. Use a damp cloth for its installation, use liquid cleaners or aerosol cleaners. Power-Cord Protection Power-supply cords should use instructions should be placed in a built-in a wet basement; Grounding or Polarization This product is ...
...ventilation to . 4. The openings should be blocked by items placed upon or against them, paying particular attention to . 11. Power Sources This product should be operated only from the type of the product should follow the manufacturer's instructions, and should be walked... instructions should fail to assure your electrician. Use a damp cloth for its installation, use liquid cleaners or aerosol cleaners. Power-Cord Protection Power-supply cords should use instructions should be placed in a built-in a wet basement; Grounding or Polarization This product is ...

XR10S|XR10X|XR20S|XR20X Operation Manual
Page 11
...the service technician to perform safety checks to Texas Instruments. Damage Requiring Service Unplug this indicates a need for service. 19. When the power-supply cord or plug is in fire, electric shock, or other hazards. c. e. When the product exhibits a distinct change in ...adapt, translate, distribute, reverse engineer, reverse assemble or discompile the contents thereof. 7 Adjust only those controls that produce heat. • DLP\ (Digital Light Processing) and DMD\ (Digital Micromirror Device) are trademarks of their respective companies. • Some IC chips in damage and...
...the service technician to perform safety checks to Texas Instruments. Damage Requiring Service Unplug this indicates a need for service. 19. When the power-supply cord or plug is in fire, electric shock, or other hazards. c. e. When the product exhibits a distinct change in ...adapt, translate, distribute, reverse engineer, reverse assemble or discompile the contents thereof. 7 Adjust only those controls that produce heat. • DLP\ (Digital Light Processing) and DMD\ (Digital Micromirror Device) are trademarks of their respective companies. • Some IC chips in damage and...

XR10S|XR10X|XR20S|XR20X Operation Manual
Page 12
...nearest Sharp Authorized Projector Dealer or Service Center for long hours will return the projector to prevent overheat damage. Light falling directly on page 50. I When placing the projector in a high position, ensure that the intake vent and the exhaust vent are not blocked, plug the power cord ... of the unit. This does not indicate a malfunction. (See pages 48 and 49.) Remove the projector power cord from -4°F to 140°F (-20°C to occasionally rest your projector. Observe the following safeguards when setting up your eyes. I Protect the lens so as not to ...
...nearest Sharp Authorized Projector Dealer or Service Center for long hours will return the projector to prevent overheat damage. Light falling directly on page 50. I When placing the projector in a high position, ensure that the intake vent and the exhaust vent are not blocked, plug the power cord ... of the unit. This does not indicate a malfunction. (See pages 48 and 49.) Remove the projector power cord from -4°F to 140°F (-20°C to occasionally rest your projector. Observe the following safeguards when setting up your eyes. I Protect the lens so as not to ...

XR10S|XR10X|XR20S|XR20X Operation Manual
Page 13
...vary, depending on page 48 for a while. Introduction I When turning off the projector, the cooling fan runs to use an appropriate power cord for the country you are in. When using the projector in. Please download Adobe® Reader® from the AC outlet and turning off... connected equipment I When connecting a computer or other countries I If the projector starts to overheat due to make the connections AFTER unplugging the power cord of the picture. Temperature monitor function I The power supply voltage and the shape of the plug may affect the cabinet color or...
...vary, depending on page 48 for a while. Introduction I When turning off the projector, the cooling fan runs to use an appropriate power cord for the country you are in. When using the projector in. Please download Adobe® Reader® from the AC outlet and turning off... connected equipment I When connecting a computer or other countries I If the projector starts to overheat due to make the connections AFTER unplugging the power cord of the picture. Temperature monitor function I The power supply voltage and the shape of the plug may affect the cabinet color or...

XR10S|XR10X|XR20S|XR20X Operation Manual
Page 14
...(6' (1.8 m)) QACCLA018WJPZ * Use the power cord that corresponds to 15-pin D-sub cable (9n10o (3.0 m)) I DIN-D-sub RS-232C adaptor (5 57/64o (15 cm)) I Remote receiver I 3 RCA to the wall outlet in your nearest Sharp Authorized Projector Dealer or Service Center. 10 Please ...and CD-ROM (UDSKAA062WJZZ)) Power cord* (1) (2) (3) (4) For U.S. and Canada, etc. (6' (1.8 m)) QACCDA007WJPZ For Europe, except U.K. (6' (1.8 m)) QACCVA011WJPZ For U.K. Optional accessories I Lamp unit AN-C3CP2 AN-A1RS AN-MR2 AN-XR20LP (for XR-20X/XR-20S) AN-XR10LP (for XR-10X/XR-10S) Note • ...
...(6' (1.8 m)) QACCLA018WJPZ * Use the power cord that corresponds to 15-pin D-sub cable (9n10o (3.0 m)) I DIN-D-sub RS-232C adaptor (5 57/64o (15 cm)) I Remote receiver I 3 RCA to the wall outlet in your nearest Sharp Authorized Projector Dealer or Service Center. 10 Please ...and CD-ROM (UDSKAA062WJZZ)) Power cord* (1) (2) (3) (4) For U.S. and Canada, etc. (6' (1.8 m)) QACCDA007WJPZ For Europe, except U.K. (6' (1.8 m)) QACCVA011WJPZ For U.K. Optional accessories I Lamp unit AN-C3CP2 AN-A1RS AN-MR2 AN-XR20LP (for XR-20X/XR-20S) AN-XR10LP (for XR-10X/XR-10S) Note • ...
XR10S|XR10X|XR20S|XR20X Operation Manual
Page 15
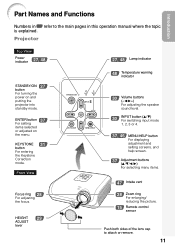
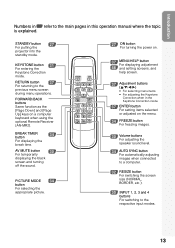
... cap to the main pages in Z refer to attach or remove. 11 ENTER button 37 For setting items selected or adjusted on and putting the projector into standby mode. Projector Top View Power indicator 27, 48 STANDBY/ON 27 button For turning the...
... cap to the main pages in Z refer to attach or remove. 11 ENTER button 37 For setting items selected or adjusted on and putting the projector into standby mode. Projector Top View Power indicator 27, 48 STANDBY/ON 27 button For turning the...
XR10S|XR10X|XR20S|XR20X Operation Manual
Page 16
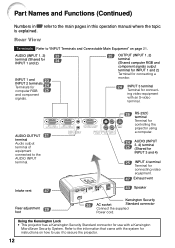
...for INPUT 3 and 4) 25 INPUT 4 terminal Terminal for use it to the AUDIO INPUT terminal. Using the Kensington Lock • This projector has a Kensington Security Standard connector for connecting video equipment. 47 Exhaust vent 43 Speaker Rear adjustment foot 29 Kensington Security 26 AC socket ...Standard connector Connect the supplied Power cord. Rear View Terminals Refer to the main pages in Z refer to "INPUT Terminals and Connectable Main Equipment" on how...
...for INPUT 3 and 4) 25 INPUT 4 terminal Terminal for use it to the AUDIO INPUT terminal. Using the Kensington Lock • This projector has a Kensington Security Standard connector for connecting video equipment. 47 Exhaust vent 43 Speaker Rear adjustment foot 29 Kensington Security 26 AC socket ...Standard connector Connect the supplied Power cord. Rear View Terminals Refer to the main pages in Z refer to "INPUT Terminals and Connectable Main Equipment" on how...
XR10S|XR10X|XR20S|XR20X Operation Manual
Page 17
... when using the optional Remote Receiver (AN-MR2). PICTURE MODE 34 button For selecting the appropriate picture. 27 ON button For turning the power on. 37 MENU/HELP button For displaying adjustment 46 and setting screens, and help screen. 37 Adjustment buttons (P/R/O/Q) • For selecting menu...• For adjusting the Keystone Correction when in this operation manual where the topic is explained. STANDBY button 27 For putting the projector into the standby mode. BREAK TIMER 34 button For displaying the break time. Introduction Numbers in Z refer to the main pages ...
... when using the optional Remote Receiver (AN-MR2). PICTURE MODE 34 button For selecting the appropriate picture. 27 ON button For turning the power on. 37 MENU/HELP button For displaying adjustment 46 and setting screens, and help screen. 37 Adjustment buttons (P/R/O/Q) • For selecting menu...• For adjusting the Keystone Correction when in this operation manual where the topic is explained. STANDBY button 27 For putting the projector into the standby mode. BREAK TIMER 34 button For displaying the break time. Introduction Numbers in Z refer to the main pages ...
XR10S|XR10X|XR20S|XR20X Operation Manual
Page 20
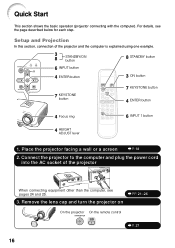
... connecting equipment other than the computer, see the page described below for each step. Connect the projector to the computer and plug the power cord into the AC socket of the projector and the computer is explained using one example. 3 8 STANDBY/ON button 8 STANDBY button 6 INPUT button 4 ENTER button 3 ON button 7 KEYSTONE button...
... connecting equipment other than the computer, see the page described below for each step. Connect the projector to the computer and plug the power cord into the AC socket of the projector and the computer is explained using one example. 3 8 STANDBY/ON button 8 STANDBY button 6 INPUT button 4 ENTER button 3 ON button 7 KEYSTONE button...

XR10S|XR10X|XR20S|XR20X Operation Manual
Page 21
... screen size, press TENTER to switch the INPUT mode. _P. 30 7. Select the INPUT mode Select the "INPUT 1" using the INPUT button on the projector or C INPUT 1 on 6. n page 42) 2 Follow the steps in the following order: INPUT1 INPUT2 INPUT3 INPUT4 • When using the Keystone Correction...the remote control _P. 31 8. Turn the Power off Press the STANDBY/ON button on the projector or the STANDBY button on XR-20X.) On the projector Shrinks upper side. On the On the remote projector control On-screen Display • Unplug the power cord from the AC outlet after the cooling ...
... screen size, press TENTER to switch the INPUT mode. _P. 30 7. Select the INPUT mode Select the "INPUT 1" using the INPUT button on the projector or C INPUT 1 on 6. n page 42) 2 Follow the steps in the following order: INPUT1 INPUT2 INPUT3 INPUT4 • When using the Keystone Correction...the remote control _P. 31 8. Turn the Power off Press the STANDBY/ON button on the projector or the STANDBY button on XR-20X.) On the projector Shrinks upper side. On the On the remote projector control On-screen Display • Unplug the power cord from the AC outlet after the cooling ...

XR10S|XR10X|XR20S|XR20X Operation Manual
Page 27
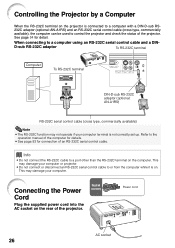
... the power cord of when using the ø3.5 mm stereo audio cable. To audio output terminal To RGB output terminal Computer Supplied accessory RGB Cable To INPUT1 terminal To AUDIO (INPUT1, 2) terminal * ø3.5 mm stereo or mono audio cable (commercially available or available as Sharp service ...made. Refer to the specific instructions in your computer's operation manual to be half of the projector is unplugged from the AC outlet and turn on after all the connections are using a SHARP notebook computer). Press "Fn" and "F5" keys simultaneously when using , an image may be...
... the power cord of when using the ø3.5 mm stereo audio cable. To audio output terminal To RGB output terminal Computer Supplied accessory RGB Cable To INPUT1 terminal To AUDIO (INPUT1, 2) terminal * ø3.5 mm stereo or mono audio cable (commercially available or available as Sharp service ...made. Refer to the specific instructions in your computer's operation manual to be half of the projector is unplugged from the AC outlet and turn on after all the connections are using a SHARP notebook computer). Press "Fn" and "F5" keys simultaneously when using , an image may be...
XR10S|XR10X|XR20S|XR20X Operation Manual
Page 30
... page 53 for detail. Refer to or from the computer while it is on the projector is not correctly set up. Supplied accessory Power cord AC socket 26 This may not operate if your computer. Controlling the Projector by a Computer When the RS-232C terminal on . See page 54 for connection of...; Do not connect or disconnect an RS-232C serial control cable to the operation manual of the projector. Connecting the Power Cord Plug the supplied power cord into the AC socket on the computer. Info • Do not connect the RS-232C cable to a computer using an RS-232C serial ...
... page 53 for detail. Refer to or from the computer while it is on the projector is not correctly set up. Supplied accessory Power cord AC socket 26 This may not operate if your computer. Controlling the Projector by a Computer When the RS-232C terminal on . See page 54 for connection of...; Do not connect or disconnect an RS-232C serial control cable to the operation manual of the projector. Connecting the Power Cord Plug the supplied power cord into the AC socket on the computer. Info • Do not connect the RS-232C cable to a computer using an RS-232C serial ...
XR10S|XR10X|XR20S|XR20X Operation Manual
Page 31
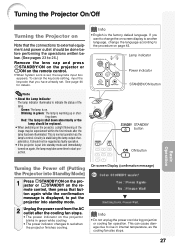
... Info • English is displayed, to put into Standby Mode) 1 Press SSTANDBY/ON on the projector or eSTANDBY on the projector, a slight flickering of the lamp. Lamp indicator Power indicator STANDBY/ON button Note • About the Lamp Indicator The lamp indicator illuminates to indicate the ...projection. It should be experienced within the first minute after the cooling fan stops. • The power indicator on the projector blinks in green while cooling. • The power indicator changes to rise in green: The lamp is warming up or shutting down abnormally or the lamp...
... Info • English is displayed, to put into Standby Mode) 1 Press SSTANDBY/ON on the projector or eSTANDBY on the projector, a slight flickering of the lamp. Lamp indicator Power indicator STANDBY/ON button Note • About the Lamp Indicator The lamp indicator illuminates to indicate the ...projection. It should be experienced within the first minute after the cooling fan stops. • The power indicator on the projector blinks in green while cooling. • The power indicator changes to rise in green: The lamp is warming up or shutting down abnormally or the lamp...

XR10S|XR10X|XR20S|XR20X Operation Manual
Page 40
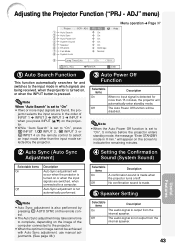
... On On On 9600 bps Normal Help Main menu PRJ - ENTER END Auto Search [On/Off] Page 43 Auto Sync [On/Off] Page 43 Auto Power Off [On/Off] Page 43 System Sound [On/Off] Page 43 Speaker [On/Off] Page 43 RS-232C Page 44 Fan Mode Page 44 System.../PALM/PAL-N/PAL-60 * The selectable items vary depending on the input signal and the selected input mode. 36 ADJ Auto Search Auto Sync Auto Power Off System Sound Speaker RS-232C Fan Mode System Lock PRJ -
... On On On 9600 bps Normal Help Main menu PRJ - ENTER END Auto Search [On/Off] Page 43 Auto Sync [On/Off] Page 43 Auto Power Off [On/Off] Page 43 System Sound [On/Off] Page 43 Speaker [On/Off] Page 43 RS-232C Page 44 Fan Mode Page 44 System.../PALM/PAL-N/PAL-60 * The selectable items vary depending on the input signal and the selected input mode. 36 ADJ Auto Search Auto Sync Auto Power Off System Sound Speaker RS-232C Fan Mode System Lock PRJ -
XR10S|XR10X|XR20S|XR20X Operation Manual
Page 44
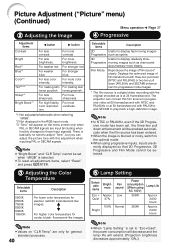
... purposes. 40 5 Lamp Setting Selectable items Brightness Eco + Approx. For less sharpness. For making skin tones purplish. Note • "Bright Boost" and "CLR Temp" cannot be set to "Eco+Quiet", the power consumption will decrease and the lamp life will appear on "CLR Temp" are ... when selecting "sRGB". *2 Not displayed in the RGB input mode. *3 "Tone" will extend. (Projection brightness decreases approximately 13%.) The projector can adjust the picture tone with this film source to progressive video at 60 frames/second with NTSC and PAL60Hz or at 24 frames/second...
... purposes. 40 5 Lamp Setting Selectable items Brightness Eco + Approx. For less sharpness. For making skin tones purplish. Note • "Bright Boost" and "CLR Temp" cannot be set to "Eco+Quiet", the power consumption will decrease and the lamp life will appear on "CLR Temp" are ... when selecting "sRGB". *2 Not displayed in the RGB input mode. *3 "Tone" will extend. (Projection brightness decreases approximately 13%.) The projector can adjust the picture tone with this film source to progressive video at 60 frames/second with NTSC and PAL60Hz or at 24 frames/second...
XR10S|XR10X|XR20S|XR20X Operation Manual
Page 47
...automatically performed. Note • Auto Sync adjustment is not output from the internal speaker. The audio signal is also performed by the projector. 3 Auto Power Off Function Selectable items On Off Description When no input signal is detected for and switches to a computer. Note When "Auto Search...If two or more than 15 minutes, the projector will occur when the projector is turned on the screen to the projector. • When the optimum image cannot be disabled. ADJ" menu) Picture SCR - ADJ Auto Search Auto Sync Auto Power Off System Sound Speaker RS-232C Fan Mode System...
...automatically performed. Note • Auto Sync adjustment is not output from the internal speaker. The audio signal is also performed by the projector. 3 Auto Power Off Function Selectable items On Off Description When no input signal is detected for and switches to a computer. Note When "Auto Search...If two or more than 15 minutes, the projector will occur when the projector is turned on the screen to the projector. • When the optimum image cannot be disabled. ADJ" menu) Picture SCR - ADJ Auto Search Auto Sync Auto Power Off System Sound Speaker RS-232C Fan Mode System...

XR10S|XR10X|XR20S|XR20X Operation Manual
Page 49
...use the keylock function while the projector is in "FREEZE" mode or on the "System Lock" screen during warming up , changing input signals, operating "Auto Sync" function, in standby mode, you have already set , the keycode input screen appears after the power is being turned on. Input ...screen for four times in "Reconfirm". Useful Features 45 When the System Lock is set • When System Lock is set • Press R on the projector for about 5 seconds. Setting the System Lock PRJ ...
...use the keylock function while the projector is in "FREEZE" mode or on the "System Lock" screen during warming up , changing input signals, operating "Auto Sync" function, in standby mode, you have already set , the keycode input screen appears after the power is being turned on. Input ...screen for four times in "Reconfirm". Useful Features 45 When the System Lock is set • When System Lock is set • Press R on the projector for about 5 seconds. Setting the System Lock PRJ ...

XR10S|XR10X|XR20S|XR20X Operation Manual
Page 51
...damage to press S STANDBY/ON on the projector or eSTANDBY on the projector before cleaning the projector. Make sure to scrape or hit the lens. Mild detergent diluted with water Appendix Mild detergent Wax Thinner Info • If you have unplugged the power cord before use volatile agents such as ...these can easily get damaged, be sure to the quality or finish of plastic. I Do not use . Maintenance Cleaning the projector I Ensure that you want to clean the air vents ...
...damage to press S STANDBY/ON on the projector or eSTANDBY on the projector before cleaning the projector. Make sure to scrape or hit the lens. Mild detergent diluted with water Appendix Mild detergent Wax Thinner Info • If you have unplugged the power cord before use volatile agents such as ...these can easily get damaged, be sure to the quality or finish of plastic. I Do not use . Maintenance Cleaning the projector I Ensure that you want to clean the air vents ...


