
PG-MB56X , PG-MB66X Operation Manual
Page 2
Model No.: Serial No.: IMPORTANT • For your assistance in reporting the loss or theft of your Projector, please record the Model and Serial Number located on the bottom of the projector and retain this information. • Before recycling the packaging, please ensure that you have checked the contents of the carton thoroughly against the list of "Supplied accessories" on page 10.
Model No.: Serial No.: IMPORTANT • For your assistance in reporting the loss or theft of your Projector, please record the Model and Serial Number located on the bottom of the projector and retain this information. • Before recycling the packaging, please ensure that you have checked the contents of the carton thoroughly against the list of "Supplied accessories" on page 10.

PG-MB56X , PG-MB66X Operation Manual
Page 6
...Projected Images 42 Selecting the On-screen Display Language 42 Adjusting the Projector Function ("PRJ - Contents Preparing Introduction How to Read this Operation Manual .... 3 Contents 4 IMPORTANT SAFEGUARDS 6 Accessories 10 Part Names and Functions 11 Inserting the Batteries 14 Usable Range... 15 Quick Start Quick Start 16 Setup Setting up the Projector 18 Setting up the Projector 18 Standard Setup (Front Projection) ....... 18 Ceiling-...
...Projected Images 42 Selecting the On-screen Display Language 42 Adjusting the Projector Function ("PRJ - Contents Preparing Introduction How to Read this Operation Manual .... 3 Contents 4 IMPORTANT SAFEGUARDS 6 Accessories 10 Part Names and Functions 11 Inserting the Batteries 14 Usable Range... 15 Quick Start Quick Start 16 Setup Setting up the Projector 18 Setting up the Projector 18 Standard Setup (Front Projection) ....... 18 Ceiling-...

PG-MB56X , PG-MB66X Operation Manual
Page 8
...In order not to lightning and power-line surges. 6 Follow Instructions All operating and use instructions should be retained for later use a mounting accessory recommended by the manufacturer, or sold with a grounding terminal. and the like. 8. This product should be adhered to operate from the product... should use . Electrical energy can perform many useful functions. Water and Moisture Do not use liquid cleaners or aerosol cleaners. Accessories Do not place this product near water-for ventilation to ensure reliable operation of the product and to protect it from the wall...
...In order not to lightning and power-line surges. 6 Follow Instructions All operating and use instructions should be retained for later use a mounting accessory recommended by the manufacturer, or sold with a grounding terminal. and the like. 8. This product should be adhered to operate from the product... should use . Electrical energy can perform many useful functions. Water and Moisture Do not use liquid cleaners or aerosol cleaners. Accessories Do not place this product near water-for ventilation to ensure reliable operation of the product and to protect it from the wall...

PG-MB56X , PG-MB66X Operation Manual
Page 12
Accessories Supplied accessories Remote control Two R-6 batteries RGB cable RRMCGA398WJSA ("AA" size, UM/SUM-3, (10' (3.0 m)) HP-7 or similar) QCNWGA045WJPZ Lens cap (attached) CCAPHA024WJSA DIN...XG-MB50X-L/XR-11XC-L/ XR-10X-L/XR-10S-L) Note • Some of the optional accessories may not be available depending on the region. Please check with XR-11XC-L) QCNWGA043WJPZ • Operation manual (TINS-C690WJZZ) Power cord (6' (1.8 m)) QACCDA007WJPZ Optional accessories I 3 RCA to 15-pin D-sub cable (10' (3.0 m)) (Only supplied with your nearest Sharp Authorized Projector Dealer or...
Accessories Supplied accessories Remote control Two R-6 batteries RGB cable RRMCGA398WJSA ("AA" size, UM/SUM-3, (10' (3.0 m)) HP-7 or similar) QCNWGA045WJPZ Lens cap (attached) CCAPHA024WJSA DIN...XG-MB50X-L/XR-11XC-L/ XR-10X-L/XR-10S-L) Note • Some of the optional accessories may not be available depending on the region. Please check with XR-11XC-L) QCNWGA043WJPZ • Operation manual (TINS-C690WJZZ) Power cord (6' (1.8 m)) QACCDA007WJPZ Optional accessories I 3 RCA to 15-pin D-sub cable (10' (3.0 m)) (Only supplied with your nearest Sharp Authorized Projector Dealer or...

PG-MB56X , PG-MB66X Operation Manual
Page 25
...work. • A Macintosh adaptor may cause some Macintosh computers. Use with the projector. Contact your computer's external output port. To audio output terminal To RGB output terminal Computer Supplied accessory RGB Cable To INPUT1 terminal To AUDIO (INPUT1, 2) terminal * ø3.5 mm... stereo or mono audio cable (commercially available or available as Sharp service part QCNWGA038WJPZ) RGB Cable * When using the &#...
...work. • A Macintosh adaptor may cause some Macintosh computers. Use with the projector. Contact your computer's external output port. To audio output terminal To RGB output terminal Computer Supplied accessory RGB Cable To INPUT1 terminal To AUDIO (INPUT1, 2) terminal * ø3.5 mm... stereo or mono audio cable (commercially available or available as Sharp service part QCNWGA038WJPZ) RGB Cable * When using the &#...

PG-MB56X , PG-MB66X Operation Manual
Page 28
... connected to a computer with PG-MB66X/PG-MB56X/ XG-MB50X-L. This may damage your computer or projector. • Do not connect or disconnect an RS-232C serial control cable to a computer using an RS-232C serial control cable and a DIN- RS-232C ... the Power Cord Plug the supplied power cord into AC outlet. Then plug into the AC socket on the rear of the projector. Supplied accessory Power cord AC socket To AC outlet 26 When connecting to or from the computer while it is on the computer. Info • Do not ...
... connected to a computer with PG-MB66X/PG-MB56X/ XG-MB50X-L. This may damage your computer or projector. • Do not connect or disconnect an RS-232C serial control cable to a computer using an RS-232C serial control cable and a DIN- RS-232C ... the Power Cord Plug the supplied power cord into AC outlet. Then plug into the AC socket on the rear of the projector. Supplied accessory Power cord AC socket To AC outlet 26 When connecting to or from the computer while it is on the computer. Info • Do not ...

PG-MB56X , PG-MB66X Operation Manual
Page 55
...accessory Lamp unit AN-XR20L2 (for PG-MB66X/ PG-MB56X) AN-XR10L2 (for lamp unit cover) Appendix 53 Loosen the user service screw (1) that you carefully follow the steps below. • Do not loosen other screws except for the lamp unit cover and lamp unit. 1 Press SSTANDBY/ON on the projector...has fully cooled down (about 1 hour). 3 Remove the lamp unit cover. • Turn the projector over. Remove the lamp unit cover (2). 1 2 User service screw (for XG-MB50X-L/ XR-11XC-L/XR-10X-L/ XR-10S-L) Info • Make sure that secures the lamp unit cover. Do not touch the glass ...
...accessory Lamp unit AN-XR20L2 (for PG-MB66X/ PG-MB56X) AN-XR10L2 (for lamp unit cover) Appendix 53 Loosen the user service screw (1) that you carefully follow the steps below. • Do not loosen other screws except for the lamp unit cover and lamp unit. 1 Press SSTANDBY/ON on the projector...has fully cooled down (about 1 hour). 3 Remove the lamp unit cover. • Turn the projector over. Remove the lamp unit cover (2). 1 2 User service screw (for XG-MB50X-L/ XR-11XC-L/XR-10X-L/ XR-10S-L) Info • Make sure that secures the lamp unit cover. Do not touch the glass ...
PG-MB56X , PG-MB66X Operation Manual
Page 57
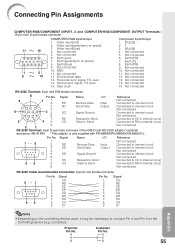
... circuit 9. 2 1 Not connected RS-232C Terminal: 9-pin D-sub male connector of the DIN-D-sub RS-232C adaptor* (optional accessory: AN-A1RS) * This adaptor is only supplied with PG-MB66X/PG-MB56X/XG-MB50X-L. Projector Computer Pin No. Not connected 10. Signal CD RD SD ER SG DR RS CS CI Note •...
... circuit 9. 2 1 Not connected RS-232C Terminal: 9-pin D-sub male connector of the DIN-D-sub RS-232C adaptor* (optional accessory: AN-A1RS) * This adaptor is only supplied with PG-MB66X/PG-MB56X/XG-MB50X-L. Projector Computer Pin No. Not connected 10. Signal CD RD SD ER SG DR RS CS CI Note •...

PG-MB56X , PG-MB66X Operation Manual
Page 68
...Lamp unit 53 Language (on-screen display language) ...... 42 Lens Cap 11 MENU/HELP button 37, 46 NORMAL 32, 33 ON button 27 Optional accessories 10 OSD Display 42 OUTPUT (INPUT1, 2) terminal 25 Phase 46 Picture Adjustment 39 Picture Mode 34, 39 PICTURE MODE button 34 Power cord 26 ...PRJ - ADJ 41 Screen Size and Projection Distance 20 Setup Guide 28, 42 Sharp 40 Speaker 43 STANDBY button 27 STANDBY/ON button 27 STRETCH 32, 33 Supplied accessories 10 System Lock 44 System Sound 43 Temperature warning indicator 50 Tint 40 Video System 36 Volume buttons...
...Lamp unit 53 Language (on-screen display language) ...... 42 Lens Cap 11 MENU/HELP button 37, 46 NORMAL 32, 33 ON button 27 Optional accessories 10 OSD Display 42 OUTPUT (INPUT1, 2) terminal 25 Phase 46 Picture Adjustment 39 Picture Mode 34, 39 PICTURE MODE button 34 Power cord 26 ...PRJ - ADJ 41 Screen Size and Projection Distance 20 Setup Guide 28, 42 Sharp 40 Speaker 43 STANDBY button 27 STANDBY/ON button 27 STRETCH 32, 33 Supplied accessories 10 System Lock 44 System Sound 43 Temperature warning indicator 50 Tint 40 Video System 36 Volume buttons...