
PG-MB56X , PG-MB66X Operation Manual
Page 2
Model No.: Serial No.: IMPORTANT • For your assistance in reporting the loss or theft of your Projector, please record the Model and Serial Number located on the bottom of the projector and retain this information. • Before recycling the packaging, please ensure that you have checked the contents of the carton thoroughly against the list of "Supplied accessories" on page 10.
Model No.: Serial No.: IMPORTANT • For your assistance in reporting the loss or theft of your Projector, please record the Model and Serial Number located on the bottom of the projector and retain this information. • Before recycling the packaging, please ensure that you have checked the contents of the carton thoroughly against the list of "Supplied accessories" on page 10.

PG-MB56X , PG-MB66X Operation Manual
Page 3
...To ensure that you immediately receive the full benefit of the parts, service and labor warranty applicable to your new SHARP Projector, using the projector, please read this operation manual carefully. Introduction Before using the REGISTRATION CARD packed with arrowhead symbol, within an ... within a triangle is intended to alert the user to the presence of important operating and maintenance (servicing) instructions in this projector continues to run for prompt warranty registration of your purchase. 2. ONLY WARNING: High brightness light source. WARRANTY This is to...
...To ensure that you immediately receive the full benefit of the parts, service and labor warranty applicable to your new SHARP Projector, using the projector, please read this operation manual carefully. Introduction Before using the REGISTRATION CARD packed with arrowhead symbol, within an ... within a triangle is intended to alert the user to the presence of important operating and maintenance (servicing) instructions in this projector continues to run for prompt warranty registration of your purchase. 2. ONLY WARNING: High brightness light source. WARRANTY This is to...
PG-MB56X , PG-MB66X Operation Manual
Page 4
ONLY Declaration of conformity SHARP PROJECTOR, MODEL PG-MB66X/PG-MB56X/XG-MB50X-L/XR-11XC-L/XR-10X-L/XR-10S-L This device complies with Part 15 of mercury. These limits are designed to provide reasonable protection against harmful interference in the... • Consult the dealer or an experienced radio/TV technician for a Class B digital device, pursuant to Part 15 of the unit. 2 U.S.A. This SHARP projector uses a DMD panel. As with any interference received, including interference that interference will not affect the picture quality or the life expectancy of the FCC...
ONLY Declaration of conformity SHARP PROJECTOR, MODEL PG-MB66X/PG-MB56X/XG-MB50X-L/XR-11XC-L/XR-10X-L/XR-10S-L This device complies with Part 15 of mercury. These limits are designed to provide reasonable protection against harmful interference in the... • Consult the dealer or an experienced radio/TV technician for a Class B digital device, pursuant to Part 15 of the unit. 2 U.S.A. This SHARP projector uses a DMD panel. As with any interference received, including interference that interference will not affect the picture quality or the life expectancy of the FCC...
PG-MB56X , PG-MB66X Operation Manual
Page 5
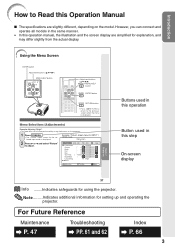
...the same manner. • In this operation manual, the illustration and the screen display are slightly different, depending on the projector. 1 Press BMENU. • The "Picture" menu screen for the selected input mode is displayed. However, you can also be ...performed by using the projector. Note .........Indicates additional information for setting up and operating the projector. Using the Menu Screen ENTER button Adjustment buttons (P/R/O/Q) MENU/HELP button Adjustment buttons (P/R/O/Q) MENU/HELP ...
...the same manner. • In this operation manual, the illustration and the screen display are slightly different, depending on the projector. 1 Press BMENU. • The "Picture" menu screen for the selected input mode is displayed. However, you can also be ...performed by using the projector. Note .........Indicates additional information for setting up and operating the projector. Using the Menu Screen ENTER button Adjustment buttons (P/R/O/Q) MENU/HELP button Adjustment buttons (P/R/O/Q) MENU/HELP ...

PG-MB56X , PG-MB66X Operation Manual
Page 6
...the Background Image ........ 42 Selecting the Setup Guide 42 Reversing/Inverting Projected Images 42 Selecting the On-screen Display Language 42 Adjusting the Projector Function ("PRJ - ADJ" menu 43 Auto Search Function 43 Auto Sync (Auto Sync Adjustment) ..... 43 Auto Power Off Function 43 ...10 Part Names and Functions 11 Inserting the Batteries 14 Usable Range 15 Quick Start Quick Start 16 Setup Setting up the Projector 18 Setting up the Projector 18 Standard Setup (Front Projection) ....... 18 Ceiling-mount Setup 18 Projection (PRJ) Mode 19 Screen Size and Projection ...
...the Background Image ........ 42 Selecting the Setup Guide 42 Reversing/Inverting Projected Images 42 Selecting the On-screen Display Language 42 Adjusting the Projector Function ("PRJ - ADJ" menu 43 Auto Search Function 43 Auto Sync (Auto Sync Adjustment) ..... 43 Auto Power Off Function 43 ...10 Part Names and Functions 11 Inserting the Batteries 14 Usable Range 15 Quick Start Quick Start 16 Setup Setting up the Projector 18 Setting up the Projector 18 Standard Setup (Front Projection) ....... 18 Ceiling-mount Setup 18 Projection (PRJ) Mode 19 Screen Size and Projection ...

PG-MB56X , PG-MB66X Operation Manual
Page 10
... cord from humidity, dust and cigarette smoke. Do not set "Fan Mode" to rest your projector. Light falling directly on page 52. Rest your nearest Sharp Authorized Projector Dealer or Service Center for replacement. I Potential hazard of the optical system. Caution concerning the ...the screen in a sunny or bright room. It will automatically put the projector into standby mode to +60°C). I For minimal servicing and to avoid personal injury caused by a Sharp Authorized Projector Dealer or Service Center. I If the cooling fan becomes obstructed, a ...
... cord from humidity, dust and cigarette smoke. Do not set "Fan Mode" to rest your projector. Light falling directly on page 52. Rest your nearest Sharp Authorized Projector Dealer or Service Center for replacement. I Potential hazard of the optical system. Caution concerning the ...the screen in a sunny or bright room. It will automatically put the projector into standby mode to +60°C). I For minimal servicing and to avoid personal injury caused by a Sharp Authorized Projector Dealer or Service Center. I If the cooling fan becomes obstructed, a ...

PG-MB56X , PG-MB66X Operation Manual
Page 11
...lamp will vary, depending on the region or country you unplug the power cord from the AC outlet and turning off period the projector will enter standby mode. The sound of the fan may affect the cabinet color or cause deformation of the plastic cover. I When...performance is automatically controlled. This can result in internal temperature, as the cooling fan also stops. 9 Caution regarding usage of the projector I If the projector starts to overheat due to setup problems or blockage of the plug may vary depending on the circumstances and the internal temperature. Refer ...
...lamp will vary, depending on the region or country you unplug the power cord from the AC outlet and turning off period the projector will enter standby mode. The sound of the fan may affect the cabinet color or cause deformation of the plastic cover. I When...performance is automatically controlled. This can result in internal temperature, as the cooling fan also stops. 9 Caution regarding usage of the projector I If the projector starts to overheat due to setup problems or blockage of the plug may vary depending on the circumstances and the internal temperature. Refer ...

PG-MB56X , PG-MB66X Operation Manual
Page 12
... (for XG-MB50X-L/XR-11XC-L/ XR-10X-L/XR-10S-L) Note • Some of the optional accessories may not be available depending on the region. Please check with XR-11XC-L) QCNWGA043WJPZ • Operation manual (TINS-C690WJZZ) Power cord (6' (1.8 m)) QACCDA007WJPZ Optional accessories I 3 RCA to 15-pin D-sub cable (10' (3.0 m)) (Only supplied with your nearest Sharp Authorized Projector Dealer or Service...
... (for XG-MB50X-L/XR-11XC-L/ XR-10X-L/XR-10S-L) Note • Some of the optional accessories may not be available depending on the region. Please check with XR-11XC-L) QCNWGA043WJPZ • Operation manual (TINS-C690WJZZ) Power cord (6' (1.8 m)) QACCDA007WJPZ Optional accessories I 3 RCA to 15-pin D-sub cable (10' (3.0 m)) (Only supplied with your nearest Sharp Authorized Projector Dealer or Service...

PG-MB56X , PG-MB66X Operation Manual
Page 13
... Names and Functions Numbers in Z refer to attach or remove. 11 ENTER button 37 For setting items selected or adjusted on and putting the projector into standby mode. Projector Top View Power indicator 27, 50 STANDBY/ON 27 button For turning the power on the menu. HEIGHT 29 ADJUST lever 27, 50...
... Names and Functions Numbers in Z refer to attach or remove. 11 ENTER button 37 For setting items selected or adjusted on and putting the projector into standby mode. Projector Top View Power indicator 27, 50 STANDBY/ON 27 button For turning the power on the menu. HEIGHT 29 ADJUST lever 27, 50...

PG-MB56X , PG-MB66X Operation Manual
Page 14
... that came with the system for use it to use with an S-video terminal. Intake vent 47 26 RS-232C terminal Terminal for controlling the projector using a computer. 24 AUDIO (INPUT 25 3, 4) terminal (Shared for INPUT 3 and 4) 25 INPUT 4 terminal Terminal for connecting video equipment... a Kensington MicroSaver Security System. Rear View Terminals Refer to "INPUT Terminals and Connectable Main Equipment" on how to secure the projector. 12 AUDIO OUTPUT 21 terminal Audio output terminal of equipment connected to the main pages in this operation manual where the topic is...
... that came with the system for use it to use with an S-video terminal. Intake vent 47 26 RS-232C terminal Terminal for controlling the projector using a computer. 24 AUDIO (INPUT 25 3, 4) terminal (Shared for INPUT 3 and 4) 25 INPUT 4 terminal Terminal for connecting video equipment... a Kensington MicroSaver Security System. Rear View Terminals Refer to "INPUT Terminals and Connectable Main Equipment" on how to secure the projector. 12 AUDIO OUTPUT 21 terminal Audio output terminal of equipment connected to the main pages in this operation manual where the topic is...

PG-MB56X , PG-MB66X Operation Manual
Page 15
... For returning to the previous menu screen during menu operations. BREAK TIMER 34 button For displaying the break time. STANDBY button 27 For putting the projector into the standby mode. FORWARD/BACK buttons Same function as the [Page Down] and [Page Up] keys on the menu. 34 FREEZE button For freezing...
... For returning to the previous menu screen during menu operations. BREAK TIMER 34 button For displaying the break time. STANDBY button 27 For putting the projector into the standby mode. FORWARD/BACK buttons Same function as the [Page Down] and [Page Up] keys on the menu. 34 FREEZE button For freezing...

PG-MB56X , PG-MB66X Operation Manual
Page 16
... explode. Incorrect use of the batteries may cause them to skin, therefore ensure you will not be using a cloth. • The batteries included with this projector may run out, as possible with new batteries. • Remove the batteries from the remote control if you wipe them first and then remove them...
... explode. Incorrect use of the batteries may cause them to skin, therefore ensure you will not be using a cloth. • The batteries included with this projector may run out, as possible with new batteries. • Remove the batteries from the remote control if you wipe them first and then remove them...

PG-MB56X , PG-MB66X Operation Manual
Page 17
... the illustration. flected off a screen for easy operation. However, the effective distance of the signal may malfunction under a fluorescent lamp. In this case, move the projector away from the remote control can be re- Note • The signal from the fluorescent lamp. 30° Remote control signal transmitters 30° Remote...
... the illustration. flected off a screen for easy operation. However, the effective distance of the signal may malfunction under a fluorescent lamp. In this case, move the projector away from the remote control can be re- Note • The signal from the fluorescent lamp. 30° Remote control signal transmitters 30° Remote...
PG-MB56X , PG-MB66X Operation Manual
Page 18
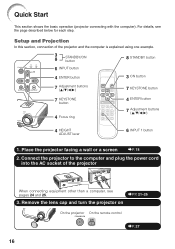
... connecting equipment other than a computer, see the page described below for each step. Connect the projector to the computer and plug the power cord into the AC socket of the projector and the computer is explained using one example. 3 8 STANDBY/ON button 6 INPUT button 4 ENTER button 8 ... button 7 KEYSTONE button 4 Focus ring 4 ENTER button 7 Adjustment buttons (P/R/O/Q) 4 HEIGHT ADJUST lever 6 INPUT 1 button 1. Remove the lens cap and turn the projector on On the projector On the remote control _P. 27 16 For details, see pages 24 and 25. _PP. 21-26 3. Place the...
... connecting equipment other than a computer, see the page described below for each step. Connect the projector to the computer and plug the power cord into the AC socket of the projector and the computer is explained using one example. 3 8 STANDBY/ON button 6 INPUT button 4 ENTER button 8 ... button 7 KEYSTONE button 4 Focus ring 4 ENTER button 7 Adjustment buttons (P/R/O/Q) 4 HEIGHT ADJUST lever 6 INPUT 1 button 1. Remove the lens cap and turn the projector on On the projector On the remote control _P. 27 16 For details, see pages 24 and 25. _PP. 21-26 3. Place the...

PG-MB56X , PG-MB66X Operation Manual
Page 19
... remote control, press the CINPUT 1/CINPUT 2/DINPUT 3/EINPUT 4 button to "On". Turn the Power off Press the STANDBY/ON button on the projector or the STANDBY button on , the Setup Guide appears. (When "Setup Guide" is displayed to finish the Setup Guide. _P. 28 5. ...is set to switch the INPUT mode. _P. 30 7. Shrinks lower side. Turn the computer on PG-MB66X/PG-MB56X.) On the projector Shrinks upper side. Quick Start 4. Correct trapezoidal distortion Correcting trapezoidal distortion using Keystone Correction. (Keystone Correction functions automatically on 6. On the ...
... remote control, press the CINPUT 1/CINPUT 2/DINPUT 3/EINPUT 4 button to "On". Turn the Power off Press the STANDBY/ON button on the projector or the STANDBY button on , the Setup Guide appears. (When "Setup Guide" is displayed to finish the Setup Guide. _P. 28 5. ...is set to switch the INPUT mode. _P. 30 7. Shrinks lower side. Turn the computer on PG-MB66X/PG-MB56X.) On the projector Shrinks upper side. Quick Start 4. Correct trapezoidal distortion Correcting trapezoidal distortion using Keystone Correction. (Keystone Correction functions automatically on 6. On the ...

PG-MB56X , PG-MB66X Operation Manual
Page 20
... separately). • AN-XRCM30 ceiling-mount bracket I Place the projector at the required distance from the screen according to the desired picture size. (See page 20.) Example of this installation. See page 42 for use the optional Sharp ceiling-mount bracket for this function. 18 Ceiling-mount Setup I ...It is recommended that you use of standard setup Side View Screen H Lens center L Note • Refer to the screen with the projector's feet flat and level. Doing so will...
... separately). • AN-XRCM30 ceiling-mount bracket I Place the projector at the required distance from the screen according to the desired picture size. (See page 20.) Example of this installation. See page 42 for use the optional Sharp ceiling-mount bracket for this function. 18 Ceiling-mount Setup I ...It is recommended that you use of standard setup Side View Screen H Lens center L Note • Refer to the screen with the projector's feet flat and level. Doing so will...
PG-MB56X , PG-MB66X Operation Manual
Page 21
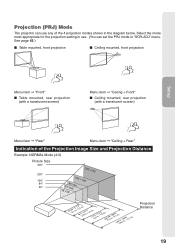
Projection (PRJ) Mode The projector can use . (You can set the PRJ mode in "SCR-ADJ" menu. Select the mode most appropriate for the projection setting in the diagram below. ...
Projection (PRJ) Mode The projector can use . (You can set the PRJ mode in "SCR-ADJ" menu. Select the mode most appropriate for the projection setting in the diagram below. ...

PG-MB56X , PG-MB66X Operation Manual
Page 22
Setting up the Projector (Continued) Screen Size and Projection Distance NORMAL Mode (4:3) Picture (Screen) size Diag. [χ] Width Height Projection distance [L] Minimum [L1] Maximum [L2] 300Љ (762 cm) ...
Setting up the Projector (Continued) Screen Size and Projection Distance NORMAL Mode (4:3) Picture (Screen) size Diag. [χ] Width Height Projection distance [L] Minimum [L1] Maximum [L2] 300Љ (762 cm) ...

PG-MB56X , PG-MB66X Operation Manual
Page 23
... INPUT 3 terminal Connecting video equipment with S-video output terminal (VCR, DVD player, etc.). (See page 24.) RS-232C terminal Connecting the computer to control the projector. (See page 26.) AUDIO OUTPUT terminal Connecting to this terminal.
... INPUT 3 terminal Connecting video equipment with S-video output terminal (VCR, DVD player, etc.). (See page 24.) RS-232C terminal Connecting the computer to control the projector. (See page 26.) AUDIO OUTPUT terminal Connecting to this terminal.

PG-MB56X , PG-MB66X Operation Manual
Page 24
... Terminal on the projector Computer RGB video RGB cable (supplied) INPUT1, 2 Audio-visual equipment ø3.5 mm stereo audio cable AUDIO INPUT Computer audio (commercially available or available as Sharp service part QCNWGA038WJPZ) Component video 3 RCA to 15-pin D-sub cable* (optional, AN-C3CP2) * This cable is only supplied with XR-11XC-L. INPUT1, 2 S-video cable... Component video S-video Cables for a camera or a video game/3 RCA INPUT1, 2 to 15-pin D-sub cable* (optional, AN-C3CP2) * This cable is only supplied with XR-11XC-L.
... Terminal on the projector Computer RGB video RGB cable (supplied) INPUT1, 2 Audio-visual equipment ø3.5 mm stereo audio cable AUDIO INPUT Computer audio (commercially available or available as Sharp service part QCNWGA038WJPZ) Component video 3 RCA to 15-pin D-sub cable* (optional, AN-C3CP2) * This cable is only supplied with XR-11XC-L. INPUT1, 2 S-video cable... Component video S-video Cables for a camera or a video game/3 RCA INPUT1, 2 to 15-pin D-sub cable* (optional, AN-C3CP2) * This cable is only supplied with XR-11XC-L.


