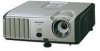

XR-32S | XR-32X Operation Manual
Page 8
... 19 Screen Size and Projection Distance .. 20 Connections Connecting the Projector to Other Equipment 21 Controlling the Projector by a Computer 24 Connecting the Power Cord 24 Using Basic Operation Turning the Projector On/Off 25 Turning the Projector on 25 Turning the Power off (Putting the Projector into Standby Mode 25 Image Projection 26 About the Setup...
... 19 Screen Size and Projection Distance .. 20 Connections Connecting the Projector to Other Equipment 21 Controlling the Projector by a Computer 24 Connecting the Power Cord 24 Using Basic Operation Turning the Projector On/Off 25 Turning the Projector on 25 Turning the Power off (Putting the Projector into Standby Mode 25 Image Projection 26 About the Setup...

XR-32S | XR-32X Operation Manual
Page 12
...that the intake vent and the exhaust vent are not blocked, plug the power cord back in and turn on the projector. Do not subject the projector to avoid personal injury caused by a Sharp Authorized Projector Dealer or Service Center. Observe the following safeguards when setting up the screen ...900 feet) or more often. Avoid locations with thin air, set up the projector in a high position, make certain it is subjected to +60°C). This does not indicate a malfunction. (See pages 50 and 51.) Remove the projector power cord from humidity, dust and cigarette smoke.
...that the intake vent and the exhaust vent are not blocked, plug the power cord back in and turn on the projector. Do not subject the projector to avoid personal injury caused by a Sharp Authorized Projector Dealer or Service Center. Observe the following safeguards when setting up the screen ...900 feet) or more often. Avoid locations with thin air, set up the projector in a high position, make certain it is subjected to +60°C). This does not indicate a malfunction. (See pages 50 and 51.) Remove the projector power cord from humidity, dust and cigarette smoke.

XR-32S | XR-32X Operation Manual
Page 13
...manuals. Other connected equipment ■ When connecting a computer or other countries ■ The power supply voltage and the shape of the plastic cover. The sound of the projector and the equipment to be connected for the country you need to "Maintenance In- visual ...operation manuals in several languages are using the projector overseas, make the connections AFTER unplugging the power cord of the projector from the Internet (http://www.adobe.com). Refer to install Adobe® Reader® on the projector will enter standby mode. Please download Adobe&#...
...manuals. Other connected equipment ■ When connecting a computer or other countries ■ The power supply voltage and the shape of the plastic cover. The sound of the projector and the equipment to be connected for the country you need to "Maintenance In- visual ...operation manuals in several languages are using the projector overseas, make the connections AFTER unplugging the power cord of the projector from the Internet (http://www.adobe.com). Refer to install Adobe® Reader® on the projector will enter standby mode. Please download Adobe&#...
XR-32S | XR-32X Operation Manual
Page 14
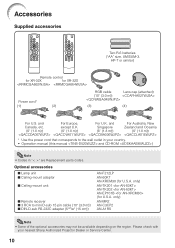
... Two R-6 batteries ("AA" size, UM/SUM-3, HP-7 or similar) Remote control for XR-32X for U.S.A. and For Europe, For U.K. only) AN-TK201 AN-TK202 AN-EP101B (for XR-32S Power cord* (1) (2) RGB cable Lens cap (attached) (10' (3.0 m)) (3) (4) For... 3 RCA to the wall outlet in your nearest Sharp Authorized Projector Dealer or Service Center. 10 and For Australia, New Canada, etc. except U.K. Singapore Zealand and Oceania (6' (1.8 m)) (6' (1.8 m)) (6' (1.8 m)) (6' (1.8 m)) * Use the power cord that corresponds to mini D-sub 15 pin cable...
... Two R-6 batteries ("AA" size, UM/SUM-3, HP-7 or similar) Remote control for XR-32X for U.S.A. and For Europe, For U.K. only) AN-TK201 AN-TK202 AN-EP101B (for XR-32S Power cord* (1) (2) RGB cable Lens cap (attached) (10' (3.0 m)) (3) (4) For... 3 RCA to the wall outlet in your nearest Sharp Authorized Projector Dealer or Service Center. 10 and For Australia, New Canada, etc. except U.K. Singapore Zealand and Oceania (6' (1.8 m)) (6' (1.8 m)) (6' (1.8 m)) (6' (1.8 m)) * Use the power cord that corresponds to mini D-sub 15 pin cable...

XR-32S | XR-32X Operation Manual
Page 15
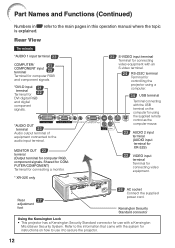
ENTER button For setting 38 items selected or adjusted on and putting the projector into standby mode. KEYSTONE 28 button For entering the Keystone Correction mode. Push both sides of the cooling fan and extending the lamp life. 29 ... the main pages in Z refer to attach or remove. 11 Introduction Part Names and Functions Numbers in this operation manual where the topic is explained. Projector Top View Power indicator 25, 50 STANDBY/ON 25 button For turning the...
ENTER button For setting 38 items selected or adjusted on and putting the projector into standby mode. KEYSTONE 28 button For entering the Keystone Correction mode. Push both sides of the cooling fan and extending the lamp life. 29 ... the main pages in Z refer to attach or remove. 11 Introduction Part Names and Functions Numbers in this operation manual where the topic is explained. Projector Top View Power indicator 25, 50 STANDBY/ON 25 button For turning the...
XR-32S | XR-32X Operation Manual
Page 16
... 24 AC socket Connect the supplied power cord. Refer to secure the projector. 12 MONITOR OUT 23 terminal (Output terminal for connecting video equipment. Kensington Security Standard connector Using the Kensington Lock • This projector has a Kensington Security Standard connector ...Shared for COMPUTER/COMPONENT) Terminal for connecting a monitor. * XR-32X only 22 S-VIDEO input terminal Terminal for connecting video equipment with an S-video terminal. 24 RS-232C terminal Terminal for controlling the projector using a computer. 34 USB terminal Terminal connecting with the...
... 24 AC socket Connect the supplied power cord. Refer to secure the projector. 12 MONITOR OUT 23 terminal (Output terminal for connecting video equipment. Kensington Security Standard connector Using the Kensington Lock • This projector has a Kensington Security Standard connector ...Shared for COMPUTER/COMPONENT) Terminal for connecting a monitor. * XR-32X only 22 S-VIDEO input terminal Terminal for connecting video equipment with an S-video terminal. 24 RS-232C terminal Terminal for controlling the projector using a computer. 34 USB terminal Terminal connecting with the...
XR-32S | XR-32X Operation Manual
Page 17
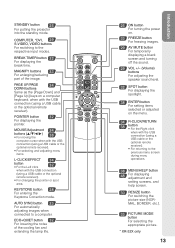
...the picture size (NORMAL, BORDER, etc.). 33 PICTURE MODE button For selecting the appropriate picture. * XR-32X only 13 Introduction KEYSTONE button 28 For entering the Keystone Correction mode. MAGNIFY buttons 33 For enlarging/...reducing part of the cooling fan and extending the lamp life. 25 ON button For turning the power on. 33 FREEZE button For freezing images. 29 AV MUTE button For temporarily displaying a black screen ...modes. STANDBY button 25 For putting the projector into the standby mode. COMPUTER, *DVI, 29 S-VIDEO, VIDEO buttons For switching to a computer.
...the picture size (NORMAL, BORDER, etc.). 33 PICTURE MODE button For selecting the appropriate picture. * XR-32X only 13 Introduction KEYSTONE button 28 For entering the Keystone Correction mode. MAGNIFY buttons 33 For enlarging/...reducing part of the cooling fan and extending the lamp life. 25 ON button For turning the power on. 33 FREEZE button For freezing images. 29 AV MUTE button For temporarily displaying a black screen ...modes. STANDBY button 25 For putting the projector into the standby mode. COMPUTER, *DVI, 29 S-VIDEO, VIDEO buttons For switching to a computer.

XR-32S | XR-32X Operation Manual
Page 20
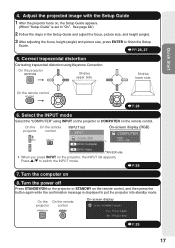
Remove the lens cap and turn the projector on On the projector On the remote control _P. 25 16 Connect the projector to the computer and plug the power cord into the AC socket of the projector and the computer is explained using one example. 3 8 STANDBY/ON button 6 INPUT ... ring 4 HEIGHT ADJUST lever 4 ENTER button 5 Adjustment buttons (P/R/O/Q) 5 KEYSTONE button 1. Setup and Projection In this section, connection of the projector When connecting equipment other than a computer, see the page described below for each step. Quick Start This section shows the basic operation...
Remove the lens cap and turn the projector on On the projector On the remote control _P. 25 16 Connect the projector to the computer and plug the power cord into the AC socket of the projector and the computer is explained using one example. 3 8 STANDBY/ON button 6 INPUT ... ring 4 HEIGHT ADJUST lever 4 ENTER button 5 Adjustment buttons (P/R/O/Q) 5 KEYSTONE button 1. Setup and Projection In this section, connection of the projector When connecting equipment other than a computer, see the page described below for each step. Quick Start This section shows the basic operation...
XR-32S | XR-32X Operation Manual
Page 21
...is displayed to finish the Setup Guide. _PP. 26, 27 5. On the On the remote projector control INPUT list INPUT COMPUTER D DVI-D Computer On-screen display (RGB) COMPUTER RGB * 1024 × 768 D DVI-D Video *XR-32X only • When you press INPUT on 8. See page 44.) 2 Follow the steps in... the confirmation message is set to switch the INPUT mode. _P. 29 7. Turn the power off Press STANDBY/ON on the projector or STANDBY on the remote control. On the On the remote projector control On-screen display _P. 25 17 Shrinks lower side. Quick Start 4. On the ...
...is displayed to finish the Setup Guide. _PP. 26, 27 5. On the On the remote projector control INPUT list INPUT COMPUTER D DVI-D Computer On-screen display (RGB) COMPUTER RGB * 1024 × 768 D DVI-D Video *XR-32X only • When you press INPUT on 8. See page 44.) 2 Follow the steps in... the confirmation message is set to switch the INPUT mode. _P. 29 7. Turn the power off Press STANDBY/ON on the projector or STANDBY on the remote control. On the On the remote projector control On-screen display _P. 25 17 Shrinks lower side. Quick Start 4. On the ...

XR-32S | XR-32X Operation Manual
Page 25
...signals compatible with some of the functions to not work. • A Macintosh adaptor may not be required for XR-32X. After making all the connections are using a SHARP notebook computer). Refer to the specific instructions in your computer's operation manual to enable your near- When connecting a ... IMPORTANT: Ensure that the appropriate input mode has been selected on the projector before you are made. Connecting the Projector to Other Equipment Before connecting, ensure that the power cord of the projector is unplugged from the AC outlet and turn off the equipment to be...
...signals compatible with some of the functions to not work. • A Macintosh adaptor may not be required for XR-32X. After making all the connections are using a SHARP notebook computer). Refer to the specific instructions in your computer's operation manual to enable your near- When connecting a ... IMPORTANT: Ensure that the appropriate input mode has been selected on the projector before you are made. Connecting the Projector to Other Equipment Before connecting, ensure that the power cord of the projector is unplugged from the AC outlet and turn off the equipment to be...

XR-32S | XR-32X Operation Manual
Page 28
... an RS-232C serial control cable (cross type, commercially available), the computer can be used to or from the computer while it is on the projector is not correctly set up. This may damage your computer. Then plug into the AC socket on the computer. Connecting the... AC outlet Power cord (supplied) Info • Do not connect the RS-232C cable to the operation manual of the computer for details. • See page 56 for details. Refer to a port other than the RS-232C terminal on the rear of an RS-232C serial control cable. Controlling the Projector by...
... an RS-232C serial control cable (cross type, commercially available), the computer can be used to or from the computer while it is on the projector is not correctly set up. This may damage your computer. Then plug into the AC socket on the computer. Connecting the... AC outlet Power cord (supplied) Info • Do not connect the RS-232C cable to the operation manual of the computer for details. • See page 56 for details. Refer to a port other than the RS-232C terminal on the rear of an RS-232C serial control cable. Controlling the Projector by...

XR-32S | XR-32X Operation Manual
Page 29
...Red: The lamp is shut down abnormally or the lamp should be replaced. • When switching on the projector, a slight flickering of the lamp. See page 46 for details. Power indicator STANDBY/ON button STANDBY button ON button Basic Operation On-screen display (confirmation message) Turning the... Power off when the projector is on, then the projector automatically turns on when the power cord is plugged into standby mode and immediately turned on again, the lamp may be experienced...
...Red: The lamp is shut down abnormally or the lamp should be replaced. • When switching on the projector, a slight flickering of the lamp. See page 46 for details. Power indicator STANDBY/ON button STANDBY button ON button Basic Operation On-screen display (confirmation message) Turning the... Power off when the projector is on, then the projector automatically turns on when the power cord is plugged into standby mode and immediately turned on again, the lamp may be experienced...

XR-32S | XR-32X Operation Manual
Page 40
...;s polski Magyar Türkçe "Projector adjustment (PRJ-ADJ)" menu Picture SCR - ADJ Page 45 SEL./ADJ. ENTER END *5 This item is available for XR-32S. ENTER END *3 Adjustment range for XR-32X. *4 Adjustment range for XR-32X only. 36 Auto Sync [On/Off] Page 45 Auto Power Off [On/Off] Page 45 Auto...] Page 46 Lamp Timer(Life) Page 47 Sub menu Standard Eco Audio 1 Audio 2 9600bps 115200bps Normal High ADJ Help Auto Sync Auto Power Off Auto Restart STANDBY Mode System Sound Speaker Audio Input RS-232C Fan Mode System Lock Lamp Timer(Life) 0h On On On Standard On...
...;s polski Magyar Türkçe "Projector adjustment (PRJ-ADJ)" menu Picture SCR - ADJ Page 45 SEL./ADJ. ENTER END *5 This item is available for XR-32S. ENTER END *3 Adjustment range for XR-32X. *4 Adjustment range for XR-32X only. 36 Auto Sync [On/Off] Page 45 Auto Power Off [On/Off] Page 45 Auto...] Page 46 Lamp Timer(Life) Page 47 Sub menu Standard Eco Audio 1 Audio 2 9600bps 115200bps Normal High ADJ Help Auto Sync Auto Power Off Auto Restart STANDBY Mode System Sound Speaker Audio Input RS-232C Fan Mode System Lock Lamp Timer(Life) 0h On On On Standard On...

XR-32S | XR-32X Operation Manual
Page 46
... to the optimal mode. 7 Lamp Setting Selectable items Eco + Quiet Bright Brightness and Power consumption Approx. 80% 100% Info • This function is available for 480I and 576I signals using COMPUTER/COMPONENT or DVI (XR-32X only) input. • This function is blurry. • When the contours and ... • When TV broadcasts with NTSC and PAL60Hz or at 24 frames/second. Film Mode Reproduces the image of moving im- The projector can convert this film source to progressive video at 60 frames/second with weak signals are lower than those in the Bright mode. (...
... to the optimal mode. 7 Lamp Setting Selectable items Eco + Quiet Bright Brightness and Power consumption Approx. 80% 100% Info • This function is available for 480I and 576I signals using COMPUTER/COMPONENT or DVI (XR-32X only) input. • This function is blurry. • When the contours and ... • When TV broadcasts with NTSC and PAL60Hz or at 24 frames/second. Film Mode Reproduces the image of moving im- The projector can convert this film source to progressive video at 60 frames/second with weak signals are lower than those in the Bright mode. (...

XR-32S | XR-32X Operation Manual
Page 49
... Selectable items On Off Description A confirmation sound is detected for more than 15 minutes, the projector will automatically enter standby mode. ADJ PRJ - The Auto Power Off function will occur when the projector is output from the internal speaker. 45 Useful Features Menu operation n Page 38 3 Auto Restart... and RS-232C functions are switched off . Auto Sync adjustment is not output from the internal speaker. The projector does not turn on automatically when the power cord is plugged into the AC outlet or the breaker switch is turned on or when the input signals are...
... Selectable items On Off Description A confirmation sound is detected for more than 15 minutes, the projector will automatically enter standby mode. ADJ PRJ - The Auto Power Off function will occur when the projector is output from the internal speaker. 45 Useful Features Menu operation n Page 38 3 Auto Restart... and RS-232C functions are switched off . Auto Sync adjustment is not output from the internal speaker. The projector does not turn on automatically when the power cord is plugged into the AC outlet or the breaker switch is turned on or when the input signals are...

XR-32S | XR-32X Operation Manual
Page 51
... have already set to "Eco +Quiet" Operated exclusively with the remote control buttons. • You cannot use the keylock function while the projector is recommended that you can confirm the cumulative lamp usage time and the remaining lamp life (percentage). On-screen display • The keylock ... on the "System Lock" screen during warming up. Note To cancel the keycode that the lamp be set , the keycode input screen appears after the power is : displaying the "Setup Guide" or "Menu" screens, in standby mode, warming up, changing input signals, operating "Auto Sync" function, in...
... have already set to "Eco +Quiet" Operated exclusively with the remote control buttons. • You cannot use the keylock function while the projector is recommended that you can confirm the cumulative lamp usage time and the remaining lamp life (percentage). On-screen display • The keylock ... on the "System Lock" screen during warming up. Note To cancel the keycode that the lamp be set , the keycode input screen appears after the power is : displaying the "Setup Guide" or "Menu" screens, in standby mode, warming up, changing input signals, operating "Auto Sync" function, in...

XR-32S | XR-32X Operation Manual
Page 53
.... ■ Do not use volatile agents such as insecticides on the projector. Appendix Mild detergent 49 Do not attach rubber or plastic items to clean the air vents during projector operation, ensure you have unplugged the power cord before use any liquid type cleaning agents, as they may discolor,... warp or damage the coating on the projector. Do not use . Avoid using benzene or thinner, as ...
.... ■ Do not use volatile agents such as insecticides on the projector. Appendix Mild detergent 49 Do not attach rubber or plastic items to clean the air vents during projector operation, ensure you have unplugged the power cord before use any liquid type cleaning agents, as they may discolor,... warp or damage the coating on the projector. Do not use . Avoid using benzene or thinner, as ...
XR-32S | XR-32X Operation Manual
Page 54
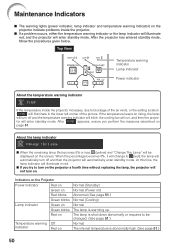
... indicator will blink, the cooling fan will run, and then the projec- After the projector has entered standby mode, follow the procedures given below. Indicators on the Projector Power indicator Red on Green on Red blinks Green blinks Lamp indicator Green on Green blinks Red... on Temperature warning Off indicator Red on Normal (Standby) Normal (Power on . At this time, the lamp indicator will illuminate...
... indicator will blink, the cooling fan will run, and then the projec- After the projector has entered standby mode, follow the procedures given below. Indicators on the Projector Power indicator Red on Green on Red blinks Green blinks Lamp indicator Green on Green blinks Red... on Temperature warning Off indicator Red on Normal (Standby) Normal (Power on . At this time, the lamp indicator will illuminate...

XR-32S | XR-32X Operation Manual
Page 55
... controlled automatically. Time to change and this case, unplug the power cord from the AC outlet, and then connect it again. • Carefully replace the lamp. (See page 52.) • Take the projector to your nearest Sharp Authorized Projector Dealer or Service Center (see page 65) for repair. &#... unit cover are securely installed, contact your nearest Sharp Authorized Projector Dealer or Service Center (see page 65) for repair. • Disconnect the power cord from the AC outlet, replace the power cord in the AC outlet and then turn the power on again. • The cooling fan keeps...
... controlled automatically. Time to change and this case, unplug the power cord from the AC outlet, and then connect it again. • Carefully replace the lamp. (See page 52.) • Take the projector to your nearest Sharp Authorized Projector Dealer or Service Center (see page 65) for repair. &#... unit cover are securely installed, contact your nearest Sharp Authorized Projector Dealer or Service Center (see page 65) for repair. • Disconnect the power cord from the AC outlet, replace the power cord in the AC outlet and then turn the power on again. • The cooling fan keeps...

XR-32S | XR-32X Operation Manual
Page 56
...one hour after the power cord is disconnected to allow the surface of the lamp due to the gas, consult a doctor as soon as possible. The lamp will be vented into the room from the projector right after replacement, take your projector to the nearest Sharp Authorized Projector Dealer or Service ... quality. Lamp failure can be replaced when the remaining lamp life becomes 5% or less, or when you contact your nearest Sharp Authorized Projector Dealer or Service Center to assure safe operation. ■ Should the lamp break, the glass particles may spread inside of purchase, nearest...
...one hour after the power cord is disconnected to allow the surface of the lamp due to the gas, consult a doctor as soon as possible. The lamp will be vented into the room from the projector right after replacement, take your projector to the nearest Sharp Authorized Projector Dealer or Service ... quality. Lamp failure can be replaced when the remaining lamp life becomes 5% or less, or when you contact your nearest Sharp Authorized Projector Dealer or Service Center to assure safe operation. ■ Should the lamp break, the glass particles may spread inside of purchase, nearest...


