XR-32S | XR-32X Operation Manual
Page 6
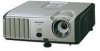
... screen. This SHARP projector uses a DLP® chip. ONLY 2 Responsible Party: SHARP ELECTRONICS CORPORATION Sharp Plaza, Mahwah, New Jersey 07430-2135 TEL: 1-800-BE-SHARP (1-800-237-4277... can be regulated due to radio communications. Disposal of conformity SHARP PROJECTOR, MODEL XR-32X/XR-32S This device complies with the operation manual, may not ...cause harmful interference, and (2) this equipment does cause harmful interference to radio or television reception, which may be determined by turning...
... screen. This SHARP projector uses a DLP® chip. ONLY 2 Responsible Party: SHARP ELECTRONICS CORPORATION Sharp Plaza, Mahwah, New Jersey 07430-2135 TEL: 1-800-BE-SHARP (1-800-237-4277... can be regulated due to radio communications. Disposal of conformity SHARP PROJECTOR, MODEL XR-32X/XR-32S This device complies with the operation manual, may not ...cause harmful interference, and (2) this equipment does cause harmful interference to radio or television reception, which may be determined by turning...

XR-32S | XR-32X Operation Manual
Page 8
... 19 Screen Size and Projection Distance .. 20 Connections Connecting the Projector to Other Equipment 21 Controlling the Projector by a Computer 24 Connecting the Power Cord 24 Using Basic Operation Turning the Projector On/Off 25 Turning the Projector on 25 Turning the Power off (Putting the Projector into Standby Mode 25 Image Projection 26 About the Setup Guide...
... 19 Screen Size and Projection Distance .. 20 Connections Connecting the Projector to Other Equipment 21 Controlling the Projector by a Computer 24 Connecting the Power Cord 24 Using Basic Operation Turning the Projector On/Off 25 Turning the Projector on 25 Turning the Power off (Putting the Projector into Standby Mode 25 Image Projection 26 About the Setup Guide...

XR-32S | XR-32X Operation Manual
Page 12
... not to avoid personal injury caused by a Sharp Authorized Projector Dealer or Service Center. It will automatically put the projector into standby mode to the normal operating condition. 8 When using the projector in and turn on . Warning about placing the projector in a high position ■ When placing the projector in direct sunlight or room light. Do not...
... not to avoid personal injury caused by a Sharp Authorized Projector Dealer or Service Center. It will automatically put the projector into standby mode to the normal operating condition. 8 When using the projector in and turn on . Warning about placing the projector in a high position ■ When placing the projector in direct sunlight or room light. Do not...

XR-32S | XR-32X Operation Manual
Page 13
...unplugged while the cooling fan is automatically controlled. Temperature monitor function ■ If the projector starts to overheat due to setup problems or blockage of the air vents, " " and " " will turn off, the temperature warn- dicators" on page 50 for the country you are in...to heat sources. visual equipment to the projector, make the connections AFTER unplugging the power cord of the projector from the AC outlet and turning off period the projector will enter standby mode. Accessing the PDF Manuals for instructions on the projector will blink, and after a 60-...
...unplugged while the cooling fan is automatically controlled. Temperature monitor function ■ If the projector starts to overheat due to setup problems or blockage of the air vents, " " and " " will turn off, the temperature warn- dicators" on page 50 for the country you are in...to heat sources. visual equipment to the projector, make the connections AFTER unplugging the power cord of the projector from the AC outlet and turning off period the projector will enter standby mode. Accessing the PDF Manuals for instructions on the projector will blink, and after a 60-...

XR-32S | XR-32X Operation Manual
Page 15
... the focus. Front View Zoom ring 26 For enlarging/ reducing the picture. ENTER button For setting 38 items selected or adjusted on and putting the projector into standby mode. Remote control 15 sensor Exhaust vent 49 25, 50 Lamp indicator 50 Temperature warning indicator 32 ECO+QUIET button For lowering the... noise of the lens cap to the main pages in Z refer to attach or remove. 11 KEYSTONE 28 button For entering the Keystone Correction mode. Projector Top View Power indicator 25, 50 STANDBY/ON 25 button For...
... the focus. Front View Zoom ring 26 For enlarging/ reducing the picture. ENTER button For setting 38 items selected or adjusted on and putting the projector into standby mode. Remote control 15 sensor Exhaust vent 49 25, 50 Lamp indicator 50 Temperature warning indicator 32 ECO+QUIET button For lowering the... noise of the lens cap to the main pages in Z refer to attach or remove. 11 KEYSTONE 28 button For entering the Keystone Correction mode. Projector Top View Power indicator 25, 50 STANDBY/ON 25 button For...
XR-32S | XR-32X Operation Manual
Page 17
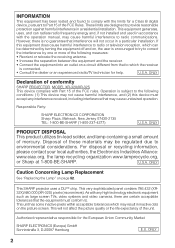
STANDBY button 25 For putting the projector into the standby mode. AUTO SYNC button 33 For automatically adjusting images when connected ... part of the cooling fan and extending the lamp life. 25 ON button For turning the power on. 33 FREEZE button For freezing images. 29 AV MUTE button For temporarily displaying a black screen and...30 RESIZE button For switching the picture size (NORMAL, BORDER, etc.). 33 PICTURE MODE button For selecting the appropriate picture. * XR-32X only 13 Introduction PAGE UP/PAGE 34 DOWN buttons Same as the [Page Down] and [Page Up] keys on the menu....
STANDBY button 25 For putting the projector into the standby mode. AUTO SYNC button 33 For automatically adjusting images when connected ... part of the cooling fan and extending the lamp life. 25 ON button For turning the power on. 33 FREEZE button For freezing images. 29 AV MUTE button For temporarily displaying a black screen and...30 RESIZE button For switching the picture size (NORMAL, BORDER, etc.). 33 PICTURE MODE button For selecting the appropriate picture. * XR-32X only 13 Introduction PAGE UP/PAGE 34 DOWN buttons Same as the [Page Down] and [Page Up] keys on the menu....

XR-32S | XR-32X Operation Manual
Page 20
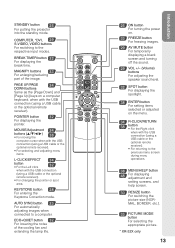
... the computer and plug the power cord into the AC socket of the projector and the computer is explained using one example. 3 8 STANDBY/ON button 6 INPUT buttons 8 STANDBY button 3 ON button 4 ENTER button 6 COMPUTER button 5 Adjustment buttons (P/R/O/Q) 5 ...3. Setup and Projection In this section, connection of the projector When connecting equipment other than a computer, see the page described below for each step. Remove the lens cap and turn the projector on On the projector On the remote control _P. 25 16 Place the projector facing a wall or a screen _P. 18 2. Quick...
... the computer and plug the power cord into the AC socket of the projector and the computer is explained using one example. 3 8 STANDBY/ON button 6 INPUT buttons 8 STANDBY button 3 ON button 4 ENTER button 6 COMPUTER button 5 Adjustment buttons (P/R/O/Q) 5 ...3. Setup and Projection In this section, connection of the projector When connecting equipment other than a computer, see the page described below for each step. Remove the lens cap and turn the projector on On the projector On the remote control _P. 25 16 Place the projector facing a wall or a screen _P. 18 2. Quick...
XR-32S | XR-32X Operation Manual
Page 21
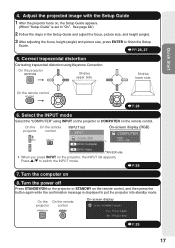
...image with the Setup Guide 1 After the projector turns on the remote control. Select the INPUT mode Select the "COMPUTER" using Keystone Correction. Turn the computer on the projector, the INPUT list appears. On the On the remote projector control On-screen display _P. 25 17 ... On-screen display (RGB) COMPUTER RGB * 1024 × 768 D DVI-D Video *XR-32X only • When you press INPUT on 8. Correct trapezoidal distortion Correcting trapezoidal distortion using INPUT on the projector or COMPUTER on , the Setup Guide appears. (When "Setup Guide" is displayed to ...
...image with the Setup Guide 1 After the projector turns on the remote control. Select the INPUT mode Select the "COMPUTER" using Keystone Correction. Turn the computer on the projector, the INPUT list appears. On the On the remote projector control On-screen display _P. 25 17 ... On-screen display (RGB) COMPUTER RGB * 1024 × 768 D DVI-D Video *XR-32X only • When you press INPUT on 8. Correct trapezoidal distortion Correcting trapezoidal distortion using INPUT on the projector or COMPUTER on , the Setup Guide appears. (When "Setup Guide" is displayed to ...

XR-32S | XR-32X Operation Manual
Page 25
...; A Macintosh adaptor may be turned on after all connections, turn on the projector and then the other cables or connectors not listed below. After making all the connections are using a SHARP notebook computer). Contact your computer's external output port. 21 Note • See page 62 "Computer Compatibility Chart" for XR-32X. est Macintosh Dealer. • Depending...
...; A Macintosh adaptor may be turned on after all connections, turn on the projector and then the other cables or connectors not listed below. After making all the connections are using a SHARP notebook computer). Contact your computer's external output port. 21 Note • See page 62 "Computer Compatibility Chart" for XR-32X. est Macintosh Dealer. • Depending...

XR-32S | XR-32X Operation Manual
Page 29
... ON button Basic Operation On-screen display (confirmation message) Turning the Power off when the projector is on, then the projector automatically turns on when the power cord is put the projector into standby mode. • The projector cannot be turned on while cooling. Info • Direct Power Off function...: You can unplug the power cord from the outlet or the breaker switch is turned off (Putting the Projector into Standby Mode) Press STANDBY/ON on the projector or STANDBY on the remote control, then press that button again while the confirmation message is displayed...
... ON button Basic Operation On-screen display (confirmation message) Turning the Power off when the projector is on, then the projector automatically turns on when the power cord is put the projector into standby mode. • The projector cannot be turned on while cooling. Info • Direct Power Off function...: You can unplug the power cord from the outlet or the breaker switch is turned off (Putting the Projector into Standby Mode) Press STANDBY/ON on the projector or STANDBY on the remote control, then press that button again while the confirmation message is displayed...

XR-32S | XR-32X Operation Manual
Page 30
...44.) STANDBY/ON button ENTER button Adjusting the Projected Image 1 Adjusting the Focus You can adjust the picture size using the zoom ring on the projector. Rotate the zoom ring to exit the Setup Guide screen. Guidance items 1 FOCUS 2 HEIGHT ADJUST 3 ZOOM Press ENTER to enlarge or shrink the... picture size. Zoom ring Focus ring 26 Image Projection Setup Guide screen About the Setup Guide After turning on the projector, the Setup Guide screen appears to display the Setup Guide for the next time, set "Menu" - lights the items in the following order...
...44.) STANDBY/ON button ENTER button Adjusting the Projected Image 1 Adjusting the Focus You can adjust the picture size using the zoom ring on the projector. Rotate the zoom ring to exit the Setup Guide screen. Guidance items 1 FOCUS 2 HEIGHT ADJUST 3 ZOOM Press ENTER to enlarge or shrink the... picture size. Zoom ring Focus ring 26 Image Projection Setup Guide screen About the Setup Guide After turning on the projector, the Setup Guide screen appears to display the Setup Guide for the next time, set "Menu" - lights the items in the following order...

XR-32S | XR-32X Operation Manual
Page 33
...), S-VIDEO or VIDEO on the remote control to temporarily display a black screen and turn the pro- Set the projector's volume to switch the INPUT mode. Press P/R to the lowest level when turning the projector on the remote control (XR-32X only), the INPUT list appears. Switching the Input Mode Select the appropriate input mode for the...
...), S-VIDEO or VIDEO on the remote control to temporarily display a black screen and turn the pro- Set the projector's volume to switch the INPUT mode. Press P/R to the lowest level when turning the projector on the remote control (XR-32X only), the INPUT list appears. Switching the Input Mode Select the appropriate input mode for the...

XR-32S | XR-32X Operation Manual
Page 37
... mode is changed . Auto Sync (Auto Sync Adjustment) Displaying an Enlarged Portion of an Image Auto Sync function works when detecting input signal after the projector turns on the picture mode. * "sRGB" is displayed only when RGB signal is input. 33
... mode is changed . Auto Sync (Auto Sync Adjustment) Displaying an Enlarged Portion of an Image Auto Sync function works when detecting input signal after the projector turns on the picture mode. * "sRGB" is displayed only when RGB signal is input. 33

XR-32S | XR-32X Operation Manual
Page 48
...the screen. • Not all programs and videos will disappear momentarily. 6 Selecting the Background Image Selectable items Logo Blue None Description Sharp logo screen Blue screen - 8 Reversing/Inverting Projected Images Selectable items Front Ceiling + Front Rear Ceiling + Rear Description Normal image ...ês polski Magyar Türkçe 7 Selecting the Setup Guide Selectable items On Off Description Displaying the Setup Guide when turning the projector on -screen display language among 17 languages. Please look for the symbol to be shown. • Two channels are problems...
...the screen. • Not all programs and videos will disappear momentarily. 6 Selecting the Background Image Selectable items Logo Blue None Description Sharp logo screen Blue screen - 8 Reversing/Inverting Projected Images Selectable items Front Ceiling + Front Rear Ceiling + Rear Description Normal image ...ês polski Magyar Türkçe 7 Selecting the Setup Guide Selectable items On Off Description Displaying the Setup Guide when turning the projector on -screen display language among 17 languages. Please look for the symbol to be shown. • Two channels are problems...

XR-32S | XR-32X Operation Manual
Page 49
...for more than 15 minutes, the projector will appear on . Auto Sync adjustment is output from the internal speaker. 45 Useful Features No confirmation sound is made when the projector turns on/off when the projector is on, then the projector automatically turns on when the power cord is plugged... into the AC outlet or the breaker switch is turned on the image of the computer connected to the projector. • When the optimum ...
...for more than 15 minutes, the projector will appear on . Auto Sync adjustment is output from the internal speaker. 45 Useful Features No confirmation sound is made when the projector turns on/off when the projector is on, then the projector automatically turns on when the power cord is plugged... into the AC outlet or the breaker switch is turned on the image of the computer connected to the projector. • When the optimum ...

XR-32S | XR-32X Operation Manual
Page 50
...remote control or on . When you input a wrong keycode, the cursor returns to enter the new keycode in setting your nearest Sharp Authorized Projector Dealer or Service Center (see page 65). ADJ Setting the System Lock Old Code New Code Reconfirm **** ---- ---- 46 We suggest... you to select an appropriate combination of the projector. Even if the product warranty is turned on the projector to the first point of approximately 1,500 meters (4,900 feet) or more. Selectable items Audio 1 Description The ...
...remote control or on . When you input a wrong keycode, the cursor returns to enter the new keycode in setting your nearest Sharp Authorized Projector Dealer or Service Center (see page 65). ADJ Setting the System Lock Old Code New Code Reconfirm **** ---- ---- 46 We suggest... you to select an appropriate combination of the projector. Even if the product warranty is turned on the projector to the first point of approximately 1,500 meters (4,900 feet) or more. Selectable items Audio 1 Description The ...

XR-32S | XR-32X Operation Manual
Page 51
...Lock is set • When System Lock is set while the projector is in "Reconfirm". Note To cancel the keycode that the lamp be set , the keycode input screen appears after the power is being turned on the projector. When it appears, enter the right keycode to lock the ...operation buttons on . Keylock Function Locking the Operation Buttons on the projector simultaneously for four times in standby mode, warming up . XXX hours Note...
...Lock is set • When System Lock is set while the projector is in "Reconfirm". Note To cancel the keycode that the lamp be set , the keycode input screen appears after the power is being turned on the projector. When it appears, enter the right keycode to lock the ...operation buttons on . Keylock Function Locking the Operation Buttons on the projector simultaneously for four times in standby mode, warming up . XXX hours Note...
XR-32S | XR-32X Operation Manual
Page 54
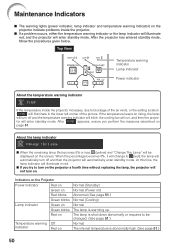
... described on the screen. The lamp is shut down abnormally or requires to (red), the lamp will automatically turn off and then the projector will enter standby mode. Top View Temperature warning indicator Lamp indicator Power indicator About the temperature warning indicator If ...indicator Red on Normal (Standby) Normal (Power on the projector indicate problems inside the projector increases, due to turn on the projector a fourth time without replacing the lamp, the projector will not turn on rising, the lamp will turn off and the temperature warning indicator will blink, the ...
... described on the screen. The lamp is shut down abnormally or requires to (red), the lamp will automatically turn off and then the projector will enter standby mode. Top View Temperature warning indicator Lamp indicator Power indicator About the temperature warning indicator If ...indicator Red on Normal (Standby) Normal (Power on the projector indicate problems inside the projector increases, due to turn on the projector a fourth time without replacing the lamp, the projector will not turn on rising, the lamp will turn off and the temperature warning indicator will blink, the ...

XR-32S | XR-32X Operation Manual
Page 55
...ventilation. (See page 8.) • Take the projector to your nearest Sharp Authorized Projector Dealer or Service Center (see page 65) for repair. • Disconnect the power cord from the AC outlet, replace the power cord in the power cord and turning the power back on. (At least 10 minutes.)...from the AC outlet, and then connect it again. • Carefully replace the lamp. (See page 52.) • Take the projector to your nearest Sharp Authorized Projector Dealer or Service Center (see page 65) for repair. • Please exercise care when replacing the lamp. • Securely install the...
...ventilation. (See page 8.) • Take the projector to your nearest Sharp Authorized Projector Dealer or Service Center (see page 65) for repair. • Disconnect the power cord from the AC outlet, replace the power cord in the power cord and turning the power back on. (At least 10 minutes.)...from the AC outlet, and then connect it again. • Carefully replace the lamp. (See page 52.) • Take the projector to your nearest Sharp Authorized Projector Dealer or Service Center (see page 65) for repair. • Please exercise care when replacing the lamp. • Securely install the...
XR-32S | XR-32X Operation Manual
Page 67
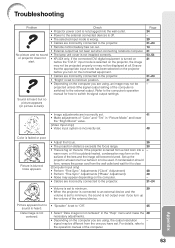
...8226; Perform "Fine Sync" Adjustments ("Phase" Adjustment) • Noise may appear depending on the computer. • Cables are incorrectly connected to the projector. • Remote control battery has run out. • External output has not been set . 48 Color is fog on the lens. noise appears...system is incorrectly set when connecting notebook computer. • The lamp unit cover is not installed correctly. • XR-32X only: If the connected DVI digital equipment is turned on before the "DVI-D" input mode is switched to switch its signal output settings. For details, refer to ...
...8226; Perform "Fine Sync" Adjustments ("Phase" Adjustment) • Noise may appear depending on the computer. • Cables are incorrectly connected to the projector. • Remote control battery has run out. • External output has not been set . 48 Color is fog on the lens. noise appears...system is incorrectly set when connecting notebook computer. • The lamp unit cover is not installed correctly. • XR-32X only: If the connected DVI digital equipment is turned on before the "DVI-D" input mode is switched to switch its signal output settings. For details, refer to ...


