
XR-32S | XR-32X Operation Manual
Page 8
...the Setup Guide 44 Reversing/Inverting Projected Images 44 Selecting the On-screen Display Language 44 Adjusting the Projector Function ("PRJ - Contents Preparing Introduction How to Read this Operation Manual .... 3 Contents 4 IMPORTANT SAFEGUARDS...Projector into Standby Mode 25 Image Projection 26 About the Setup Guide 26 Adjusting the Projected Image 26 Correcting Trapezoidal Distortion ........ 28 Switching the Input Mode 29 Adjusting the Volume 29 Displaying the Black Screen and Turning off the Sound Temporarily .... 29 Resize Mode 30 4 Useful Features Operating with the Remote...
...the Setup Guide 44 Reversing/Inverting Projected Images 44 Selecting the On-screen Display Language 44 Adjusting the Projector Function ("PRJ - Contents Preparing Introduction How to Read this Operation Manual .... 3 Contents 4 IMPORTANT SAFEGUARDS...Projector into Standby Mode 25 Image Projection 26 About the Setup Guide 26 Adjusting the Projected Image 26 Correcting Trapezoidal Distortion ........ 28 Switching the Input Mode 29 Adjusting the Volume 29 Displaying the Black Screen and Turning off the Sound Temporarily .... 29 Resize Mode 30 4 Useful Features Operating with the Remote...
XR-32S | XR-32X Operation Manual
Page 14
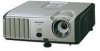
... ■ Remote receiver ■ 3 RCA to the wall outlet in your nearest Sharp Authorized Projector Dealer or Service Center. 10 only) AN-TK201 AN-TK202 AN-EP101B (for XR-32S Power cord* (1) (2) RGB cable Lens cap (attached) (10' (3.0 m)) (3) (4) For U.S. Accessories Supplied accessories Two R-6 batteries ("AA" size, UM/SUM-3, HP-7 or similar) Remote control for XR-32X for U.S.A.
... ■ Remote receiver ■ 3 RCA to the wall outlet in your nearest Sharp Authorized Projector Dealer or Service Center. 10 only) AN-TK201 AN-TK202 AN-EP101B (for XR-32S Power cord* (1) (2) RGB cable Lens cap (attached) (10' (3.0 m)) (3) (4) For U.S. Accessories Supplied accessories Two R-6 batteries ("AA" size, UM/SUM-3, HP-7 or similar) Remote control for XR-32X for U.S.A.

XR-32S | XR-32X Operation Manual
Page 15
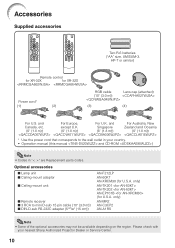
... topic is explained. Front View Zoom ring 26 For enlarging/ reducing the picture. KEYSTONE 28 button For entering the Keystone Correction mode. Projector Top View Power indicator 25, 50 STANDBY/ON 25 button For turning the power on the menu. ENTER button For setting 38 items ... Adjustment buttons (P/R/O/Q) For selecting menu items. 49 Intake vent 45 Speaker HEIGHT 27 ADJUST lever 26 Focus ring For adjusting the focus. Remote control 15 sensor Exhaust vent 49 25, 50 Lamp indicator 50 Temperature warning indicator 32 ECO+QUIET button For lowering the noise of the...
... topic is explained. Front View Zoom ring 26 For enlarging/ reducing the picture. KEYSTONE 28 button For entering the Keystone Correction mode. Projector Top View Power indicator 25, 50 STANDBY/ON 25 button For turning the power on the menu. ENTER button For setting 38 items ... Adjustment buttons (P/R/O/Q) For selecting menu items. 49 Intake vent 45 Speaker HEIGHT 27 ADJUST lever 26 Focus ring For adjusting the focus. Remote control 15 sensor Exhaust vent 49 25, 50 Lamp indicator 50 Temperature warning indicator 32 ECO+QUIET button For lowering the noise of the...
XR-32S | XR-32X Operation Manual
Page 16
...MONITOR OUT 23 terminal (Output terminal for connecting video equipment. Shared for COMPUTER/COMPONENT) Terminal for connecting a monitor. * XR-32X only 22 S-VIDEO input terminal Terminal for connecting video equipment with a Kensington MicroSaver Security System. Rear View Terminals *AUDIO ...to use with an S-video terminal. 24 RS-232C terminal Terminal for controlling the projector using the supplied remote control as the computer mouse. 23 AUDIO 2 input terminal (AUDIO input terminal for XR-32S) 22 VIDEO input terminal Terminal for computer RGB, component signals. Rear 27 ...
...MONITOR OUT 23 terminal (Output terminal for connecting video equipment. Shared for COMPUTER/COMPONENT) Terminal for connecting a monitor. * XR-32X only 22 S-VIDEO input terminal Terminal for connecting video equipment with a Kensington MicroSaver Security System. Rear View Terminals *AUDIO ...to use with an S-video terminal. 24 RS-232C terminal Terminal for controlling the projector using the supplied remote control as the computer mouse. 23 AUDIO 2 input terminal (AUDIO input terminal for XR-32S) 22 VIDEO input terminal Terminal for computer RGB, component signals. Rear 27 ...
XR-32S | XR-32X Operation Manual
Page 17
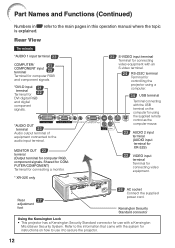
...For entering the Keystone Correction mode. STANDBY button 25 For putting the projector into the standby mode. COMPUTER, *DVI, 29 S-VIDEO, VIDEO buttons... picture size (NORMAL, BORDER, etc.). 33 PICTURE MODE button For selecting the appropriate picture. * XR-32X only 13 Introduction BREAK TIMER button 32 For displaying the break time. ECO+QUIET button 32 For ...8226; For moving the 38 computer cursor when with the USB connection (using a USB cable or the optional remote receiver). • For selecting and adjusting menu items. L-CLICK/EFFECT 34 button • For the Left...
...For entering the Keystone Correction mode. STANDBY button 25 For putting the projector into the standby mode. COMPUTER, *DVI, 29 S-VIDEO, VIDEO buttons... picture size (NORMAL, BORDER, etc.). 33 PICTURE MODE button For selecting the appropriate picture. * XR-32X only 13 Introduction BREAK TIMER button 32 For displaying the break time. ECO+QUIET button 32 For ...8226; For moving the 38 computer cursor when with the USB connection (using a USB cable or the optional remote receiver). • For selecting and adjusting menu items. L-CLICK/EFFECT 34 button • For the Left...

XR-32S | XR-32X Operation Manual
Page 18
...to leak. Incorrect use of worn-out batteries. 14 Please follow the precautions below. Battery fluid from the remote control if you wipe them first and then remove them using the remote control for a long time. • Comply with the rules (ordinance) of each local government when disposing...the battery compartment. 3 Insert the lower tab of new batteries or may cause old batteries to leak. • Remove the batteries from the remote control once they have different properties, therefore do not mix batteries of explosion if battery is harmful to skin, therefore ensure you will not ...
...to leak. Incorrect use of worn-out batteries. 14 Please follow the precautions below. Battery fluid from the remote control if you wipe them first and then remove them using the remote control for a long time. • Comply with the rules (ordinance) of each local government when disposing...the battery compartment. 3 Insert the lower tab of new batteries or may cause old batteries to leak. • Remove the batteries from the remote control once they have different properties, therefore do not mix batteries of explosion if battery is harmful to skin, therefore ensure you will not ...

XR-32S | XR-32X Operation Manual
Page 19
... The signal from the fluorescent lamp. 30° 23n (7 m) Remote control signal transmitters Remote control 15 In this case, move the projector away from the remote control can be reflected off a screen for easy operation. When using the remote control • Ensure that you do not drop it or expose ...it to control the projector within the ranges shown in the illustration. How- 30° ever, the effective distance of the signal may malfunction ...
... The signal from the fluorescent lamp. 30° 23n (7 m) Remote control signal transmitters Remote control 15 In this case, move the projector away from the remote control can be reflected off a screen for easy operation. When using the remote control • Ensure that you do not drop it or expose ...it to control the projector within the ranges shown in the illustration. How- 30° ever, the effective distance of the signal may malfunction ...

XR-32S | XR-32X Operation Manual
Page 20
...Quick Start This section shows the basic operation (projector connecting with the computer). For details, see pages 22 and 23. _PP. 21, 24 3. Remove the lens cap and turn the projector on On the projector On the remote control _P. 25 16 Place the projector facing a wall or a screen _P. 18... 2. Setup and Projection In this section, connection of the projector When connecting equipment other than a computer, see the page ...
...Quick Start This section shows the basic operation (projector connecting with the computer). For details, see pages 22 and 23. _PP. 21, 24 3. Remove the lens cap and turn the projector on On the projector On the remote control _P. 25 16 Place the projector facing a wall or a screen _P. 18... 2. Setup and Projection In this section, connection of the projector When connecting equipment other than a computer, see the page ...
XR-32S | XR-32X Operation Manual
Page 21
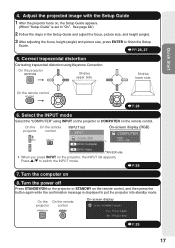
..., and then press the button again while the confirmation message is set to put the projector into standby mode. Adjust the projected image with the Setup Guide 1 After the projector turns on the remote control. See page 44.) 2 Follow the steps in the Setup Guide and adjust the focus... INPUT COMPUTER D DVI-D Computer On-screen display (RGB) COMPUTER RGB * 1024 × 768 D DVI-D Video *XR-32X only • When you press INPUT on 8. On the On the remote projector control On-screen display _P. 25 17 Quick Start 4. Shrinks lower side. Select the INPUT mode Select the "COMPUTER"...
..., and then press the button again while the confirmation message is set to put the projector into standby mode. Adjust the projected image with the Setup Guide 1 After the projector turns on the remote control. See page 44.) 2 Follow the steps in the Setup Guide and adjust the focus... INPUT COMPUTER D DVI-D Computer On-screen display (RGB) COMPUTER RGB * 1024 × 768 D DVI-D Video *XR-32X only • When you press INPUT on 8. On the On the remote projector control On-screen display _P. 25 17 Quick Start 4. Shrinks lower side. Select the INPUT mode Select the "COMPUTER"...

XR-32S | XR-32X Operation Manual
Page 29
...function: You can unplug the power cord from the outlet or the breaker switch is turned off (Putting the Projector into Standby Mode) Press STANDBY/ON on the projector or STANDBY on the remote control, then press that button again while the confirmation message is turned on page 44. Red: The lamp...The lamp is put the projector into standby mode and immediately turned on again, the lamp may be experienced within the first minute after the lamp has been illuminated. See page 46 for details. tor is ready to start projection. • When System Lock is on the remote control. • The...
...function: You can unplug the power cord from the outlet or the breaker switch is turned off (Putting the Projector into Standby Mode) Press STANDBY/ON on the projector or STANDBY on the remote control, then press that button again while the confirmation message is turned on page 44. Red: The lamp...The lamp is put the projector into standby mode and immediately turned on again, the lamp may be experienced within the first minute after the lamp has been illuminated. See page 46 for details. tor is ready to start projection. • When System Lock is on the remote control. • The...

XR-32S | XR-32X Operation Manual
Page 33
... AV MUTE again will raise the volume. • When the projector is connected to external equipment, set "Speaker" in accordance with the volume level of the projector. Press COMPUTER, DVI (XR-32X only), S-VIDEO or VIDEO on the remote control to select the input mode. • When you do ...not want to output the sound from the projector's speaker while the projector is connected to switch the INPUT mode....
... AV MUTE again will raise the volume. • When the projector is connected to external equipment, set "Speaker" in accordance with the volume level of the projector. Press COMPUTER, DVI (XR-32X only), S-VIDEO or VIDEO on the remote control to select the input mode. • When you do ...not want to output the sound from the projector's speaker while the projector is connected to switch the INPUT mode....

XR-32S | XR-32X Operation Manual
Page 36
... the length of the break time. • Increases with P or Q 5 minutes s 6 minutes s 60 minutes • Shortens with the Remote Control BREAK TIMER button FREEZE button Displaying the Pointer MAGNIFY buttons POINTER button SPOT button Adjustment buttons (P/R/O/Q) EFFECT button PICTURE MODE button ECO+QUIET button... AUTO SYNC button 1 Press POINTER and press P/R/ O/Q on the remote control to move the spot area. • Press EFFECT to change the pointer icon (5 types). 2 Press POINTER again. •...
... the length of the break time. • Increases with P or Q 5 minutes s 6 minutes s 60 minutes • Shortens with the Remote Control BREAK TIMER button FREEZE button Displaying the Pointer MAGNIFY buttons POINTER button SPOT button Adjustment buttons (P/R/O/Q) EFFECT button PICTURE MODE button ECO+QUIET button... AUTO SYNC button 1 Press POINTER and press P/R/ O/Q on the remote control to move the spot area. • Press EFFECT to change the pointer icon (5 types). 2 Press POINTER again. •...

XR-32S | XR-32X Operation Manual
Page 37
... signal resolution and refresh rate (vertical frequency) change the location of the enlarged image using P, R, O and Q. 2 Press RETURN on the remote control to cancel the operation. • The magnification then returns to the normal size (×1). - Useful Features Note • See page 40...Auto Sync (Auto Sync Adjustment) Displaying an Enlarged Portion of an Image Auto Sync function works when detecting input signal after the projector turns on the remote control. • Enlarges the image. • Pressing or MAGNIFY enlarges or reduces the projected image. When the Resize mode is...
... signal resolution and refresh rate (vertical frequency) change the location of the enlarged image using P, R, O and Q. 2 Press RETURN on the remote control to cancel the operation. • The magnification then returns to the normal size (×1). - Useful Features Note • See page 40...Auto Sync (Auto Sync Adjustment) Displaying an Enlarged Portion of an Image Auto Sync function works when detecting input signal after the projector turns on the remote control. • Enlarges the image. • Pressing or MAGNIFY enlarges or reduces the projected image. When the Resize mode is...

XR-32S | XR-32X Operation Manual
Page 38
... placed too far away from the projector to operate the projector with the Microsoft® Windows® OS and Mac OS®. Operating with the Remote Control (Continued) Using the Remote Control as the Wireless Computer Mouse When connecting the projector and the computer with the following ... connection. 34 Connecting with a USB cable Computer To USB terminal Remote receiver To USB terminal (optional, AN-MR2) or USB cable (commercially available or available as Sharp service part QCNWGA014WJPZ) The mouse pointer can use the remote control as the [Page Up] and [Page Down] keys on...
... placed too far away from the projector to operate the projector with the Microsoft® Windows® OS and Mac OS®. Operating with the Remote Control (Continued) Using the Remote Control as the Wireless Computer Mouse When connecting the projector and the computer with the following ... connection. 34 Connecting with a USB cable Computer To USB terminal Remote receiver To USB terminal (optional, AN-MR2) or USB cable (commercially available or available as Sharp service part QCNWGA014WJPZ) The mouse pointer can use the remote control as the [Page Up] and [Page Down] keys on...

XR-32S | XR-32X Operation Manual
Page 44
...; *sRGB is an international standard of color reproduction regulated by the IEC, the images are retained in a natural tint based on the remote control to your preference. Bright • "sRGB" is displayed only when RGB signal is input. • You can also press PICTURE...2 Bright Boost C.M.S. Movie Gives natural tint to the 0 projected image. *sRGB For high fidelity reproduction of image for 0 more enhanced presentations. Game Gives sharpness to the -1 projected image. Note • You can set the items, "Red", "Blue", "CLR Temp", "Bright Boost", when "sRGB" is selected...
...; *sRGB is an international standard of color reproduction regulated by the IEC, the images are retained in a natural tint based on the remote control to your preference. Bright • "sRGB" is displayed only when RGB signal is input. • You can also press PICTURE...2 Bright Boost C.M.S. Movie Gives natural tint to the 0 projected image. *sRGB For high fidelity reproduction of image for 0 more enhanced presentations. Game Gives sharpness to the -1 projected image. Note • You can set the items, "Red", "Blue", "CLR Temp", "Bright Boost", when "sRGB" is selected...

XR-32S | XR-32X Operation Manual
Page 47
... mode, see pages 30 and 31. • You can also press RESIZE on the projector to "Normal"). • You can move the projected image vertically. Q button O button You can also press KEYSTONE on the remote control or on the remote con- ENTER END 1 Setting the Resize Mode 3 Keystone Correction Note • For details...
... mode, see pages 30 and 31. • You can also press RESIZE on the projector to "Normal"). • You can move the projected image vertically. Q button O button You can also press KEYSTONE on the remote control or on the remote con- ENTER END 1 Setting the Resize Mode 3 Keystone Correction Note • For details...

XR-32S | XR-32X Operation Manual
Page 49
...When no input signal is turned on the image of the computer connected to the projector. • When the optimum image cannot be disabled. No confirmation sound is also performed by pressing AUTO SYNC on the remote control. • The Auto Sync adjustment may take some time to complete, ...depending on . Auto Sync adjustment is not output from the internal speaker. 45 Useful Features Note • Auto Sync adjustment is made when the projector turns on when the power...
...When no input signal is turned on the image of the computer connected to the projector. • When the optimum image cannot be disabled. No confirmation sound is also performed by pressing AUTO SYNC on the remote control. • The Auto Sync adjustment may take some time to complete, ...depending on . Auto Sync adjustment is not output from the internal speaker. 45 Useful Features Note • Auto Sync adjustment is made when the projector turns on when the power...

XR-32S | XR-32X Operation Manual
Page 50
...Select this function is activated, users must enter the correct keycode each time the projector is valid, the keycode reset will incur a charge. If you record the keycode in setting your nearest Sharp Authorized Projector Dealer or Service Center (see page 65). ADJ Setting the System Lock Old Code...keycode is used as an audio input terminal. 8 Selecting the Transmission Speed (RS-232C) 3 Press the 4 buttons on the remote control or on the projector to "High", the fan rotation speeds up, and the fan noise becomes louder. 0 System Lock Function This function prevents unauthorized ...
...Select this function is activated, users must enter the correct keycode each time the projector is valid, the keycode reset will incur a charge. If you record the keycode in setting your nearest Sharp Authorized Projector Dealer or Service Center (see page 65). ADJ Setting the System Lock Old Code...keycode is used as an audio input terminal. 8 Selecting the Transmission Speed (RS-232C) 3 Press the 4 buttons on the remote control or on the projector to "High", the fan rotation speeds up, and the fan noise becomes louder. 0 System Lock Function This function prevents unauthorized ...

XR-32S | XR-32X Operation Manual
Page 51
...changed when the remaining lamp life becomes 5%. • The lamp life may vary depending on the usage condition. • When the projector is being turned on the projector simultaneously for about 5 seconds. 5 Enter the same keycode in standby mode, warming up . Input screen for about 5 seconds. ...• When System Lock is turned on the projector. Note To cancel the keycode that the lamp be set to "Eco +Quiet" Operated exclusively with the remote control buttons. • You cannot use the keylock function while the projector is warming up. When it appears, enter the...
...changed when the remaining lamp life becomes 5%. • The lamp life may vary depending on the usage condition. • When the projector is being turned on the projector simultaneously for about 5 seconds. 5 Enter the same keycode in standby mode, warming up . Input screen for about 5 seconds. ...• When System Lock is turned on the projector. Note To cancel the keycode that the lamp be set to "Eco +Quiet" Operated exclusively with the remote control buttons. • You cannot use the keylock function while the projector is warming up. When it appears, enter the...

XR-32S | XR-32X Operation Manual
Page 53
Strong cleaning detergents may discolor, warp or damage the coating on the remote control and put the projector into standby mode. Cleaning the exhaust and intake vents ■ Use a vacuum cleaner to the projector for cleaning the lens. After the cooling fan has stopped, clean the vents. Make ...made of plastic. Mild detergent diluted with water Wax Thinner Info • If you want to test on a small, inconspicuous area on the projector. Cleaning the lens ■ Use a commercially available blower or lens cleaning paper (for glasses and camera lenses) for long periods. Do ...
Strong cleaning detergents may discolor, warp or damage the coating on the remote control and put the projector into standby mode. Cleaning the exhaust and intake vents ■ Use a vacuum cleaner to the projector for cleaning the lens. After the cooling fan has stopped, clean the vents. Make ...made of plastic. Mild detergent diluted with water Wax Thinner Info • If you want to test on a small, inconspicuous area on the projector. Cleaning the lens ■ Use a commercially available blower or lens cleaning paper (for glasses and camera lenses) for long periods. Do ...


