XR-32S | XR-32X Operation Manual
Page 1
DATA PROJECTOR MODEL XR-32X XR-32S OPERATION MANUAL XR-32X Introduction Quick Start Setup Connections Basic Operation Useful Features Appendix
DATA PROJECTOR MODEL XR-32X XR-32S OPERATION MANUAL XR-32X Introduction Quick Start Setup Connections Basic Operation Useful Features Appendix

XR-32S | XR-32X Operation Manual
Page 2
Model No.: Serial No.: ii IMPORTANT • For your assistance in reporting the loss or theft of your Projector, please record the Model and Serial Number located on the bottom of the projector and retain this information. • Before recycling the packaging, please ensure that you have checked the contents of the carton thoroughly against the list of "Supplied accessories" on page 10.
Model No.: Serial No.: ii IMPORTANT • For your assistance in reporting the loss or theft of your Projector, please record the Model and Serial Number located on the bottom of the projector and retain this information. • Before recycling the packaging, please ensure that you have checked the contents of the carton thoroughly against the list of "Supplied accessories" on page 10.

XR-32S | XR-32X Operation Manual
Page 5
...This is intended to alert the user to the presence of fire or electric shock, do not stare directly into the beam of projector. U.S.A. WARNING: To reduce the risk of important operating and maintenance (servicing) instructions in the literature accompanying the product. The ... are two important reasons for prompt warranty registration of sufficient magnitude to constitute a risk or electric shock to your new SHARP Projector, using the projector, please read this product to give under the 1972 Consumer Product Safety Act, PLEASE READ CAREFULLY THE IMPORTANT "LIMITED WARRANTY...
...This is intended to alert the user to the presence of fire or electric shock, do not stare directly into the beam of projector. U.S.A. WARNING: To reduce the risk of important operating and maintenance (servicing) instructions in the literature accompanying the product. The ... are two important reasons for prompt warranty registration of sufficient magnitude to constitute a risk or electric shock to your new SHARP Projector, using the projector, please read this product to give under the 1972 Consumer Product Safety Act, PLEASE READ CAREFULLY THE IMPORTANT "LIMITED WARRANTY...
XR-32S | XR-32X Operation Manual
Page 6
... of conformity SHARP PROJECTOR, MODEL XR-32X/XR-32S This device complies with the operation manual, may result in a residential installation. This SHARP projector uses a DLP® chip. Responsible Party: SHARP ELECTRONICS CORPORATION Sharp Plaza, Mahwah, New Jersey 07430-2135 TEL: 1-800-BE-SHARP (1-800-237..., there is connected. • Consult the dealer or an experienced radio/TV technician for the European Union Community Market SHARP ELECTRONICS (Europe) GmbH Sonninstraße 3, D-20097 Hamburg E.U. Disposal of the following conditions: (1) This device may cause...
... of conformity SHARP PROJECTOR, MODEL XR-32X/XR-32S This device complies with the operation manual, may result in a residential installation. This SHARP projector uses a DLP® chip. Responsible Party: SHARP ELECTRONICS CORPORATION Sharp Plaza, Mahwah, New Jersey 07430-2135 TEL: 1-800-BE-SHARP (1-800-237..., there is connected. • Consult the dealer or an experienced radio/TV technician for the European Union Community Market SHARP ELECTRONICS (Europe) GmbH Sonninstraße 3, D-20097 Hamburg E.U. Disposal of the following conditions: (1) This device may cause...
XR-32S | XR-32X Operation Manual
Page 7
... "Picture" to Read this Operation Manual ■ The specifications are based on the XR-32X model. The examples used throughout this manual are slightly different, depending on the model. Example: "Picture" screen menu for setting up and operating the projector. ADJ Help Picture Mode Contrast Bright Red Blue CLR Temp Bright Boost C.M.S. DNR...
... "Picture" to Read this Operation Manual ■ The specifications are based on the XR-32X model. The examples used throughout this manual are slightly different, depending on the model. Example: "Picture" screen menu for setting up and operating the projector. ADJ Help Picture Mode Contrast Bright Red Blue CLR Temp Bright Boost C.M.S. DNR...

XR-32S | XR-32X Operation Manual
Page 8
... View 12 Inserting the Batteries 14 Usable Range 15 Quick Start Quick Start 16 Setup and Projection 16 Setup Setting up the Projector 18 Setting up the Projector 18 Standard Setup (Front Projection) ....... 18 Ceiling-mount Setup 18 Projection (PRJ) Mode 19 Screen Size and Projection Distance ... 41 Adjusting the Color Temperature ......... 41 Adjusting the Colors 41 Progressive 42 Reducing Image Noise (DNR 42 Lamp Setting 42 Adjusting the Projector Image ("SCR - ADJ" Menu 43 Setting the Resize Mode 43 Adjusting the Image Position 43 Keystone Correction 43 Setting the On-screen...
... View 12 Inserting the Batteries 14 Usable Range 15 Quick Start Quick Start 16 Setup and Projection 16 Setup Setting up the Projector 18 Setting up the Projector 18 Standard Setup (Front Projection) ....... 18 Ceiling-mount Setup 18 Projection (PRJ) Mode 19 Screen Size and Projection Distance ... 41 Adjusting the Color Temperature ......... 41 Adjusting the Colors 41 Progressive 42 Reducing Image Noise (DNR 42 Lamp Setting 42 Adjusting the Projector Image ("SCR - ADJ" Menu 43 Setting the Resize Mode 43 Adjusting the Image Position 43 Keystone Correction 43 Setting the On-screen...

XR-32S | XR-32X Operation Manual
Page 12
...9632; Allow at least 11 13/16 inches (30 cm) of the projector ■ For minimal servicing and to the normal operating condition. 8 This will return the projector to maintain high image quality, SHARP recommends that the intake vent and the exhaust vent are not blocked, ... Position the screen so that it is used for replacement. Take regular breaks to avoid personal injury caused by a Sharp Authorized Projector Dealer or Service Center. Place the projector where the intake and exhaust vents are not obstructed. ■ If the cooling fan becomes obstructed, a protection circuit...
...9632; Allow at least 11 13/16 inches (30 cm) of the projector ■ For minimal servicing and to the normal operating condition. 8 This will return the projector to maintain high image quality, SHARP recommends that the intake vent and the exhaust vent are not blocked, ... Position the screen so that it is used for replacement. Take regular breaks to avoid personal injury caused by a Sharp Authorized Projector Dealer or Service Center. Place the projector where the intake and exhaust vents are not obstructed. ■ If the cooling fan becomes obstructed, a protection circuit...

XR-32S | XR-32X Operation Manual
Page 13
...; or Macintosh®). Info • The cooling fan regulates the internal temperature, and its performance is running, some parts of the projector may vary depending on how to make the connections. How to Access the PDF Operation Manuals PDF operation manuals in several languages are included... in the fan speed. visual equipment to the projector, make certain you unplug the power cord from the Internet (http://www.adobe.com). This does not indicate malfunction. If the temperature...
...; or Macintosh®). Info • The cooling fan regulates the internal temperature, and its performance is running, some parts of the projector may vary depending on how to make the connections. How to Access the PDF Operation Manuals PDF operation manuals in several languages are included... in the fan speed. visual equipment to the projector, make certain you unplug the power cord from the Internet (http://www.adobe.com). This does not indicate malfunction. If the temperature...
XR-32S | XR-32X Operation Manual
Page 14
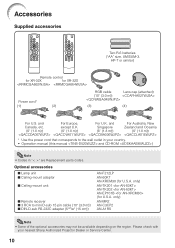
Accessories Supplied accessories Two R-6 batteries ("AA" size, UM/SUM-3, HP-7 or similar) Remote control for XR-32X for U.S.A. except U.K. only) AN-TK201 AN-TK202 AN-EP101B (for XR-32S Power cord* (1) (2) RGB cable Lens cap (attached) (10' (3.0 m)) (3) (4) For U.S. and For Australia, New Canada, etc....Please check with your country. • Operation manual (this manual and CD-ROM ) Note • Codes in your nearest Sharp Authorized Projector Dealer or Service Center. 10 only) AN-MR2 AN-C3CP2 AN-A1RS Note • Some of the optional accessories may not...
Accessories Supplied accessories Two R-6 batteries ("AA" size, UM/SUM-3, HP-7 or similar) Remote control for XR-32X for U.S.A. except U.K. only) AN-TK201 AN-TK202 AN-EP101B (for XR-32S Power cord* (1) (2) RGB cable Lens cap (attached) (10' (3.0 m)) (3) (4) For U.S. and For Australia, New Canada, etc....Please check with your country. • Operation manual (this manual and CD-ROM ) Note • Codes in your nearest Sharp Authorized Projector Dealer or Service Center. 10 only) AN-MR2 AN-C3CP2 AN-A1RS Note • Some of the optional accessories may not...

XR-32S | XR-32X Operation Manual
Page 15
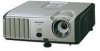
Front View Zoom ring 26 For enlarging/ reducing the picture. Projector Top View Power indicator 25, 50 STANDBY/ON 25 button For turning the power on the menu. Remote control 15 sensor Exhaust vent 49 25, ... cap to the main pages in Z refer to attach or remove. 11 ENTER button For setting 38 items selected or adjusted on and putting the projector into standby mode. KEYSTONE 28 button For entering the Keystone Correction mode. Push both sides of the cooling fan and extending the lamp life. 29...
Front View Zoom ring 26 For enlarging/ reducing the picture. Projector Top View Power indicator 25, 50 STANDBY/ON 25 button For turning the power on the menu. Remote control 15 sensor Exhaust vent 49 25, ... cap to the main pages in Z refer to attach or remove. 11 ENTER button For setting 38 items selected or adjusted on and putting the projector into standby mode. KEYSTONE 28 button For entering the Keystone Correction mode. Push both sides of the cooling fan and extending the lamp life. 29...
XR-32S | XR-32X Operation Manual
Page 16
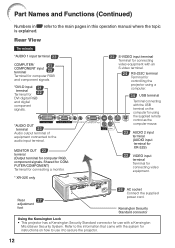
...Shared for COMPUTER/COMPONENT) Terminal for connecting a monitor. * XR-32X only 22 S-VIDEO input terminal Terminal for connecting video equipment with an S-video terminal. 24 RS-232C terminal Terminal for controlling the projector using the supplied remote control as the computer mouse. 23 ...AUDIO 2 input terminal (AUDIO input terminal for XR-32S) 22 VIDEO input terminal Terminal for use it to secure the projector. 12 Kensington Security Standard connector Using the Kensington Lock • This projector has a Kensington Security Standard connector for connecting video equipment...
...Shared for COMPUTER/COMPONENT) Terminal for connecting a monitor. * XR-32X only 22 S-VIDEO input terminal Terminal for connecting video equipment with an S-video terminal. 24 RS-232C terminal Terminal for controlling the projector using the supplied remote control as the computer mouse. 23 ...AUDIO 2 input terminal (AUDIO input terminal for XR-32S) 22 VIDEO input terminal Terminal for use it to secure the projector. 12 Kensington Security Standard connector Using the Kensington Lock • This projector has a Kensington Security Standard connector for connecting video equipment...
XR-32S | XR-32X Operation Manual
Page 17
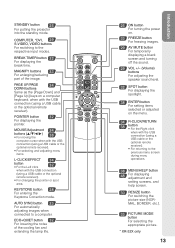
... setting screens, and help screen. 30 RESIZE button For switching the picture size (NORMAL, BORDER, etc.). 33 PICTURE MODE button For selecting the appropriate picture. * XR-32X only 13 Introduction POINTER button 32 For displaying the pointer. AUTO SYNC button 33 For automatically adjusting images when connected to the respective input modes...). • For changing the pointer or spot area. ECO+QUIET button 32 For lowering the noise of the image. STANDBY button 25 For putting the projector into the standby mode.
... setting screens, and help screen. 30 RESIZE button For switching the picture size (NORMAL, BORDER, etc.). 33 PICTURE MODE button For selecting the appropriate picture. * XR-32X only 13 Introduction POINTER button 32 For displaying the pointer. AUTO SYNC button 33 For automatically adjusting images when connected to the respective input modes...). • For changing the pointer or spot area. ECO+QUIET button 32 For lowering the noise of the image. STANDBY button 25 For putting the projector into the standby mode.

XR-32S | XR-32X Operation Manual
Page 18
...; Do not mix new and old batteries. Be sure to skin, therefore ensure you will not be using a cloth. • The batteries included with this projector may cause old batteries to leak. • Remove the batteries from leaked batteries is incorrectly replaced. Please follow the precautions below. Battery fluid from the...
...; Do not mix new and old batteries. Be sure to skin, therefore ensure you will not be using a cloth. • The batteries included with this projector may cause old batteries to leak. • Remove the batteries from leaked batteries is incorrectly replaced. Please follow the precautions below. Battery fluid from the...

XR-32S | XR-32X Operation Manual
Page 19
... control can be used to moisture or high temperature. • The remote control may differ depending on the screen material. In this case, move the projector away from the remote control can be reflected off a screen for easy operation. How- 30° ever, the effective distance of the signal may malfunction... under a fluorescent lamp. When using the remote control • Ensure that you do not drop it or expose it to control the projector within the ranges shown in the illustration.
... control can be used to moisture or high temperature. • The remote control may differ depending on the screen material. In this case, move the projector away from the remote control can be reflected off a screen for easy operation. How- 30° ever, the effective distance of the signal may malfunction... under a fluorescent lamp. When using the remote control • Ensure that you do not drop it or expose it to control the projector within the ranges shown in the illustration.

XR-32S | XR-32X Operation Manual
Page 20
...connecting equipment other than a computer, see the page described below for each step. Connect the projector to the computer and plug the power cord into the AC socket of the projector and the computer is explained using one example. 3 8 STANDBY/ON button 6 INPUT buttons ...Focus ring 4 HEIGHT ADJUST lever 4 ENTER button 5 Adjustment buttons (P/R/O/Q) 5 KEYSTONE button 1. Place the projector facing a wall or a screen _P. 18 2. Quick Start This section shows the basic operation (projector connecting with the computer). For details, see pages 22 and 23. _PP. 21, 24 3. Remove ...
...connecting equipment other than a computer, see the page described below for each step. Connect the projector to the computer and plug the power cord into the AC socket of the projector and the computer is explained using one example. 3 8 STANDBY/ON button 6 INPUT buttons ...Focus ring 4 HEIGHT ADJUST lever 4 ENTER button 5 Adjustment buttons (P/R/O/Q) 5 KEYSTONE button 1. Place the projector facing a wall or a screen _P. 18 2. Quick Start This section shows the basic operation (projector connecting with the computer). For details, see pages 22 and 23. _PP. 21, 24 3. Remove ...
XR-32S | XR-32X Operation Manual
Page 21
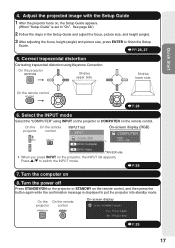
... INPUT mode Select the "COMPUTER" using Keystone Correction. On the On the remote projector control INPUT list INPUT COMPUTER D DVI-D Computer On-screen display (RGB) COMPUTER RGB * 1024 × 768 D DVI-D Video *XR-32X only • When you press INPUT on 8. Quick Start 4. Shrinks lower side.... Turn the power off Press STANDBY/ON on the projector or STANDBY on the remote control, and then press the button again while ...
... INPUT mode Select the "COMPUTER" using Keystone Correction. On the On the remote projector control INPUT list INPUT COMPUTER D DVI-D Computer On-screen display (RGB) COMPUTER RGB * 1024 × 768 D DVI-D Video *XR-32X only • When you press INPUT on 8. Quick Start 4. Shrinks lower side.... Turn the power off Press STANDBY/ON on the projector or STANDBY on the remote control, and then press the button again while ...
XR-32S | XR-32X Operation Manual
Page 22
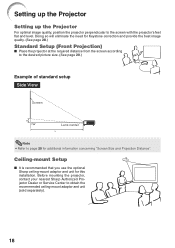
... installation. Ceiling-mount Setup ■ It is recommended that you use the optional Sharp ceiling-mount adaptor and unit for Keystone correction and provide the best image quality. (See page 28.) Standard Setup (Front Projection) ■ Place the projector at the required distance from the screen according to the desired picture size...
... installation. Ceiling-mount Setup ■ It is recommended that you use the optional Sharp ceiling-mount adaptor and unit for Keystone correction and provide the best image quality. (See page 28.) Standard Setup (Front Projection) ■ Place the projector at the required distance from the screen according to the desired picture size...

XR-32S | XR-32X Operation Manual
Page 23
Projection (PRJ) Mode The projector can set the PRJ mode in "SCR-ADJ" menu. See page 44.) ■ Table mounted, front projection [Menu item ➞ "Front"] ■ Ceiling mounted, front ...
Projection (PRJ) Mode The projector can set the PRJ mode in "SCR-ADJ" menu. See page 44.) ■ Table mounted, front projection [Menu item ➞ "Front"] ■ Ceiling mounted, front ...

XR-32S | XR-32X Operation Manual
Page 24
Setting up the Projector (Continued) Screen Size and Projection Distance NORMAL Mode (4:3) Picture (Screen) size Projection distance [L] Diag. [χ] Width Height Minimum [L1] Maximum [L2] 300Љ (762 cm) ...
Setting up the Projector (Continued) Screen Size and Projection Distance NORMAL Mode (4:3) Picture (Screen) size Projection distance [L] Diag. [χ] Width Height Minimum [L1] Maximum [L2] 300Љ (762 cm) ...

XR-32S | XR-32X Operation Manual
Page 25
... may be required for XR-32X. After making all the connections are using a SHARP notebook computer). Note • See page 62 "Computer Compatibility Chart" for a list of computer signals compatible with some of XR-32X Connections Equipment Computer Terminal on connected equipment Cable RGB output terminal RGB cable (supplied) Terminal on the projector COMPUTER/ COMPONENT DVI...
... may be required for XR-32X. After making all the connections are using a SHARP notebook computer). Note • See page 62 "Computer Compatibility Chart" for a list of computer signals compatible with some of XR-32X Connections Equipment Computer Terminal on connected equipment Cable RGB output terminal RGB cable (supplied) Terminal on the projector COMPUTER/ COMPONENT DVI...


