
PG-MB56X , PG-MB66X Operation Manual
Page 21
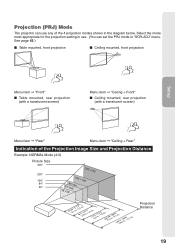
...I Table mounted, front projection I Ceiling mounted, front projection Setup Menu item © "Front" I Table mounted, rear projection (with a translucent screen) Menu item © "Ceiling + Front" I Ceiling mounted, rear projection (with a translucent screen) Menu item © "Rear" Menu item © "Ceiling + Rear" Indication of the 4 projection modes shown in the diagram...129".4'7m("2-).191m'1-"3.41m1)'(53."5-1m3-'34".0 m2)2'(17.00"m-2-68'5.1"3m4)'(310"-.43m9'8-"12.1 m) Projection Distance 19 Projection (PRJ) Mode The projector can use . (You can set the PRJ mode in "SCR-ADJ" menu.
...I Table mounted, front projection I Ceiling mounted, front projection Setup Menu item © "Front" I Table mounted, rear projection (with a translucent screen) Menu item © "Ceiling + Front" I Ceiling mounted, rear projection (with a translucent screen) Menu item © "Rear" Menu item © "Ceiling + Rear" Indication of the 4 projection modes shown in the diagram...129".4'7m("2-).191m'1-"3.41m1)'(53."5-1m3-'34".0 m2)2'(17.00"m-2-68'5.1"3m4)'(310"-.43m9'8-"12.1 m) Projection Distance 19 Projection (PRJ) Mode The projector can use . (You can set the PRJ mode in "SCR-ADJ" menu.

PG-MB56X , PG-MB66X Operation Manual
Page 23
...23 and 24.) COMPUTER-RGB/COMPONENT OUTPUT terminal Connecting the monitor when you want to simultaneously watch the projection image on the monitor. (See page 25.) AUDIO (INPUT 3, 4) terminal Connecting an audio cable...) (Shared audio output terminal for INPUT 3 and 4). (See pages 24 and 25.) Rear View Connections INPUT 3 terminal Connecting video equipment with S-video output terminal (VCR, DVD player..., etc.). (See page 24.) RS-232C terminal Connecting the computer to control the projector. (See page 26.) AUDIO OUTPUT terminal Connecting to an amplifier or other audio equipment...
...23 and 24.) COMPUTER-RGB/COMPONENT OUTPUT terminal Connecting the monitor when you want to simultaneously watch the projection image on the monitor. (See page 25.) AUDIO (INPUT 3, 4) terminal Connecting an audio cable...) (Shared audio output terminal for INPUT 3 and 4). (See pages 24 and 25.) Rear View Connections INPUT 3 terminal Connecting video equipment with S-video output terminal (VCR, DVD player..., etc.). (See page 24.) RS-232C terminal Connecting the computer to control the projector. (See page 26.) AUDIO OUTPUT terminal Connecting to an amplifier or other audio equipment...

PG-MB56X , PG-MB66X Operation Manual
Page 31
...by the lens area. When the screen is above the projector, the projection image can be adjusted using the adjustment feet at the front and rear of the projector, trapezoidal distortion occurs. 3 Adjusting the Height The height of the projector can be careful not to get your hands from the HEIGHT... ADJUST lever of the projector after its height has been finely adjusted. • The angle of projection is adjustable up to 8 degrees from the surface on which the projector is placed. 3 Use the rear adjustment foot to adjust its height while lifting the HEIGHT...
...by the lens area. When the screen is above the projector, the projection image can be adjusted using the adjustment feet at the front and rear of the projector, trapezoidal distortion occurs. 3 Adjusting the Height The height of the projector can be careful not to get your hands from the HEIGHT... ADJUST lever of the projector after its height has been finely adjusted. • The angle of projection is adjustable up to 8 degrees from the surface on which the projector is placed. 3 Use the rear adjustment foot to adjust its height while lifting the HEIGHT...

PG-MB56X , PG-MB66X Operation Manual
Page 44
... Selectable items Front Ceiling + Front Rear Ceiling + Rear Description Normal image (Projected from the front of the screen) Inverted image (Projected from the front of the screen with an inverted projector) Reversed image (Projected from the rear of the screen or with a mirror...) Reversed and inverted image (Projected with a mirror) See page 19 for details of Projection (PRJ) Mode. 5 Selecting the Background Image 8 Selecting the On-screen Display Language Selectable items Logo Blue None Description Sharp...
... Selectable items Front Ceiling + Front Rear Ceiling + Rear Description Normal image (Projected from the front of the screen) Inverted image (Projected from the front of the screen with an inverted projector) Reversed image (Projected from the rear of the screen or with a mirror...) Reversed and inverted image (Projected with a mirror) See page 19 for details of Projection (PRJ) Mode. 5 Selecting the Background Image 8 Selecting the On-screen Display Language Selectable items Logo Blue None Description Sharp...

PG-MB56X , PG-MB66X Operation Manual
Page 68
ADJ 41 Screen Size and Projection Distance 20 Setup Guide 28, 42 Sharp 40 Speaker 43 STANDBY button 27 STANDBY/ON button 27 STRETCH 32, 33 Supplied accessories 10 System Lock 44 System Sound 43 Temperature warning indicator ... Picture Adjustment 39 Picture Mode 34, 39 PICTURE MODE button 34 Power cord 26 PRJ - ADJ 43 PRJ Mode 19, 42 Progressive 40 R-6 batteries 14 Rear adjustment foot 29 Red 40 Remote control 13 Remote control sensor 15 Replacing the lamp 52, 53 Resize 32, 41 RESIZE button 32 RETURN button...
ADJ 41 Screen Size and Projection Distance 20 Setup Guide 28, 42 Sharp 40 Speaker 43 STANDBY button 27 STANDBY/ON button 27 STRETCH 32, 33 Supplied accessories 10 System Lock 44 System Sound 43 Temperature warning indicator ... Picture Adjustment 39 Picture Mode 34, 39 PICTURE MODE button 34 Power cord 26 PRJ - ADJ 43 PRJ Mode 19, 42 Progressive 40 R-6 batteries 14 Rear adjustment foot 29 Red 40 Remote control 13 Remote control sensor 15 Replacing the lamp 52, 53 Resize 32, 41 RESIZE button 32 RETURN button...

