

PG-MB56X , PG-MB66X Operation Manual
Page 3
... and maintenance (servicing) instructions in this product to rain or moisture. Ensure the cooling fan has stopped before disconnecting the power cord. REFER SERVICING TO QUALIFIED SERVICE PERSONNEL. WARNING: FCC Regulations state that may be of your purchase. 2. U.S.A. DO... ensure that you immediately receive the full benefit of the parts, service and labor warranty applicable to your new SHARP Projector, using the projector, please read this equipment. Introduction Before using the REGISTRATION CARD packed with arrowhead symbol, within an equilateral triangle,...
... and maintenance (servicing) instructions in this product to rain or moisture. Ensure the cooling fan has stopped before disconnecting the power cord. REFER SERVICING TO QUALIFIED SERVICE PERSONNEL. WARNING: FCC Regulations state that may be of your purchase. 2. U.S.A. DO... ensure that you immediately receive the full benefit of the parts, service and labor warranty applicable to your new SHARP Projector, using the projector, please read this equipment. Introduction Before using the REGISTRATION CARD packed with arrowhead symbol, within an equilateral triangle,...

PG-MB56X , PG-MB66X Operation Manual
Page 6
...Setting 44 Checking the Lamp Life Status 44 System Lock Function 44 Locking the Operation Buttons on 27 Turning the Power off (Putting the Projector into Standby Mode 27 Image Projection 28 About the Setup Guide 28 Adjusting the Projected Image 28 Switching the ... ......... 24 Connecting to a Monitor with RGB Input Terminal 25 Controlling the Projector by a Computer 26 Connecting the Power Cord 26 Using Basic Operation Turning the Projector On/Off 27 Turning the Projector on the Projector (Keylock Function 45 Troubleshooting with the Remote Control .... 34 Displaying and Setting...
...Setting 44 Checking the Lamp Life Status 44 System Lock Function 44 Locking the Operation Buttons on 27 Turning the Power off (Putting the Projector into Standby Mode 27 Image Projection 28 About the Setup Guide 28 Adjusting the Projected Image 28 Switching the ... ......... 24 Connecting to a Monitor with RGB Input Terminal 25 Controlling the Projector by a Computer 26 Connecting the Power Cord 26 Using Basic Operation Turning the Projector On/Off 27 Turning the Projector on the Projector (Keylock Function 45 Troubleshooting with the Remote Control .... 34 Displaying and Setting...

PG-MB56X , PG-MB66X Operation Manual
Page 8
...when it is provided with care. Two-wire type (mains) plug. Accessories Do not place this product, observe the following types of power supply to . 4. Transportation A product and cart combination should not be placed in a built-in the operating instructions should be retained ...recommended by the product manufacturer as a bookcase or rack unless proper ventilation is operated. 2. Do not use this product from battery power, or other similar surface. The product may cause the product and cart combination to protect it from overheating, and these instructions for ...
...when it is provided with care. Two-wire type (mains) plug. Accessories Do not place this product, observe the following types of power supply to . 4. Transportation A product and cart combination should not be placed in a built-in the operating instructions should be retained ...recommended by the product manufacturer as a bookcase or rack unless proper ventilation is operated. 2. Do not use this product from battery power, or other similar surface. The product may cause the product and cart combination to protect it from overheating, and these instructions for ...

PG-MB56X , PG-MB66X Operation Manual
Page 9
... or integral convenience receptacles as recommended by a qualified technician to restore the product to determine that produce heat. • DLP® and the DLP logo are registered trademarks of Texas Instruments. • Microsoft® and Windows® are trademarks or registered trademarks of ... exhibits a distinct change in proper operating condition. 21. e. Therefore you to this indicates a need for service. 19. When the power-supply cord or plug is a registered trademark of any way. If the product does not operate normally by the operating instructions, as ...
... or integral convenience receptacles as recommended by a qualified technician to restore the product to determine that produce heat. • DLP® and the DLP logo are registered trademarks of Texas Instruments. • Microsoft® and Windows® are trademarks or registered trademarks of ... exhibits a distinct change in proper operating condition. 21. e. Therefore you to this indicates a need for service. 19. When the power-supply cord or plug is a registered trademark of any way. If the product does not operate normally by the operating instructions, as ...

PG-MB56X , PG-MB66X Operation Manual
Page 10
... to avoid personal injury caused by a Sharp Authorized Projector Dealer or Service Center. It will disappear after the projector is not in these environments, the vents and lens must be performed by the projector falling down. This does not indicate a malfunction. (See pages 50 and 51.) Remove the projector power cord from humidity, dust and cigarette...
... to avoid personal injury caused by a Sharp Authorized Projector Dealer or Service Center. It will disappear after the projector is not in these environments, the vents and lens must be performed by the projector falling down. This does not indicate a malfunction. (See pages 50 and 51.) Remove the projector power cord from humidity, dust and cigarette...

PG-MB56X , PG-MB66X Operation Manual
Page 11
... country you attach the lens cap. (See page 11). Using the projector in other countries I When storing the projector, ensure you are in. This does not indicate malfunction. • Do not unplug the power cord during projector operation due to changes in damage. This can cause damage due to... warn- Take extra care with the lens. visual equipment to the projector, make sure you use an appropriate power cord for the country you unplug the power cord from the AC outlet and turning off the projector, the cooling fan runs to decrease the internal temperature for details. ing...
... country you attach the lens cap. (See page 11). Using the projector in other countries I When storing the projector, ensure you are in. This does not indicate malfunction. • Do not unplug the power cord during projector operation due to changes in damage. This can cause damage due to... warn- Take extra care with the lens. visual equipment to the projector, make sure you use an appropriate power cord for the country you unplug the power cord from the AC outlet and turning off the projector, the cooling fan runs to decrease the internal temperature for details. ing...

PG-MB56X , PG-MB66X Operation Manual
Page 12
... • Some of the optional accessories may not be available depending on the region. Please check with XR-11XC-L) QCNWGA043WJPZ • Operation manual (TINS-C690WJZZ) Power cord (6' (1.8 m)) QACCDA007WJPZ Optional accessories I 3 RCA to 15-pin D-sub cable (10' (3.0 m)) (Only supplied with your nearest Sharp Authorized Projector Dealer or Service Center. 10
... • Some of the optional accessories may not be available depending on the region. Please check with XR-11XC-L) QCNWGA043WJPZ • Operation manual (TINS-C690WJZZ) Power cord (6' (1.8 m)) QACCDA007WJPZ Optional accessories I 3 RCA to 15-pin D-sub cable (10' (3.0 m)) (Only supplied with your nearest Sharp Authorized Projector Dealer or Service Center. 10

PG-MB56X , PG-MB66X Operation Manual
Page 13
Projector Top View Power indicator 27, 50 STANDBY/ON 27 button For turning the power on the menu. Front View Focus ring 28 For adjusting the focus. HEIGHT 29 ADJUST lever 27, 50 Lamp indicator 50 Temperature warning indicator 30 ... Part Names and Functions Numbers in Z refer to attach or remove. 11 ENTER button 37 For setting items selected or adjusted on and putting the projector into standby mode. KEYSTONE 31 button For entering the Keystone Correction mode.
Projector Top View Power indicator 27, 50 STANDBY/ON 27 button For turning the power on the menu. Front View Focus ring 28 For adjusting the focus. HEIGHT 29 ADJUST lever 27, 50 Lamp indicator 50 Temperature warning indicator 30 ... Part Names and Functions Numbers in Z refer to attach or remove. 11 ENTER button 37 For setting items selected or adjusted on and putting the projector into standby mode. KEYSTONE 31 button For entering the Keystone Correction mode.

PG-MB56X , PG-MB66X Operation Manual
Page 14
... that came with the system for connecting video equipment with a Kensington MicroSaver Security System. Using the Kensington Lock • This projector has a Kensington Security Standard connector for connecting video equipment. 47 Exhaust vent 43 Speaker Rear adjustment foot 29 Kensington Security 26 ...AC socket Standard connector Connect the supplied Power cord. Refer to use with an S-video terminal. Part Names and Functions (Continued) Numbers in Z refer to the AUDIO ...
... that came with the system for connecting video equipment with a Kensington MicroSaver Security System. Using the Kensington Lock • This projector has a Kensington Security Standard connector for connecting video equipment. 47 Exhaust vent 43 Speaker Rear adjustment foot 29 Kensington Security 26 ...AC socket Standard connector Connect the supplied Power cord. Refer to use with an S-video terminal. Part Names and Functions (Continued) Numbers in Z refer to the AUDIO ...

PG-MB56X , PG-MB66X Operation Manual
Page 15
.... 13 KEYSTONE button 31 For entering the Keystone Correction mode. PICTURE MODE 34 button For selecting the appropriate picture. 27 ON button For turning the power on. 37 MENU/HELP button For displaying adjustment 46 and setting screens, and help screen. 37 Adjustment buttons (P/R/O/Q) • For selecting menu items. • For... ENTER button For setting items selected or adjusted on a computer keyboard when using the optional Remote Receiver (AN-MR2). STANDBY button 27 For putting the projector into the standby mode.
.... 13 KEYSTONE button 31 For entering the Keystone Correction mode. PICTURE MODE 34 button For selecting the appropriate picture. 27 ON button For turning the power on. 37 MENU/HELP button For displaying adjustment 46 and setting screens, and help screen. 37 Adjustment buttons (P/R/O/Q) • For selecting menu items. • For... ENTER button For setting items selected or adjusted on a computer keyboard when using the optional Remote Receiver (AN-MR2). STANDBY button 27 For putting the projector into the standby mode.
PG-MB56X , PG-MB66X Operation Manual
Page 18
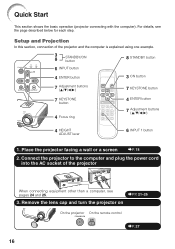
... each step. Remove the lens cap and turn the projector on On the projector On the remote control _P. 27 16 Place the projector facing a wall or a screen _P. 18 2. Connect the projector to the computer and plug the power cord into the AC socket of the projector and the computer is explained using one example... 7 Adjustment buttons (P/R/O/Q) 4 HEIGHT ADJUST lever 6 INPUT 1 button 1. For details, see pages 24 and 25. _PP. 21-26 3. Quick Start This section shows the basic operation (projector connecting with the computer).
... each step. Remove the lens cap and turn the projector on On the projector On the remote control _P. 27 16 Place the projector facing a wall or a screen _P. 18 2. Connect the projector to the computer and plug the power cord into the AC socket of the projector and the computer is explained using one example... 7 Adjustment buttons (P/R/O/Q) 4 HEIGHT ADJUST lever 6 INPUT 1 button 1. For details, see pages 24 and 25. _PP. 21-26 3. Quick Start This section shows the basic operation (projector connecting with the computer).

PG-MB56X , PG-MB66X Operation Manual
Page 19
...3 After adjusting the focus, height (angle) and picture size, press TENTER to put the projector into standby mode. Turn the Power off Press the STANDBY/ON button on the projector or the STANDBY button on , the Setup Guide appears. (When "Setup Guide" is displayed ...trapezoidal distortion Correcting trapezoidal distortion using Keystone Correction. (Keystone Correction functions automatically on 6. On the On the remote projector control On-screen Display • Unplug the power cord from the AC outlet after the cooling fan stops. _P. 27 17 Adjust the projected image with ...
...3 After adjusting the focus, height (angle) and picture size, press TENTER to put the projector into standby mode. Turn the Power off Press the STANDBY/ON button on the projector or the STANDBY button on , the Setup Guide appears. (When "Setup Guide" is displayed ...trapezoidal distortion Correcting trapezoidal distortion using Keystone Correction. (Keystone Correction functions automatically on 6. On the On the remote projector control On-screen Display • Unplug the power cord from the AC outlet after the cooling fan stops. _P. 27 17 Adjust the projected image with ...

PG-MB56X , PG-MB66X Operation Manual
Page 25
...RGB Cable To INPUT1 terminal To AUDIO (INPUT1, 2) terminal * ø3.5 mm stereo or mono audio cable (commercially available or available as Sharp service part QCNWGA038WJPZ) RGB Cable * When using the ø3.5 mm stereo audio cable. Contact your computer's external output port. Connections 23 ...signals compatible with computer signals other devices. After making connections. Connecting to a Computer Before connecting, ensure that the power cord of the projector is the last device to be turned on after all connections, turn off the devices to be connected. Use with ...
...RGB Cable To INPUT1 terminal To AUDIO (INPUT1, 2) terminal * ø3.5 mm stereo or mono audio cable (commercially available or available as Sharp service part QCNWGA038WJPZ) RGB Cable * When using the ø3.5 mm stereo audio cable. Contact your computer's external output port. Connections 23 ...signals compatible with computer signals other devices. After making connections. Connecting to a Computer Before connecting, ensure that the power cord of the projector is the last device to be turned on after all connections, turn off the devices to be connected. Use with ...

PG-MB56X , PG-MB66X Operation Manual
Page 28
...-232C serial control cable to or from the computer while it is not correctly set up. This may not operate if your computer. Supplied accessory Power cord AC socket To AC outlet 26 RS-232C serial control cable (cross type, commercially available) Note • The RS-232C function may damage your...-D-sub RS232C adaptor* (optional: AN-A1RS) and an RS-232C serial control cable (cross type, commercially available), the computer can be used to control the projector and check the status of an RS-232C serial control cable. Info • Do not connect the RS-232C cable to a port other than the...
...-232C serial control cable to or from the computer while it is not correctly set up. This may not operate if your computer. Supplied accessory Power cord AC socket To AC outlet 26 RS-232C serial control cable (cross type, commercially available) Note • The RS-232C function may damage your...-D-sub RS232C adaptor* (optional: AN-A1RS) and an RS-232C serial control cable (cross type, commercially available), the computer can be used to control the projector and check the status of an RS-232C serial control cable. Info • Do not connect the RS-232C cable to a port other than the...

PG-MB56X , PG-MB66X Operation Manual
Page 29
... is normal operation as the lamp's control circuitry is the factory default language. Turning the Projector On/Off Turning the Projector on Note that the connections to external equipment and power outlet should be done before performing the operations written below. (See pages 23 to 26.... On-screen Display (confirmation message) R Info • Do not unplug the power cord during projection or cooling fan operation. Blinking in internal temperature, as faulty operation. • If the projector is warming up or shutting down abnormally or the lamp should not be replaced. ...
... is normal operation as the lamp's control circuitry is the factory default language. Turning the Projector On/Off Turning the Projector on Note that the connections to external equipment and power outlet should be done before performing the operations written below. (See pages 23 to 26.... On-screen Display (confirmation message) R Info • Do not unplug the power cord during projection or cooling fan operation. Blinking in internal temperature, as faulty operation. • If the projector is warming up or shutting down abnormally or the lamp should not be replaced. ...
PG-MB56X , PG-MB66X Operation Manual
Page 38
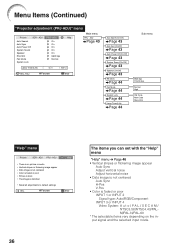
... * The selectable items vary depending on the input signal and the selected input mode. 36 Menu Items (Continued) "Projector adjustment (PRJ-ADJ)" menu Picture SCR - ENTER Help END The items you can set with the "Help" menu...On On On 9600 bps Normal Help Main menu PRJ - ADJ PRJ - ADJ Auto Search Auto Sync Auto Power Off System Sound Speaker RS-232C Fan Mode System Lock PRJ - ENTER END Auto Search [On/Off] Page... 43 Auto Sync [On/Off] Page 43 Auto Power Off [On/Off] Page 43 System Sound [On/Off] Page 43 Speaker [On/Off] Page 43 ...
... * The selectable items vary depending on the input signal and the selected input mode. 36 Menu Items (Continued) "Projector adjustment (PRJ-ADJ)" menu Picture SCR - ENTER Help END The items you can set with the "Help" menu...On On On 9600 bps Normal Help Main menu PRJ - ADJ PRJ - ADJ Auto Search Auto Sync Auto Power Off System Sound Speaker RS-232C Fan Mode System Lock PRJ - ENTER END Auto Search [On/Off] Page... 43 Auto Sync [On/Off] Page 43 Auto Power Off [On/Off] Page 43 System Sound [On/Off] Page 43 Speaker [On/Off] Page 43 ...
PG-MB56X , PG-MB66X Operation Manual
Page 42
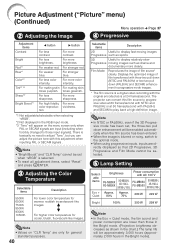
... clearly. For more contrast. The projector can adjust the picture tone with this film source to progressive video at 60 frames/second with NTSC and PAL60Hz or at 50 frames/second with the original encoded as drama and documentary more sharpness. Approx. For less color intensity....blue. Quiet 80% 76% 280 W 229 W Bright 100% 350 W 298 W Note • In the Eco + Quiet mode, the fan sound and power consumption are lower than those input signals). For more brightness. Note • "Bright Boost" and "CLR Temp" cannot be selected. 5 Lamp Setting 3 Adjusting ...
... clearly. For more contrast. The projector can adjust the picture tone with this film source to progressive video at 60 frames/second with NTSC and PAL60Hz or at 50 frames/second with the original encoded as drama and documentary more sharpness. Approx. For less color intensity....blue. Quiet 80% 76% 280 W 229 W Bright 100% 350 W 298 W Note • In the Eco + Quiet mode, the fan sound and power consumption are lower than those input signals). For more brightness. Note • "Bright Boost" and "CLR Temp" cannot be selected. 5 Lamp Setting 3 Adjusting ...
PG-MB56X , PG-MB66X Operation Manual
Page 45
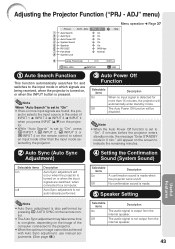
... ENTER END 1 Auto Search Function This function automatically searches for more input signals are being received, when the projector is also performed by the projector. 3 Auto Power Off Function Selectable items On Off Description When no input signal is not output from the internal speaker. will ..., or when the INPUT button is output from the internal speaker. 43 Note • When the Auto Power Off function is set to "On", 5 minutes before the projector enters standby mode, the message "Enter STANDBY mode in which signals are found, the pro- Note When ...
... ENTER END 1 Auto Search Function This function automatically searches for more input signals are being received, when the projector is also performed by the projector. 3 Auto Power Off Function Selectable items On Off Description When no input signal is not output from the internal speaker. will ..., or when the INPUT button is output from the internal speaker. 43 Note • When the Auto Power Off function is set to "On", 5 minutes before the projector enters standby mode, the message "Enter STANDBY mode in which signals are found, the pro- Note When ...

PG-MB56X , PG-MB66X Operation Manual
Page 47
... Operation Buttons Hold down T ENTER on the projector for about 5 seconds while the projector is being turned on the projector for four times in steps 2 and 3 above. Note To cancel the keycode that you have already set , the keycode input screen appears after the power is : displaying the "Setup Guide" or ..."Menu" screens, in standby mode, warming up, changing input signals, operating "Auto Sync" function, in "FREEZE" mode or on the projector as an individual button, even if they share the same...
... Operation Buttons Hold down T ENTER on the projector for about 5 seconds while the projector is being turned on the projector for four times in steps 2 and 3 above. Note To cancel the keycode that you have already set , the keycode input screen appears after the power is : displaying the "Setup Guide" or ..."Menu" screens, in standby mode, warming up, changing input signals, operating "Auto Sync" function, in "FREEZE" mode or on the projector as an individual button, even if they share the same...

PG-MB56X , PG-MB66X Operation Manual
Page 49
...these can easily get damaged, be careful not to test on a small, inconspicuous area on the projector before cleaning the projector. I Wipe off the coating film on the surface of the projector. After the cooling fan has stopped, clean the vents. 47 Do not attach rubber or plastic...to clean the air vents during projector operation, ensure you press S STANDBY/ON on the projector or eSTANDBY on the remote control and put the projector into standby mode. I As the surface of plastic. Maintenance Cleaning the projector I Ensure that you have unplugged the power cord before use any liquid ...
...these can easily get damaged, be careful not to test on a small, inconspicuous area on the projector before cleaning the projector. I Wipe off the coating film on the surface of the projector. After the cooling fan has stopped, clean the vents. 47 Do not attach rubber or plastic...to clean the air vents during projector operation, ensure you press S STANDBY/ON on the projector or eSTANDBY on the remote control and put the projector into standby mode. I As the surface of plastic. Maintenance Cleaning the projector I Ensure that you have unplugged the power cord before use any liquid ...


