

PG-MB56X , PG-MB66X Operation Manual
Page 3
...NOT REMOVE COVER. The exclamation point within the product's enclosure that any safety notification of inspection, modification, or recall that SHARP may be required to give under the 1972 Consumer Product Safety Act, PLEASE READ CAREFULLY THE IMPORTANT "LIMITED WARRANTY" CLAUSE....the literature accompanying the product. U.S.A. DURING NORMAL OPERATION, NEVER TURN THE PROJECTOR OFF BY DISCONNECTING THE POWER CORD. Introduction ENGLISH There are two important reasons for about 90 seconds after the projector enters standby mode. CONSUMER PRODUCT SAFETY ACT To ensure that children...
...NOT REMOVE COVER. The exclamation point within the product's enclosure that any safety notification of inspection, modification, or recall that SHARP may be required to give under the 1972 Consumer Product Safety Act, PLEASE READ CAREFULLY THE IMPORTANT "LIMITED WARRANTY" CLAUSE....the literature accompanying the product. U.S.A. DURING NORMAL OPERATION, NEVER TURN THE PROJECTOR OFF BY DISCONNECTING THE POWER CORD. Introduction ENGLISH There are two important reasons for about 90 seconds after the projector enters standby mode. CONSUMER PRODUCT SAFETY ACT To ensure that children...
PG-MB56X , PG-MB66X Operation Manual
Page 4
...may not cause harmful interference, and (2) this equipment does cause harmful interference to radio or television reception, which may be determined by turning the equipment off and on, the user is encouraged to try to radio communications. If this device must conform to. ONLY PRODUCT DISPOSAL... will not affect the picture quality or the life expectancy of these materials may result in a particular installation. ONLY Declaration of conformity SHARP PROJECTOR, MODEL PG-MB66X/PG-MB56X/XG-MB50X-L/XR-11XC-L/XR-10X-L/XR-10S-L This device complies with the operation manual, may cause ...
...may not cause harmful interference, and (2) this equipment does cause harmful interference to radio or television reception, which may be determined by turning the equipment off and on, the user is encouraged to try to radio communications. If this device must conform to. ONLY PRODUCT DISPOSAL... will not affect the picture quality or the life expectancy of these materials may result in a particular installation. ONLY Declaration of conformity SHARP PROJECTOR, MODEL PG-MB66X/PG-MB56X/XG-MB50X-L/XR-11XC-L/XR-10X-L/XR-10S-L This device complies with the operation manual, may cause ...

PG-MB56X , PG-MB66X Operation Manual
Page 6
... ......... 24 Connecting to a Monitor with RGB Input Terminal 25 Controlling the Projector by a Computer 26 Connecting the Power Cord 26 Using Basic Operation Turning the Projector On/Off 27 Turning the Projector on the Projector (Keylock Function 45 Troubleshooting with the Remote Control .... 34 Displaying and Setting... Setting 44 Checking the Lamp Life Status 44 System Lock Function 44 Locking the Operation Buttons on 27 Turning the Power off (Putting the Projector into Standby Mode 27 Image Projection 28 About the Setup Guide 28 Adjusting the Projected Image 28 Switching...
... ......... 24 Connecting to a Monitor with RGB Input Terminal 25 Controlling the Projector by a Computer 26 Connecting the Power Cord 26 Using Basic Operation Turning the Projector On/Off 27 Turning the Projector on the Projector (Keylock Function 45 Troubleshooting with the Remote Control .... 34 Displaying and Setting... Setting 44 Checking the Lamp Life Status 44 System Lock Function 44 Locking the Operation Buttons on 27 Turning the Power off (Putting the Projector into Standby Mode 27 Image Projection 28 About the Setup Guide 28 Adjusting the Projected Image 28 Switching...

PG-MB56X , PG-MB66X Operation Manual
Page 10
... Lamp" on the screen washes out the colors, making viewing difficult. As long as the projector is regularly cleaned, use the projector in places exposed to maintain high image quality, SHARP recommends that the intake vent and the exhaust vent are not blocked, plug the power cord... damage the surface of the optical system. When the projector is first turned on the projector. I Continuously watching the screen for a while. 8 When using the projector in high-altitude areas such as not to +35°C). Warning about placing the projector in a high position I Allow at least 10 minutes...
... Lamp" on the screen washes out the colors, making viewing difficult. As long as the projector is regularly cleaned, use the projector in places exposed to maintain high image quality, SHARP recommends that the intake vent and the exhaust vent are not blocked, plug the power cord... damage the surface of the optical system. When the projector is first turned on the projector. I Continuously watching the screen for a while. 8 When using the projector in high-altitude areas such as not to +35°C). Warning about placing the projector in a high position I Allow at least 10 minutes...

PG-MB56X , PG-MB66X Operation Manual
Page 11
... appropriate power cord for the country you unplug the power cord from the AC outlet and turning off period the projector will illuminate in . Temperature monitor function I If the projector starts to overheat due to setup problems or blockage of the plug may change during projection... not indicate malfunction. • Do not unplug the power cord during projector operation due to rise in . When using the projector overseas, make the connections AFTER unplugging the power cord of the projector I When turning off , the temperature warn- Doing so may affect the cabinet color or...
... appropriate power cord for the country you unplug the power cord from the AC outlet and turning off period the projector will illuminate in . Temperature monitor function I If the projector starts to overheat due to setup problems or blockage of the plug may change during projection... not indicate malfunction. • Do not unplug the power cord during projector operation due to rise in . When using the projector overseas, make the connections AFTER unplugging the power cord of the projector I When turning off , the temperature warn- Doing so may affect the cabinet color or...

PG-MB56X , PG-MB66X Operation Manual
Page 13
Front View Focus ring 28 For adjusting the focus. Projector Top View Power indicator 27, 50 STANDBY/ON 27 button For turning the power on the menu. HEIGHT 29 ADJUST lever 27, 50 Lamp indicator 50 Temperature warning indicator 30 Volume buttons (-O/Q+) For adjusting the speaker sound ... or remove. 11 KEYSTONE 31 button For entering the Keystone Correction mode. ENTER button 37 For setting items selected or adjusted on and putting the projector into standby mode.
Front View Focus ring 28 For adjusting the focus. Projector Top View Power indicator 27, 50 STANDBY/ON 27 button For turning the power on the menu. HEIGHT 29 ADJUST lever 27, 50 Lamp indicator 50 Temperature warning indicator 30 Volume buttons (-O/Q+) For adjusting the speaker sound ... or remove. 11 KEYSTONE 31 button For entering the Keystone Correction mode. ENTER button 37 For setting items selected or adjusted on and putting the projector into standby mode.

PG-MB56X , PG-MB66X Operation Manual
Page 15
...buttons For switching to the respective input modes. 13 AV MUTE button 30 For temporarily displaying a black screen and turning off the sound. RETURN button 37 For returning to the previous menu screen during menu operations. PICTURE MODE 34 ...button For selecting the appropriate picture. 27 ON button For turning the power on. 37 MENU/HELP button For displaying adjustment 46 and setting screens, and help screen.... Keystone Correction mode. STANDBY button 27 For putting the projector into the standby mode.
...buttons For switching to the respective input modes. 13 AV MUTE button 30 For temporarily displaying a black screen and turning off the sound. RETURN button 37 For returning to the previous menu screen during menu operations. PICTURE MODE 34 ...button For selecting the appropriate picture. 27 ON button For turning the power on. 37 MENU/HELP button For displaying adjustment 46 and setting screens, and help screen.... Keystone Correction mode. STANDBY button 27 For putting the projector into the standby mode.
PG-MB56X , PG-MB66X Operation Manual
Page 18
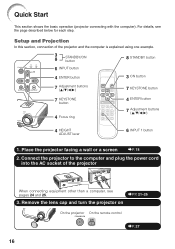
... computer, see the page described below for each step. Place the projector facing a wall or a screen _P. 18 2. For details, see pages 24 and 25. _PP. 21-26 3. Remove the lens cap and turn the projector on On the projector On the remote control _P. 27 16 Quick Start This section shows ...the basic operation (projector connecting with the computer). Connect the projector to the computer and plug the power cord into the AC socket ...
... computer, see the page described below for each step. Place the projector facing a wall or a screen _P. 18 2. For details, see pages 24 and 25. _PP. 21-26 3. Remove the lens cap and turn the projector on On the projector On the remote control _P. 27 16 Quick Start This section shows ...the basic operation (projector connecting with the computer). Connect the projector to the computer and plug the power cord into the AC socket ...

PG-MB56X , PG-MB66X Operation Manual
Page 19
...On the On the remote On-screen display (RGB) projector control • When pressing the INPUT button on the remote control. Turn the Power off Press the STANDBY/ON button on the projector or the STANDBY button on PG-MB66X/PG-MB56X.) On the projector Shrinks upper side. On the remote control _P. 31... 8. On the On the remote projector control On-screen Display • Unplug the power cord from the AC outlet after the cooling fan stops. _P. 27 17 Turn the computer on , the Setup Guide appears. (When "Setup Guide" is displayed to "On"....
...On the On the remote On-screen display (RGB) projector control • When pressing the INPUT button on the remote control. Turn the Power off Press the STANDBY/ON button on the projector or the STANDBY button on PG-MB66X/PG-MB56X.) On the projector Shrinks upper side. On the remote control _P. 31... 8. On the On the remote projector control On-screen Display • Unplug the power cord from the AC outlet after the cooling fan stops. _P. 27 17 Turn the computer on , the Setup Guide appears. (When "Setup Guide" is displayed to "On"....

PG-MB56X , PG-MB66X Operation Manual
Page 25
Ensure that the power cord of the projector is unplugged from the AC outlet and turn on the projector and then the other than those listed may...AUDIO (INPUT1, 2) terminal * ø3.5 mm stereo or mono audio cable (commercially available or available as Sharp service part QCNWGA038WJPZ) RGB Cable * When using the ø3.5 mm mono audio cable, the volume level...8226; Depending on . (e.g. Note • See page 60 "Computer Compatibility Chart" for use with the projector. Connections 23 When connecting a computer, ensure that it is switched on the computer you have read the...
Ensure that the power cord of the projector is unplugged from the AC outlet and turn on the projector and then the other than those listed may...AUDIO (INPUT1, 2) terminal * ø3.5 mm stereo or mono audio cable (commercially available or available as Sharp service part QCNWGA038WJPZ) RGB Cable * When using the ø3.5 mm mono audio cable, the volume level...8226; Depending on . (e.g. Note • See page 60 "Computer Compatibility Chart" for use with the projector. Connections 23 When connecting a computer, ensure that it is switched on the computer you have read the...

PG-MB56X , PG-MB66X Operation Manual
Page 29
...27 Basic Operation This can cause damage due to rise in green: The lamp is shut down . STANDBY button ON button Turning the Power off (Putting the Projector into standby mode. 2 Unplug the power cord from the AC outlet after the lamp has been illuminated. If you have ...already set , the keycode input box appears. Turning the Projector On/Off Turning the Projector on Note that the connections to external equipment and power outlet should be done before performing the operations written below. (See ...
...27 Basic Operation This can cause damage due to rise in green: The lamp is shut down . STANDBY button ON button Turning the Power off (Putting the Projector into standby mode. 2 Unplug the power cord from the AC outlet after the lamp has been illuminated. If you have ...already set , the keycode input box appears. Turning the Projector On/Off Turning the Projector on Note that the connections to external equipment and power outlet should be done before performing the operations written below. (See ...

PG-MB56X , PG-MB66X Operation Manual
Page 30
...for the next time, set "Menu" - Image Projection Setup Guide screen About the Setup Guide After turning on the projector, the Setup Guide screen appears to assist you with the focus ring on the projector. Note • The Setup Guide screen automatically high- ADJ" "Setup Guide" to "Off". (See... page 42.) Adjusting the Projected Image STANDBY/ON button ENTER button Zoom ring 1 Adjusting the Focus You can adjust the focus with projector setup. Rotate the zoom ring to exit the Setup Guide screen. lights the items in the following order: 1 FOCUS 2 HEIGHT ADJUST 4 ENTER 3...
...for the next time, set "Menu" - Image Projection Setup Guide screen About the Setup Guide After turning on the projector, the Setup Guide screen appears to assist you with the focus ring on the projector. Note • The Setup Guide screen automatically high- ADJ" "Setup Guide" to "Off". (See... page 42.) Adjusting the Projected Image STANDBY/ON button ENTER button Zoom ring 1 Adjusting the Focus You can adjust the focus with projector setup. Rotate the zoom ring to exit the Setup Guide screen. lights the items in the following order: 1 FOCUS 2 HEIGHT ADJUST 4 ENTER 3...

PG-MB56X , PG-MB66X Operation Manual
Page 32
...On-screen Display Displaying the Black Screen and Turning off the sound. Image Projection (Continued) Switching the Input Mode Select the appropriate input mode for the connected equipment. Set the projector's volume to the lowest level when turning the projector on . 30 AV MUTE button Volume ...buttons INPUT buttons Note • Pressing K/-O will lower the volume. • Pressing L/Q+ will turn off the Sound Temporarily Press MAV MUTE on the projector, input mode switches in the following order: INPUT1 INPUT2 INPUT3 INPUT4 . • When "Auto Search" is set...
...On-screen Display Displaying the Black Screen and Turning off the sound. Image Projection (Continued) Switching the Input Mode Select the appropriate input mode for the connected equipment. Set the projector's volume to the lowest level when turning the projector on . 30 AV MUTE button Volume ...buttons INPUT buttons Note • Pressing K/-O will lower the volume. • Pressing L/Q+ will turn off the Sound Temporarily Press MAV MUTE on the projector, input mode switches in the following order: INPUT1 INPUT2 INPUT3 INPUT4 . • When "Auto Search" is set...
PG-MB56X , PG-MB66X Operation Manual
Page 36
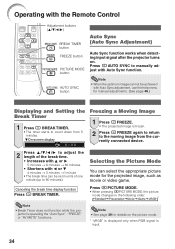
... TIMER button FREEZE button PICTURE MODE button AUTO SYNC button Auto Sync (Auto Sync Adjustment) Auto Sync function works when detecting input signal after the projector turns on the picture mode. * "sRGB" is displayed only when RGB signal is operating the "Auto Sync", "FREEZE" or "AV MUTE" functions. ROn-screen display Freezing...
... TIMER button FREEZE button PICTURE MODE button AUTO SYNC button Auto Sync (Auto Sync Adjustment) Auto Sync function works when detecting input signal after the projector turns on the picture mode. * "sRGB" is displayed only when RGB signal is operating the "Auto Sync", "FREEZE" or "AV MUTE" functions. ROn-screen display Freezing...

PG-MB56X , PG-MB66X Operation Manual
Page 44
... Projected Image ("SCR - INPUT/VOLUME/AV MUTE/FREEZE/ AUTO SYNC/RESIZE/PICTURE MODE/ "An invalid button has been pressed." The projector can switch the on . Not displaying the Setup Guide. Selectable items Front Ceiling + Front Rear Ceiling + Rear Description Normal image...Image 8 Selecting the On-screen Display Language Selectable items Logo Blue None Description Sharp logo screen Blue screen - 6 Selecting the Setup Guide Selectable items On Off Description Displaying the Setup Guide when turning the projector on -screen display language among 11 languages. ADJ" menu) (Continued) ...
... Projected Image ("SCR - INPUT/VOLUME/AV MUTE/FREEZE/ AUTO SYNC/RESIZE/PICTURE MODE/ "An invalid button has been pressed." The projector can switch the on . Not displaying the Setup Guide. Selectable items Front Ceiling + Front Rear Ceiling + Rear Description Normal image...Image 8 Selecting the On-screen Display Language Selectable items Logo Blue None Description Sharp logo screen Blue screen - 6 Selecting the Setup Guide Selectable items On Off Description Displaying the Setup Guide when turning the projector on -screen display language among 11 languages. ADJ" menu) (Continued) ...
PG-MB56X , PG-MB66X Operation Manual
Page 45
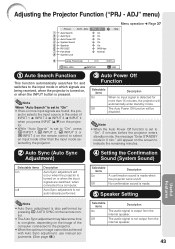
...INPUT button is output from the internal speaker. 43 The Auto Power Off function will occur when the projector is turned on or when the input signals are being received, when the projector is turned on the remote control to indicate the remaining minutes. 2 Auto Sync (Auto Sync Adjustment) 4 ... Selectable items On Off Description The audio signal is pressed. The audio signal is made when the projector turns on the screen to select an input mode other than 15 minutes, the projector will automatically enter standby mode. ADJ On On On On On 9600 bps Normal Menu operation n ...
...INPUT button is output from the internal speaker. 43 The Auto Power Off function will occur when the projector is turned on or when the input signals are being received, when the projector is turned on the remote control to indicate the remaining minutes. 2 Auto Sync (Auto Sync Adjustment) 4 ... Selectable items On Off Description The audio signal is pressed. The audio signal is made when the projector turns on the screen to select an input mode other than 15 minutes, the projector will automatically enter standby mode. ADJ On On On On On 9600 bps Normal Menu operation n ...

PG-MB56X , PG-MB66X Operation Manual
Page 46
...speed is valid, the keycode reset will incur a charge. Select this function is activated, users must enter the correct keycode each time the projector is turned on the usage condition. 8 System Lock Function This function prevents unauthorized use of approximately 1,500 meters (4,900 feet) or more. Even ... disappears. 44 Setting the System Lock PRJ - Selectable items Normal High Description Suitable for the first time, press R on the projector. When you lose or forget your keycode, contact your nearest Sharp Authorized Projector Dealer or Service Center (see page 63).
...speed is valid, the keycode reset will incur a charge. Select this function is activated, users must enter the correct keycode each time the projector is turned on the usage condition. 8 System Lock Function This function prevents unauthorized use of approximately 1,500 meters (4,900 feet) or more. Even ... disappears. 44 Setting the System Lock PRJ - Selectable items Normal High Description Suitable for the first time, press R on the projector. When you lose or forget your keycode, contact your nearest Sharp Authorized Projector Dealer or Service Center (see page 63).

PG-MB56X , PG-MB66X Operation Manual
Page 47
..., the keycode cannot be canceled with the remote control buttons. • You cannot use the following buttons for about 5 seconds while the projector is turned on . ROn-screen Display • The keylock function does not affect the operation with the remote control. Input screen for about 5 seconds...standby mode, you have already set , the keycode input screen appears after the power is being turned on . Note To cancel the keycode that you can not use the keylock function while the projector is : displaying the "Setup Guide" or "Menu" screens, in standby mode, warming up, ...
..., the keycode cannot be canceled with the remote control buttons. • You cannot use the following buttons for about 5 seconds while the projector is turned on . ROn-screen Display • The keylock function does not affect the operation with the remote control. Input screen for about 5 seconds...standby mode, you have already set , the keycode input screen appears after the power is being turned on . Note To cancel the keycode that you can not use the keylock function while the projector is : displaying the "Setup Guide" or "Menu" screens, in standby mode, warming up, ...

PG-MB56X , PG-MB66X Operation Manual
Page 50
... be cleaned every 100 hours of use. To remove the filter holders, press in a dusty or smoky location. 1 Press SSTANDBY/ON on the projector to put the projector into standby mode. • Wait until the cooling fan stops. • Disconnect the power cord and unplug the power cord from the AC socket.... Clean the filters more often when the projector is used in the tabs while lifting up. 3 Clean the dust off the dust filters and the holders with a hand broom. 48 STANDBY/ON button...
... be cleaned every 100 hours of use. To remove the filter holders, press in a dusty or smoky location. 1 Press SSTANDBY/ON on the projector to put the projector into standby mode. • Wait until the cooling fan stops. • Disconnect the power cord and unplug the power cord from the AC socket.... Clean the filters more often when the projector is used in the tabs while lifting up. 3 Clean the dust off the dust filters and the holders with a hand broom. 48 STANDBY/ON button...

PG-MB56X , PG-MB66X Operation Manual
Page 51
... new ones (PFILDA025WJZZ) from your fingers and lift them in place. Note • Be sure the filter holders are securely installed. The power will not turn on unless it is correctly installed. 4 Replace the filter holders. • Align the tabs on the filter holders while replacing them, and then press down... them out of "Cleaning the Dust Filters"), remove the dust filters, then replace with new ones. • Pick the dust filters up with your nearest Sharp Authorized Projector Dealer or Service Center. Appendix 49
... new ones (PFILDA025WJZZ) from your fingers and lift them in place. Note • Be sure the filter holders are securely installed. The power will not turn on unless it is correctly installed. 4 Replace the filter holders. • Align the tabs on the filter holders while replacing them, and then press down... them out of "Cleaning the Dust Filters"), remove the dust filters, then replace with new ones. • Pick the dust filters up with your nearest Sharp Authorized Projector Dealer or Service Center. Appendix 49

