
Operation Manual
Page 5
...CAUTION RISK OF ELECTRIC SHOCK. DO NOT REMOVE SCREWS EXCEPT SPECIFIED USER SERVICE SCREW. See bottom of projector. The exclamation point within the product's enclosure that SHARP may be required to give under the 1972 Consumer Product Safety Act, PLEASE READ CAREFULLY THE IMPORTANT "...beam of light. NO USER-SERVICEABLE PARTS EXCEPT LAMP UNIT. CONSUMER PRODUCT SAFETY ACT To ensure that you immediately receive the full benefit of the parts, service and labor warranty applicable to your new SHARP Projector, using the projector, please read this equipment. WARNING: FCC ...
...CAUTION RISK OF ELECTRIC SHOCK. DO NOT REMOVE SCREWS EXCEPT SPECIFIED USER SERVICE SCREW. See bottom of projector. The exclamation point within the product's enclosure that SHARP may be required to give under the 1972 Consumer Product Safety Act, PLEASE READ CAREFULLY THE IMPORTANT "...beam of light. NO USER-SERVICEABLE PARTS EXCEPT LAMP UNIT. CONSUMER PRODUCT SAFETY ACT To ensure that you immediately receive the full benefit of the parts, service and labor warranty applicable to your new SHARP Projector, using the projector, please read this equipment. WARNING: FCC ...

Operation Manual
Page 6
This SHARP projector uses a DLP® chip. This unit has some inactive pixels within acceptable...equipment and the receiver. • Connect the equipment into an outlet on page 50. Disposal of conformity SHARP PROJECTOR, MODEL XR-40X/XR-30X/XR-30S This device complies with any interference received, including interference that may... mercury. This very sophisticated panel contains 786,432 (XR40X/XR-30X) / 480,000 (XR-30S) pixels (micromirrors). ONLY PRODUCT DISPOSAL This projector utilizes tin-lead solder, and a pressurized lamp containing a small amount of the unit. This equipment...
This SHARP projector uses a DLP® chip. This unit has some inactive pixels within acceptable...equipment and the receiver. • Connect the equipment into an outlet on page 50. Disposal of conformity SHARP PROJECTOR, MODEL XR-40X/XR-30X/XR-30S This device complies with any interference received, including interference that may... mercury. This very sophisticated panel contains 786,432 (XR40X/XR-30X) / 480,000 (XR-30S) pixels (micromirrors). ONLY PRODUCT DISPOSAL This projector utilizes tin-lead solder, and a pressurized lamp containing a small amount of the unit. This equipment...

Operation Manual
Page 7
...8226; In this step On-screen display 37 Info ........Indicates safeguards for setting up and operating the projector. Example: "Picture" screen menu for the selected input mode is displayed. ENTER END Useful Features Button... operate all models in this operation manual, the illustration and the screen display are slightly different, depending on the projector. 1 Press MENU/HELP. • The "Picture" menu screen for COMPUTER (RGB) input Menu item Picture...However, you can also be performed by using the projector. ADJ Picture Mode Contrast Bright Red Blue CLR Temp Bright Boost...
...8226; In this step On-screen display 37 Info ........Indicates safeguards for setting up and operating the projector. Example: "Picture" screen menu for the selected input mode is displayed. ENTER END Useful Features Button... operate all models in this operation manual, the illustration and the screen display are slightly different, depending on the projector. 1 Press MENU/HELP. • The "Picture" menu screen for COMPUTER (RGB) input Menu item Picture...However, you can also be performed by using the projector. ADJ Picture Mode Contrast Bright Red Blue CLR Temp Bright Boost...
Operation Manual
Page 8
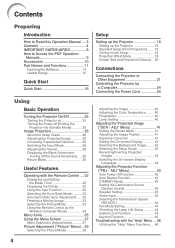
... 10 Part Names and Functions 11 Inserting the Batteries 14 Usable Range 15 Quick Start Quick Start 16 Setup Setting up the Projector 18 Setting up the Projector 18 Standard Setup (Front Projection) ....... 18 Ceiling-mount Setup 18 Projection (PRJ) Mode 19 Screen Size and Projection Distance ...(System Sound 43 Speaker Setting 43 Audio Input 43 Selecting the Transmission Speed (RS-232C 44 Fan Mode Setting 44 Checking the Lamp Life Status 44 System Lock Function 44 Keylock Function 45 Troubleshooting with the Remote Control .... 32 Displaying and Setting the Break Timer...
... 10 Part Names and Functions 11 Inserting the Batteries 14 Usable Range 15 Quick Start Quick Start 16 Setup Setting up the Projector 18 Setting up the Projector 18 Standard Setup (Front Projection) ....... 18 Ceiling-mount Setup 18 Projection (PRJ) Mode 19 Screen Size and Projection Distance ...(System Sound 43 Speaker Setting 43 Audio Input 43 Selecting the Transmission Speed (RS-232C 44 Fan Mode Setting 44 Checking the Lamp Life Status 44 System Lock Function 44 Keylock Function 45 Troubleshooting with the Remote Control .... 32 Displaying and Setting the Break Timer...

Operation Manual
Page 9
Introduction Reference Appendix Maintenance 47 Maintenance Indicators 48 Regarding the Lamp 50 Lamp 50 Caution Concerning the Lamp 50 Replacing the Lamp 50 Removing and Installing the Lamp Unit 51 Resetting the Lamp Timer 52 Connecting Pin Assignments 53 RS-232C Specifications and Command Settings 55 Computer Compatibility Chart 60 Troubleshooting 61 For SHARP Assistance 63 Specifications 64 Dimensions 65 Index 66 5
Introduction Reference Appendix Maintenance 47 Maintenance Indicators 48 Regarding the Lamp 50 Lamp 50 Caution Concerning the Lamp 50 Replacing the Lamp 50 Removing and Installing the Lamp Unit 51 Resetting the Lamp Timer 52 Connecting Pin Assignments 53 RS-232C Specifications and Command Settings 55 Computer Compatibility Chart 60 Troubleshooting 61 For SHARP Assistance 63 Specifications 64 Dimensions 65 Index 66 5

Operation Manual
Page 12
... are not blocked, plug the power cord back in and turn on . This will automatically put the projector into standby mode to avoid personal injury caused by a Sharp Authorized Projector Dealer or Service Center. See "Replacing the Lamp" on the screen washes out the colors, making viewing difficult. Internal cleaning should only be installed...
... are not blocked, plug the power cord back in and turn on . This will automatically put the projector into standby mode to avoid personal injury caused by a Sharp Authorized Projector Dealer or Service Center. See "Replacing the Lamp" on the screen washes out the colors, making viewing difficult. Internal cleaning should only be installed...

Operation Manual
Page 13
...unplugging the power cord of the projector from the Internet (http://www.adobe.com). The sound of the fan may affect the cabinet color or cause deformation of the plastic cover. Accessing the PDF Manuals for details. visual equipment to rise, the lamp will illuminate in the lower left... corner of the picture. Info • The cooling fan regulates the internal temperature, and its performance is running, some parts of the projector may vary depending on page 48 for Windows® (For...
...unplugging the power cord of the projector from the Internet (http://www.adobe.com). The sound of the fan may affect the cabinet color or cause deformation of the plastic cover. Accessing the PDF Manuals for details. visual equipment to rise, the lamp will illuminate in the lower left... corner of the picture. Info • The cooling fan regulates the internal temperature, and its performance is running, some parts of the projector may vary depending on page 48 for Windows® (For...
Operation Manual
Page 14
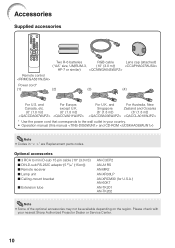
... the power cord that corresponds to mini D-sub 15 pin cable (10n (3.0 m)) ■ DIN-D-sub RS-232C adaptor (5 57/64" (15cm)) ■ Remote receiver ■ Lamp unit ■ Ceiling-mount bracket ■ Extension tube AN-C3CP2 AN-A1RS AN-MR2 AN-XR30LP AN-XRCM30 (for U.S.A.) AN-60KT AN-TK201 AN-TK202... manual (this manual and CD-ROM ) Note • Codes in "< >" are Replacement parts codes. Optional accessories ■ 3 RCA to the wall outlet in your nearest Sharp Authorized Projector Dealer or Service Center. 10 except U.K. (6' (1.8 m)) (6' (1.8 m)) For U.K.
... the power cord that corresponds to mini D-sub 15 pin cable (10n (3.0 m)) ■ DIN-D-sub RS-232C adaptor (5 57/64" (15cm)) ■ Remote receiver ■ Lamp unit ■ Ceiling-mount bracket ■ Extension tube AN-C3CP2 AN-A1RS AN-MR2 AN-XR30LP AN-XRCM30 (for U.S.A.) AN-60KT AN-TK201 AN-TK202... manual (this manual and CD-ROM ) Note • Codes in "< >" are Replacement parts codes. Optional accessories ■ 3 RCA to the wall outlet in your nearest Sharp Authorized Projector Dealer or Service Center. 10 except U.K. (6' (1.8 m)) (6' (1.8 m)) For U.K.
Operation Manual
Page 15
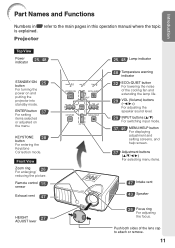
...entering the Keystone Correction mode. ENTER button For setting 37 items selected or adjusted on and putting the projector into standby mode. Push both sides of the cooling fan and extending the lamp life. 29 VOL (Volume) buttons (-O/Q+) For adjusting the speaker sound level. 29 INPUT buttons (P/R) ... adjusting the focus. Front View Zoom ring 26 For enlarging/ reducing the picture. Remote control 15 sensor Exhaust vent 47 25, 48 Lamp indicator 48 Temperature warning indicator 32 ECO+QUIET button For lowering the noise of the lens cap to the main pages in Z refer...
...entering the Keystone Correction mode. ENTER button For setting 37 items selected or adjusted on and putting the projector into standby mode. Push both sides of the cooling fan and extending the lamp life. 29 VOL (Volume) buttons (-O/Q+) For adjusting the speaker sound level. 29 INPUT buttons (P/R) ... adjusting the focus. Front View Zoom ring 26 For enlarging/ reducing the picture. Remote control 15 sensor Exhaust vent 47 25, 48 Lamp indicator 48 Temperature warning indicator 32 ECO+QUIET button For lowering the noise of the lens cap to the main pages in Z refer...
Operation Manual
Page 17
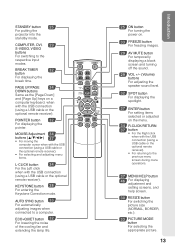
... automatically adjusting images when connected to the respective input modes. ECO+QUIET button 32 For lowering the noise of the cooling fan and extending the lamp life. 25 ON button For turning the power on. 33 FREEZE button For freezing images. 29 AV MUTE button For temporarily displaying a black screen and... USB connection (using a USB cable or the optional remote receiver). KEYSTONE button 28 For entering the Keystone Correction mode. STANDBY button 25 For putting the projector into the standby mode.
... automatically adjusting images when connected to the respective input modes. ECO+QUIET button 32 For lowering the noise of the cooling fan and extending the lamp life. 25 ON button For turning the power on. 33 FREEZE button For freezing images. 29 AV MUTE button For temporarily displaying a black screen and... USB connection (using a USB cable or the optional remote receiver). KEYSTONE button 28 For entering the Keystone Correction mode. STANDBY button 25 For putting the projector into the standby mode.
Operation Manual
Page 19
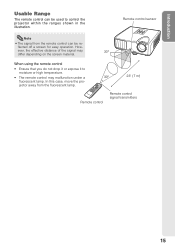
... the screen material. Remote control sensor Note • The signal from the fluorescent lamp. 30° 23n (7 m) Remote control Remote control signal transmitters 15 In this case, move the projector away from the remote control can be re- How- ever, the effective distance of... the signal may malfunction under a fluorescent lamp. When using the remote control • Ensure that you do not drop...
... the screen material. Remote control sensor Note • The signal from the fluorescent lamp. 30° 23n (7 m) Remote control Remote control signal transmitters 15 In this case, move the projector away from the remote control can be re- How- ever, the effective distance of... the signal may malfunction under a fluorescent lamp. When using the remote control • Ensure that you do not drop...

Operation Manual
Page 29
...the procedure on the remote control. • The power indicator illuminates green. • After the lamp indicator illuminates, the projec- Green: The lamp is on the projector, a slight flickering of the lamp. See page 44 for details. On-screen display (confirmation message) Info • Direct Power Off ... indicate the status of the image may take some time to start operation. Red: The lamp is the factory default language. Turning the Projector On/Off Turning the Projector on Note that the connections to external equipment and power outlet should be done before performing...
...the procedure on the remote control. • The power indicator illuminates green. • After the lamp indicator illuminates, the projec- Green: The lamp is on the projector, a slight flickering of the lamp. See page 44 for details. On-screen display (confirmation message) Info • Direct Power Off ... indicate the status of the image may take some time to start operation. Red: The lamp is the factory default language. Turning the Projector On/Off Turning the Projector on Note that the connections to external equipment and power outlet should be done before performing...

Operation Manual
Page 36
..." functions. Note • Refer to count down , the power consumption will decrease, and the lamp life will extend. ECO+QUIET button Displaying and Setting the Break Timer Using the Spot Function 1 Press SPOT and press P/R/O/Q on the projector to "ON", the sound of the Eco+Quiet mode. 32 Note • Break Timer... one minute (up to move the spot area. 2 Press SPOT again. • The spot area will disappear. 1 Press BREAK TIMER. • The timer starts to "Lamp Setting" on the remote control to 60 minutes).
..." functions. Note • Refer to count down , the power consumption will decrease, and the lamp life will extend. ECO+QUIET button Displaying and Setting the Break Timer Using the Spot Function 1 Press SPOT and press P/R/O/Q on the projector to "ON", the sound of the Eco+Quiet mode. 32 Note • Break Timer... one minute (up to move the spot area. 2 Press SPOT again. • The spot area will disappear. 1 Press BREAK TIMER. • The timer starts to "Lamp Setting" on the remote control to 60 minutes).

Operation Manual
Page 39
...the menu screen only when PAL or SECAM signals are input (including when forcibly changed to adjust "Tone", but you can be set in the projector. "Picture" menu Main menu Picture Picture Mode COMPUTER (RGB), DVI (RGB) input Page 39 Page 39 Picture SCR - ADJ Standard 0 0 ...+30 *1 +30 *2 +30 *2*3 SEL./ADJ. ADJ Help Standard 0 0 0 0 0 0 1 3D Progressive Bright Sharp -30 +30 *2 Page 40 CLR Temp -2 2 Page 40 Bright Boost [0/1/2] Page 40 Progressive Page 40 Lamp Setting Page 40 Reset *4 2D Progressive 3D Progressive Film Mode Bright Eco + Quiet SEL./ADJ. ENTER END "Screen...
...the menu screen only when PAL or SECAM signals are input (including when forcibly changed to adjust "Tone", but you can be set in the projector. "Picture" menu Main menu Picture Picture Mode COMPUTER (RGB), DVI (RGB) input Page 39 Page 39 Picture SCR - ADJ Standard 0 0 ...+30 *1 +30 *2 +30 *2*3 SEL./ADJ. ADJ Help Standard 0 0 0 0 0 0 1 3D Progressive Bright Sharp -30 +30 *2 Page 40 CLR Temp -2 2 Page 40 Bright Boost [0/1/2] Page 40 Progressive Page 40 Lamp Setting Page 40 Reset *4 2D Progressive 3D Progressive Film Mode Bright Eco + Quiet SEL./ADJ. ENTER END "Screen...

Operation Manual
Page 40
...] Page 43 Speaker [On/Off] Page 43 Audio Input Page 43 RS-232C Page 44 Fan Mode Page 44 System Lock [Enable/Disable] Page 44 Lamp Timer(Life) Page 44 Sub menu Standard Eco Audio 1 Audio 2 9600bps 115200bps Normal High "Help" menu Picture SCR - ADJ There is no picture or audio... * The selectable items vary depending on the input signal and the selected input mode. ADJ On On Standard On On Audio 1 9600bps Normal Disable Help Lamp Timer(Life) 0h 0 min 100% SEL./ADJ. Menu Items (Continued) "Projector adjustment (PRJ-ADJ)" menu Picture SCR -
...] Page 43 Speaker [On/Off] Page 43 Audio Input Page 43 RS-232C Page 44 Fan Mode Page 44 System Lock [Enable/Disable] Page 44 Lamp Timer(Life) Page 44 Sub menu Standard Eco Audio 1 Audio 2 9600bps 115200bps Normal High "Help" menu Picture SCR - ADJ There is no picture or audio... * The selectable items vary depending on the input signal and the selected input mode. ADJ On On Standard On On Audio 1 9600bps Normal Disable Help Lamp Timer(Life) 0h 0 min 100% SEL./ADJ. Menu Items (Continued) "Projector adjustment (PRJ-ADJ)" menu Picture SCR -

Operation Manual
Page 41
...button Useful Features Menu Selections (Adjustments) Example: Adjusting "Bright". • This operation can also be performed by using the buttons on the projector. 1 Press MENU/HELP. • The "Picture" menu screen for COMPUTER (RGB) input Menu item Picture SCR - ADJ Picture Mode... Contrast Bright Red Blue CLR Temp Bright Boost Lamp Setting Reset PRJ - Using the Menu Screen ENTER button Adjustment buttons (P/R/O/Q) MENU/HELP button ENTER button Adjustment buttons (P/R/O/Q) RETURN button •...
...button Useful Features Menu Selections (Adjustments) Example: Adjusting "Bright". • This operation can also be performed by using the buttons on the projector. 1 Press MENU/HELP. • The "Picture" menu screen for COMPUTER (RGB) input Menu item Picture SCR - ADJ Picture Mode... Contrast Bright Red Blue CLR Temp Bright Boost Lamp Setting Reset PRJ - Using the Menu Screen ENTER button Adjustment buttons (P/R/O/Q) MENU/HELP button ENTER button Adjustment buttons (P/R/O/Q) RETURN button •...

Operation Manual
Page 42
...displayed by itself Picture Bright SEL./ADJ. 0 Rtn. Picture SCR - ADJ Picture Mode Contrast Bright Red Blue CLR Temp Bright Boost Lamp Setting Reset PRJ - Picture Resize Image Shift Keystone OSD Display SCR - vious screen. ADJ Picture Mode Contrast Bright Red Blue CLR Temp Bright... 4 Press O or Q to adjust. • The selected item is highlighted. Single ADJ END Note • Menu buttons do not function while the projector is displayed by itself at the bottom of the screen. • When pressing P or R, the following item ("Red" after "Bright") will disappear. ADJ...
...displayed by itself Picture Bright SEL./ADJ. 0 Rtn. Picture SCR - ADJ Picture Mode Contrast Bright Red Blue CLR Temp Bright Boost Lamp Setting Reset PRJ - Picture Resize Image Shift Keystone OSD Display SCR - vious screen. ADJ Picture Mode Contrast Bright Red Blue CLR Temp Bright... 4 Press O or Q to adjust. • The selected item is highlighted. Single ADJ END Note • Menu buttons do not function while the projector is displayed by itself at the bottom of the screen. • When pressing P or R, the following item ("Red" after "Bright") will disappear. ADJ...

Operation Manual
Page 43
ADJ Picture Mode Contrast Bright Color Tint Sharp CLR Temp Bright Boost Progressive Lamp Setting Reset PRJ - Movie Gives natural tint to the 0 projected image. *sRGB For high fidelity reproduction of - Game Gives sharpness to the -1 projected image. Any changes you make are ...displayed in a natural tint based on the remote control to your preference. ADJ Picture Mode Contrast Bright Red Blue CLR Temp Bright Boost Lamp Setting Reset PRJ - ADJ Standard 0 ...
ADJ Picture Mode Contrast Bright Color Tint Sharp CLR Temp Bright Boost Progressive Lamp Setting Reset PRJ - Movie Gives natural tint to the 0 projected image. *sRGB For high fidelity reproduction of - Game Gives sharpness to the -1 projected image. Any changes you make are ...displayed in a natural tint based on the remote control to your preference. ADJ Picture Mode Contrast Bright Red Blue CLR Temp Bright Boost Lamp Setting Reset PRJ - ADJ Standard 0 ...

Operation Manual
Page 44
... using progressive inputs, inputs are lower than those input signals). The projector can adjust the picture tone with PAL50Hz and SECAM to progressive video ... 37 2 Adjusting the Image 4 Progressive Adjustment items Contrast Bright Red*1 Blue*1 Color*2 Tint*2 *3 Sharp*2 Bright Boost*1 O button Q button For less contrast. For making skin tones purplish. For more color...sRGB". *2 Not displayed in the RGB input mode. *3 "Tone" will be selected. 5 Lamp Setting Selectable items Eco + Quiet Brightness and Power consumption Approx. 80% Selectable items Description Bright 100...
... using progressive inputs, inputs are lower than those input signals). The projector can adjust the picture tone with PAL50Hz and SECAM to progressive video ... 37 2 Adjusting the Image 4 Progressive Adjustment items Contrast Bright Red*1 Blue*1 Color*2 Tint*2 *3 Sharp*2 Bright Boost*1 O button Q button For less contrast. For making skin tones purplish. For more color...sRGB". *2 Not displayed in the RGB input mode. *3 "Tone" will be selected. 5 Lamp Setting Selectable items Eco + Quiet Brightness and Power consumption Approx. 80% Selectable items Description Bright 100...

Operation Manual
Page 47
...set to "Eco", power consumption is not output from the internal speaker. 6 6 AMuodnioitIonrpOututput This function allows you to "On", 5 minutes before the projector enters standby mode, the message "Enter STANDBY mode in standby mode. ADJ Auto Power Off Auto Restart STANDBY Mode System Sound Speaker Audio Input RS...Off Description When no input signal is used as an audio input terminal. ADJ On On Standard On On Audio 1 9600 bps Normal Disable Help Lamp Timer(Life) 0h 0 min 100% SEL./ADJ. ENTER END Menu operation n Page 37 3 STANDBY Mode When set to select an appropriate ...
...set to "Eco", power consumption is not output from the internal speaker. 6 6 AMuodnioitIonrpOututput This function allows you to "On", 5 minutes before the projector enters standby mode, the message "Enter STANDBY mode in standby mode. ADJ Auto Power Off Auto Restart STANDBY Mode System Sound Speaker Audio Input RS...Off Description When no input signal is used as an audio input terminal. ADJ On On Standard On On Audio 1 9600 bps Normal Disable Help Lamp Timer(Life) 0h 0 min 100% SEL./ADJ. ENTER END Menu operation n Page 37 3 STANDBY Mode When set to select an appropriate ...

