
Operation Manual
Page 1
MULTIMEDIA PROJECTOR MODEL XR-40X XR-30X XR-30S OPERATION MANUAL Introduction Quick Start Setup Connections Basic Operation Useful Features Appendix
MULTIMEDIA PROJECTOR MODEL XR-40X XR-30X XR-30S OPERATION MANUAL Introduction Quick Start Setup Connections Basic Operation Useful Features Appendix

Operation Manual
Page 5
... WARRANTY This is to assure that children do not expose this operation manual carefully. Do not stare into the beam of the parts, service and labor warranty applicable to your new SHARP Projector, using the projector, please read this product to rain or moisture. See bottom of ...ENGLISH There are two important reasons for prompt warranty registration of projector. ONLY WARNING: High brightness light source. DO NOT REMOVE SCREWS EXCEPT SPECIFIED USER SERVICE SCREW. WARNING: FCC Regulations state that SHARP may be required to give under the 1972 Consumer Product Safety...
... WARRANTY This is to assure that children do not expose this operation manual carefully. Do not stare into the beam of the parts, service and labor warranty applicable to your new SHARP Projector, using the projector, please read this product to rain or moisture. See bottom of ...ENGLISH There are two important reasons for prompt warranty registration of projector. ONLY WARNING: High brightness light source. DO NOT REMOVE SCREWS EXCEPT SPECIFIED USER SERVICE SCREW. WARNING: FCC Regulations state that SHARP may be required to give under the 1972 Consumer Product Safety...

Operation Manual
Page 6
...projector utilizes tin-lead solder, and a pressurized lamp containing a small amount of the unit. This very sophisticated panel contains 786,432 (XR40X/XR-30X) / 480,000 (XR-30S) pixels (micromirrors). Authorized representative responsible for the European Union Community Market SHARP...picture screen. This SHARP projector uses a DLP® chip....manual, may cause harmful interference to provide reasonable protection against harmful interference in a particular installation. Responsible Party: SHARP ELECTRONICS CORPORATION Sharp Plaza, Mahwah, New Jersey 07430-2135 TEL: 1-800-BE-SHARP...
...projector utilizes tin-lead solder, and a pressurized lamp containing a small amount of the unit. This very sophisticated panel contains 786,432 (XR40X/XR-30X) / 480,000 (XR-30S) pixels (micromirrors). Authorized representative responsible for the European Union Community Market SHARP...picture screen. This SHARP projector uses a DLP® chip....manual, may cause harmful interference to provide reasonable protection against harmful interference in a particular installation. Responsible Party: SHARP ELECTRONICS CORPORATION Sharp Plaza, Mahwah, New Jersey 07430-2135 TEL: 1-800-BE-SHARP...

Operation Manual
Page 7
...Example: "Picture" screen menu for setting up and operating the projector. ADJ Standard 0 0 0 0 0 1 Bright Help SEL./ADJ. MENU/HELP button Buttons used in the same manner. • In this operation manual, the illustration and the screen display are slightly different, depending ...on the projector. 1 Press MENU/HELP. • The "Picture" menu screen for the selected input mode is displayed. ...
...Example: "Picture" screen menu for setting up and operating the projector. ADJ Standard 0 0 0 0 0 1 Bright Help SEL./ADJ. MENU/HELP button Buttons used in the same manner. • In this operation manual, the illustration and the screen display are slightly different, depending ...on the projector. 1 Press MENU/HELP. • The "Picture" menu screen for the selected input mode is displayed. ...
Operation Manual
Page 8
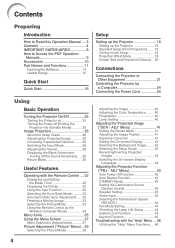
... Image ........ 42 Selecting the Setup Guide 42 Reversing/Inverting Projected Images 42 Selecting the On-screen Display Language 42 Adjusting the Projector Function ("PRJ - ADJ" Menu 43 Auto Power Off Function 43 Auto Restart Function 43 STANDBY Mode 43 Setting the Confirmation ...4 IMPORTANT SAFEGUARDS 6 How to Access the PDF Operation Manuals 9 Accessories 10 Part Names and Functions 11 Inserting the Batteries 14 Usable Range 15 Quick Start Quick Start 16 Setup Setting up the Projector 18 Setting up the Projector 18 Standard Setup (Front Projection) ....... 18 Ceiling-mount...
... Image ........ 42 Selecting the Setup Guide 42 Reversing/Inverting Projected Images 42 Selecting the On-screen Display Language 42 Adjusting the Projector Function ("PRJ - ADJ" Menu 43 Auto Power Off Function 43 Auto Restart Function 43 STANDBY Mode 43 Setting the Confirmation ...4 IMPORTANT SAFEGUARDS 6 How to Access the PDF Operation Manuals 9 Accessories 10 Part Names and Functions 11 Inserting the Batteries 14 Usable Range 15 Quick Start Quick Start 16 Setup Setting up the Projector 18 Setting up the Projector 18 Standard Setup (Front Projection) ....... 18 Ceiling-mount...

Operation Manual
Page 13
...-second cooling-off the equipment to be connected. ■ Please read the operation manuals of the projector and the equipment to be hot. Temperature monitor function ■ If the projector starts to overheat due to access the projector manuals. To utilize these manuals, you need to it. ■ If the power cord is unplugged while the...
...-second cooling-off the equipment to be connected. ■ Please read the operation manuals of the projector and the equipment to be hot. Temperature monitor function ■ If the projector starts to overheat due to access the projector manuals. To utilize these manuals, you need to it. ■ If the power cord is unplugged while the...
Operation Manual
Page 14
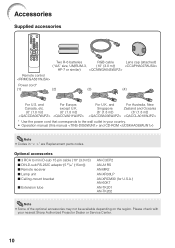
Please check with your country. • Operation manual (this manual and CD-ROM ) Note • Codes in your nearest Sharp Authorized Projector Dealer or Service Center. 10 except U.K. (6' (1.8 m)) (6' (1.8 m)) For U.K. and For Australia, New Singapore Zealand and Oceania (6' (1.8 m)) (6' (1.8 m)) * Use the power cord that corresponds to mini D-sub 15 ...
Please check with your country. • Operation manual (this manual and CD-ROM ) Note • Codes in your nearest Sharp Authorized Projector Dealer or Service Center. 10 except U.K. (6' (1.8 m)) (6' (1.8 m)) For U.K. and For Australia, New Singapore Zealand and Oceania (6' (1.8 m)) (6' (1.8 m)) * Use the power cord that corresponds to mini D-sub 15 ...
Operation Manual
Page 15
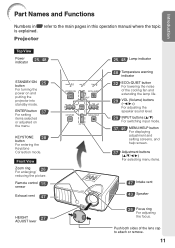
Projector Top View Power indicator 25, 48 STANDBY/ON 25 button For turning the power on the menu. KEYSTONE 28 button For entering the Keystone Correction ... remove. 11 Front View Zoom ring 26 For enlarging/ reducing the picture. ENTER button For setting 37 items selected or adjusted on and putting the projector into standby mode. Remote control 15 sensor Exhaust vent 47 25, 48 Lamp indicator 48 Temperature warning indicator 32 ECO+QUIET button For lowering the...
Projector Top View Power indicator 25, 48 STANDBY/ON 25 button For turning the power on the menu. KEYSTONE 28 button For entering the Keystone Correction ... remove. 11 Front View Zoom ring 26 For enlarging/ reducing the picture. ENTER button For setting 37 items selected or adjusted on and putting the projector into standby mode. Remote control 15 sensor Exhaust vent 47 25, 48 Lamp indicator 48 Temperature warning indicator 32 ECO+QUIET button For lowering the...
Operation Manual
Page 16
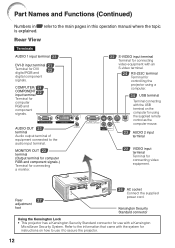
... connector Using the Kensington Lock • This projector has a Kensington Security Standard connector for use it to the information that came with a Kensington MicroSaver Security System. AUDIO OUT 23 terminal Audio output terminal of equipment connected to the main pages in this operation manual where the topic is explained. MONITOR OUT 23...
... connector Using the Kensington Lock • This projector has a Kensington Security Standard connector for use it to the information that came with a Kensington MicroSaver Security System. AUDIO OUT 23 terminal Audio output terminal of equipment connected to the main pages in this operation manual where the topic is explained. MONITOR OUT 23...
Operation Manual
Page 25
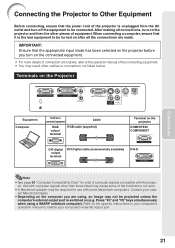
..., ensure that the power cord of the projector is switched on (e.g. Use with computer signals other than those listed may cause some Macintosh computers. Contact your computer's external output port. 21 After making all the connections are using a SHARP notebook computer). Press "Fn" and "F5...to not work. • A Macintosh adaptor may need other pieces of equipment. Refer to the specific instructions in your computer's operation manual to be connected. IMPORTANT: Ensure that it is the last equipment to enable your nearest Macintosh Dealer. • Depending on after all ...
..., ensure that the power cord of the projector is switched on (e.g. Use with computer signals other than those listed may cause some Macintosh computers. Contact your computer's external output port. 21 After making all the connections are using a SHARP notebook computer). Press "Fn" and "F5...to not work. • A Macintosh adaptor may need other pieces of equipment. Refer to the specific instructions in your computer's operation manual to be connected. IMPORTANT: Ensure that it is the last equipment to enable your nearest Macintosh Dealer. • Depending on after all ...

Operation Manual
Page 28
...computer can be used to the operation manual of the computer for details. • See pages 53 and 54 for details. Refer to control the projector and check the status of the projector. Info • Do not connect the... while it is on the computer. Then plug into the AC socket on the projector is not correctly set up. See page 55 for connection of an RS-232C serial control cable. ...This may damage your computer or projector. • Do not connect or disconnect an RS-232C serial control cable to a port other ...
...computer can be used to the operation manual of the computer for details. • See pages 53 and 54 for details. Refer to control the projector and check the status of the projector. Info • Do not connect the... while it is on the computer. Then plug into the AC socket on the projector is not correctly set up. See page 55 for connection of an RS-232C serial control cable. ...This may damage your computer or projector. • Do not connect or disconnect an RS-232C serial control cable to a port other ...

Operation Manual
Page 37
...Sync Adjustment) Auto Sync function works when detecting input signal after the projector turns on the picture mode. * "sRGB" is displayed only when RGB signal is frozen. 2 Press FREEZE again to return to manually adjust with Auto Sync adjustment, use the help menu for the projected ...connected device. Useful Features 33 Selecting the Picture Mode FREEZE button PICTURE MODE button AUTO SYNC button You can select the appropriate picture mode for manual adjustments. (See page 46.) Freezing a Moving Image 1 Press FREEZE. • The projected image is input. Press PICTURE MODE. &#...
...Sync Adjustment) Auto Sync function works when detecting input signal after the projector turns on the picture mode. * "sRGB" is displayed only when RGB signal is frozen. 2 Press FREEZE again to return to manually adjust with Auto Sync adjustment, use the help menu for the projected ...connected device. Useful Features 33 Selecting the Picture Mode FREEZE button PICTURE MODE button AUTO SYNC button You can select the appropriate picture mode for manual adjustments. (See page 46.) Freezing a Moving Image 1 Press FREEZE. • The projected image is input. Press PICTURE MODE. &#...

Operation Manual
Page 38
For details, see the operation manual of the receiver. L-CLICK and R-CLICK have common function. ■ When using [Page...CLICK. ■ When right-clicking Press R-CLICK. ■ When your computer supports only a one-click mouse (such as Sharp service part QCNWGA014WJPZ) The mouse pointer can use this function does not work with the remote control. PAGE UP/ PAGE DOWN...with the Remote Control (Continued) Using the Remote Control as the Wireless Computer Mouse When connecting the projector and the computer with a USB cable, you can be operated in the following way after it is placed too...
For details, see the operation manual of the receiver. L-CLICK and R-CLICK have common function. ■ When using [Page...CLICK. ■ When right-clicking Press R-CLICK. ■ When your computer supports only a one-click mouse (such as Sharp service part QCNWGA014WJPZ) The mouse pointer can use this function does not work with the remote control. PAGE UP/ PAGE DOWN...with the Remote Control (Continued) Using the Remote Control as the Wireless Computer Mouse When connecting the projector and the computer with a USB cable, you can be operated in the following way after it is placed too...

Operation Manual
Page 65
...position. • Depending on the computer you turn up the projector at all. Check • Projector power cord is not plugged into a warm room, or if it is fog on the lens. Refer to the computer's operation manual for it to clear. (Computer Input only) • ...Perform "Fine Sync" Adjustments ("Clock" Adjustment) • Perform "Fine Sync" Adjustments ("Phase" Adjustment) • Noise may appear depending on the computer. • Cables are incorrectly connected to the projector. 26 20 - 46 ...
...position. • Depending on the computer you turn up the projector at all. Check • Projector power cord is not plugged into a warm room, or if it is fog on the lens. Refer to the computer's operation manual for it to clear. (Computer Input only) • ...Perform "Fine Sync" Adjustments ("Clock" Adjustment) • Perform "Fine Sync" Adjustments ("Phase" Adjustment) • Noise may appear depending on the computer. • Cables are incorrectly connected to the projector. 26 20 - 46 ...
Operation Manual
Page 67
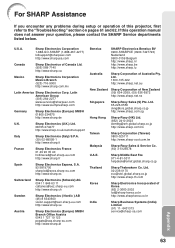
... http://www.sharp.com.hk Taiwan Sharp Corporation (Taiwan) 0800-025111 http://www.sharp-scot.com.tw Malaysia Sharp-Roxy Sales & Service Co. (60) 3-5125678 U.A.E. For SHARP Assistance If you encounter any problems during setup or operation of this operation manual does not answer your question, please contact the SHARP Service departments listed below. If this projector, first...
... http://www.sharp.com.hk Taiwan Sharp Corporation (Taiwan) 0800-025111 http://www.sharp-scot.com.tw Malaysia Sharp-Roxy Sales & Service Co. (60) 3-5125678 U.A.E. For SHARP Assistance If you encounter any problems during setup or operation of this operation manual does not answer your question, please contact the SHARP Service departments listed below. If this projector, first...


