
Instruction Manual 15
Page 1
14SH744/14CG744 (2.3.4 THREAD OVERLOCK MACHINE) 14SH754/14CG754 (2.3. 4 THREAD OVERLOCK MACHINE WITH DIFFERENTIAL FEED) Operator's Guide SINGER SINGER
14SH744/14CG744 (2.3.4 THREAD OVERLOCK MACHINE) 14SH754/14CG754 (2.3. 4 THREAD OVERLOCK MACHINE WITH DIFFERENTIAL FEED) Operator's Guide SINGER SINGER
Instruction Manual 15
Page 3
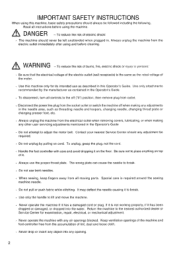
... any other user servicing adjustments mentioned in the needle area, such as the rated voltage of the electric outlet (wall receptacle) is the same as threading needle and loopers, changing needle, changing throat plate or changing presser foot, etc. . To reduce the risk of burns, fire, electric shock or injury to...
... any other user servicing adjustments mentioned in the needle area, such as the rated voltage of the electric outlet (wall receptacle) is the same as threading needle and loopers, changing needle, changing throat plate or changing presser foot, etc. . To reduce the risk of burns, fire, electric shock or injury to...

Instruction Manual 15
Page 5
...Specification 50 4 How to Sew a Rolled Hem 36 1) 2-thread wrapped edge overlock 37 2-thread standard rolled hem stitching 37 2) 3-thread standard rolled hem stitching 38 3-thread upper looper thread wrapped rolled hem stitching 38 24. Free Arm Sewing (Tubular Work... Foot Pressure 22 16. Suggested Tension Setting 30 1) 2-thread wrapped edge overlock 30 2) 2-thread standard rolled hem stitching 31 3) 3-Thread Overlock 32 4) 3-Thread Flatlock 33 5) 3-Thread Wrapped Edge Overlock 34 6) 4-Thread Ultra Stretch Mock Satety Stitch 35 23. Troubleshooting Chart 48...
...Specification 50 4 How to Sew a Rolled Hem 36 1) 2-thread wrapped edge overlock 37 2-thread standard rolled hem stitching 37 2) 3-thread standard rolled hem stitching 38 3-thread upper looper thread wrapped rolled hem stitching 38 24. Free Arm Sewing (Tubular Work... Foot Pressure 22 16. Suggested Tension Setting 30 1) 2-thread wrapped edge overlock 30 2) 2-thread standard rolled hem stitching 31 3) 3-Thread Overlock 32 4) 3-Thread Flatlock 33 5) 3-Thread Wrapped Edge Overlock 34 6) 4-Thread Ultra Stretch Mock Satety Stitch 35 23. Troubleshooting Chart 48...
Instruction Manual 15
Page 6
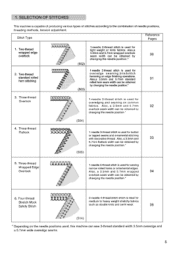
...adjustment. Also, a 3.5mm and 33 5.7mm flatlock width can be obtained by changing the needle position.* (503) - - 1-needle 3-thread stitch is used , this machine can be obtained by changing the needle position.' 32 4. SELECTION OF STITCHES This machine is ideal for ... is used for overedging and seaming on the needle positions used for 7 light weight or knits fabrics. Four-thread Stretch Mock Safety Stitch 2-needle 4-thread stitch which is capable of producing various types of stitches according to heavy weight stretchy fabrics such as double knits and swim wear....
...adjustment. Also, a 3.5mm and 33 5.7mm flatlock width can be obtained by changing the needle position.* (503) - - 1-needle 3-thread stitch is used , this machine can be obtained by changing the needle position.' 32 4. SELECTION OF STITCHES This machine is ideal for ... is used for overedging and seaming on the needle positions used for 7 light weight or knits fabrics. Four-thread Stretch Mock Safety Stitch 2-needle 4-thread stitch which is capable of producing various types of stitches according to heavy weight stretchy fabrics such as double knits and swim wear....

Instruction Manual 15
Page 7
... suggested guides. The tension settings shown on medium weigh fabric with standard #80 po yester spun thread Blue Green Orange Yellow isoiL;et r Page Two-Thread 3.5mm Wrapped Edge oar 1 Overlock 5.7mm (502) lio Two-Thread 3.5mm Standard Rolled oil 2 Hem Stitching 5.7mm (503) •0 3.0 3.0 0.5 0.5 ...no greater than half a number at a time 6 Adjust thread tensions to higher numbers. For best results make tension adjustments in small increments of thread used Overedge right needle Overedge left needle Needle thread tension dial Green Blue OW :fi 9O 2. Also, for ...
... suggested guides. The tension settings shown on medium weigh fabric with standard #80 po yester spun thread Blue Green Orange Yellow isoiL;et r Page Two-Thread 3.5mm Wrapped Edge oar 1 Overlock 5.7mm (502) lio Two-Thread 3.5mm Standard Rolled oil 2 Hem Stitching 5.7mm (503) •0 3.0 3.0 0.5 0.5 ...no greater than half a number at a time 6 Adjust thread tensions to higher numbers. For best results make tension adjustments in small increments of thread used Overedge right needle Overedge left needle Needle thread tension dial Green Blue OW :fi 9O 2. Also, for ...
Instruction Manual 15
Page 9
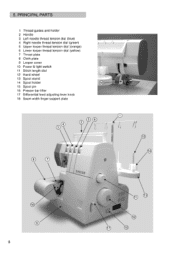
5. PRINCIPAL PARTS 1 Thread guides and holder 2 Handle 3 Left needle thread tension dial (blue) 4 Right needle thread tension dial (green) 5 Upper looper thread tension dial (orange) 6 Lower looper thread tension dial (yellow) 7 Throat plate 8 Cloth plate 9 Looper cover 10 Power & light switch 11 Stitch length dial 12 Hand wheel 13 Spool stand 14 Spool holder 15 Spool pin 16 Presser bar lifter 17 Differential feed adjusting lever knob 18 Seam width finger support plate 0 8
5. PRINCIPAL PARTS 1 Thread guides and holder 2 Handle 3 Left needle thread tension dial (blue) 4 Right needle thread tension dial (green) 5 Upper looper thread tension dial (orange) 6 Lower looper thread tension dial (yellow) 7 Throat plate 8 Cloth plate 9 Looper cover 10 Power & light switch 11 Stitch length dial 12 Hand wheel 13 Spool stand 14 Spool holder 15 Spool pin 16 Presser bar lifter 17 Differential feed adjusting lever knob 18 Seam width finger support plate 0 8

Instruction Manual 15
Page 11
...FOR U.S.A. & CANADA ONLY) This appliance has a polarized plug (one way. SINGER • Center the thread guides above the spool pins. • Place thread over the cone adapters on the floor. PREPARATION FOR THREADING Setting Up the Thread Guide Holder • This machine is the same as the rated voltage of it... it still does not fit, contact a qualified electrician to prevent tangling. • r,) 10 Handle the foot controller with the thread guide holder in a polarized outlet only one blade wider than the other). This eliminates the possibility of electric shock, this plug is...
...FOR U.S.A. & CANADA ONLY) This appliance has a polarized plug (one way. SINGER • Center the thread guides above the spool pins. • Place thread over the cone adapters on the floor. PREPARATION FOR THREADING Setting Up the Thread Guide Holder • This machine is the same as the rated voltage of it... it still does not fit, contact a qualified electrician to prevent tangling. • r,) 10 Handle the foot controller with the thread guide holder in a polarized outlet only one blade wider than the other). This eliminates the possibility of electric shock, this plug is...
Instruction Manual 15
Page 13
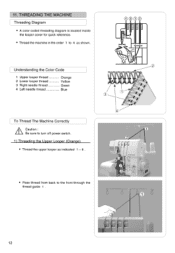
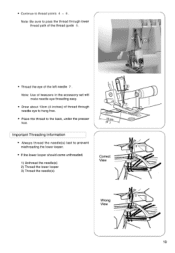
... Color Code 1 Upper looper thread 2 Lower looper thread 3 Right needle thread 4 Left needle thread Orange Yellow Green Blue To Thread The Machine Correctly A Caution Be sure to the front through the thread guide 1 2 3 4 8. 5! 7214 12 THREADING THE MACHINE I Threading Diagram • A color coded threading diagram is located inside the looper cover for quick reference. • Thread the machine in the...
... Color Code 1 Upper looper thread 2 Lower looper thread 3 Right needle thread 4 Left needle thread Orange Yellow Green Blue To Thread The Machine Correctly A Caution Be sure to the front through the thread guide 1 2 3 4 8. 5! 7214 12 THREADING THE MACHINE I Threading Diagram • A color coded threading diagram is located inside the looper cover for quick reference. • Thread the machine in the...

Instruction Manual 15
Page 14
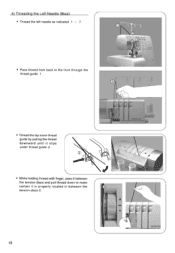
... the back of the machine following the orange color coded thread guides ( 4 - 7 ). SINGE 6c' 4 0 8 7 0 O 6 0 13 • Thread the top cover thread guide by pulling the thread downward until it slips under thread guide 2 . • While holding thread with finger, pass it between the tension discs and pull thread down to make certain it is properly located in...
... the back of the machine following the orange color coded thread guides ( 4 - 7 ). SINGE 6c' 4 0 8 7 0 O 6 0 13 • Thread the top cover thread guide by pulling the thread downward until it slips under thread guide 2 . • While holding thread with finger, pass it between the tension discs and pull thread down to make certain it is properly located in...
Instruction Manual 15
Page 15
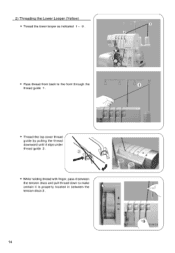
C?) • While holding thread with finger, pass it between the tension discs and pull thread down to the front through the thread guide 1 . I 'Y • Thread the top cover thread guide by pulling the thread downward until it is properly located in between the 3 tension discs 3 . 4 tr- INGE 14 2) Threading the Lower Looper (Yellow) /7- • Thread the lower looper as indicated 1 - 9 2 LL L 3 Ira 4 8 7 5 0 • Pass thread from back to make certain it slips under thread guide 2 .
C?) • While holding thread with finger, pass it between the tension discs and pull thread down to the front through the thread guide 1 . I 'Y • Thread the top cover thread guide by pulling the thread downward until it is properly located in between the 3 tension discs 3 . 4 tr- INGE 14 2) Threading the Lower Looper (Yellow) /7- • Thread the lower looper as indicated 1 - 9 2 LL L 3 Ira 4 8 7 5 0 • Pass thread from back to make certain it slips under thread guide 2 .

Instruction Manual 15
Page 16
...SINGER 4 SING :Or •• 0 7 xl (1'0 C) co 0 15 Note : Use the tweezers provided in the accessory set to aid in threading the looper. • Grasp the thread with the tweezers 4 cm (1-1/2 inches) from thread guide 7. • Place the thread with the point of the tweezers slightly under and to the left of threading...looper and place it over the top of the upper looper and to aid in threading the looper. • The thread should be positioned in the end of the machine following the yellow color coded thread guides 4 - 7 . Note: Use the tweezers provided in the accessory set ...
...SINGER 4 SING :Or •• 0 7 xl (1'0 C) co 0 15 Note : Use the tweezers provided in the accessory set to aid in threading the looper. • Grasp the thread with the tweezers 4 cm (1-1/2 inches) from thread guide 7. • Place the thread with the point of the tweezers slightly under and to the left of threading...looper and place it over the top of the upper looper and to aid in threading the looper. • The thread should be positioned in the end of the machine following the yellow color coded thread guides 4 - 7 . Note: Use the tweezers provided in the accessory set ...
Instruction Manual 15
Page 17
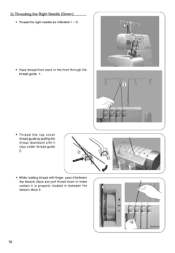
SINGE 16 3) Threading the Right Needle (Green) • Thread the right needle as indicated 1 - 8. • Pass thread from back to the front through the thread guide 1 . 6 5 7 8 • Thread the top cover thread guide by pulling the thread downward until it slips under thread guide 2. !L4i- * ' • While holding thread with finger, pass it between the tension discs and pull thread down to make certain it is properly located in between the tension discs 3 .
SINGE 16 3) Threading the Right Needle (Green) • Thread the right needle as indicated 1 - 8. • Pass thread from back to the front through the thread guide 1 . 6 5 7 8 • Thread the top cover thread guide by pulling the thread downward until it slips under thread guide 2. !L4i- * ' • While holding thread with finger, pass it between the tension discs and pull thread down to make certain it is properly located in between the tension discs 3 .
Instruction Manual 15
Page 18
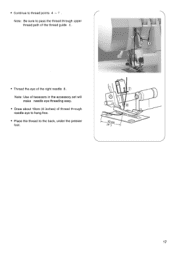
• Continue to the back, under the presser foot. I tl 0 7 10cm (4-) 17 Note: Use of tweezers in the accessory set will make needle eye threading easy. • Draw about 10cm (4 inches) of the right needle 8 . Note: Be sure to pass the thread through upper thread path of the thread guide 6. • Thread the eye of thread through needle eye to hang free. • Place the thread to thread points 4 - 7 .
• Continue to the back, under the presser foot. I tl 0 7 10cm (4-) 17 Note: Use of tweezers in the accessory set will make needle eye threading easy. • Draw about 10cm (4 inches) of the right needle 8 . Note: Be sure to pass the thread through upper thread path of the thread guide 6. • Thread the eye of thread through needle eye to hang free. • Place the thread to thread points 4 - 7 .
Instruction Manual 15
Page 19
o4. 6 • Thread the top cover thread guide by pulling the thread downward until it slips under thread guide 2 . ••• • While holding thread with finger, pass it between the tension discs and pull thread down to the front through the thread guide 1 . 4) Threading the Left Needle (Blue) • Thread the left needle as indicated 1 - 7. • Pass thread from back to make certain it is properly located in between the tension discs 3. 18 SINGER 4 SINGE
o4. 6 • Thread the top cover thread guide by pulling the thread downward until it slips under thread guide 2 . ••• • While holding thread with finger, pass it between the tension discs and pull thread down to the front through the thread guide 1 . 4) Threading the Left Needle (Blue) • Thread the left needle as indicated 1 - 7. • Pass thread from back to make certain it is properly located in between the tension discs 3. 18 SINGER 4 SINGE
Instruction Manual 15
Page 20
...: Use of tweezers in the accessory set will make needle eye threading easy. • Draw about 10cm (4 inches) of the left needle 7 . I • Thread the eye of thread through lower thread path of the thread guide 5. Note: Be sure to thread points 4 - 6 . Important Threading Information • Always thread the needle(s) last to the back, under the presser foot.
...: Use of tweezers in the accessory set will make needle eye threading easy. • Draw about 10cm (4 inches) of the left needle 7 . I • Thread the eye of thread through lower thread path of the thread guide 5. Note: Be sure to thread points 4 - 6 . Important Threading Information • Always thread the needle(s) last to the back, under the presser foot.

Instruction Manual 15
Page 21
... on stand. • Tie new thread and old thread ends together. • Clip thread tails to previous settings. 20 SINGER 12. HOW TO CHANGE THREADS / TIE ON METHOD • To change thread type or color, clip thread near the spool. • Place new thread on thread guides or looping under thread stand. • When pulling thread through the needle, STOP when...
... on stand. • Tie new thread and old thread ends together. • Clip thread tails to previous settings. 20 SINGER 12. HOW TO CHANGE THREADS / TIE ON METHOD • To change thread type or color, clip thread near the spool. • Place new thread on thread guides or looping under thread stand. • When pulling thread through the needle, STOP when...
Instruction Manual 15
Page 30
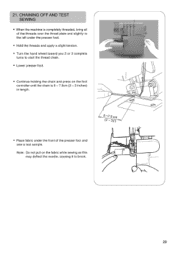
... OFF AND TEST SEWING • When the machine is 5 - 7.5cm (2 - 3 inches) in length. SUOMI 5- 7.5 cm 2 - 3);) • Place fabric under the presser foot. • Hold the threads and apply a slight tension. • Turn the hand wheel toward you 2 or 3 complete turns to break. 29 21. Note: Do not pull on the fabric... while sewing as this may deflect the needle, causing it to start the thread chain. • Lower presser foot. • Continue holding the chain and press on the foot controller until the chain is completely...
... OFF AND TEST SEWING • When the machine is 5 - 7.5cm (2 - 3 inches) in length. SUOMI 5- 7.5 cm 2 - 3);) • Place fabric under the presser foot. • Hold the threads and apply a slight tension. • Turn the hand wheel toward you 2 or 3 complete turns to break. 29 21. Note: Do not pull on the fabric... while sewing as this may deflect the needle, causing it to start the thread chain. • Lower presser foot. • Continue holding the chain and press on the foot controller until the chain is completely...
Instruction Manual 15
Page 31
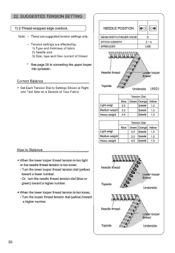
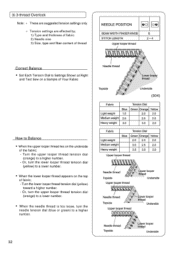
... Green Orange Yellow 2.5 Spreader 1.5 Medium weight Heavy weight 3.0 Spreader 1.5 4.5 Spreader 1.5 • When the lower looper thread tension is too tight or the needle thread tension is too loose; - Note: x These are effected by; 1) Type and thickness of fabric 2) Needle size 3)... settings are suggested tension settings only. Turn the looper thread tension dial (yellow) toward a lower number. - Needle thread Topside Needle thread Topside Low r looper thread Underside Lo :r looper thread Underside 30 Or, turn the needle thread tension dial (blue or green) toward a higher number...
... Green Orange Yellow 2.5 Spreader 1.5 Medium weight Heavy weight 3.0 Spreader 1.5 4.5 Spreader 1.5 • When the lower looper thread tension is too tight or the needle thread tension is too loose; - Note: x These are effected by; 1) Type and thickness of fabric 2) Needle size 3)... settings are suggested tension settings only. Turn the looper thread tension dial (yellow) toward a lower number. - Needle thread Topside Needle thread Topside Low r looper thread Underside Lo :r looper thread Underside 30 Or, turn the needle thread tension dial (blue or green) toward a higher number...
Instruction Manual 15
Page 32
... dial(yellow) toward a lower number. Or, turn the lower looper thread tension dial (yellow) toward a higher number. - Lower looper thread Topside Lower looper thread Topside Needl= thread Underside Nee\e thread Underside 31 Turn the needle thread tension dial (blue on a Sample of the fabric. - 2) 2-Thread standard rolled hem stitching Note: These are effected by: 1) Type and thickness...
... dial(yellow) toward a lower number. Or, turn the lower looper thread tension dial (yellow) toward a higher number. - Lower looper thread Topside Lower looper thread Topside Needl= thread Underside Nee\e thread Underside 31 Turn the needle thread tension dial (blue on a Sample of the fabric. - 2) 2-Thread standard rolled hem stitching Note: These are effected by: 1) Type and thickness...
Instruction Manual 15
Page 33
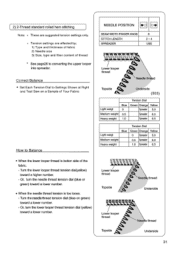
...on a Sample of Your Fabric How to a higher number. - Turn the upper looper thread tension dial (orange) to Balance • When the upper looper thread lies on the top of the fabric: - Tension settings are suggested tension settings only....2.0 2.0 2.0 Medium weight 3.0 2.5 2.0 Heavy weight 3.5 3.0 2.0 Upper looper thread Needle thread Topside Upper looper thread \L wer looper thrtitad Underside Needle thread Topside Upper looper thread L wer looper tti d Underside Needle thread Topside L• er looper thread Underside 2 Or, turn the needle tension dial (blue or green) to a...
...on a Sample of Your Fabric How to a higher number. - Turn the upper looper thread tension dial (orange) to Balance • When the upper looper thread lies on the top of the fabric: - Tension settings are suggested tension settings only....2.0 2.0 2.0 Medium weight 3.0 2.5 2.0 Heavy weight 3.5 3.0 2.0 Upper looper thread Needle thread Topside Upper looper thread \L wer looper thrtitad Underside Needle thread Topside Upper looper thread L wer looper tti d Underside Needle thread Topside L• er looper thread Underside 2 Or, turn the needle tension dial (blue or green) to a...


