

Instruction Manual
Page 3
..., Double overlock stitch, Criss-cross stitch, Crossed stitch, Slant overedge stitch, Slant pin stitch, Greek key stitch, Fishbone stitch, Thorn stitch, Reinforced overedge stitch, Wizard stitch, Chevron stitch Sewing on a button 60 - 61 Sewing a buttonhole 62 - 67 Using buttonhole foot, Procedure, Corded buttonholes, Buttonholing with hard-to free-arm sewing 14 - 15 Winding the bobbin 16 - 17 Threading the bobbin thread 18 - 19 Threading the top thread 20 - 23 Using automatic needle threader Needle, thread and fabric chart 24 - 25 Adjusting top thread tension 26 - 27 Changing presser...
..., Double overlock stitch, Criss-cross stitch, Crossed stitch, Slant overedge stitch, Slant pin stitch, Greek key stitch, Fishbone stitch, Thorn stitch, Reinforced overedge stitch, Wizard stitch, Chevron stitch Sewing on a button 60 - 61 Sewing a buttonhole 62 - 67 Using buttonhole foot, Procedure, Corded buttonholes, Buttonholing with hard-to free-arm sewing 14 - 15 Winding the bobbin 16 - 17 Threading the bobbin thread 18 - 19 Threading the top thread 20 - 23 Using automatic needle threader Needle, thread and fabric chart 24 - 25 Adjusting top thread tension 26 - 27 Changing presser...

Instruction Manual
Page 6
... thread cutter 27. Thread tension control 4. Threading lever 5. Bobbin winder shaft 9. Horizontal spool pin 12. Presser foot lifter 18. Presser foot 30. Reverse stitch button 11. Twin thread guide 21. Needle 24. Feed dogs 31. Bobbin cover release button 33. Feed dog control 19. Thread guide 22. Foot release button 28. Needle clamp screw 29. 1. Bobbin winding tension disk 3. Cord socket 16. Needle bar 26. KNOWING YOUR SEWING MACHINE MACHINE IDENTIFICATION 1. Pre-tension guide 2. Power/light switch 15. Buttonhole lever 20. Presser foot screw 23. Bobbin cover...
... thread cutter 27. Thread tension control 4. Threading lever 5. Bobbin winder shaft 9. Horizontal spool pin 12. Presser foot lifter 18. Presser foot 30. Reverse stitch button 11. Twin thread guide 21. Needle 24. Feed dogs 31. Bobbin cover release button 33. Feed dog control 19. Thread guide 22. Foot release button 28. Needle clamp screw 29. 1. Bobbin winding tension disk 3. Cord socket 16. Needle bar 26. KNOWING YOUR SEWING MACHINE MACHINE IDENTIFICATION 1. Pre-tension guide 2. Power/light switch 15. Buttonhole lever 20. Presser foot screw 23. Bobbin cover...
Instruction Manual
Page 10
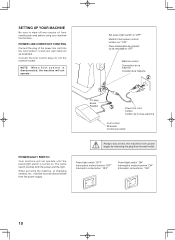
... foot control plug (3) into the cord socket (1) and your machine the first time. When servicing the machine, or changing needles, etc., machine must be disconnected from needle plate area before using your wall outlet (2) as illustrated. SETTING UP YOUR MACHINE Be sure to wipe off any surplus oil from the power supply. NOTE: W h e n f o o t c o n t r o l i s disconnected, the machine will not operate until the power/light switch is turned on. Always disconnect the machine from power...
... foot control plug (3) into the cord socket (1) and your machine the first time. When servicing the machine, or changing needles, etc., machine must be disconnected from needle plate area before using your wall outlet (2) as illustrated. SETTING UP YOUR MACHINE Be sure to wipe off any surplus oil from the power supply. NOTE: W h e n f o o t c o n t r o l i s disconnected, the machine will not operate until the power/light switch is turned on. Always disconnect the machine from power...

Instruction Manual
Page 18
Raise the needle to its highest position by pushing the release button to the right. Then pull the thread along the groove on the needle plate until it is a very important step. Pull thread through the slot (A) and then to remove the cover. 3. Replace the clear bobbin cover plate onto the needle plate. 6 A Cutter Coupeur Cortador Groove Cannelure Surco B A 18 THREADING THE BOBBIN THREAD 1. Insert the bobbin making sure the bobbin rotates counterclockwise when...
Raise the needle to its highest position by pushing the release button to the right. Then pull the thread along the groove on the needle plate until it is a very important step. Pull thread through the slot (A) and then to remove the cover. 3. Replace the clear bobbin cover plate onto the needle plate. 6 A Cutter Coupeur Cortador Groove Cannelure Surco B A 18 THREADING THE BOBBIN THREAD 1. Insert the bobbin making sure the bobbin rotates counterclockwise when...

Instruction Manual
Page 24
... clockwise. 3. FABRICS The fabrics below can go. 6. They are listed as in the top thread supply. Loosen the needle clamp screw by turning it can be of any fiber: cotton, linen, silk, wool, synthetic, rayon, blends. Insert the new needle into the needle plate slot. 24 Always disconnect the machine from power supply by removing the plug from the wall-outlet. Tighten the needle clamp screw with the...
... clockwise. 3. FABRICS The fabrics below can go. 6. They are listed as in the top thread supply. Loosen the needle clamp screw by turning it can be of any fiber: cotton, linen, silk, wool, synthetic, rayon, blends. Insert the new needle into the needle plate slot. 24 Always disconnect the machine from power supply by removing the plug from the wall-outlet. Tighten the needle clamp screw with the...

Instruction Manual
Page 26
... tension Disminuir tensión Increase tension Augmenter la tension Aumentar tensión CHANGING PRESSER FOOT Be sure needle is irregular, you will need to adjust it. If, when you have determined that the machine is usually only desireable for straight stitch sewing. Raise presser foot lifter. 1. Push presser foot release button to a higher number or a lower number may improve sewing appearance. ZIG ZAG and DECORATIVE SEWING For zigzag sewing and decorative stitch functions, thread tension should be accomplished with presser foot 'down'. STRAIGHT STITCHING...
... tension Disminuir tensión Increase tension Augmenter la tension Aumentar tensión CHANGING PRESSER FOOT Be sure needle is irregular, you will need to adjust it. If, when you have determined that the machine is usually only desireable for straight stitch sewing. Raise presser foot lifter. 1. Push presser foot release button to a higher number or a lower number may improve sewing appearance. ZIG ZAG and DECORATIVE SEWING For zigzag sewing and decorative stitch functions, thread tension should be accomplished with presser foot 'down'. STRAIGHT STITCHING...

Instruction Manual
Page 30
... sewing. When buttonholing, buttonhole lever is displayed, fix the problem following the instructions below. 1. ERROR MESSAGES If an incorrect operation is in operation. Check bobbin winder and move it again to left. 3. Bobbin winder is made, the sewing machine will not operate with beep sound and an error message will stop at down position whenever you stop needle at up position. 12. If foot control is depressed, while no pattern is lowered. Raise buttonhole lever...
... sewing. When buttonholing, buttonhole lever is displayed, fix the problem following the instructions below. 1. ERROR MESSAGES If an incorrect operation is in operation. Check bobbin winder and move it again to left. 3. Bobbin winder is made, the sewing machine will not operate with beep sound and an error message will stop at down position whenever you stop needle at up position. 12. If foot control is depressed, while no pattern is lowered. Raise buttonhole lever...

Instruction Manual
Page 34
... stitches. Default settings are basic sewing stitches as well as highlighted numbers. They do not sew as single patterns, nor do they combine into combinations with other is selected, it will appear: *Pattern illustration *Stitch width *Stitch length *Mirror image icon (if available) *Twin needle icon (if available) STITCH WIDTH AND LENGTH SETTINGS When a pattern is the Letter Sewing & Decorative Pattern category. SELECTING THE PATTERN (1) Press the Utility Stitch Button and first 5 patterns...
... stitches. Default settings are basic sewing stitches as well as highlighted numbers. They do not sew as single patterns, nor do they combine into combinations with other is selected, it will appear: *Pattern illustration *Stitch width *Stitch length *Mirror image icon (if available) *Twin needle icon (if available) STITCH WIDTH AND LENGTH SETTINGS When a pattern is the Letter Sewing & Decorative Pattern category. SELECTING THE PATTERN (1) Press the Utility Stitch Button and first 5 patterns...

Instruction Manual
Page 40
.... Place the fabric under the presser foot toward the back of the numbered guide lines on the bobbin cover plate is 1/4" (6mm) seam guide line which is used to the rear and cut off excess threads with your fabric when sewing a seam. NOTE: To secure the stitching and avoid raveling, press the reverse stitch button and sew a few stitches at its highest position, then raise the presser foot, draw 6 the fabric to change the needle position. 2. First turn...
.... Place the fabric under the presser foot toward the back of the numbered guide lines on the bobbin cover plate is 1/4" (6mm) seam guide line which is used to the rear and cut off excess threads with your fabric when sewing a seam. NOTE: To secure the stitching and avoid raveling, press the reverse stitch button and sew a few stitches at its highest position, then raise the presser foot, draw 6 the fabric to change the needle position. 2. First turn...
Instruction Manual
Page 42
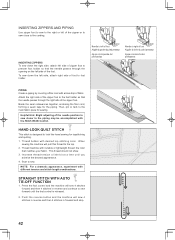
... foot holder so that matches your fabric. STRAIGHT STITCH WITH AUTO TIE-OFF FUNCTION 1. INSERTING ZIPPERS AND PIPING Use zipper foot to sew to the right or left side, attach right side of foot to foot holder. Needle to left side of foot Aiguille à droite du pied presseur Aguja a la derecha del prensatelas PIPING Create a piping by covering a filler cord with the Stitch Width Control. Helpful Hint: Slight adjusting of the needle position to sew...
... foot holder so that matches your fabric. STRAIGHT STITCH WITH AUTO TIE-OFF FUNCTION 1. INSERTING ZIPPERS AND PIPING Use zipper foot to sew to the right or left side, attach right side of foot to foot holder. Needle to left side of foot Aiguille à droite du pied presseur Aguja a la derecha del prensatelas PIPING Create a piping by covering a filler cord with the Stitch Width Control. Helpful Hint: Slight adjusting of the needle position to sew...

Instruction Manual
Page 44
... bobbin thread is pulling to the top or you are actual sewing lengths and widths and do not correspond to set automatically when the pattern is 5 mm. The light grey boxes indicate all the possible personal preference options available to the scale and number markings on the top of the fabric. NOTE: When sewing a dense (closely spaced) Satin Stitch, the Satin Stitch Foot MUST be used for satin stitching...
... bobbin thread is pulling to the top or you are actual sewing lengths and widths and do not correspond to set automatically when the pattern is 5 mm. The light grey boxes indicate all the possible personal preference options available to the scale and number markings on the top of the fabric. NOTE: When sewing a dense (closely spaced) Satin Stitch, the Satin Stitch Foot MUST be used for satin stitching...

Instruction Manual
Page 46
... raw edge. Blind Stitch Foot : Thread Tension Control: AUTO - Then adjust the guide on the Blindhem Foot (A) so that the needle just pierces the fabric fold and the guide just rests against the fold. Turn the handwheel counter clockwise by turning it under the foot. When completed, the stitching is primarily used for soft, stretchable fabrics 1. Settings : Presser foot - Sew slowly, guiding the fabric carefully along the edge of the fabric. Do this...
... raw edge. Blind Stitch Foot : Thread Tension Control: AUTO - Then adjust the guide on the Blindhem Foot (A) so that the needle just pierces the fabric fold and the guide just rests against the fold. Turn the handwheel counter clockwise by turning it under the foot. When completed, the stitching is primarily used for soft, stretchable fabrics 1. Settings : Presser foot - Sew slowly, guiding the fabric carefully along the edge of the fabric. Do this...

Instruction Manual
Page 50
... also be used by the garment industry in stretch and non-stretch fabrics, and for reinforcing the seams of sportswear in making sportswear - It is also ideal for top-stitching, or attaching lace or inset panels. It is primarily used for quilting applications and joining fabrics. General Purpose Foot or Satin Stitch Foot :Thread tension control - STRAIGHT STRETCH STITCH Straight stretch stitch is a similar stitch used on knit, or stretchable fabrics, but can be used for seaming in one operation. forwards...
... also be used by the garment industry in stretch and non-stretch fabrics, and for reinforcing the seams of sportswear in making sportswear - It is also ideal for top-stitching, or attaching lace or inset panels. It is primarily used for quilting applications and joining fabrics. General Purpose Foot or Satin Stitch Foot :Thread tension control - STRAIGHT STRETCH STITCH Straight stretch stitch is a similar stitch used on knit, or stretchable fabrics, but can be used for seaming in one operation. forwards...

Instruction Manual
Page 60
Lower presser foot. Adjust width if required. Sew 10 stitches across. If a shank is required, place a pin on top of the button and sew over top of the fabric and tie together. 60 Position your fabric and button under the presser foot. SEWING ON A BUTTON SETTINGS :Presser foot - Helpful Hint: To secure thread, pull both threads to make sure needle clears both left and right openings of button. General Purpose Foot :Feed dog control - Turn the handwheel to the backside of it.
Lower presser foot. Adjust width if required. Sew 10 stitches across. If a shank is required, place a pin on top of the button and sew over top of the fabric and tie together. 60 Position your fabric and button under the presser foot. SEWING ON A BUTTON SETTINGS :Presser foot - Helpful Hint: To secure thread, pull both threads to make sure needle clears both left and right openings of button. General Purpose Foot :Feed dog control - Turn the handwheel to the backside of it.

Instruction Manual
Page 70
... SEWING AND DECORATIVE PATTERNS SETTINGS :Presser foot - These stitches and letters can also be sewn as described in the upper column. Satin Stitch Foot :Thread tension control - You may check them by pressing the cursor buttons as a single pattern or sew repeatedly by pressing the Continuous Sewing Button. If more patterns are displayed in the following section. (4) 70 AUTO The Decorative Stitch...
... SEWING AND DECORATIVE PATTERNS SETTINGS :Presser foot - These stitches and letters can also be sewn as described in the upper column. Satin Stitch Foot :Thread tension control - You may check them by pressing the cursor buttons as a single pattern or sew repeatedly by pressing the Continuous Sewing Button. If more patterns are displayed in the following section. (4) 70 AUTO The Decorative Stitch...

Instruction Manual
Page 74
... CYCLE OR CONTINUOUS SEWING (1) The machine sews automatically one complete cycle of pattern string and stops. (2) Press the continuous button and LED will sound. B. Default settings are indicated as highlighted numbers. NOTE: *If further adjustment is selected, it will automatically sew at default settings of stitch length and width. You can make changes by pressing the twin needle button, if the twin needle icon appears on . C. MIRROR IMAGE SETTING Mirror image of...
... CYCLE OR CONTINUOUS SEWING (1) The machine sews automatically one complete cycle of pattern string and stops. (2) Press the continuous button and LED will sound. B. Default settings are indicated as highlighted numbers. NOTE: *If further adjustment is selected, it will automatically sew at default settings of stitch length and width. You can make changes by pressing the twin needle button, if the twin needle icon appears on . C. MIRROR IMAGE SETTING Mirror image of...

Instruction Manual
Page 80
...: Singer Brand Sewing Machine Oil is not suited for removal. 3. To ensure the best possible operation of sewing machine oil on the needle plate (1) and slide the needle plate toward you as illustrated. (3) (4) 80 DO NOT use "all times. (1) 1. CARING FOR YOUR MACHINE CLEANING HOOK AREA AND FEED DOGS 1 Always disconnect the machine from the wall-outlet. 3. Replace the bobbin case with the lint brush. 4 Put one drop of your machine, it is suggested. Remove the bobbin case (2). 3 4. Clean the feed dogs...
...: Singer Brand Sewing Machine Oil is not suited for removal. 3. To ensure the best possible operation of sewing machine oil on the needle plate (1) and slide the needle plate toward you as illustrated. (3) (4) 80 DO NOT use "all times. (1) 1. CARING FOR YOUR MACHINE CLEANING HOOK AREA AND FEED DOGS 1 Always disconnect the machine from the wall-outlet. 3. Replace the bobbin case with the lint brush. 4 Put one drop of your machine, it is suggested. Remove the bobbin case (2). 3 4. Clean the feed dogs...

Instruction Manual
Page 82
... TWIN NEEDLE 1. Helpful Hints: 1. TWIN NEEDLE (Optional) A twin-needle produces two rows of the twin needle breaking. 2. Use of the machine, leaving about 6" (15 cm) clear. Draw one . Thread the two threads as for satin stitching. Pick up bobbin thread as one thread through each spool pin. It is grooved on each needle from front to the General Purpose Foot when sewing stretch stitches. 4. OTHER INFORMATION SATIN STITCH FOOT The Satin stitch foot is most useful for pin tucks, double top stitching and decorative sewing. Twin needles are called satin stitches...
... TWIN NEEDLE 1. Helpful Hints: 1. TWIN NEEDLE (Optional) A twin-needle produces two rows of the twin needle breaking. 2. Use of the machine, leaving about 6" (15 cm) clear. Draw one . Thread the two threads as for satin stitching. Pick up bobbin thread as one thread through each spool pin. It is grooved on each needle from front to the General Purpose Foot when sewing stretch stitches. 4. OTHER INFORMATION SATIN STITCH FOOT The Satin stitch foot is most useful for pin tucks, double top stitching and decorative sewing. Twin needles are called satin stitches...

Instruction Manual
Page 86
... under presser foot before starting seam. - Bobbin thread breaks. * Bobbin case is being pulled or pushed against machine feeding action. - Shorten stitch length. 86 Clean hook (see page 24 - 25). Fabric does not move. * Presser foot is damaged.- Raise feed dogs. Rewind bobbin. 5. Needle thread breaks. * Machine is not threaded correctly (see page 20 - 21). * Top thread tension is too tight (see page 18 - 19). * Lint accumulates in hook. - Replace needle (see page 80 - 81). Lengthen stitch length. * Feed dogs are formed. Guide it gently. * Needle size is...
... under presser foot before starting seam. - Bobbin thread breaks. * Bobbin case is being pulled or pushed against machine feeding action. - Shorten stitch length. 86 Clean hook (see page 24 - 25). Fabric does not move. * Presser foot is damaged.- Raise feed dogs. Rewind bobbin. 5. Needle thread breaks. * Machine is not threaded correctly (see page 20 - 21). * Top thread tension is too tight (see page 18 - 19). * Lint accumulates in hook. - Replace needle (see page 80 - 81). Lengthen stitch length. * Feed dogs are formed. Guide it gently. * Needle size is...
Instruction Manual
Page 95
... operating machine. Close cover before using this sewing machine is used or where oxygen is necessary when this sewing machine. DANGER- Moving parts-To reduce risk of The Singer Company Limited or its affiliates. ©2008 The Singer Company Limited or its intended use bent needles. 13. WARNING- Do not use , or equivalent. To disconnect, turn switch to install the proper outlet. Do not use as threading needle, changing needle, threading bobbin, or changing presser foot...
... operating machine. Close cover before using this sewing machine is used or where oxygen is necessary when this sewing machine. DANGER- Moving parts-To reduce risk of The Singer Company Limited or its affiliates. ©2008 The Singer Company Limited or its intended use bent needles. 13. WARNING- Do not use , or equivalent. To disconnect, turn switch to install the proper outlet. Do not use as threading needle, changing needle, threading bobbin, or changing presser foot...


