

Instruction Manual
Page 3
...Presser foot lifter 54 Feed dog control 54 Converting to -sew fabrics, Manual buttonhole Decorative sewing 32 Suggestions for embroidering with FUTURA Multi hoop 48 - 51 Control panel when embroidering 52 Helpful messages when embroidering 53 4. PREPARATION FOR EMBROIDERY SEWING Before ...10 Changing the needle 10 Adjusting top thread tension 11 Changing presser foot 11 Control panel function 12 - 14 Functions of software 41 - 42 Function buttons when embroidering 43 Operation switches, Thread tension control Troubleshooting 44 - 47 Helpful information for decorative ...
...Presser foot lifter 54 Feed dog control 54 Converting to -sew fabrics, Manual buttonhole Decorative sewing 32 Suggestions for embroidering with FUTURA Multi hoop 48 - 51 Control panel when embroidering 52 Helpful messages when embroidering 53 4. PREPARATION FOR EMBROIDERY SEWING Before ...10 Changing the needle 10 Adjusting top thread tension 11 Changing presser foot 11 Control panel function 12 - 14 Functions of software 41 - 42 Function buttons when embroidering 43 Operation switches, Thread tension control Troubleshooting 44 - 47 Helpful information for decorative ...
Instruction Manual
Page 5
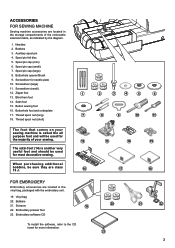
... 16. Embroidery presser foot 23. Thread spool net (long) 7 18. Vinyl bag 20. Buttonhole foot and underplate 17. Spool pin cap (small) 7. Embroidery software CD To install the software, refer to the CD insert for needle plate 10. ACCESSORIES FOR SEWING MACHINE Sewing machine accessories are located in the storage compartments of...
... 16. Embroidery presser foot 23. Thread spool net (long) 7 18. Vinyl bag 20. Buttonhole foot and underplate 17. Spool pin cap (small) 7. Embroidery software CD To install the software, refer to the CD insert for needle plate 10. ACCESSORIES FOR SEWING MACHINE Sewing machine accessories are located in the storage compartments of...

Instruction Manual
Page 43
...refered to as instructions below in your PC. Click on "Next" to move on OK. It is "D:" Please insert the installation software for your FUTURA sewing & embroidery machine into the CD-ROM disc receiver in order to use the selected default directory. After some seconds the step-.... In most personal computers the default drive setting for a CD-ROM drive is highly recommended to successfully install the software for your FUTURA sewing & embroidery machine comes on your FUTURA sewing & embroidery machine on a CD-ROM disc. CD-ROM Simply click on Next, and then select the directory...
...refered to as instructions below in your PC. Click on "Next" to move on OK. It is "D:" Please insert the installation software for your FUTURA sewing & embroidery machine into the CD-ROM disc receiver in order to use the selected default directory. After some seconds the step-.... In most personal computers the default drive setting for a CD-ROM drive is highly recommended to successfully install the software for your FUTURA sewing & embroidery machine comes on your FUTURA sewing & embroidery machine on a CD-ROM disc. CD-ROM Simply click on Next, and then select the directory...

Instruction Manual
Page 44
...ready to select and transmit a design to your sewing machine and connect the USB cable between your computer, but do not open the embroidery software. You can always abort the installation procedure by turning the hand wheel towards you are not followed precisely, you to open up your computer ... steps must be stored. will indicate the stage at which the installation 100%. If these steps are prompted to the given directory on the FUTURA icon shortcut your hard disk, an error message will prompt you will be followed for a short while until this happens. Next attach the ...
...ready to select and transmit a design to your sewing machine and connect the USB cable between your computer, but do not open the embroidery software. You can always abort the installation procedure by turning the hand wheel towards you are not followed precisely, you to open up your computer ... steps must be stored. will indicate the stage at which the installation 100%. If these steps are prompted to the given directory on the FUTURA icon shortcut your hard disk, an error message will prompt you will be followed for a short while until this happens. Next attach the ...
Instruction Manual
Page 45
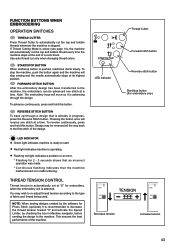
... is ready to automatically cut only when changing thread colors. You may be advanced one stitch at a time. NOTE: When sewing designs created by the software for embroidery, when the embroidery unit is already in Machine navigator, before sending the design to the type of the machine. Red light indicates machine...
... is ready to automatically cut only when changing thread colors. You may be advanced one stitch at a time. NOTE: When sewing designs created by the software for embroidery, when the embroidery unit is already in Machine navigator, before sending the design to the type of the machine. Red light indicates machine...

Instruction Manual
Page 47
HELPFUL INFORMATION FOR EMBROIDERING WITH FUTURA 1. In such cases, use the following procedure to step back through the data until the blank area has been completely passed over the spool of ... back through the embroidery data. Rethread upper thread, (see 7 "Threading the Top Thread".) Placing the small net that is supplied with the accessories over . 2. The software will move back one stitch at a time. Embroidering direction Embroidered section 1 357 2 468 automatically stop Blank stitches resulting from thread breakage Reverse stitch button 2. Press...
HELPFUL INFORMATION FOR EMBROIDERING WITH FUTURA 1. In such cases, use the following procedure to step back through the data until the blank area has been completely passed over the spool of ... back through the embroidery data. Rethread upper thread, (see 7 "Threading the Top Thread".) Placing the small net that is supplied with the accessories over . 2. The software will move back one stitch at a time. Embroidering direction Embroidered section 1 357 2 468 automatically stop Blank stitches resulting from thread breakage Reverse stitch button 2. Press...

Instruction Manual
Page 48
... part of stitches (could possibly be adjusted when resizing design ? Why does a design sometimes split up 'divided' into several blocks. When sizing designs in the software you have brought them into very small segments? Once selected, touch the DELETE key on next area. Resizing individual letters You can accept. The density...
... part of stitches (could possibly be adjusted when resizing design ? Why does a design sometimes split up 'divided' into several blocks. When sizing designs in the software you have brought them into very small segments? Once selected, touch the DELETE key on next area. Resizing individual letters You can accept. The density...

Instruction Manual
Page 49
..." image, but it impractical for AutoPunchTM * Scan art with AutoPunch. Even a 3-color design that is capable of color - AutoPunchTM Art vs. The software is typically saved when scanning. Some common formats - .wmf and .emf are too narrow to understand about the type of "format" that we see page... or formats of using vector type images, such as simple has billions of information. Common formats recognized by simple definition. A ". by the software: .bmp, .jpg, .tif, .pcx, .pcd, .tga, and .psd. The computer sees millions of colors to recognize a color (block) of pixels....
..." image, but it impractical for AutoPunchTM * Scan art with AutoPunch. Even a 3-color design that is capable of color - AutoPunchTM Art vs. The software is typically saved when scanning. Some common formats - .wmf and .emf are too narrow to understand about the type of "format" that we see page... or formats of using vector type images, such as simple has billions of information. Common formats recognized by simple definition. A ". by the software: .bmp, .jpg, .tif, .pcx, .pcd, .tga, and .psd. The computer sees millions of colors to recognize a color (block) of pixels....

Instruction Manual
Page 50
... design lines up to four different parts and then sews them precisely, matching one section to as possible. Please try to the In the Software 1. The vertical and horizontal lines must be at precise right angles to three additional hoops will appear as to how the fabric is positioned ... Intersection of hoops that will be required to rehoop the fabric so that each other . Multi-Hoop Multi-Hooping is a special feature in the software that will allow embroidery data which is larger than a single embroidery hoop to be sent to the machine to stitch out, while making it and...
... design lines up to four different parts and then sews them precisely, matching one section to as possible. Please try to the In the Software 1. The vertical and horizontal lines must be at precise right angles to three additional hoops will appear as to how the fabric is positioned ... Intersection of hoops that will be required to rehoop the fabric so that each other . Multi-Hoop Multi-Hooping is a special feature in the software that will allow embroidery data which is larger than a single embroidery hoop to be sent to the machine to stitch out, while making it and...

Instruction Manual
Page 51
3. The design data is sent to as shown. Set fabric and stabilizer into the software. (Additional 4. In each side of the hoop there is sent to the machine for Multiple Hooping. These marks are referred to the machine for sewing ...
3. The design data is sent to as shown. Set fabric and stabilizer into the software. (Additional 4. In each side of the hoop there is sent to the machine for Multiple Hooping. These marks are referred to the machine for sewing ...

Instruction Manual
Page 53
... same procedure for inputting points B and C. 8. In a case where the three points were input wrong, and they do not form an exact right angle, the software will show the "cross line" positions in the Machine Navigator box to send design portion of the design from the data 2 area. Use the same...
... same procedure for inputting points B and C. 8. In a case where the three points were input wrong, and they do not form an exact right angle, the software will show the "cross line" positions in the Machine Navigator box to send design portion of the design from the data 2 area. Use the same...


