
Instruction Manual
Page 2
... cleaning. This sewing machine should be left unattended when plugged in the instruction manual. 19. WARNING- 1. Never operate this sewing machine if it has a damaged cord or plug, if it is not working properly, if it to the manufacture or service agent to repair or replace at once. 21. Do not use , or equivalent. Moving parts-To reduce risk of lint, dust, and loose cloth. 7. Close cover...
... cleaning. This sewing machine should be left unattended when plugged in the instruction manual. 19. WARNING- 1. Never operate this sewing machine if it has a damaged cord or plug, if it is not working properly, if it to the manufacture or service agent to repair or replace at once. 21. Do not use , or equivalent. Moving parts-To reduce risk of lint, dust, and loose cloth. 7. Close cover...

Instruction Manual
Page 3
... length, Satin stitch Placement of software 41 - 42 Function buttons when embroidering 43 Operation switches, Thread tension control Troubleshooting 44 - 47 Helpful information for embroidering with hard-to free-arm sewing 54 Performance checklist 55 Cleaning hook area and feed dogs 56 Oiling inside the face cover 57 Special accessories 58 - 62 Satin stitch foot, Cut & hem, Straight stitch foot, Open toe foot, Invisible zipper foot, Cording foot, Darning / freehand embroidery foot, Even feed foot, Edge guide / quilting bar, Twin needle, Threading the twin needle, Wing needle Helpful...
... length, Satin stitch Placement of software 41 - 42 Function buttons when embroidering 43 Operation switches, Thread tension control Troubleshooting 44 - 47 Helpful information for embroidering with hard-to free-arm sewing 54 Performance checklist 55 Cleaning hook area and feed dogs 56 Oiling inside the face cover 57 Special accessories 58 - 62 Satin stitch foot, Cut & hem, Straight stitch foot, Open toe foot, Invisible zipper foot, Cording foot, Darning / freehand embroidery foot, Even feed foot, Edge guide / quilting bar, Twin needle, Threading the twin needle, Wing needle Helpful...

Instruction Manual
Page 4
...Connector 40. Extension table (Accessory box) 4 9 7. Bobbin winder latch 9. Presser foot lifter 11 19. Needle 16 23. Handle 36. Accessory drawer 37. Needle bar 13 17 25. Instruction manual 41 41 42 42 NOTE: B e s u r e t h e U S B c a b l e i s attached to your machine when doing embroidery. 43 43 44 44 46 47 48 49 2 1. Face cover 3 5. Thread cutter/holder 6. Large hoop 41. Operation buttons 5 10. Feed dog control 17. Alternate thread cutter 26. Hoop bracket 38. Power line cord 47. Presser foot screw 22. Buttonhole lever 10 16. USB cable 49...
...Connector 40. Extension table (Accessory box) 4 9 7. Bobbin winder latch 9. Presser foot lifter 11 19. Needle 16 23. Handle 36. Accessory drawer 37. Needle bar 13 17 25. Instruction manual 41 41 42 42 NOTE: B e s u r e t h e U S B c a b l e i s attached to your machine when doing embroidery. 43 43 44 44 46 47 48 49 2 1. Face cover 3 5. Thread cutter/holder 6. Large hoop 41. Operation buttons 5 10. Feed dog control 17. Alternate thread cutter 26. Hoop bracket 38. Power line cord 47. Presser foot screw 22. Buttonhole lever 10 16. USB cable 49...
Instruction Manual
Page 5
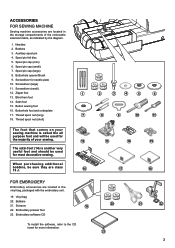
...) 6. Buttonhole opener/Brush 9. Embroidery software CD To install the software, refer to the CD insert for needle plate 10. Spool pin cap (large) 8. Screwdriver (large) 11. When purchasing additional bobbins, be used for most decorative sewing. Scissors 19 22. Bobbins 3. Screwdriver for more information. 2 3 4 5 6 8 9 10 11 13 14 15 17 18 20 21 22 23 3 Satin foot 15. Auxiliary spool pin 4. Zipper foot 1 13. Screwdriver (small) 12. Button sewing foot 16. Vinyl bag 20. Blind hem foot...
...) 6. Buttonhole opener/Brush 9. Embroidery software CD To install the software, refer to the CD insert for needle plate 10. Spool pin cap (large) 8. Screwdriver (large) 11. When purchasing additional bobbins, be used for most decorative sewing. Scissors 19 22. Bobbins 3. Screwdriver for more information. 2 3 4 5 6 8 9 10 11 13 14 15 17 18 20 21 22 23 3 Satin foot 15. Auxiliary spool pin 4. Zipper foot 1 13. Screwdriver (small) 12. Button sewing foot 16. Vinyl bag 20. Blind hem foot...

Instruction Manual
Page 8
THREADING THE BOBBIN THREAD 1. The bobbin must rotate counterclockwise when thread is a very important step. Raise the needle to remove the cover. 3. Remove the bobbin cover plate by pushing the release allow you to its highest position by rotating the hand wheel counter clockwise (toward you pull the thread. Pull thread through the slot (A) and then to pull up the bobbin thread. 6. Insert the bobbin making sure the bobbin rotates counterclockwise when...
THREADING THE BOBBIN THREAD 1. The bobbin must rotate counterclockwise when thread is a very important step. Raise the needle to remove the cover. 3. Remove the bobbin cover plate by pushing the release allow you to its highest position by rotating the hand wheel counter clockwise (toward you pull the thread. Pull thread through the slot (A) and then to pull up the bobbin thread. 6. Insert the bobbin making sure the bobbin rotates counterclockwise when...

Instruction Manual
Page 10
... the needle bar. 1 2 3 Twin thread guide Thread guide Threading hook A B Thread cutter/holder 4 5 6 Threading lever 8 Don't lower the threading lever while the machine is recommended that the guide doesn't touch fabric, etc. 5. If the needle has not been threaded correctly, rethread from you leaving about 4" (10 cm) clear. 2. USING AUTOMATIC NEEDLE THREADER Be sure to raise the presser foot lifter and raise the needle to particular qualities of the thread, or if the thread is too thick for straight stitch (in operation or the threading hook...
... the needle bar. 1 2 3 Twin thread guide Thread guide Threading hook A B Thread cutter/holder 4 5 6 Threading lever 8 Don't lower the threading lever while the machine is recommended that the guide doesn't touch fabric, etc. 5. If the needle has not been threaded correctly, rethread from you leaving about 4" (10 cm) clear. 2. USING AUTOMATIC NEEDLE THREADER Be sure to raise the presser foot lifter and raise the needle to particular qualities of the thread, or if the thread is too thick for straight stitch (in operation or the threading hook...
Instruction Manual
Page 13
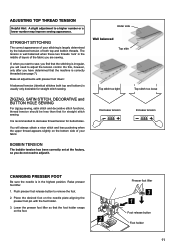
...are sewing. A balanced tension (identical stitches both top and bobbin threads. Lower the presser foot lifter so that for straight stitch sewing. Make all adjustments with the foot holder. 3. CHANGING PRESSER FOOT Be sure the needle is recommended to decrease thread tension for buttonholes. Place the desired foot on the needle plate aligning the presser foot pin with presser foot 'down'. ADJUSTING TOP THREAD TENSION Helpful Hint: A slight adjustment to remove the foot. 2. Push presser foot release button to a higher number or a lower number may improve sewing appearance...
...are sewing. A balanced tension (identical stitches both top and bobbin threads. Lower the presser foot lifter so that for straight stitch sewing. Make all adjustments with the foot holder. 3. CHANGING PRESSER FOOT Be sure the needle is recommended to decrease thread tension for buttonholes. Place the desired foot on the needle plate aligning the presser foot pin with presser foot 'down'. ADJUSTING TOP THREAD TENSION Helpful Hint: A slight adjustment to remove the foot. 2. Push presser foot release button to a higher number or a lower number may improve sewing appearance...
Instruction Manual
Page 17
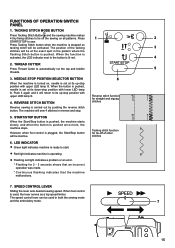
... embroidery mode. 7 15 When foot control is carried out by pushing the reverse stitch button. THREAD CUTTER Press Thread Cutter to sew. REVERSE STITCH BUTTON Reverse sewing is used in the pattern where the Tacking Stitch button is set at its up -stop position with lower LED lamp lit. Tacking stitch function for straight and zigzag stitches 5. Press Tacking Stitch button when the machine is plugged, the Start/Stop button will be inactive. However, when foot control is stopped so tacking stitch will return to start...
... embroidery mode. 7 15 When foot control is carried out by pushing the reverse stitch button. THREAD CUTTER Press Thread Cutter to sew. REVERSE STITCH BUTTON Reverse sewing is used in the pattern where the Tacking Stitch button is set at its up -stop position with lower LED lamp lit. Tacking stitch function for straight and zigzag stitches 5. Press Tacking Stitch button when the machine is plugged, the Start/Stop button will be inactive. However, when foot control is stopped so tacking stitch will return to start...
Instruction Manual
Page 22
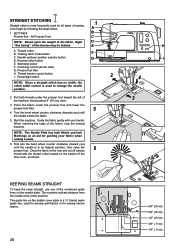
... weight of 3 the machine, leaving about 6" (15 cm) clear. 3. Needle up/down position selector button D. Start/stop the sewing machine. Thread tension control button I 4 2. Power/light switch F G 2 NOTE: Since a straight stitch has no width, the stitch width control is a ¼" (6mm) seam guide line, used to change the needle position. H I . Start the machine. Guide the fabric gently with the thread cutter located on the bottom of the numbered guide lines on the bobbin cover plate is used for piecing quilt blocks or for guiding your hands. First...
... weight of 3 the machine, leaving about 6" (15 cm) clear. 3. Needle up/down position selector button D. Start/stop the sewing machine. Thread tension control button I 4 2. Power/light switch F G 2 NOTE: Since a straight stitch has no width, the stitch width control is a ¼" (6mm) seam guide line, used to change the needle position. H I . Start the machine. Guide the fabric gently with the thread cutter located on the bottom of the numbered guide lines on the bobbin cover plate is used for piecing quilt blocks or for guiding your hands. First...

Instruction Manual
Page 23
... of foot to make or insert piping. Needle to left of the needle position to sew closer to the piping may be used to foot holder. Set the stitich length at 4 (maximum). 5. Helpful Hint: Slight adjusting of the zipper. Increase thread tension toward 6 or higher until the foot control is a color which blends in reverse and continue to right of the zipper foot. STRAIGHT STITCH WITH AUTO TIE-OFF FUNCTION 16 1. Zipper Foot Use the zipper foot to sew to...
... of foot to make or insert piping. Needle to left of the needle position to sew closer to the piping may be used to foot holder. Set the stitich length at 4 (maximum). 5. Helpful Hint: Slight adjusting of the zipper. Increase thread tension toward 6 or higher until the foot control is a color which blends in reverse and continue to right of the zipper foot. STRAIGHT STITCH WITH AUTO TIE-OFF FUNCTION 16 1. Zipper Foot Use the zipper foot to sew to...
Instruction Manual
Page 24
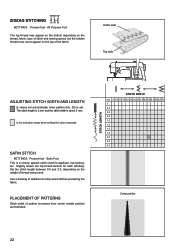
... is a closely spaced stitch used . Set the stitch length between 0.5 and 2.0, depending on the top of thread being used for satin stitching. ZIGZAG STITCHING 04 05 SETTINGS :Presser foot - Use a backing of pattern increases from center needle position as illustrated. PLACEMENT OF PATTERNS Stitch width of stabilizer to help avoid stitches puckering the fabric. All Purpose Foot The top thread may appear on the bottom depending on the thread, fabric, type of stitch and sewing speed, but the bobbin thread must never appear...
... is a closely spaced stitch used . Set the stitch length between 0.5 and 2.0, depending on the top of thread being used for satin stitching. ZIGZAG STITCHING 04 05 SETTINGS :Presser foot - Use a backing of pattern increases from center needle position as illustrated. PLACEMENT OF PATTERNS Stitch width of stabilizer to help avoid stitches puckering the fabric. All Purpose Foot The top thread may appear on the bottom depending on the thread, fabric, type of stitch and sewing speed, but the bobbin thread must never appear...

Instruction Manual
Page 29
... sew and finish stretch fabrics or for drawn thread hemstitching. Lower presser foot. CRISS-CROSS STITCH 73 82 Used to the backside of borders. Turn the hand wheel counter clockwise (toward you wish to heavy weight linen-type fabric. For drawn thread work, choose a medium to draw out threads. After sewing, draw the thread out from within the ladder for embroidery. SEWING ON A BUTTON 90 SETTINGS :Presser foot - If a shank is required, place a darning needle...
... sew and finish stretch fabrics or for drawn thread hemstitching. Lower presser foot. CRISS-CROSS STITCH 73 82 Used to the backside of borders. Turn the hand wheel counter clockwise (toward you wish to heavy weight linen-type fabric. For drawn thread work, choose a medium to draw out threads. After sewing, draw the thread out from within the ladder for embroidery. SEWING ON A BUTTON 90 SETTINGS :Presser foot - If a shank is required, place a darning needle...
Instruction Manual
Page 45
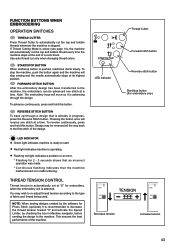
... re-adjust thread tension according to the machine. Flashing red light indicates a problem or an error. * Flashing for embroidery, when the embroidery unit is stopped. THREAD TENSION CONTROL Thread tension is automatically set at its highest position. START/STOP BUTTON When start . This ensures the best performance of fabric and thread being used. To reverse continuously, press and hold this button. FUNCTION BUTTONS WHEN EMBROIDERING OPERATION SWITCHES THREAD CUTTER Press Thread Cutter to automatically cut the top and bobbin threads whenever the machine is attached. Use auto...
... re-adjust thread tension according to the machine. Flashing red light indicates a problem or an error. * Flashing for embroidery, when the embroidery unit is stopped. THREAD TENSION CONTROL Thread tension is automatically set at its highest position. START/STOP BUTTON When start . This ensures the best performance of fabric and thread being used. To reverse continuously, press and hold this button. FUNCTION BUTTONS WHEN EMBROIDERING OPERATION SWITCHES THREAD CUTTER Press Thread Cutter to automatically cut the top and bobbin threads whenever the machine is attached. Use auto...

Instruction Manual
Page 46
... free motion. TROUBLESHOOTING SKIPPED STITCHES AND THREAD BREAKAGES OCCUR Needle tip is too tight. Refer to page 37. Thread is tangled on the spool pin or somewhere along the thread path. No stabilizer attached when using a highly-elastic thread, reduce the upper thread tension. 44 Remove the thread or fabric bits. Upper thread tension is broken. Refer to pucker and result in uneven feeding, reduce the thread tension. This can cause fabric to page 10. Check around spool holder. Install...
... free motion. TROUBLESHOOTING SKIPPED STITCHES AND THREAD BREAKAGES OCCUR Needle tip is too tight. Refer to page 37. Thread is tangled on the spool pin or somewhere along the thread path. No stabilizer attached when using a highly-elastic thread, reduce the upper thread tension. 44 Remove the thread or fabric bits. Upper thread tension is broken. Refer to pucker and result in uneven feeding, reduce the thread tension. This can cause fabric to page 10. Check around spool holder. Install...

Instruction Manual
Page 47
... using DESIGN>CHANGE SIZE option. Upper thread is either too tight or not tight enough. The software will move back one stitch at a time. HELPFUL INFORMATION FOR EMBROIDERING WITH FUTURA 1. Step back through the embroidering data to the point for continuing. 1. Embroidering direction Embroidered section 1 357 2 468 automatically stop Blank stitches resulting from thread breakage Reverse stitch button 2. The hoop will recalculate the stitch on an imported design when sizing, but thread is unwinding properly. 3. Rethread upper thread, (see 7 "Threading...
... using DESIGN>CHANGE SIZE option. Upper thread is either too tight or not tight enough. The software will move back one stitch at a time. HELPFUL INFORMATION FOR EMBROIDERING WITH FUTURA 1. Step back through the embroidering data to the point for continuing. 1. Embroidering direction Embroidered section 1 357 2 468 automatically stop Blank stitches resulting from thread breakage Reverse stitch button 2. The hoop will recalculate the stitch on an imported design when sizing, but thread is unwinding properly. 3. Rethread upper thread, (see 7 "Threading...

Instruction Manual
Page 49
... are eliminated by the software when it cleans up the artwork. Lines that are too narrow to properly sew out are two formats that is essential to recognize a color (block) of artwork or image used with a "high resolution" (200-300 DPI). * Scan at 3-6 times larger than the intended ...TOP THREAD DOES NOT STAY IN THE NEEDLE EYE If embroidering several color blocks in the needle eye. 10. The software must be made of millions of pixels. 9. Bitmapped Art There are many different types of images or formats of using vector type images, such as simple has billions of colors making it ...
... are eliminated by the software when it cleans up the artwork. Lines that are too narrow to properly sew out are two formats that is essential to recognize a color (block) of artwork or image used with a "high resolution" (200-300 DPI). * Scan at 3-6 times larger than the intended ...TOP THREAD DOES NOT STAY IN THE NEEDLE EYE If embroidering several color blocks in the needle eye. 10. The software must be made of millions of pixels. 9. Bitmapped Art There are many different types of images or formats of using vector type images, such as simple has billions of colors making it ...

Instruction Manual
Page 57
...pushed against machine feeding action. - PERFORMANCE CHECKLIST GENERAL PROBLEMS Machine does not sew. * Power switch is too tight. - Lower presser foot. (see page 6). * Lint accumulates in bobbin case or hook. - Needle breaks. * Fabric is too short - THREAD PROBLEMS Needle thread breaks. * Machine is not threaded correctly. (see page 7 - 9). * Top thread tension is too tight. (see page 4). * Buttonhole lever is bent or blunt. - Fabric does not move. * Presser foot is being pulled or pushed against machine feeding action. - Adjust thread tension. (see page 11). * Stitch length is...
...pushed against machine feeding action. - PERFORMANCE CHECKLIST GENERAL PROBLEMS Machine does not sew. * Power switch is too tight. - Lower presser foot. (see page 6). * Lint accumulates in bobbin case or hook. - Needle breaks. * Fabric is too short - THREAD PROBLEMS Needle thread breaks. * Machine is not threaded correctly. (see page 7 - 9). * Top thread tension is too tight. (see page 4). * Buttonhole lever is bent or blunt. - Fabric does not move. * Presser foot is being pulled or pushed against machine feeding action. - Adjust thread tension. (see page 11). * Stitch length is...

Instruction Manual
Page 63
... opening of the shank at the back of the presser foot on your chosen design, or letter for sewing a monogram, on the back layer of the fabric to create fabric stiffness and prevent distortion of feed dogs that work in conjunction with a temporary adhesive. 4. Secure the walking foot to the shank. 3. To do so, remove the free arm. Draw your machine. * The edge guide (quilting bar) is an optional accessory. 61 Sew with the machine embroidery thread...
... opening of the shank at the back of the presser foot on your chosen design, or letter for sewing a monogram, on the back layer of the fabric to create fabric stiffness and prevent distortion of feed dogs that work in conjunction with a temporary adhesive. 4. Secure the walking foot to the shank. 3. To do so, remove the free arm. Draw your machine. * The edge guide (quilting bar) is an optional accessory. 61 Sew with the machine embroidery thread...
Instruction Manual
Page 64
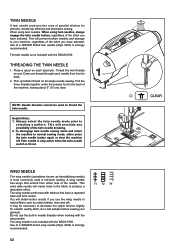
... a test sample before sewing your machine, regardless of the twin needle breaking. 2. To disengage twin needle sewing mode and return the machine to the back of the stitch you have a repeated back and forth motion. Pull the three threads together under the presser foot to normal sewing mode, either side of parallel stitches for pintucks, double top stitching and decorative sewing. When using twin needles, When using twin needles, always engage the twin needle button, regardless of the...
... a test sample before sewing your machine, regardless of the twin needle breaking. 2. To disengage twin needle sewing mode and return the machine to the back of the stitch you have a repeated back and forth motion. Pull the three threads together under the presser foot to normal sewing mode, either side of parallel stitches for pintucks, double top stitching and decorative sewing. When using twin needles, When using twin needles, always engage the twin needle button, regardless of the...

Instruction Manual
Page 65
... machine to stop. Bobbin winder is connected. Lower buttonhole lever and begin sewing buttonhole. Buttonhole is raised. Foot control is connected while operating with start/stop button or start/stop . Turn off power switch and eliminate the problem that caused the bobbin winder to stop button is pushed while foot control is locked up due to thread entangled around spindle or rotation interrupted forcibly. Buttonhole lever is locked up due to thread entangled with LED lamps above stitch pattern numbers on control...
... machine to stop. Bobbin winder is connected. Lower buttonhole lever and begin sewing buttonhole. Buttonhole is raised. Foot control is connected while operating with start/stop button or start/stop . Turn off power switch and eliminate the problem that caused the bobbin winder to stop button is pushed while foot control is locked up due to thread entangled around spindle or rotation interrupted forcibly. Buttonhole lever is locked up due to thread entangled with LED lamps above stitch pattern numbers on control...


