
Singer Futura Quartet SEQS-6700 Support Question
Singer Futura Quartet SEQS-6700 Support Question
Find answers below for this question about Singer Futura Quartet SEQS-6700.Need a Singer Futura Quartet SEQS-6700 manual? We have 1 online manual for this item!
Question posted by ellierosariod on January 25th, 2023
Is There Repair Manual To Singer Futura Quartet Seqs 6700,
It's not recognize the hoop, too it has to much thread and knot under fabric and do not make Stitch hole to bottom. No repair manual on place sewing machine fix.
Current Answers
Answer #1: Posted by SonuKumar on January 25th, 2023 7:28 AM
SonuKumar

Member since:
May 9th, 2021 Points: 16,609,800

Member since:
May 9th, 2021 Points: 16,609,800
https://www.manualslib.com/manual/621061/Singer-Futura-Quartet.html?page=54
Manual has all the necessary instruction and troubleshooting guide
Please respond to my effort to provide you with the best possible solution by using the "Acceptable Solution" and/or the "Helpful" buttons when the answer has proven to be helpful.
Regards,
Sonu
Your search handyman for all e-support needs!!
Answer #2: Posted by MercedesAMG on January 25th, 2023 6:21 AM
MercedesAMG

Member since:
January 26th, 2013 Points: 193,710
Member since:
January 26th, 2013 Points: 193,710
If your machine is under warranty, it may be best to contact Singer customer service for assistance. Additionally, you may want to try contacting a local sewing machine repair shop for help. They may have experience with the SEQS 6700 model and be able to diagnose and repair the issues you are experiencing.
Please respond to my effort to provide you with the best possible solution by using the "Acceptable Solution" and/or the "Helpful" buttons when the answer has proven to be helpful. Please feel free to submit further info for your question, if a solution was not provided. I appreciate the opportunity to serve you!
Related Singer Futura Quartet SEQS-6700 Manual Pages
Instruction Manual - Page 1
SEQS-6700
INSTRUCTION MANUAL
67
Instruction Manual - Page 2
...any adjustments in the instruction manual.
19. Switch the sewing machine off („0") position, then remove plug from the electrical outlet when removing covers, lubricating, or when making any opening. 8. Unplug ... this sewing machine only for household use as contained in this sewing machine if it has a damaged cord or plug, if it to the manufacture or service agent to repair or ...
Instruction Manual - Page 3

..., Inserting the bobbin, Threading the top thread, Extension table, Attaching embroidery unit 36 Removing embroidery unit 36 Securing fabric in embroidery hoop 37 Using fabric and stabilizer 38 - 39 Preparing the machine before installing the hoop 40 Attaching and removing embroidery hoop 40 Installation of patterns Blind stitch 23 Multi-stitch zigzag 23 Stretch stitches 24 - 27 Straight...
Instruction Manual - Page 12
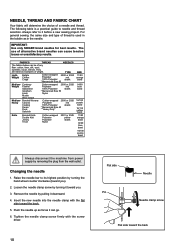
...THREAD AND FABRIC CHART
Your fabric will determine the choice of thread is a practical guide to needle and thread selection. For general sewing, the same size and type of a needle and thread...Always disconnect the machine from power supply ...SINGER brand needles for best results. Raise the needle bar to it downward. 4.
Loosen the needle clamp screw by pulling it before a new sewing...
Instruction Manual - Page 16
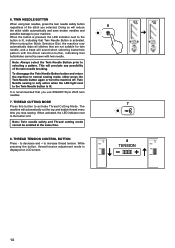
... will preclude any possibility of the stitch you use SINGER Style 2025 twin needles.
7.
When activated, the LED indicator next to the Twin Needle button is lit. To disengage the Twin Needle Button button and return the machine to activate Thread Cutting Mode. THREAD TENSION CONTROL BUTTON
Press - Twin Needle sewing is only active when the...
Instruction Manual - Page 18

...4.0
CENTER
-
Counter clockwise
16
Clockwise
Counter clockwise
Clockwise
Lower scroll dial STARTING TO SEW
QUICK REFERENCE TABLE OF STITCH LENGTH AND WIDTH
STITCH No. 00
LENGTH AUTO
MANUAL
2.5
0.5 - 4.8
NEEDLE POSITION
AUTO
MANUAL
CENTER
LEFT -
LENGTH
STITCH No. AUTO
MANUAL
WIDTH
AUTO
MANUAL
LENGTH
STITCH No. 2.
RIGHT
01
2.5
1.5 - 3.0
CENTER
LEFT - AUTO...
Instruction Manual - Page 22
...6
thread with your fabric when sewing a seam.
6. Thread tension control button I
4
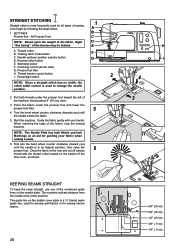
2. The guide line on the needle plate. Let's begin by following the steps below. 1. STRAIGHT STITCHING 00
Straight stitch is most frequently used for guiding your hands. Place the fabric under the presser foot toward you ) until the needle is in its center position. H I .
Start the machine.
Instruction Manual - Page 24
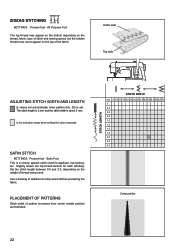
... on the thread, fabric, type of stitch and sewing speed, but the bobbin thread must never appear on the weight of the fabric.
Satin Foot This is about 5 mm. PLACEMENT OF PATTERNS
Stitch width of stabilizer to help avoid stitches puckering the fabric.
Set the stitch length between 0.5 and 2.0, depending on the top of thread being used for satin stitching. ZIGZAG STITCHING 04...
Instruction Manual - Page 25
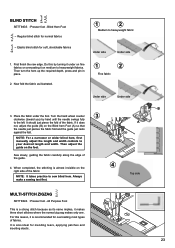
... the guide just rests
against the fold.
B
23 Place the fabric under the foot. When completed, the stitching is a strong stitch because as illustrated.
1
2
Fine fabric
Under side
Under side
3. Turn the hand wheel counter
3
clockwise (toward you) by hand until the needle swings fully
to sew blind hem. It should just pierce the fold of...
Instruction Manual - Page 26

... topstitch for machine appliqué, though it locks three times - All Purpose Foot Stretch stitches are mainly for applique, adjust the length or width of the stitch according to give
OVEREDGE STITCH 09
This stitch is particularly suitable for reinforcing the seams of sportswear in stretch and non-stretch fabrics, and for making sportswear. It sews repairing raw or...
Instruction Manual - Page 28
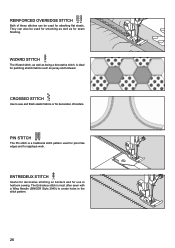
... most often sewn with a Wing Needle (SINGER Style 2040) to create holes in heirloom sewing. REINFORCED OVEREDGE STITCH 80 81
They can also be used for picot like edges and for patching stretch fabrics such as being a decorative stitch, is ideal for appliqué work. ENTREDEUX STITCH 71
Useful for decorative stitching on borders and for use in...
Instruction Manual - Page 33

...91 92 93
31 Stop sewing when you have completed the buttonhole
and press Tacking Stitch button to
complete buttonhole.
4
5. MANUAL BUTTONHOLE
* Use the automatic buttonhole stitches (#94-99) and ... the manual
buttonhole stitches (#91-93).
* Use the satin foot to 1 3/4 "(45mm) in length. buttonhole.
2
3. Carefully mark the buttonhole length on your garment. Place the fabric with ...
Instruction Manual - Page 43

... seconds, the Installation Procedure of the software will start the installation procedure manually by -step installation of the software begins with terms given in your PC. CD-ROM
Simply click on a CD-ROM disc. The software for your FUTURA sewing & embroidery machine comes on
to continue.
41
Click on "Next" to move on your...
Instruction Manual - Page 44

... followed for a short while until this happens. If the installation utility identifies a lack of available space on the FUTURA icon shortcut your desktop to your sewing machine and connect the USB cable between your computer and sewing machine.
1. Make sure the needle has been moved to continue. will prompt you .
2. Simply click on
to the highest...
Instruction Manual - Page 47

... back through the embroidery data. Restart the embroidery machine and continue embroidering. Embroidering direction
Embroidered section
1 357
2 468
automatically stop
Blank stitches resulting from thread breakage
Reverse stitch button
2. The software will move back one stitch at a time. If stitches are flashing lights and making a beeping sound, but only when using DESIGN>CHANGE...
Instruction Manual - Page 54
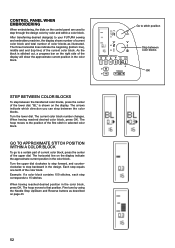
... as described on page 43.
52
Go to 15 stitches. Example: If a color block contains 150 stitches, each step corresponds to stitch position
Step between color blocks
OK When having reached desired... that position. The block. The horizontal line on the display. The hoop moves to your FUTURA sewing and embroidery machine, the display shows number of current color block and total number of the...
Instruction Manual - Page 57

... page 40). THREAD PROBLEMS Needle thread breaks. * Machine is not threaded correctly. (see page 7 - 9). * Top thread tension is too tight. (see page 11). * Fabric is being pulled or pushed against machine feeding action. - Remove lint (see page 5). Adjust thread tension. (see page 11). * Stitch length is too long for thread and fabric. (see page 10). * Machine is not threaded correctly...
Instruction Manual - Page 58
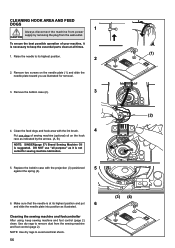
... as illustrated for sewing machine lubrication.
5. Use dry rags to avoid electrical shock.
56
(3) (4) Remove the bobbin case (2).
3
4. Raise the needle to keep sewing machine and foot control (page 2) clean.
CLEANING HOOK AREA AND FEED DOGS
1
Always disconnect the machine from power
CAUTION supply by the arrows. (A, B)
NOTE: SINGER(page 57) Brand Sewing Machine Oil
suited...
Instruction Manual - Page 60

... clampscrew
to the right. 2. This is an attractive stitch used to trim excess material while sewing. 1. Slightly loosen top thread tension for sewing satin stitches. NOTE on starting to sew in one direction and preferably be placed under it is usually because the material is an optional accessory. Place the fabric OVER the first metal platform and then
UNDER...
Instruction Manual - Page 64
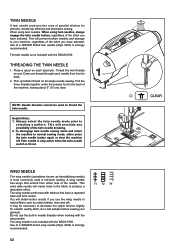
... known as hemstitching needle) is not included with the SEQS-6700. Use of a SINGER brand wing needle (Style 2040) is strongly recommended.
Place a spool on each needle from either press the twin needle button again or shut the machine off. Thread the two threads as for single needle sewing. NOTE: Needle threader cannot be necessary to your garment...
Similar Questions

Singer Futura Quartet Seqs-6700 Embroidery Carriage Has Stopped Working
My embroidery carriage will not move. The machine gives the error that the hoop is the wrong size an...
My embroidery carriage will not move. The machine gives the error that the hoop is the wrong size an...
(Posted by kpbilleaud 2 years ago)

Singer Futura Quartet Seqs 6700 Sewing Machine
how to set my singer futura quartet seqs 6700 sewing machine to sew. A distance more than one inch a...
how to set my singer futura quartet seqs 6700 sewing machine to sew. A distance more than one inch a...
(Posted by johour2194 3 years ago)

Seqs-6700 Installation Software Cd
I have lost the CD for the embroidery installation on my SEQS-6700. Can someone please help me get a...
I have lost the CD for the embroidery installation on my SEQS-6700. Can someone please help me get a...
(Posted by rcohernour 9 years ago)

Do It Yourself Repair Manual
My sister gave me her serger. I would like to try to fix it myself. How can I find the repair manual...
My sister gave me her serger. I would like to try to fix it myself. How can I find the repair manual...
(Posted by SandyWagner 10 years ago)

What Are The Consumer Comments/reviews For The Singer Quartet Seqs 6700
(Posted by ulethomp 10 years ago)