
Instruction Manual 2
Page 2
... examination, repair, electrical or mechanical adjustment. 4. Return the sewing machine to place anything on cord. Never operate the sewing machine with care and avoid dropping it to persons: 1. SAVE THESE INSTRUCTIONS Servicing should always be performed by an authorized service representative. 2 SINGER is a registered Trademark of The Singer Company Ltd. Never operate this manual. Never drop...
... examination, repair, electrical or mechanical adjustment. 4. Return the sewing machine to place anything on cord. Never operate the sewing machine with care and avoid dropping it to persons: 1. SAVE THESE INSTRUCTIONS Servicing should always be performed by an authorized service representative. 2 SINGER is a registered Trademark of The Singer Company Ltd. Never operate this manual. Never drop...

Instruction Manual 2
Page 3
... SAFETY INSTRUCTIONS 2 MODEL 9960 8 FOR EUROPEAN AND SIMILAR TERRITORIES: ...... 8 MAIN PARTS 10 ACCESSORIES 12 DUST COVER 12 EXTENSION TABLE 14 a. Removing the presser foot holder 14 INSERTING THE NEEDLE 16 FABRIC, THREAD AND NEEDLE TABLE ........ 16 CONNECTING THE MACHINE 18 FOOT CONTROLLER 18 ...presser foot 14 B. PRESSER FOOT LIFTER 20 F. TOP COVER 22 J. CLEAR BUTTON 26 J. DRAWING UP THE BOBBIN THREAD 34 STARTING TO SEW 36 A. SEWING THIN FABRICS 82 USING THE EVEN-FEED FOOT 82 A. THREAD CUTTER 22 I. REMOVING THE EXTENSION TABLE 14 b. START/STOP BUTTON 20 B....
... SAFETY INSTRUCTIONS 2 MODEL 9960 8 FOR EUROPEAN AND SIMILAR TERRITORIES: ...... 8 MAIN PARTS 10 ACCESSORIES 12 DUST COVER 12 EXTENSION TABLE 14 a. Removing the presser foot holder 14 INSERTING THE NEEDLE 16 FABRIC, THREAD AND NEEDLE TABLE ........ 16 CONNECTING THE MACHINE 18 FOOT CONTROLLER 18 ...presser foot 14 B. PRESSER FOOT LIFTER 20 F. TOP COVER 22 J. CLEAR BUTTON 26 J. DRAWING UP THE BOBBIN THREAD 34 STARTING TO SEW 36 A. SEWING THIN FABRICS 82 USING THE EVEN-FEED FOOT 82 A. THREAD CUTTER 22 I. REMOVING THE EXTENSION TABLE 14 b. START/STOP BUTTON 20 B....

Instruction Manual 2
Page 8
... capabilities, or lack of the CISPR. Please refer to this sewing machine. To get the most modern sewing capabilities, the manufacturer reserves the right to the earth terminal of a three-pin plug. 8 MODEL 9960 PREFACE Thank you for your purchase of this booklet for proper use... excellent performance in sewing from light to ensure that you are colored in accordance with the following the instruction manual page by a person responsible for their safety. 2. This machine intended for household use and optimum service. Copyright © 2010 THE SINGER COMPANY All Rights ...
... capabilities, or lack of the CISPR. Please refer to this sewing machine. To get the most modern sewing capabilities, the manufacturer reserves the right to the earth terminal of a three-pin plug. 8 MODEL 9960 PREFACE Thank you for your purchase of this booklet for proper use... excellent performance in sewing from light to ensure that you are colored in accordance with the following the instruction manual page by a person responsible for their safety. 2. This machine intended for household use and optimum service. Copyright © 2010 THE SINGER COMPANY All Rights ...
Instruction Manual 2
Page 12
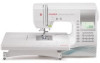
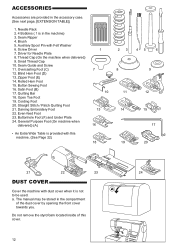
... of the dust cover by opening the front cover towards you. Auxiliary Spool Pin with dust cover when it is in the compartment of this machine. (See Page 22) 1 7 10 13 16 18 23 8 11 14 19 45 6 9 12 15 17 20 21 22 23 24 DUST COVER Cover the... 19. Blind Hem Foot (D) 13. Zipper Foot (E) 14. Quilting Bar 18. The manual may be used. Satin Foot (B) 17. Brush 5. Driver for Needle Plate 8. Button Sewing Foot 16. Darning Embroidery Foot 22. Seam Ripper 4. Seam Guide and Screw 11. ACCESSORIES Accessories are provided in the accessory case. (See next page, [EXTENSION...
... of the dust cover by opening the front cover towards you. Auxiliary Spool Pin with dust cover when it is in the compartment of this machine. (See Page 22) 1 7 10 13 16 18 23 8 11 14 19 45 6 9 12 15 17 20 21 22 23 24 DUST COVER Cover the... 19. Blind Hem Foot (D) 13. Zipper Foot (E) 14. Quilting Bar 18. The manual may be used. Satin Foot (B) 17. Brush 5. Driver for Needle Plate 8. Button Sewing Foot 16. Darning Embroidery Foot 22. Seam Ripper 4. Seam Guide and Screw 11. ACCESSORIES Accessories are provided in the accessory case. (See next page, [EXTENSION...
Instruction Manual 2
Page 14
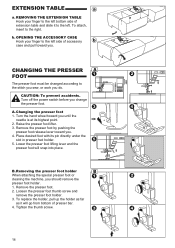
... prevent accidents. Place desired foot with its highest point. 2. To replace the holder, pull up the holder as far as it to the stitch you sew, or work you . 4. Changing the presser foot 1. Lower the presser foot lifting lever and the presser foot will go from bottom of accessory case and... the power switch before you should remove the presser foot holder. 1. Removing the presser foot holder When attaching the special presser foot or cleaning the machine, you change the presser foot. EXTENSION TABLE a. A. Raise the presser foot lifter. 3. Tighten the thumb screw. 14
... prevent accidents. Place desired foot with its highest point. 2. To replace the holder, pull up the holder as far as it to the stitch you sew, or work you . 4. Changing the presser foot 1. Lower the presser foot lifting lever and the presser foot will go from bottom of accessory case and... the power switch before you should remove the presser foot holder. 1. Removing the presser foot holder When attaching the special presser foot or cleaning the machine, you change the presser foot. EXTENSION TABLE a. A. Raise the presser foot lifter. 3. Tighten the thumb screw. 14
Instruction Manual 2
Page 18
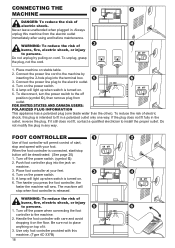
... light up when switch is intended to the machine. 2. Handle the foot controller with your feet. 4. WARNING: To reduce the risk of burns, fire, electric shock, or injury to place anything on the power switch. 5. A lamp will sew. To disconnect, turn the power switch to the off the... power when connecting the foot controller to fit in . If it . 3. Do not modify the plug in the outlet, reverse the plug. Use only foot controller provided with this machine from outlet. Turn off position...
... light up when switch is intended to the machine. 2. Handle the foot controller with your feet. 4. WARNING: To reduce the risk of burns, fire, electric shock, or injury to place anything on the power switch. 5. A lamp will sew. To disconnect, turn the power switch to the off the... power when connecting the foot controller to fit in . If it . 3. Do not modify the plug in the outlet, reverse the plug. Use only foot controller provided with this machine from outlet. Turn off position...
Instruction Manual 2
Page 20
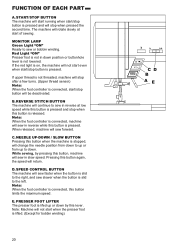
... needle position from down to up or from up or down by pressing this lever. While sewing, by this button, machine will sew faster when the button is slid to the right, and sew slower when the button is released. FUNCTION OF EACH PART A. MONITOR LAMP Green Light "ON... Ready to the left. SPEED CONTROL BUTTON The machine will sew in down . Note: When the foot controller is not lowered. REVERSE STITCH BUTTON The machine will continue to down position or buttonhole lever is connected, machine will return. The machine will rotate slowly at low speed while this button ...
... needle position from down to up or from up or down by pressing this lever. While sewing, by this button, machine will sew faster when the button is slid to the right, and sew slower when the button is released. FUNCTION OF EACH PART A. MONITOR LAMP Green Light "ON... Ready to the left. SPEED CONTROL BUTTON The machine will sew in down . Note: When the foot controller is not lowered. REVERSE STITCH BUTTON The machine will continue to down position or buttonhole lever is connected, machine will return. The machine will rotate slowly at low speed while this button ...
Instruction Manual 2
Page 22
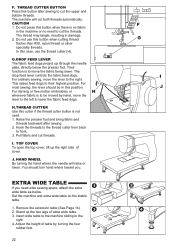
... upper and bobbin threads. Their function is no fabric in the machine or no need wide sewing space, attach the extra wide table as below the presser foot. For ordinary sewing, move the lever to the left to the right. 4. For most sewing, the lever should turn hand wheel toward you need to cut..., use the thread cutter (H). CAUTION 1. The drop feed lever controls the fabric feed dogs. F. Raise the presser foot and bring fabric and threads backward after sewing to cut threads. Insert wide table to the machine sliding to lower the fabric feed dogs.
... upper and bobbin threads. Their function is no fabric in the machine or no need wide sewing space, attach the extra wide table as below the presser foot. For ordinary sewing, move the lever to the left to the right. 4. For most sewing, the lever should turn hand wheel toward you need to cut..., use the thread cutter (H). CAUTION 1. The drop feed lever controls the fabric feed dogs. F. Raise the presser foot and bring fabric and threads backward after sewing to cut threads. Insert wide table to the machine sliding to lower the fabric feed dogs.

Instruction Manual 2
Page 26
CLEAR BUTTON UTILITY STITCH SEWING If you changed the setting (mirror/reverse, elongation, stitch width, length and thread tension) of a decorative stitch pattern, machine will not turn off until the machine is pressed at the end of utility stitch pattern, you can operate the machine without the audible beep. 1.... Turn off the single beep only. This function is kept off . 26 This function turns off the power switch. 2. M. Machine will scroll up or down by pressing these buttons. TWIN NEEDLE BUTTON If you can check and edit combined patterns or letters by ...
CLEAR BUTTON UTILITY STITCH SEWING If you changed the setting (mirror/reverse, elongation, stitch width, length and thread tension) of a decorative stitch pattern, machine will not turn off until the machine is pressed at the end of utility stitch pattern, you can operate the machine without the audible beep. 1.... Turn off the single beep only. This function is kept off . 26 This function turns off the power switch. 2. M. Machine will scroll up or down by pressing these buttons. TWIN NEEDLE BUTTON If you can check and edit combined patterns or letters by ...
Instruction Manual 2
Page 36
... lower the presser foot. 3. Keep holding threads after sewing a few stitches. Upper Thread Sensor If upper thread is broken or missing, machine will be set to sew straight stitch when power switch is turned on the left side of the machine. (See page 22) NOTE After you reach end ...cutting thread thicker than #30, nylon thread or other speciality threads. Machine automatically feeds the fabric, do not pull or push the fabric. Check the presser foot (General Purpose Presser Foot). Lightly guide the fabric while sewing. Press the thread cutter button. 6. Raise the presser foot lifter ...
... lower the presser foot. 3. Keep holding threads after sewing a few stitches. Upper Thread Sensor If upper thread is broken or missing, machine will be set to sew straight stitch when power switch is turned on the left side of the machine. (See page 22) NOTE After you reach end ...cutting thread thicker than #30, nylon thread or other speciality threads. Machine automatically feeds the fabric, do not pull or push the fabric. Check the presser foot (General Purpose Presser Foot). Lightly guide the fabric while sewing. Press the thread cutter button. 6. Raise the presser foot lifter ...
Instruction Manual 2
Page 38
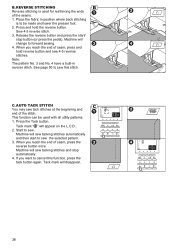
... function, press the tack button again. Place the fabric in reverse stitch. Press and hold reverse button and sew 4-5 reverse stitches. Machine will sew tacking stitches and stop button (or press the pedal). Release the reverse button and press the start to be... end of the seams. 1. B. REVERSE STITCHING Reverse stitching is to sew the selected pattern. 3. Machine will appear on the L.C.D.. 2. If you want to forward sewing. 4. Tack mark will change to cancel this stitch. See page 50 to sew. This function can be made and lower the presser foot. 2. Tack...
... function, press the tack button again. Place the fabric in reverse stitch. Press and hold reverse button and sew 4-5 reverse stitches. Machine will sew tacking stitches and stop button (or press the pedal). Release the reverse button and press the start to be... end of the seams. 1. B. REVERSE STITCHING Reverse stitching is to sew the selected pattern. 3. Machine will appear on the L.C.D.. 2. If you want to forward sewing. 4. Tack mark will change to cancel this stitch. See page 50 to sew. This function can be made and lower the presser foot. 2. Tack...

Instruction Manual 2
Page 40
Stop the machine when you reach a corner. Lower the presser foot and resume sewing. E. In such case, set as a pivot and turn fabric. 4. Push the lock button located on the needle plate indicate the distance from the center needle positon. Start sewing. The presser bar lifter can be started smoothly.... right side of general purpose foot and lower the foot. 3. The machine will be feeded smoothly. Use the needle as follows. 1. a. To keep the width of presser foot tends to lift up and sewing cannot be raised 1step higher for placing heavy materials under the presser foot...
Stop the machine when you reach a corner. Lower the presser foot and resume sewing. E. In such case, set as a pivot and turn fabric. 4. Push the lock button located on the needle plate indicate the distance from the center needle positon. Start sewing. The presser bar lifter can be started smoothly.... right side of general purpose foot and lower the foot. 3. The machine will be feeded smoothly. Use the needle as follows. 1. a. To keep the width of presser foot tends to lift up and sewing cannot be raised 1step higher for placing heavy materials under the presser foot...

Instruction Manual 2
Page 42
... and change the thread tension as shown on drawing, stitches on the top side, check the bobbin to a slightly weaker tension than when sewing straight stitch. The mark " " is increased. By pressing the function F1 button, LCD return to pre-set. Thread tension except for ...previous mode (Stitch information mode). A. When thread tension is indicating the absolute thread tension. C. Refer to pre-set. THREAD TENSION This machine adjusts the thread tension automatically when pattern is set correctly. LCD changes to look like a towel, it is selected. You can change tension ...
... and change the thread tension as shown on drawing, stitches on the top side, check the bobbin to a slightly weaker tension than when sewing straight stitch. The mark " " is increased. By pressing the function F1 button, LCD return to pre-set. Thread tension except for ...previous mode (Stitch information mode). A. When thread tension is indicating the absolute thread tension. C. Refer to pre-set. THREAD TENSION This machine adjusts the thread tension automatically when pattern is set correctly. LCD changes to look like a towel, it is selected. You can change tension ...

Instruction Manual 2
Page 46
... Note: When further width or length adjustments are not indicated, the pattern cannot be changed. SETTING STITCH WIDTH AND LENGTH Machine will set stitch width and length will be made while sewing. 46 LCD will return to show the stitch width and length. When you pressed clear "C" button..., machine will return to regular length (also mirror/reverse will change the needle position. To shift the needle to the right,...
... Note: When further width or length adjustments are not indicated, the pattern cannot be changed. SETTING STITCH WIDTH AND LENGTH Machine will set stitch width and length will be made while sewing. 46 LCD will return to show the stitch width and length. When you pressed clear "C" button..., machine will return to regular length (also mirror/reverse will change the needle position. To shift the needle to the right,...

Instruction Manual 2
Page 50
... cutter button. 50 Straight Stitch 1. Position the fabric under the presser foot and lower it . 2. Machine will sew a few stitches backward and sew a few stitches forward and stop sewing. 4. Center needle Position No. 2. When you reach the end of fabric being sewn. Position the ...the presser foot and lower it . 2. Press the thread cutter button. Machine will sew 4-5 stitches forward and sew 4-5 stitches backward and continue sewing forward. 3. Left needle position (No.2) is most suited for sewing light weight fabrics. Left needle Position No. 3. Hold the upper thread ...
... cutter button. 50 Straight Stitch 1. Position the fabric under the presser foot and lower it . 2. Machine will sew a few stitches backward and sew a few stitches forward and stop sewing. 4. Center needle Position No. 2. When you reach the end of fabric being sewn. Position the ...the presser foot and lower it . 2. Press the thread cutter button. Machine will sew 4-5 stitches forward and sew 4-5 stitches backward and continue sewing forward. 3. Left needle position (No.2) is most suited for sewing light weight fabrics. Left needle Position No. 3. Hold the upper thread ...
Instruction Manual 2
Page 52
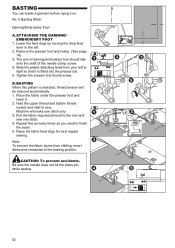
...page 14) 3. B. BASTING When this as many times as you need to finish the seam. 5. Raise the fabric feed dogs for next regular sewing. Machine will be reduced automatically. 1. CAUTION: To prevent accidents. The arm of darning/embroidery foot should ride onto the shaft of the needle clamp screw....Darning/Embroidery Foot A. Repeat this pattern is fitted into the presser bar. 5. Be sure the needle does not hit the dress pin, while sewing. 52 ATTACHING THE DARNING/ EMBROIDERY FOOT 1. Place the fabric under the presser foot and lower it on. Note: To prevent the fabric layers ...
...page 14) 3. B. BASTING When this as many times as you need to finish the seam. 5. Raise the fabric feed dogs for next regular sewing. Machine will be reduced automatically. 1. CAUTION: To prevent accidents. The arm of darning/embroidery foot should ride onto the shaft of the needle clamp screw....Darning/Embroidery Foot A. Repeat this pattern is fitted into the presser bar. 5. Be sure the needle does not hit the dress pin, while sewing. 52 ATTACHING THE DARNING/ EMBROIDERY FOOT 1. Place the fabric under the presser foot and lower it on. Note: To prevent the fabric layers ...
Instruction Manual 2
Page 56
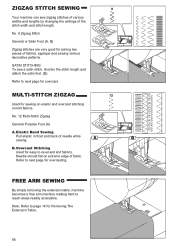
...easy to next page for Removing The Extension Table. 56 Needle should fall on knit fabrics. FREE ARM SEWING By simply removing the extension table, machine becomes a free arm machine making hard to next page for joining two pieces of fabric. Overcast Stitching Used for... sewing on elastic and overcast stitching on extreme edge of fabrics, applique and sewing various decorative patterns. No. 9 Zigzag Stitch General or Satin...
...easy to next page for Removing The Extension Table. 56 Needle should fall on knit fabrics. FREE ARM SEWING By simply removing the extension table, machine becomes a free arm machine making hard to next page for joining two pieces of fabric. Overcast Stitching Used for... sewing on elastic and overcast stitching on extreme edge of fabrics, applique and sewing various decorative patterns. No. 9 Zigzag Stitch General or Satin...
Instruction Manual 2
Page 68
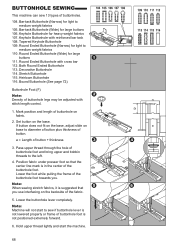
... 111. Keyhole Buttonhole with cross bar 112. Mark position and length of buttonhole on the backside of the buttonhole foot. BUTTONHOLE SEWING This machine can sew 13 types of buttonhole foot and bring upper and bobbin threads to the left. 4. Pass upper thread through the hole of buttonholes.... 104. Note: When sewing stretch fabrics, it is suggested that the center line mark is not positioned extremely forward. 6. Lower the ...
... 111. Keyhole Buttonhole with cross bar 112. Mark position and length of buttonhole on the backside of the buttonhole foot. BUTTONHOLE SEWING This machine can sew 13 types of buttonhole foot and bring upper and bobbin threads to the left. 4. Pass upper thread through the hole of buttonholes.... 104. Note: When sewing stretch fabrics, it is suggested that the center line mark is not positioned extremely forward. 6. Lower the ...
Instruction Manual 2
Page 78
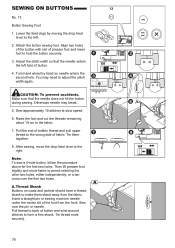
... drop feed lever to back of fabric. Thread Shank Buttons on coats and jackets should have a thread shank to the fabric. 7. Insert a straight pin or sewing machine needle under the center slit of presser foot and lower foot to form a firm shank. CAUTION: To prevent accidents... thread and pull upper thread to the wrong side of button and wind around stitches to hold the button securely. 3. Attach the button sewing foot. You may break. 5. After sewing, move fabric to the right. Pull thread to the left hole of button. 4. Lower the feed dogs by hand so needle enters...
... drop feed lever to back of fabric. Thread Shank Buttons on coats and jackets should have a thread shank to the fabric. 7. Insert a straight pin or sewing machine needle under the center slit of presser foot and lower foot to form a firm shank. CAUTION: To prevent accidents... thread and pull upper thread to the wrong side of button and wind around stitches to hold the button securely. 3. Attach the button sewing foot. You may break. 5. After sewing, move fabric to the right. Pull thread to the left hole of button. 4. Lower the feed dogs by hand so needle enters...
Instruction Manual 2
Page 96
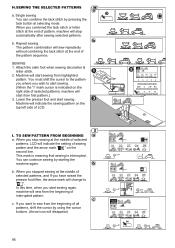
...the middle of selected patterns, LCD will disappear) 96 Machine will sew from first pattern.) 3. I " mark cursor is interrupted. If you want to sew from highlighted pattern. H.SEWING THE SELECTED PATTERNS a. Machine will start sewing from the beginning of all patterns, shift the cursor by... start from the beginning of selected patterns, machine will stop sewing at the end of LCD. Single sewing You can continue sewing by pressing the tack button at selecting mode. SEWING 1. b. This mark is meaning that sewing is indicated on the right side of interrupted...
...the middle of selected patterns, LCD will disappear) 96 Machine will sew from first pattern.) 3. I " mark cursor is interrupted. If you want to sew from highlighted pattern. H.SEWING THE SELECTED PATTERNS a. Machine will start sewing from the beginning of all patterns, shift the cursor by... start from the beginning of selected patterns, machine will stop sewing at the end of LCD. Single sewing You can continue sewing by pressing the tack button at selecting mode. SEWING 1. b. This mark is meaning that sewing is indicated on the right side of interrupted...


