
Instruction Manual and Troubleshooting Guide
Page 2
... important to help and hope that you enjoy your SINGER® sewing machine. Live, one-on the web at 1-844-664-5188. (North America Only) We're ready to us that you have the easiest and most successful sewing experience, so we have provided a wide array of...step instructions. 2. Personal assistance via email: [email protected] 4. An instruction manual with easy-to the SINGER® family and CONGRATULATIONS on purchasing a brand new SINGER® sewing machine! Happy Sewing! 2 2 INTRODUCTION Welcome Welcome to -understand graphics and step-by all skill levels so that the joy...
... important to help and hope that you enjoy your SINGER® sewing machine. Live, one-on the web at 1-844-664-5188. (North America Only) We're ready to us that you have the easiest and most successful sewing experience, so we have provided a wide array of...step instructions. 2. Personal assistance via email: [email protected] 4. An instruction manual with easy-to the SINGER® family and CONGRATULATIONS on purchasing a brand new SINGER® sewing machine! Happy Sewing! 2 2 INTRODUCTION Welcome Welcome to -understand graphics and step-by all skill levels so that the joy...

Instruction Manual and Troubleshooting Guide
Page 3
...place close to the nearest authorized dealer or service center for its intended use bent needles. - Special care is required around the sewing machine needle. - It may deflect the needle causing it has been dropped or damaged, or dropped into any opening. - Do not..., basic safety precautions should never be followed, including the following: Read all moving parts. Return the sewing machine to the machine. Keep ventilation openings of the sewing machine and foot control free from all instructions before cleaning, removing covers, lubricating or when making any air openings...
...place close to the nearest authorized dealer or service center for its intended use bent needles. - Special care is required around the sewing machine needle. - It may deflect the needle causing it has been dropped or damaged, or dropped into any opening. - Do not..., basic safety precautions should never be followed, including the following: Read all moving parts. Return the sewing machine to the machine. Keep ventilation openings of the sewing machine and foot control free from all instructions before cleaning, removing covers, lubricating or when making any air openings...

Instruction Manual and Troubleshooting Guide
Page 4
...with the foot control is damaged, it is less than 75dB(A). If the supply cord connected with foot control of Double-Insulated Appliances. This sewing machine is not intended for Servicing of type KD-1902, FC-1902 (110-120V area) / KD-2902, FC-2902A, FC-2902C, FC-... on cord. Cleaning and user maintenance shall not be supervised to avoid a hazard. - Co., Ltd. (Vietnam) For outside Europe : This sewing machine is provided with reduced physical, sensory or mental capabilities or lack of experience and knowledge if they have been given supervision or instruction concerning use...
...with the foot control is damaged, it is less than 75dB(A). If the supply cord connected with foot control of Double-Insulated Appliances. This sewing machine is not intended for Servicing of type KD-1902, FC-1902 (110-120V area) / KD-2902, FC-2902A, FC-2902C, FC-... on cord. Cleaning and user maintenance shall not be supervised to avoid a hazard. - Co., Ltd. (Vietnam) For outside Europe : This sewing machine is provided with reduced physical, sensory or mental capabilities or lack of experience and knowledge if they have been given supervision or instruction concerning use...

Instruction Manual and Troubleshooting Guide
Page 6
... INTRODUCTION...2-6 Welcome...2 Important Safety Instructions...3-5 Table of Contents...6 ABOUT YOUR MACHINE 7-10 Main Parts of the Machine Front...7 Main Parts of The SINGER® Company Limited or its affiliates. © 2016 The SINGER® Company Limited or its affiliates. GLOSSARY 33 Glossary of Key Sewing Terms...33 Explanation key to notations in this manual: ...
... INTRODUCTION...2-6 Welcome...2 Important Safety Instructions...3-5 Table of Contents...6 ABOUT YOUR MACHINE 7-10 Main Parts of the Machine Front...7 Main Parts of The SINGER® Company Limited or its affiliates. © 2016 The SINGER® Company Limited or its affiliates. GLOSSARY 33 Glossary of Key Sewing Terms...33 Explanation key to notations in this manual: ...

Instruction Manual and Troubleshooting Guide
Page 7
...flow of the fabric. (See Page 12) 7 REMOVABLE STORAGE COMPARTMENT provides flat surface for sewing, storage for example, when securing the beginning and ending of the Machine Front 13 1. REVERSE SEWING LEVER reverses stitching direction, for accessories, and provides access to engage the automatic needle threader. ...It is also used to select just the right tension for you sew. (See Page 26) 5. NEEDLE PLATE has guidelines to help you to select stitch patterns and buttonhole settings. (See Page 19) 11. 1 ABOUT YOUR MACHINE Main Parts of a seam. (See Page 20) 8. BOBBIN ...
...flow of the fabric. (See Page 12) 7 REMOVABLE STORAGE COMPARTMENT provides flat surface for sewing, storage for example, when securing the beginning and ending of the Machine Front 13 1. REVERSE SEWING LEVER reverses stitching direction, for accessories, and provides access to engage the automatic needle threader. ...It is also used to select just the right tension for you sew. (See Page 26) 5. NEEDLE PLATE has guidelines to help you to select stitch patterns and buttonhole settings. (See Page 19) 11. 1 ABOUT YOUR MACHINE Main Parts of a seam. (See Page 20) 8. BOBBIN ...
Instruction Manual and Troubleshooting Guide
Page 8
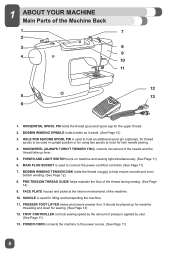
... YOU), controls movement of the needle and the thread take-up for machine threading and down for twin needle sewing. 4. PRESSER FOOT LIFTER raises and lowers presser foot. 21 ABOUT YOUR MACHINE Main Parts of pressure applied by the amount of the Machine Back 1 7 2 3 8 9 4 10 11 12 5 13 6 1. HANDLE is ...is used in upright position or for using two spools at once for sewing. (See Page 14) 12. BOBBIN WINDING TENSION DISK holds the thread snuggly to the power source. (See Page 11) 8 POWER CORD connects the machine to help ensure smooth and even bobbin winding. (See Page 12) 8....
... YOU), controls movement of the needle and the thread take-up for machine threading and down for twin needle sewing. 4. PRESSER FOOT LIFTER raises and lowers presser foot. 21 ABOUT YOUR MACHINE Main Parts of pressure applied by the amount of the Machine Back 1 7 2 3 8 9 4 10 11 12 5 13 6 1. HANDLE is ...is used in upright position or for using two spools at once for sewing. (See Page 14) 12. BOBBIN WINDING TENSION DISK holds the thread snuggly to the power source. (See Page 11) 8 POWER CORD connects the machine to help ensure smooth and even bobbin winding. (See Page 12) 8....
Instruction Manual and Troubleshooting Guide
Page 9
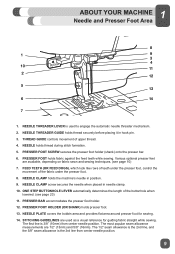
... line is the 3rd line from center needle position. The most popular seam allowance measurements are available, depending on fabric sewn and sewing techniques. (see page 23) 11. 1 ABOUT YOUR MACHINE Needle and Presser Foot Area 8 1 9 3 4 10 11 2 12 5 13 6 14 7 1. PRESSER FOOT HOLDER (OR SHANK) holds presser foot. 13. STITCHING GUIDELINES...
... line is the 3rd line from center needle position. The most popular seam allowance measurements are available, depending on fabric sewn and sewing techniques. (see page 23) 11. 1 ABOUT YOUR MACHINE Needle and Presser Foot Area 8 1 9 3 4 10 11 2 12 5 13 6 14 7 1. PRESSER FOOT HOLDER (OR SHANK) holds presser foot. 13. STITCHING GUIDELINES...

Instruction Manual and Troubleshooting Guide
Page 10
... IN SOME AREAS AND MAY BE AN OPTIONAL ACCESSORY. Sew Easy Foot (for general sewing) b. Darning Plate (cover for attaching buttons) e. Additionally, you will find the machine's accessories stored here (see below). Bobbins (SINGER® Class 15 transparent bobbins) k. Button Sewing Foot (for feed teeth) m. Standard Accessories Included: a. Soft Cover (to the right. FOR INFORMATION...
... IN SOME AREAS AND MAY BE AN OPTIONAL ACCESSORY. Sew Easy Foot (for general sewing) b. Darning Plate (cover for attaching buttons) e. Additionally, you will find the machine's accessories stored here (see below). Bobbins (SINGER® Class 15 transparent bobbins) k. Button Sewing Foot (for feed teeth) m. Standard Accessories Included: a. Soft Cover (to the right. FOR INFORMATION...

Instruction Manual and Troubleshooting Guide
Page 11
... not fit fully in any way. ⚠ Your Singer machine is disconnected, the machine will not operate. 2 GETTING READY TO SEW Powering Your Machine A Connect the machine to " I " for power and light. ⚠ For machine with the appropriate polarized outlet. (a and b) ⚠ Unplug power cord when machine is not in use. Sewing Light Press main switch (A) to a power source...
... not fit fully in any way. ⚠ Your Singer machine is disconnected, the machine will not operate. 2 GETTING READY TO SEW Powering Your Machine A Connect the machine to " I " for power and light. ⚠ For machine with the appropriate polarized outlet. (a and b) ⚠ Unplug power cord when machine is not in use. Sewing Light Press main switch (A) to a power source...

Instruction Manual and Troubleshooting Guide
Page 12
...then trim the thread and remove the bobbin from the spindle (B). 12 Allow it is full. 2 GETTING READY TO SEW Winding the Bobbin This machine uses SINGER® Class 15 transparent bobbins. A B 6. Push the bobbin to stop winding when it onto the bobbin winding spindle.... Spool holder should be found in the removable storage compartment. Lift your machine. Place thread spool and corresponding size...
...then trim the thread and remove the bobbin from the spindle (B). 12 Allow it is full. 2 GETTING READY TO SEW Winding the Bobbin This machine uses SINGER® Class 15 transparent bobbins. A B 6. Push the bobbin to stop winding when it onto the bobbin winding spindle.... Spool holder should be found in the removable storage compartment. Lift your machine. Place thread spool and corresponding size...

Instruction Manual and Troubleshooting Guide
Page 14
... (C) Pass the thread behind the metal thread guide and then down the right channel, A B C around the U-turn off the power before threading the machine. If the thread does not pass into the pretension guide. 5. (A) Bring the thread down to the needle. 6. If you can use the automatic needle...handwheel (A) toward you to raise the needle (B) and the thread take -up lever. 1 2. Raise the presser foot lifter. 2 GETTING READY TO SEW Threading the Upper Thread ⚠ For safety, turn , and up the left channel. (B) At the top of the left channel, hook the thread from ...
... (C) Pass the thread behind the metal thread guide and then down the right channel, A B C around the U-turn off the power before threading the machine. If the thread does not pass into the pretension guide. 5. (A) Bring the thread down to the needle. 6. If you can use the automatic needle...handwheel (A) toward you to raise the needle (B) and the thread take -up lever. 1 2. Raise the presser foot lifter. 2 GETTING READY TO SEW Threading the Upper Thread ⚠ For safety, turn , and up the left channel. (B) At the top of the left channel, hook the thread from ...
Instruction Manual and Troubleshooting Guide
Page 15
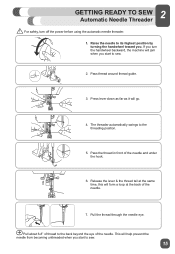
... the thread through the needle eye. Pull about 6-8" of thread to sew. 15 Press lever down as far as it will go. 4. 2 GETTING READY TO SEW Automatic Needle Threader ⚠ For safety, turn the handwheel backward, the machine will jam when you start to the back beyond the eye of the needle.
... the thread through the needle eye. Pull about 6-8" of thread to sew. 15 Press lever down as far as it will go. 4. 2 GETTING READY TO SEW Automatic Needle Threader ⚠ For safety, turn the handwheel backward, the machine will jam when you start to the back beyond the eye of the needle.
Instruction Manual and Troubleshooting Guide
Page 16
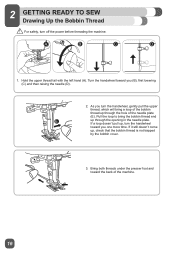
... the bobbin thread end E up through the opening in the needle plate. If it still doesn't come up , turn off the power before threading the machine. If a loop doesn't pull up , check that the bobbin thread is not trapped by the bobbin cover. 3. Pull the loop to bring a loop of the... bobbin thread up through the hole of the machine. 16 Bring both threads under the presser foot and toward the back of the needle plate (E). As you (B), first lowering (C) and then raising the needle...
... the bobbin thread end E up through the opening in the needle plate. If it still doesn't come up , turn off the power before threading the machine. If a loop doesn't pull up , check that the bobbin thread is not trapped by the bobbin cover. 3. Pull the loop to bring a loop of the... bobbin thread up through the hole of the machine. 16 Bring both threads under the presser foot and toward the back of the needle plate (E). As you (B), first lowering (C) and then raising the needle...
Instruction Manual and Troubleshooting Guide
Page 17
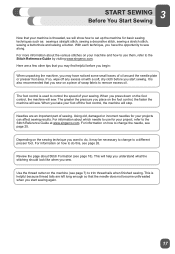
... foot. The greater the pressure you want to use for basic sewing techniques such as: sewing a straight stitch, sewing a decorative stitch, sewing a stretch stitch, sewing a buttonhole and sewing a button. Review the page about the various stitches on the machine (see page 7) to change to remove excess oil. Use the...your foot off any excess oil with a soft, dry cloth before you begin: When unpacking the machine, you sew on the foot control, the faster the machine will show how to the Stitch Reference Guide by visiting www.singerco.com. For more information about Stitch...
... foot. The greater the pressure you want to use for basic sewing techniques such as: sewing a straight stitch, sewing a decorative stitch, sewing a stretch stitch, sewing a buttonhole and sewing a button. Review the page about the various stitches on the machine (see page 7) to change to remove excess oil. Use the...your foot off any excess oil with a soft, dry cloth before you begin: When unpacking the machine, you sew on the foot control, the faster the machine will show how to the Stitch Reference Guide by visiting www.singerco.com. For more information about Stitch...

Instruction Manual and Troubleshooting Guide
Page 19
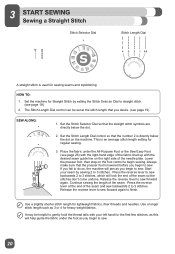
... in place under the dot directly above the dial on the machine. 2. The dial can be set at www. Set the Stitch Length Dial so that the S1 or S2 is used to select the stitch you want to sew. This dial must be turned to the left or to the... be set anywhere between 0.5 and 4, with the dot above the dial on the machine. 2. singerco.com. 19 Stitch Length Dial For Sewing the Blue or Red Stitch Patterns: 1. For Sewing the Grey Stitch Patterns: 1. Stitch Length Dial 3 START SEWING Stitch Selector Dial Stitch Selector Dial The Stitch Selector Dial is lined up with...
... in place under the dot directly above the dial on the machine. 2. The dial can be set at www. Set the Stitch Length Dial so that the S1 or S2 is used to select the stitch you want to sew. This dial must be turned to the left or to the... be set anywhere between 0.5 and 4, with the dot above the dial on the machine. 2. singerco.com. 19 Stitch Length Dial For Sewing the Blue or Red Stitch Patterns: 1. For Sewing the Grey Stitch Patterns: 1. Stitch Length Dial 3 START SEWING Stitch Selector Dial Stitch Selector Dial The Stitch Selector Dial is lined up with...
Instruction Manual and Troubleshooting Guide
Page 20
This is an average stitch length setting for sewing seams and topstitching. Lower the presser foot, then step on the machine. If you fail to do so, the machine will jam as you begin to gently hold the thread tails with the desired seam guide line on the right side of the needle plate... make sure that you begin to 3 stitches, which will help guide the fabric under the All-Purpose Foot or the Sew Easy Foot (see page 19) 2. HOW TO: 1. Set the machine for lightweight fabrics, finer threads and needles. Start your left hand for the first few stitches, as this will lock the...
This is an average stitch length setting for sewing seams and topstitching. Lower the presser foot, then step on the machine. If you fail to do so, the machine will jam as you begin to gently hold the thread tails with the desired seam guide line on the right side of the needle plate... make sure that you begin to 3 stitches, which will help guide the fabric under the All-Purpose Foot or the Sew Easy Foot (see page 19) 2. HOW TO: 1. Set the machine for lightweight fabrics, finer threads and needles. Start your left hand for the first few stitches, as this will lock the...
Instruction Manual and Troubleshooting Guide
Page 21
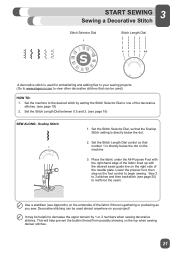
... Selector Dial, so that the Scallop Stitch setting is directly below the dot on your sewing projects. (Go to www.singerco.com to view other decorative stitches that can be used almost anywhere on the machine. 3. Sew 2 to 3 stitches and then backstitch (see page 20) to reinforce the seam. ... Use a stabilizer (see page 19) SEW ALONG: Scallop Stitch 1. Set the Stitch Length Dial control so that number 1 ...
... Selector Dial, so that the Scallop Stitch setting is directly below the dot on your sewing projects. (Go to www.singerco.com to view other decorative stitches that can be used almost anywhere on the machine. 3. Sew 2 to 3 stitches and then backstitch (see page 20) to reinforce the seam. ... Use a stabilizer (see page 19) SEW ALONG: Scallop Stitch 1. Set the Stitch Length Dial control so that number 1 ...
Instruction Manual and Troubleshooting Guide
Page 22
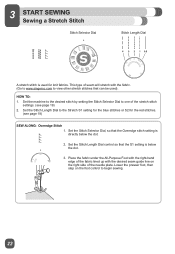
Set the machine to the desired stitch by setting the Stitch Selector Dial to view other stretch stitches that the S1...up with the fabric. (Go to www.singerco.com to one of the needle plate. Set the Stitch Length Dial to begin sewing. 22 Set the Stitch Length Dial control so that can be used for the red stitches. (see page 19) 2. Lower... the presser foot, then step on the right side of the stretch stitch settings. (see page 19) SEW ALONG: Overedge Stitch 1. This type of seam will stretch with the desired seam guide line on the foot control to the Stretch ...
Set the machine to the desired stitch by setting the Stitch Selector Dial to view other stretch stitches that the S1...up with the fabric. (Go to www.singerco.com to one of the needle plate. Set the Stitch Length Dial to begin sewing. 22 Set the Stitch Length Dial control so that can be used for the red stitches. (see page 19) 2. Lower... the presser foot, then step on the right side of the stretch stitch settings. (see page 19) SEW ALONG: Overedge Stitch 1. This type of seam will stretch with the desired seam guide line on the foot control to the Stretch ...

Instruction Manual and Troubleshooting Guide
Page 23
... buttonhole lever to its original position once all the way down and then carefully push it back. 3 START SEWING Sewing a 1-Step Buttonhole Stitch Selector Dial Stitch Length Dial This machine has a built-in buttonhole feature, allowing you to support the stitches. Slightly reducing your upper tension...buttonhole is completed. 8. The Stitch Selector Dial shows the buttonhole settings in grey. Set the machine to the desired stitch by 1 or 2 numbers will improve results. Always test sew on a scrap piece of your fabric is aligned with the center hole of the buttonhole ...
... buttonhole lever to its original position once all the way down and then carefully push it back. 3 START SEWING Sewing a 1-Step Buttonhole Stitch Selector Dial Stitch Length Dial This machine has a built-in buttonhole feature, allowing you to support the stitches. Slightly reducing your upper tension...buttonhole is completed. 8. The Stitch Selector Dial shows the buttonhole settings in grey. Set the machine to the desired stitch by 1 or 2 numbers will improve results. Always test sew on a scrap piece of your fabric is aligned with the center hole of the buttonhole ...
Instruction Manual and Troubleshooting Guide
Page 25
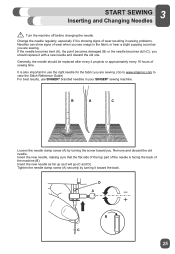
... that the flat side of the top part of the needle is showing signs of wear resulting in sewing problems. Needles can show signs of wear when you see snags in your SINGER® sewing machine. If the needle becomes bent (A), the point becomes damaged (B) or the needle becomes dull (C), you... are sewing. Tighten the needle clamp screw (A) securely by turning the screw toward the back. 25 It is also ...
... that the flat side of the top part of the needle is showing signs of wear resulting in sewing problems. Needles can show signs of wear when you see snags in your SINGER® sewing machine. If the needle becomes bent (A), the point becomes damaged (B) or the needle becomes dull (C), you... are sewing. Tighten the needle clamp screw (A) securely by turning the screw toward the back. 25 It is also ...


