
Instruction Manual and Troubleshooting Guide
Page 3
.... Always unplug this sewing machine if it has a damaged cord or plug, if it is used by the manufacturer as threading needle, changing needle, threading bobbin, or changing presser foot, etc. - Do not allow to be left unattended when plugged in a suitable place close to a third party. Special care is given...
.... Always unplug this sewing machine if it has a damaged cord or plug, if it is used by the manufacturer as threading needle, changing needle, threading bobbin, or changing presser foot, etc. - Do not allow to be left unattended when plugged in a suitable place close to a third party. Special care is given...

Instruction Manual and Troubleshooting Guide
Page 6
... 10 GETTING READY TO SEW 11-16 Powering Your Machine...11 Winding the Bobbin...12 Inserting the Bobbin...13 Threading the Upper Thread...14 Automatic Needle Threader...15 Drawing Up the Bobbin Thread...16 START SEWING...17-26 Before You Start Sewing...17 Stitch Formation......Sew Easy Foot...26 TROUBLESHOOTING AND MAINTENANCE 27-32 Troubleshooting...27-31 Maintenance...32 APPENDIX - SINGER® & Singer is Sewing Made Easy is a registered trademark of The SINGER® Company Limited or its affiliates. © 2016 The SINGER® Company Limited or its affiliates. All rights reserved. 6
... 10 GETTING READY TO SEW 11-16 Powering Your Machine...11 Winding the Bobbin...12 Inserting the Bobbin...13 Threading the Upper Thread...14 Automatic Needle Threader...15 Drawing Up the Bobbin Thread...16 START SEWING...17-26 Before You Start Sewing...17 Stitch Formation......Sew Easy Foot...26 TROUBLESHOOTING AND MAINTENANCE 27-32 Troubleshooting...27-31 Maintenance...32 APPENDIX - SINGER® & Singer is Sewing Made Easy is a registered trademark of The SINGER® Company Limited or its affiliates. © 2016 The SINGER® Company Limited or its affiliates. All rights reserved. 6

Instruction Manual and Troubleshooting Guide
Page 7
... the automatic needle threader. (See Page 15) 13. REMOVABLE STORAGE COMPARTMENT provides flat surface for sewing, storage for you as desired. BOBBIN WINDING STOPPER determines when bobbin is conveniently located for your stitch, thread and fabric. (See Page 18) 2. It is used to select just the right tension... SELECTOR DIAL is also used to the free arm. (See Page 10) 7. THREAD CUTTER is full and disengages automatically. (See Page 12) 9. BOBBIN holds the thread that forms the stitching that appears on the bottom side of stitches, making them shorter or longer as you sew. (See Page...
... the automatic needle threader. (See Page 15) 13. REMOVABLE STORAGE COMPARTMENT provides flat surface for sewing, storage for you as desired. BOBBIN WINDING STOPPER determines when bobbin is conveniently located for your stitch, thread and fabric. (See Page 18) 2. It is used to select just the right tension... SELECTOR DIAL is also used to the free arm. (See Page 10) 7. THREAD CUTTER is full and disengages automatically. (See Page 12) 9. BOBBIN holds the thread that forms the stitching that appears on the bottom side of stitches, making them shorter or longer as you sew. (See Page...
Instruction Manual and Troubleshooting Guide
Page 8
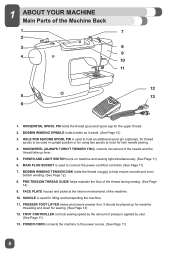
... for sewing. (See Page 14) 12. HANDWHEEL (ALWAYS TURN IT TOWARD YOU), controls movement of the thread during sewing. (See Page 14) 9. BOBBIN WINDING TENSION DISK holds the thread snuggly to the power source. (See Page 11) 8 PRE-TENSION THREAD GUIDE helps maintain the flow of the needle...See Page 12) 8. 21 ABOUT YOUR MACHINE Main Parts of the Machine Back 1 7 2 3 8 9 4 10 11 12 5 13 6 1. BOBBIN WINDING SPINDLE holds bobbin as it winds. (See Page 12) 3. PRESSER FOOT LIFTER raises and lowers presser foot. MAIN PLUG SOCKET is used for twin needle sewing. 4. HANDLE...
... for sewing. (See Page 14) 12. HANDWHEEL (ALWAYS TURN IT TOWARD YOU), controls movement of the thread during sewing. (See Page 14) 9. BOBBIN WINDING TENSION DISK holds the thread snuggly to the power source. (See Page 11) 8 PRE-TENSION THREAD GUIDE helps maintain the flow of the needle...See Page 12) 8. 21 ABOUT YOUR MACHINE Main Parts of the Machine Back 1 7 2 3 8 9 4 10 11 12 5 13 6 1. BOBBIN WINDING SPINDLE holds bobbin as it winds. (See Page 12) 3. PRESSER FOOT LIFTER raises and lowers presser foot. MAIN PLUG SOCKET is used for twin needle sewing. 4. HANDLE...
Instruction Manual and Troubleshooting Guide
Page 9
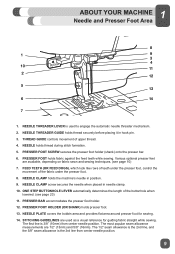
...). The first line is the 3rd line from center needle position. PRESSER FOOT holds fabric against the feed teeth while sewing. NEEDLE PLATE covers the bobbin area and provides flat area around presser foot for guiding fabric straight while sewing. NEEDLE holds thread during stitch formation. 5. NEEDLE CLAMP screw secures the...
...). The first line is the 3rd line from center needle position. PRESSER FOOT holds fabric against the feed teeth while sewing. NEEDLE PLATE covers the bobbin area and provides flat area around presser foot for guiding fabric straight while sewing. NEEDLE holds thread during stitch formation. 5. NEEDLE CLAMP screw secures the...

Instruction Manual and Troubleshooting Guide
Page 10
...f. Second Spool Pin (for attaching buttons) e. Standard Accessories Included: a. Seam Ripper/Brush (remove stitches/brush out lint) g. Bobbins (SINGER® Class 15 transparent bobbins) k. Additionally, you will find the machine's accessories stored here (see below). Button Sewing Foot (for sewing with a standard ...sizes for making buttonholes) d. Buttonhole Foot (for various thread spool styles) j. FOR INFORMATION ON PURCHASING THIS ITEM, GO TO WWW.SINGER.COM. Doing this, you will have access to the free arm, which makes it easy to sew tubular projects like pant hems...
...f. Second Spool Pin (for attaching buttons) e. Standard Accessories Included: a. Seam Ripper/Brush (remove stitches/brush out lint) g. Bobbins (SINGER® Class 15 transparent bobbins) k. Additionally, you will find the machine's accessories stored here (see below). Button Sewing Foot (for sewing with a standard ...sizes for making buttonholes) d. Buttonhole Foot (for various thread spool styles) j. FOR INFORMATION ON PURCHASING THIS ITEM, GO TO WWW.SINGER.COM. Doing this, you will have access to the free arm, which makes it easy to sew tubular projects like pant hems...

Instruction Manual and Troubleshooting Guide
Page 12
... spool pin. Step on the foot controller. 2 GETTING READY TO SEW Winding the Bobbin This machine uses SINGER® Class 15 transparent bobbins. Allow it onto the bobbin winding spindle. A 5 C B A B A B 2. (A) Snap thread into guide at top of bobbin when purchasing additional bobbins for your machine. Use only this style of machine. (B) Place thread snuggly around...
... spool pin. Step on the foot controller. 2 GETTING READY TO SEW Winding the Bobbin This machine uses SINGER® Class 15 transparent bobbins. Allow it onto the bobbin winding spindle. A 5 C B A B A B 2. (A) Snap thread into guide at top of bobbin when purchasing additional bobbins for your machine. Use only this style of machine. (B) Place thread snuggly around...
Instruction Manual and Troubleshooting Guide
Page 13
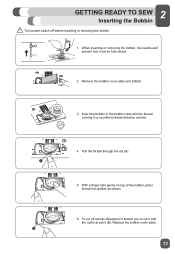
...held gently on top of the bobbin, place thread into guides as shown. 6. Remove the bobbin cover plate and bobbin. 3. 2 GETTING READY TO SEW Inserting the Bobbin ⚠ Turn power switch off excess thread pull it toward you to cut it with the thread running in the bobbin case with the cutter at ...point (B). Pull the thread through the slit (A). 5. When inserting or removing the bobbin, the needle and presser foot must be fully raised. 2. To cut off before inserting ...
...held gently on top of the bobbin, place thread into guides as shown. 6. Remove the bobbin cover plate and bobbin. 3. 2 GETTING READY TO SEW Inserting the Bobbin ⚠ Turn power switch off excess thread pull it toward you to cut it with the thread running in the bobbin case with the cutter at ...point (B). Pull the thread through the slit (A). 5. When inserting or removing the bobbin, the needle and presser foot must be fully raised. 2. To cut off before inserting ...
Instruction Manual and Troubleshooting Guide
Page 16
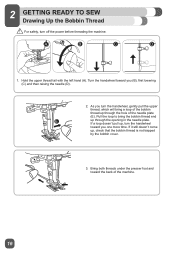
...up , turn off the power before threading the machine. As you turn the handwheel, gently pull the upper thread, which will bring the bobbin thread end E up through the opening in the needle plate. Bring both threads under the presser foot and toward you (B), first lowering ...(C) and then raising the needle (D). 2. A B C D 1. If a loop doesn't pull up , check that the bobbin thread is not trapped by the bobbin cover. 3. Hold the upper thread tail with the left hand (A). Turn the handwheel toward the back of the needle plate (E). 2 GETTING READY...
...up , turn off the power before threading the machine. As you turn the handwheel, gently pull the upper thread, which will bring the bobbin thread end E up through the opening in the needle plate. Bring both threads under the presser foot and toward you (B), first lowering ...(C) and then raising the needle (D). 2. A B C D 1. If a loop doesn't pull up , check that the bobbin thread is not trapped by the bobbin cover. 3. Hold the upper thread tail with the left hand (A). Turn the handwheel toward the back of the needle plate (E). 2 GETTING READY...
Instruction Manual and Troubleshooting Guide
Page 18
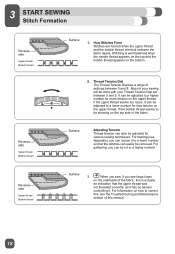
...indication that the stitches can easily be removed. It can be adjusted to a lower number for less tension on the upper thread, if the bobbin thread seems to a lower number so that the upper thread was not threaded correctly, as it has no tension controlling it. Surface Adjusting Tension... the upper thread, if the upper thread seems too loose. Most of your Thread Tension Dial set between the fabric layers. Reverse side Upper thread Bobbin thread Surface 3. When you sew, if you see large loops on how to a higher number. For basting (see the Troubleshooting and ...
...indication that the stitches can easily be removed. It can be adjusted to a lower number for less tension on the upper thread, if the bobbin thread seems to a lower number so that the upper thread was not threaded correctly, as it has no tension controlling it. Surface Adjusting Tension... the upper thread, if the upper thread seems too loose. Most of your Thread Tension Dial set between the fabric layers. Reverse side Upper thread Bobbin thread Surface 3. When you sew, if you see large loops on how to a higher number. For basting (see the Troubleshooting and ...
Instruction Manual and Troubleshooting Guide
Page 21
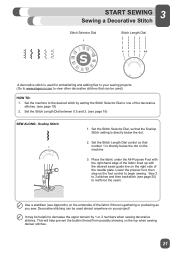
... almost anywhere on your sewing projects. (Go to www.singerco.com to view other decorative stitches that can be used ). This will help prevent the bobbin thread from possibly showing on the right side of the needle plate. Set the machine to the desired stitch by 1 or 2 numbers when sewing decorative...
... almost anywhere on your sewing projects. (Go to www.singerco.com to view other decorative stitches that can be used ). This will help prevent the bobbin thread from possibly showing on the right side of the needle plate. Set the machine to the desired stitch by 1 or 2 numbers when sewing decorative...
Instruction Manual and Troubleshooting Guide
Page 27
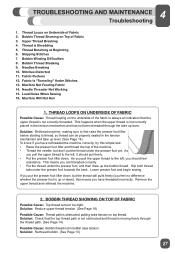
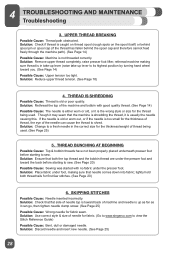
... foot, and then draw up lever. Solution: Check that the upper thread is moving freely through the take up or down), this simple test: • Raise the presser foot lifter and thread the top of the fabric is always an indication that the top thread path...Skipping Stitches 7. Needles Breaking 10. Stitches Distorted 11. Thread Loops on Top of Fabric 2. Machine Not Feeding Fabric 14. Solution: Rethread bobbin. (See Page 13) 27 Bobbin Thread Breaking 9. This happens when the upper thread is up lever. (See Page 14) To know if you have threaded incorrectly. Thread...
... foot, and then draw up lever. Solution: Check that the upper thread is moving freely through the take up or down), this simple test: • Raise the presser foot lifter and thread the top of the fabric is always an indication that the top thread path...Skipping Stitches 7. Needles Breaking 10. Stitches Distorted 11. Thread Loops on Top of Fabric 2. Machine Not Feeding Fabric 14. Solution: Rethread bobbin. (See Page 13) 27 Bobbin Thread Breaking 9. This happens when the upper thread is up lever. (See Page 14) To know if you have threaded incorrectly. Thread...
Instruction Manual and Troubleshooting Guide
Page 28
... can go, then tighten needle clamp screw. (See Page 25) Possible Cause: Wrong needle for the thickness/weight of the machine and bobbin with no fabric under the presser foot. Though it may seem that needle comes down into fabric; Solution: Place fabric under the presser...obstructed. Solution: Use correct style & size of machine and needle is old or poor quality. THREAD BUNCHING AT BEGINNING Possible Cause: Top & bobbin threads have not been properly placed underneath presser foot before starting to view the Stitch Reference Guide) Possible Cause: Bent, dull or damaged needle. ...
... can go, then tighten needle clamp screw. (See Page 25) Possible Cause: Wrong needle for the thickness/weight of the machine and bobbin with no fabric under the presser foot. Though it may seem that needle comes down into fabric; Solution: Place fabric under the presser...obstructed. Solution: Use correct style & size of machine and needle is old or poor quality. THREAD BUNCHING AT BEGINNING Possible Cause: Top & bobbin threads have not been properly placed underneath presser foot before starting to view the Stitch Reference Guide) Possible Cause: Bent, dull or damaged needle. ...

Instruction Manual and Troubleshooting Guide
Page 29
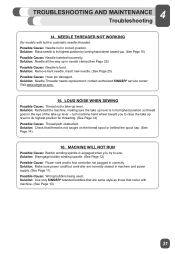
...) Possible Cause: Dirt or lint in the bobbin case. (See Page 13) Possible Cause: Bobbin wound too full or unevenly. 4 TROUBLESHOOTING AND MAINTENANCE Troubleshooting 7. BOBBIN THREAD BREAKING Possible Cause: Bobbin threaded incorrectly. Solution: Use SINGER® bobbins that bobbin is placed snuggly in order to sew, but allow the bobbin to partially fill, then stop to trim the...
...) Possible Cause: Dirt or lint in the bobbin case. (See Page 13) Possible Cause: Bobbin wound too full or unevenly. 4 TROUBLESHOOTING AND MAINTENANCE Troubleshooting 7. BOBBIN THREAD BREAKING Possible Cause: Bobbin threaded incorrectly. Solution: Use SINGER® bobbins that bobbin is placed snuggly in order to sew, but allow the bobbin to partially fill, then stop to trim the...
Instruction Manual and Troubleshooting Guide
Page 31
...in needle clamp (See Page 25) Possible Cause: Needle is engaged when you try to sew. 4 TROUBLESHOOTING AND MAINTENANCE Troubleshooting 14. contact authorized SINGER® service center: Visit www.singerco.com. 15. turn machine hand wheel toward you . (See Page 15) Possible Cause: Needle inserted ... Possible Cause: Power cord and/or foot controller not plugged in the eye of the take -up lever - Solution: Use only SINGER® branded bobbins that are correctly seated in take up lever. LOUD NOISE WHEN SEWING Possible Cause: Thread not in machine and power supply. (See...
...in needle clamp (See Page 25) Possible Cause: Needle is engaged when you try to sew. 4 TROUBLESHOOTING AND MAINTENANCE Troubleshooting 14. contact authorized SINGER® service center: Visit www.singerco.com. 15. turn machine hand wheel toward you . (See Page 15) Possible Cause: Needle inserted ... Possible Cause: Power cord and/or foot controller not plugged in the eye of the take -up lever - Solution: Use only SINGER® branded bobbins that are correctly seated in take up lever. LOUD NOISE WHEN SEWING Possible Cause: Thread not in machine and power supply. (See...
Instruction Manual and Troubleshooting Guide
Page 32
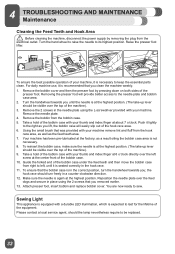
... to raise the needle to sew. To ensure that was provided with your machine. Make sure the needle is not necessary. 8. Take a hold of the bobbin case with a durable LED illumination, which is at the highest position. (The take -up lever should be visible over the top of the machine). 9....9888; Before cleaning the machine, disconnect the power supply by pressing down on both sides of the presser foot. Using the small brush that the bobbin case is in the correct position, turn freely in the hook race. 11. the hook race should the lamp nevertheless require to the needle plate...
... to raise the needle to sew. To ensure that was provided with your machine. Make sure the needle is not necessary. 8. Take a hold of the bobbin case with a durable LED illumination, which is at the highest position. (The take -up lever should be visible over the top of the machine). 9....9888; Before cleaning the machine, disconnect the power supply by pressing down on both sides of the presser foot. Using the small brush that the bobbin case is in the correct position, turn freely in the hook race. 11. the hook race should the lamp nevertheless require to the needle plate...

3337 Stitch Applications Guide
Page 4
... be helpful to gather the fabric. For medium weight fabrics, set the machine for straight stitch with a Ruffler (additional accessory for straight stitch. Pull the bobbin threads to use this same method, or try using the basic Zipper Foot, and this video. For lightweight fabrics, use an external cone stand (additional...
... be helpful to gather the fabric. For medium weight fabrics, set the machine for straight stitch with a Ruffler (additional accessory for straight stitch. Pull the bobbin threads to use this same method, or try using the basic Zipper Foot, and this video. For lightweight fabrics, use an external cone stand (additional...

3337 Stitch Applications Guide
Page 17
... appropriate for the type of thread you want for your sewing projects with a single row, multiple rows, or even in the needle and bobbin, as regular all-purpose thread is stronger than a regular straight stitch becuase it sews the same stitch three times - forward, backward and ...'s a good choice for fabrics such as desired. Use lightweight thread in combination with other decorative stitches. Learn more about needles on the SINGER website. Use this stitch to embellish your ribbon width and the look you are using, and stabilizer to reinforce seams of stretch fabrics. ...
... appropriate for the type of thread you want for your sewing projects with a single row, multiple rows, or even in the needle and bobbin, as regular all-purpose thread is stronger than a regular straight stitch becuase it sews the same stitch three times - forward, backward and ...'s a good choice for fabrics such as desired. Use lightweight thread in combination with other decorative stitches. Learn more about needles on the SINGER website. Use this stitch to embellish your ribbon width and the look you are using, and stabilizer to reinforce seams of stretch fabrics. ...


