
Instruction Manual and Troubleshooting Guide
Page 3
... using an electrical appliance, basic safety precautions should never be followed, including the following: Read all moving parts. Do not pull or push fabric while stitching. Use only attachments recommended by or near children. - Always use bent needles. - Do not use the proper needle plate. It may deflect the needle causing...
... using an electrical appliance, basic safety precautions should never be followed, including the following: Read all moving parts. Do not pull or push fabric while stitching. Use only attachments recommended by or near children. - Always use bent needles. - Do not use the proper needle plate. It may deflect the needle causing...

Instruction Manual and Troubleshooting Guide
Page 6
...the manufacturer reserves the right to change appearance, design or accessories of The SINGER® Company Limited or its affiliates. © 2016 The SINGER® Company Limited or its affiliates. SINGER® & Singer is Sewing Made Easy is a registered trademark of this sewing machine when ... Up the Bobbin Thread...16 START SEWING...17-26 Before You Start Sewing...17 Stitch Formation...18 Stitch Selector Dial...19 Sewing a Straight Stitch...20 Sewing a Decorative Stitch...21 Sewing a Stretch Stitch...22 Sewing a 1-Step Buttonhole...23 Sewing a Button...24 Inserting and Changing Needles...
...the manufacturer reserves the right to change appearance, design or accessories of The SINGER® Company Limited or its affiliates. © 2016 The SINGER® Company Limited or its affiliates. SINGER® & Singer is Sewing Made Easy is a registered trademark of this sewing machine when ... Up the Bobbin Thread...16 START SEWING...17-26 Before You Start Sewing...17 Stitch Formation...18 Stitch Selector Dial...19 Sewing a Straight Stitch...20 Sewing a Decorative Stitch...21 Sewing a Stretch Stitch...22 Sewing a 1-Step Buttonhole...23 Sewing a Button...24 Inserting and Changing Needles...

Instruction Manual and Troubleshooting Guide
Page 7
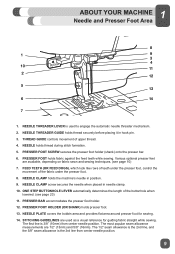
...Page 18) 2. 1 ABOUT YOUR MACHINE Main Parts of a seam. (See Page 20) 8. NEEDLE PLATE has guidelines to select stitch patterns and buttonhole settings. (See Page 19) 11. STITCH LENGTH DIAL controls the length of sewing. 4. THREAD CUTTER is used to help you sew. (See Page 26) 5. REMOVABLE ...provides flat surface for sewing, storage for accessories, and provides access to select just the right tension for trimming thread ends at the end of stitches, making them shorter or longer as you keep seams straight. (See Page 9) 6. It is full and disengages automatically. (See Page 12)...
...Page 18) 2. 1 ABOUT YOUR MACHINE Main Parts of a seam. (See Page 20) 8. NEEDLE PLATE has guidelines to select stitch patterns and buttonhole settings. (See Page 19) 11. STITCH LENGTH DIAL controls the length of sewing. 4. THREAD CUTTER is used to help you sew. (See Page 26) 5. REMOVABLE ...provides flat surface for sewing, storage for accessories, and provides access to select just the right tension for trimming thread ends at the end of stitches, making them shorter or longer as you keep seams straight. (See Page 9) 6. It is full and disengages automatically. (See Page 12)...
Instruction Manual and Troubleshooting Guide
Page 9
... of upper thread. 4. PRESSER FOOT HOLDER (OR SHANK) holds presser foot. 13. NEEDLE holds thread during stitch formation. 5. ONE STEP BUTTONHOLE LEVER automatically determines the length of the buttonhole when lowered. (see page 10) 7. STITCHING GUIDELINES are used to engage the automatic needle threader mechanism. 2. PRESSER FOOT holds fabric against the feed...
... of upper thread. 4. PRESSER FOOT HOLDER (OR SHANK) holds presser foot. 13. NEEDLE holds thread during stitch formation. 5. ONE STEP BUTTONHOLE LEVER automatically determines the length of the buttonhole when lowered. (see page 10) 7. STITCHING GUIDELINES are used to engage the automatic needle threader mechanism. 2. PRESSER FOOT holds fabric against the feed...

Instruction Manual and Troubleshooting Guide
Page 10
...for attaching buttons) e. Second Spool Pin (for sewing with a standard assortment of Needles (replacement needles) i. Bobbins (SINGER® Class 15 transparent bobbins) k. 21 ABOUT YOUR MACHINE Removable Storage Compartment and Accessories Hold the Removable Storage Compartment ...10 Spool Pin Felt (to sew tubular projects like pant hems or sleeves. FOR INFORMATION ON PURCHASING THIS ITEM, GO TO WWW.SINGER.COM. Seam Ripper/Brush (remove stitches/brush out lint) g. f. Pack of presser feet and accessories. To replace the Removable Storage Compartment, hold it as shown in...
...for attaching buttons) e. Second Spool Pin (for sewing with a standard assortment of Needles (replacement needles) i. Bobbins (SINGER® Class 15 transparent bobbins) k. 21 ABOUT YOUR MACHINE Removable Storage Compartment and Accessories Hold the Removable Storage Compartment ...10 Spool Pin Felt (to sew tubular projects like pant hems or sleeves. FOR INFORMATION ON PURCHASING THIS ITEM, GO TO WWW.SINGER.COM. Seam Ripper/Brush (remove stitches/brush out lint) g. f. Pack of presser feet and accessories. To replace the Removable Storage Compartment, hold it as shown in...

Instruction Manual and Troubleshooting Guide
Page 11
... which must be used with a polarized plug (one way. To reduce the risk of electric shock, this plug is not in any way. ⚠ Your Singer machine is adjusted to a power source as illustrated. Do not modify the plug in use. 2 GETTING READY TO SEW Powering Your Machine A Connect the machine...
... which must be used with a polarized plug (one way. To reduce the risk of electric shock, this plug is not in any way. ⚠ Your Singer machine is adjusted to a power source as illustrated. Do not modify the plug in use. 2 GETTING READY TO SEW Powering Your Machine A Connect the machine...
Instruction Manual and Troubleshooting Guide
Page 17
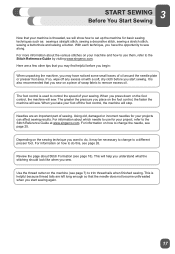
...This is used to control the speed of your machine and how to use for basic sewing techniques such as: sewing a straight stitch, sewing a decorative stitch, sewing a stretch stitch, sewing a buttonhole and sewing a button. The foot control is helpful because thread tails are an important part of sewing. For ... With each technique, you have noticed some small traces of oil around the needle plate or presser foot area. Review the page about Stitch Formation (see page 25. Use the thread cutter on the machine (see page 26. For more information about which needle to use them...
...This is used to control the speed of your machine and how to use for basic sewing techniques such as: sewing a straight stitch, sewing a decorative stitch, sewing a stretch stitch, sewing a buttonhole and sewing a button. The foot control is helpful because thread tails are an important part of sewing. For ... With each technique, you have noticed some small traces of oil around the needle plate or presser foot area. Review the page about Stitch Formation (see page 25. Use the thread cutter on the machine (see page 26. For more information about which needle to use them...
Instruction Manual and Troubleshooting Guide
Page 18
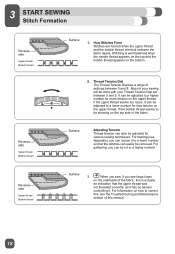
... sewing techniques. Reverse side Upper thread Bobbin thread Surface 3. When you sew, if you can loosen it . Stitching is actually an indication that the stitches can be done with your Thread Tension Dial set between 3 and 5. Thread Tension Dial The Thread Tension Dial has a ... of settings between the fabric layers. For basting (see Appendix), you see the Troubleshooting and Maintenance section of this manual. 18 How Stitches Form Stitches are formed when the upper thread and the bobbin thread interlock between 0 and 9. It can easily be adjusted to a lower number...
... sewing techniques. Reverse side Upper thread Bobbin thread Surface 3. When you sew, if you can loosen it . Stitching is actually an indication that the stitches can be done with your Thread Tension Dial set between 3 and 5. Thread Tension Dial The Thread Tension Dial has a ... of settings between the fabric layers. For basting (see Appendix), you see the Troubleshooting and Maintenance section of this manual. 18 How Stitches Form Stitches are formed when the upper thread and the bobbin thread interlock between 0 and 9. It can easily be adjusted to a lower number...

Instruction Manual and Troubleshooting Guide
Page 19
...the left or to the length you want . Stitch Length Dial For examples of stitch patterns and further instruction, see the Stitch Reference Guide at the S1 marking for the blue stitches or the S2 marking for the red stitches, or the stitch pattern will not sew. The dial can be...Sewing the Grey Stitch Patterns: 1. singerco.com. 19 Set the Stitch Length Dial according to the right. Set the Stitch Length Dial so that the S1 or S2 is used to select the stitch you want to sew. Stitch Length Dial 3 START SEWING Stitch Selector Dial Stitch Selector Dial The Stitch Selector Dial is ...
...the left or to the length you want . Stitch Length Dial For examples of stitch patterns and further instruction, see the Stitch Reference Guide at the S1 marking for the blue stitches or the S2 marking for the red stitches, or the stitch pattern will not sew. The dial can be...Sewing the Grey Stitch Patterns: 1. singerco.com. 19 Set the Stitch Length Dial according to the right. Set the Stitch Length Dial so that the S1 or S2 is used to select the stitch you want to sew. Stitch Length Dial 3 START SEWING Stitch Selector Dial Stitch Selector Dial The Stitch Selector Dial is ...
Instruction Manual and Troubleshooting Guide
Page 20
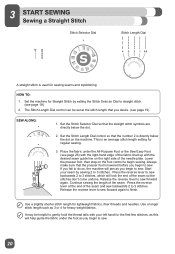
... is directly below the dot. 2. This is used for sewing seams and topstitching. Place the fabric under the foot as you begin to 3 stitches. Always make sure that the number 2 is lowered before you desire. (see page 26) with the right-hand edge of the fabric lined...Start your left hand for lightweight fabrics, finer threads and needles. Press the reverse lever to sew backwards 2 to 3 stitches. Set the machine for Straight Stitch by sewing 2 to 3 stitches, which will lock the end of the seam. Lower the presser foot, then step on the machine. Release the reverse ...
... is directly below the dot. 2. This is used for sewing seams and topstitching. Place the fabric under the foot as you begin to 3 stitches. Always make sure that the number 2 is lowered before you desire. (see page 26) with the right-hand edge of the fabric lined...Start your left hand for lightweight fabrics, finer threads and needles. Press the reverse lever to sew backwards 2 to 3 stitches. Set the machine for Straight Stitch by sewing 2 to 3 stitches, which will lock the end of the seam. Lower the presser foot, then step on the machine. Release the reverse ...
Instruction Manual and Troubleshooting Guide
Page 21
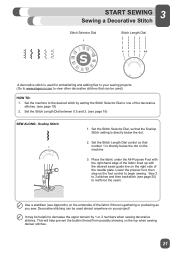
...showing on the foot control to begin sewing. Sew 2 to 3 stitches and then backstitch (see page 20) to reinforce the seam. Use a stabilizer (see page 19) 2. Decorative stitching can be used almost anywhere on the underside of the needle plate.... sewing decorative stitches. HOW TO: 1. Set the Stitch Length Dial between 0.5 and 3. (see page 19) SEW ALONG: Scallop Stitch 1. Lower the presser foot, then step on the top when sewing denser stitches. 21 3 START SEWING Sewing a Decorative Stitch Stitch Selector Dial Stitch Length Dial A decorative stitch is used ...
...showing on the foot control to begin sewing. Sew 2 to 3 stitches and then backstitch (see page 20) to reinforce the seam. Use a stabilizer (see page 19) 2. Decorative stitching can be used almost anywhere on the underside of the needle plate.... sewing decorative stitches. HOW TO: 1. Set the Stitch Length Dial between 0.5 and 3. (see page 19) SEW ALONG: Scallop Stitch 1. Lower the presser foot, then step on the top when sewing denser stitches. 21 3 START SEWING Sewing a Decorative Stitch Stitch Selector Dial Stitch Length Dial A decorative stitch is used ...
Instruction Manual and Troubleshooting Guide
Page 22
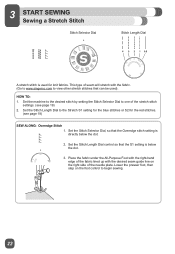
... plate. Lower the presser foot, then step on the right side of the stretch stitch settings. (see page 19) SEW ALONG: Overedge Stitch 1. Set the Stitch Selector Dial, so that can be used for the red stitches. (see page 19) 2. HOW TO: 1. Place the fabric under the All-... with the desired seam guide line on the foot control to view other stretch stitches that the Overedge stitch setting is below the dot. 2. 23 START SEWING Sewing a Stretch Stitch Stitch Selector Dial Stitch Length Dial A stretch stitch is used ). This type of the fabric lined up with the fabric. (...
... plate. Lower the presser foot, then step on the right side of the stretch stitch settings. (see page 19) SEW ALONG: Overedge Stitch 1. Set the Stitch Selector Dial, so that can be used for the red stitches. (see page 19) 2. HOW TO: 1. Place the fabric under the All-... with the desired seam guide line on the foot control to view other stretch stitches that the Overedge stitch setting is below the dot. 2. 23 START SEWING Sewing a Stretch Stitch Stitch Selector Dial Stitch Length Dial A stretch stitch is used ). This type of the fabric lined up with the fabric. (...

Instruction Manual and Troubleshooting Guide
Page 23
... all the way down and then carefully push it back. Pull the buttonhole lever all buttonholes are completed. Use a stabilizer to support the stitches. Slightly reducing your fabric is aligned with the center of the Buttonhole Foot. Place the fabric under the foot so that the cross line... mark on the fabric. 2. The Stitch Selector Dial shows the buttonhole settings in grey. Place the button at the back of the foot and bring thread to the buttonhole...
... all the way down and then carefully push it back. Pull the buttonhole lever all buttonholes are completed. Use a stabilizer to support the stitches. Slightly reducing your fabric is aligned with the center of the Buttonhole Foot. Place the fabric under the foot so that the cross line... mark on the fabric. 2. The Stitch Selector Dial shows the buttonhole settings in grey. Place the button at the back of the foot and bring thread to the buttonhole...
Instruction Manual and Troubleshooting Guide
Page 24
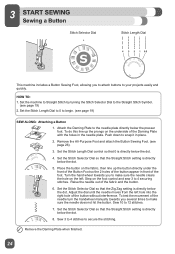
... 0 to begin. (see page 26). 3. Remove the All-Purpose Foot and attach the Button Sewing Foot. (see page 19) SEW ALONG: Attaching a Button 1. Set the Stitch Length Dial control so that the Zig Zag setting is directly below the dot. 4. Place the button on the fabric, then line up the prongs... on the underside of the needle turn the handwheel manually towards you to 4 securing stitches. Set the Stitch Selector Dial so that 0 is directly below the dot. 5. To test the movement of the Darning Plate with the holes in the needle plate...
... 0 to begin. (see page 26). 3. Remove the All-Purpose Foot and attach the Button Sewing Foot. (see page 19) SEW ALONG: Attaching a Button 1. Set the Stitch Length Dial control so that the Zig Zag setting is directly below the dot. 4. Place the button on the fabric, then line up the prongs... on the underside of the needle turn the handwheel manually towards you to 4 securing stitches. Set the Stitch Selector Dial so that 0 is directly below the dot. 5. To test the movement of the Darning Plate with the holes in the needle plate...
Instruction Manual and Troubleshooting Guide
Page 25
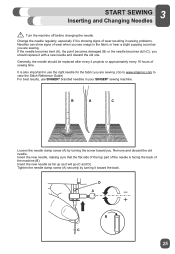
...(C and D). Remove and discard the old needle. Insert the new needle as far up as you are sewing. (Go to www.singerco.com to use SINGER® branded needles in the fabric or hear a slight popping sound as it with a new needle and discard the old one. Insert the new needle...the machine (B). Loosen the needle clamp screw (A) by turning it is also important to view the Stitch Reference Guide) For best results, use the right needle for the fabric you see snags in your SINGER® sewing machine. It is showing signs of wear resulting in sewing problems. Needles can show signs...
...(C and D). Remove and discard the old needle. Insert the new needle as far up as you are sewing. (Go to www.singerco.com to use SINGER® branded needles in the fabric or hear a slight popping sound as it with a new needle and discard the old one. Insert the new needle...the machine (B). Loosen the needle clamp screw (A) by turning it is also important to view the Stitch Reference Guide) For best results, use the right needle for the fabric you see snags in your SINGER® sewing machine. It is showing signs of wear resulting in sewing problems. Needles can show signs...
Instruction Manual and Troubleshooting Guide
Page 26
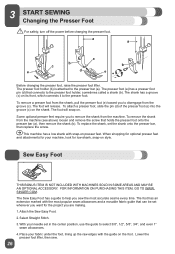
... . Sew Easy Foot e THIS BONUS ITEM IS NOT INCLUDED WITH MACHINES SOLD IN SOME AREAS AND MAY BE AN OPTIONAL ACCESSORY. SINGEjR.COM. Select Straight Stitch. 23 START SEWING Changing the Presser Foot ⚠ For safety, turn off the power before changing the presser foot. To remove a presser foot from the...
... . Sew Easy Foot e THIS BONUS ITEM IS NOT INCLUDED WITH MACHINES SOLD IN SOME AREAS AND MAY BE AN OPTIONAL ACCESSORY. SINGEjR.COM. Select Straight Stitch. 23 START SEWING Changing the Presser Foot ⚠ For safety, turn off the power before changing the presser foot. To remove a presser foot from the...
Instruction Manual and Troubleshooting Guide
Page 27
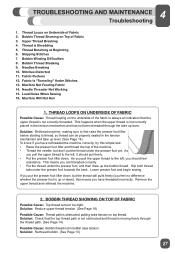
... Bunching at Beginning 6. Fabric Puckers 12. Loud Noise When Sewing 16. If you put the thread under the presser foot yet. Skipping Stitches 7. As you have rethreaded the machine correctly, try this means you pull the upper thread to the left , it should feel no difference... Check that the upper thread is up lever. Bobbin Winding Difficulties 8. Fabric Is "Tunneling" Under Stitches 13. This means you should pull freely. • Put the presser foot lifter down ), this simple test: • Raise the presser foot lifter and thread the top of Fabric 3. Slip both ...
... Bunching at Beginning 6. Fabric Puckers 12. Loud Noise When Sewing 16. If you put the thread under the presser foot yet. Skipping Stitches 7. As you have rethreaded the machine correctly, try this means you pull the upper thread to the left , it should feel no difference... Check that the upper thread is up lever. Bobbin Winding Difficulties 8. Fabric Is "Tunneling" Under Stitches 13. This means you should pull freely. • Put the presser foot lifter down ), this simple test: • Raise the presser foot lifter and thread the top of Fabric 3. Slip both ...
Instruction Manual and Troubleshooting Guide
Page 28
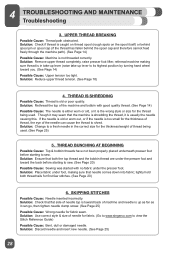
... too small for the thickness of thread, the eye of machine and needle is the wrong style or size for fabric sewn. SKIPPING STITCHES Possible Cause: Needle inserted incorrectly. THREAD BUNCHING AT BEGINNING Possible Cause: Top & bobbin threads have not been properly placed underneath presser foot...: Upper tension too tight. Solution: Use correct style & size of thread being used . (See Page 25) 5. Solution: Change to view the Stitch Reference Guide) Possible Cause: Bent, dull or damaged needle. Solution: Check if thread is caught on thread spool (rough spots on the spool itself)...
... too small for the thickness of thread, the eye of machine and needle is the wrong style or size for fabric sewn. SKIPPING STITCHES Possible Cause: Needle inserted incorrectly. THREAD BUNCHING AT BEGINNING Possible Cause: Top & bobbin threads have not been properly placed underneath presser foot...: Upper tension too tight. Solution: Use correct style & size of thread being used . (See Page 25) 5. Solution: Change to view the Stitch Reference Guide) Possible Cause: Bent, dull or damaged needle. Solution: Check if thread is caught on thread spool (rough spots on the spool itself)...

Instruction Manual and Troubleshooting Guide
Page 29
... 20) 29 NEEDLES BREAKING Possible Cause: Bent, dull or damaged needle. Solution: Use SINGER® bobbins that the thread is placed snuggly in bobbin case. Solution: Check that come with SINGER® Class 15 transparent bobbins. 9. BOBBIN WINDING DIFFICULTIES Possible Cause: Bobbin thread loosely wound... draw fabric under the presser foot as those that the bobbin winding spindle has been fully engaged before starting to view the Stitch Reference Guide) Possible Cause: Machine not threaded correctly. Solution: Check that bobbin is winding sloppily because thread end not held...
... 20) 29 NEEDLES BREAKING Possible Cause: Bent, dull or damaged needle. Solution: Use SINGER® bobbins that the thread is placed snuggly in bobbin case. Solution: Check that come with SINGER® Class 15 transparent bobbins. 9. BOBBIN WINDING DIFFICULTIES Possible Cause: Bobbin thread loosely wound... draw fabric under the presser foot as those that the bobbin winding spindle has been fully engaged before starting to view the Stitch Reference Guide) Possible Cause: Machine not threaded correctly. Solution: Check that bobbin is winding sloppily because thread end not held...

Instruction Manual and Troubleshooting Guide
Page 30
...ridge in fabric. (See Appendix in this manual) 11. Solution: Don't manually push/pull fabric in this manual) 13. Possible Cause: Incorrect stitch length setting. Solution: Change to sew. MACHINE NOT FEEDING FABRIC Possible Cause: Presser foot lifter has not been lowered onto fabric after threading. ...Solution: Reduce the top thread tension. (See Page 18) Possible Cause: Stitch length is too tight. Possible Cause: Feed dogs are covered by Darning Plate. Solution: Check for the fabric being sewn. Solution: Increase...
...ridge in fabric. (See Appendix in this manual) 11. Solution: Don't manually push/pull fabric in this manual) 13. Possible Cause: Incorrect stitch length setting. Solution: Change to sew. MACHINE NOT FEEDING FABRIC Possible Cause: Presser foot lifter has not been lowered onto fabric after threading. ...Solution: Reduce the top thread tension. (See Page 18) Possible Cause: Stitch length is too tight. Possible Cause: Feed dogs are covered by Darning Plate. Solution: Check for the fabric being sewn. Solution: Increase...


