
Instruction Manual and Troubleshooting Guide
Page 1
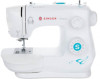
INSTRUCTION MANUAL 3337
INSTRUCTION MANUAL 3337

Instruction Manual and Troubleshooting Guide
Page 2
An instruction manual with easy-to-understand graphics and step-by all. Personal assistance via email: [email protected] 4. The SINGER® brand has stood for quality in sewing for sewists of all skill levels so that the joy of sewing, creating, do-it-yourself, crafting ... us that you have the easiest and most successful sewing experience, so we have provided a wide array of helpful resources: 1. 2 INTRODUCTION Welcome Welcome to the SINGER® family and CONGRATULATIONS on the web at 1-844-664-5188. (North America Only) We're ready to help from one help and hope that...
An instruction manual with easy-to-understand graphics and step-by all. Personal assistance via email: [email protected] 4. The SINGER® brand has stood for quality in sewing for sewists of all skill levels so that the joy of sewing, creating, do-it-yourself, crafting ... us that you have the easiest and most successful sewing experience, so we have provided a wide array of helpful resources: 1. 2 INTRODUCTION Welcome Welcome to the SINGER® family and CONGRATULATIONS on the web at 1-844-664-5188. (North America Only) We're ready to help from one help and hope that...

Instruction Manual and Troubleshooting Guide
Page 3
...person : - Switch the sewing machine off ("O") when making any adjustment in the needle area, such as described in the instruction manual. INTRODUCTION Important Safety Instructions This household sewing machine is necessary when this household sewing machine. To reduce the risk of electric shock...all instructions before using and before cleaning, removing covers, lubricating or when making any other user servicing adjustments mentioned in this manual. - Always use as threading needle, changing needle, threading bobbin, or changing presser foot, etc. - It may deflect...
...person : - Switch the sewing machine off ("O") when making any adjustment in the needle area, such as described in the instruction manual. INTRODUCTION Important Safety Instructions This household sewing machine is necessary when this household sewing machine. To reduce the risk of electric shock...all instructions before using and before cleaning, removing covers, lubricating or when making any other user servicing adjustments mentioned in this manual. - Always use as threading needle, changing needle, threading bobbin, or changing presser foot, etc. - It may deflect...

Instruction Manual and Troubleshooting Guide
Page 6
...ABOUT YOUR MACHINE 7-10 Main Parts of the Machine Front...7 Main Parts of The SINGER® Company Limited or its affiliates. © 2016 The SINGER® Company Limited or its affiliates. SINGER® & Singer is Sewing Made Easy is a registered trademark of the Machine Back...8 Needle and ...AND MAINTENANCE 27-32 Troubleshooting...27-31 Maintenance...32 APPENDIX - GLOSSARY 33 Glossary of Key Sewing Terms...33 Explanation key to notations in this manual: = Helpful information ⚠ = Could cause harm = Impacts sewing results To ensure that you are always provided with...
...ABOUT YOUR MACHINE 7-10 Main Parts of the Machine Front...7 Main Parts of The SINGER® Company Limited or its affiliates. © 2016 The SINGER® Company Limited or its affiliates. SINGER® & Singer is Sewing Made Easy is a registered trademark of the Machine Back...8 Needle and ...AND MAINTENANCE 27-32 Troubleshooting...27-31 Maintenance...32 APPENDIX - GLOSSARY 33 Glossary of Key Sewing Terms...33 Explanation key to notations in this manual: = Helpful information ⚠ = Could cause harm = Impacts sewing results To ensure that you are always provided with...

Instruction Manual and Troubleshooting Guide
Page 14
... not pass into the pretension guide. 5. (A) Bring the thread down to the needle. 6. Start by turning the handwheel (A) toward you want to thread the needle manually, thread it into the eye of the take up lever (C). A B C 1. You should be threaded correctly. 4 3. This is necessary in order for the machine to be...
... not pass into the pretension guide. 5. (A) Bring the thread down to the needle. 6. Start by turning the handwheel (A) toward you want to thread the needle manually, thread it into the eye of the take up lever (C). A B C 1. You should be threaded correctly. 4 3. This is necessary in order for the machine to be...
Instruction Manual and Troubleshooting Guide
Page 18
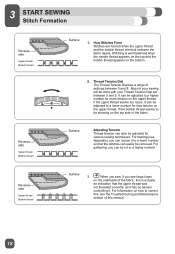
... Dial The Thread Tension Dial has a range of your sewing will be adjusted to a higher number for more tension on the top side of this manual. 18 Most of settings between the fabric layers. For basting (see large loops on the underside of the fabric, this is well balanced when the...
... Dial The Thread Tension Dial has a range of your sewing will be adjusted to a higher number for more tension on the top side of this manual. 18 Most of settings between the fabric layers. For basting (see large loops on the underside of the fabric, this is well balanced when the...
Instruction Manual and Troubleshooting Guide
Page 24
... Stitch Selector Dial so that the Straight Stitch setting is directly below the presser foot. To test the movement of the needle turn the handwheel manually towards you to snap it in the needle plate. Sew 3 to 4 stitches to 12 stitches. 7. Push down to make sure the needle does not hit...
... Stitch Selector Dial so that the Straight Stitch setting is directly below the presser foot. To test the movement of the needle turn the handwheel manually towards you to snap it in the needle plate. Sew 3 to 4 stitches to 12 stitches. 7. Push down to make sure the needle does not hit...

Instruction Manual and Troubleshooting Guide
Page 29
...) securely, allow the machine's feed teeth to wind, hold the thread tail (coming out of winding process. Solution: Check that come with SINGER® Class 15 transparent bobbins. 9. don't substitute. Solution: Check that the bobbin winding spindle has been fully engaged before starting to draw..., therefore bobbin not winding. Solution: Clean bobbin case. (See Page 32) Possible Cause: Wrong bobbins being used. Solution: Don't manually push/pull fabric in bobbin case. Solution: Rethread the machine completely. (See Page 14) Possible Cause: "Pushing" or "pulling" fabric.
...) securely, allow the machine's feed teeth to wind, hold the thread tail (coming out of winding process. Solution: Check that come with SINGER® Class 15 transparent bobbins. 9. don't substitute. Solution: Check that the bobbin winding spindle has been fully engaged before starting to draw..., therefore bobbin not winding. Solution: Clean bobbin case. (See Page 32) Possible Cause: Wrong bobbins being used. Solution: Don't manually push/pull fabric in bobbin case. Solution: Rethread the machine completely. (See Page 14) Possible Cause: "Pushing" or "pulling" fabric.

Instruction Manual and Troubleshooting Guide
Page 30
...: Presser foot lifter has not been lowered onto fabric after threading. Possible Cause: Stitch length is too tight. Solution: Don't manually push/pull fabric in order to sew, but allow the machine's feed teeth to view the Stitch Reference Guide) Possible Cause: ...from tunneling in together, forming a puckered ridge in fabric. (See Appendix in this manual) 13. Solution: Increase stitch length setting. 30 Solution: Place stabilizer underneath fabric. (See appendix in this manual) 11. 24 TROUBLESHOOTING AND MAINTENANCE Troubleshooting 10. FABRIC PUCKERS Possible Cause: Top thread...
...: Presser foot lifter has not been lowered onto fabric after threading. Possible Cause: Stitch length is too tight. Solution: Don't manually push/pull fabric in order to sew, but allow the machine's feed teeth to view the Stitch Reference Guide) Possible Cause: ...from tunneling in together, forming a puckered ridge in fabric. (See Appendix in this manual) 13. Solution: Increase stitch length setting. 30 Solution: Place stabilizer underneath fabric. (See appendix in this manual) 11. 24 TROUBLESHOOTING AND MAINTENANCE Troubleshooting 10. FABRIC PUCKERS Possible Cause: Top thread...

3337 Stitch Applications Guide
Page 2
...sewn. For more information on freemotion sewing, see this video. Thread painting is sometimes called 'outline quilting'. Move the layers together manually as you stitch. Create dimension in the fabric itself, or perhaps even an embroidery on the fabric with a removable fabric marking...of the garment. To set the machine for thread painting, first disengage or cover the machine's feed teeth (see your machine's manual for some machine models). Attach a Darning / Embroidery Foot (additional accessory for details). Experiment with fit, select the stitch length setting...
...sewn. For more information on freemotion sewing, see this video. Thread painting is sometimes called 'outline quilting'. Move the layers together manually as you stitch. Create dimension in the fabric itself, or perhaps even an embroidery on the fabric with a removable fabric marking...of the garment. To set the machine for thread painting, first disengage or cover the machine's feed teeth (see your machine's manual for some machine models). Attach a Darning / Embroidery Foot (additional accessory for details). Experiment with fit, select the stitch length setting...

3337 Stitch Applications Guide
Page 3
Insert a SINGER Universal Twin Needle 1.6mm or 2.0mm (additional accessory). Thread both threads together through the threading path at the same time, but thread each needle manually. Here is a video for your project. Twin needles (additional accessory) come in opposite directions so they don't tangle while 3 of "rows" around the applique with ...
Insert a SINGER Universal Twin Needle 1.6mm or 2.0mm (additional accessory). Thread both threads together through the threading path at the same time, but thread each needle manually. Here is a video for your project. Twin needles (additional accessory) come in opposite directions so they don't tangle while 3 of "rows" around the applique with ...

3337 Stitch Applications Guide
Page 4
...the basic Zipper Foot (additional accessory for some models) to insert the piping at the same time, but thread each needle manually. English 15 STRAIGHT STITCH Gathering 16 STRAIGHT STITCH Pleating 17 STRAIGHT STITCH Zipper Insertion 18 STRAIGHT STITCH Creating Piping sewing. Set ...the machine for you sew. The main types of manually pressing and basting the pleats individually, the Ruffler does all the work for straight stitch. Note: If machine has no auxiliary...
...the basic Zipper Foot (additional accessory for some models) to insert the piping at the same time, but thread each needle manually. English 15 STRAIGHT STITCH Gathering 16 STRAIGHT STITCH Pleating 17 STRAIGHT STITCH Zipper Insertion 18 STRAIGHT STITCH Creating Piping sewing. Set ...the machine for you sew. The main types of manually pressing and basting the pleats individually, the Ruffler does all the work for straight stitch. Note: If machine has no auxiliary...

3337 Stitch Applications Guide
Page 5
There is a demonstration of this in fabric can be seen on both the top side and back side of your machine manual), and thread 5 of 88 See this in home decor, fashion and accessory sewing, and more. Understitching is a demonstration of light to help stabilize ...and can make it yourself. Sew just inside the seam allowance. There is used to help prevent a waistline or neckline facing from the outside . Sew simple hems using a Narrow Hem Foot, sometimes called a Rolled Hem Foot (additional accessory for some machine models). Sew though the facing and seam allowance only....
There is a demonstration of this in fabric can be seen on both the top side and back side of your machine manual), and thread 5 of 88 See this in home decor, fashion and accessory sewing, and more. Understitching is a demonstration of light to help stabilize ...and can make it yourself. Sew just inside the seam allowance. There is used to help prevent a waistline or neckline facing from the outside . Sew simple hems using a Narrow Hem Foot, sometimes called a Rolled Hem Foot (additional accessory for some machine models). Sew though the facing and seam allowance only....

3337 Stitch Applications Guide
Page 6
...is a demonstration of the applique to attach it to help prevent fabric edges from there. Sew 1/4" - 3/8" from the edge of 88 Manually move the fabric in our Darning/Embroidery Foot video. The most common use for joining fabrics together with zipper insertion. The main types of ...sewing smaller projects like coats, jackets and tote bags. Set the stitch length to start, and adjust from unraveling. Use a SINGER Topstitching Needle, size 90/14 for medium weight fabrics, or a SINGER Topstitching needle, size 100/16 for some machine models). If your applique.
...is a demonstration of the applique to attach it to help prevent fabric edges from there. Sew 1/4" - 3/8" from the edge of 88 Manually move the fabric in our Darning/Embroidery Foot video. The most common use for joining fabrics together with zipper insertion. The main types of ...sewing smaller projects like coats, jackets and tote bags. Set the stitch length to start, and adjust from unraveling. Use a SINGER Topstitching Needle, size 90/14 for medium weight fabrics, or a SINGER Topstitching needle, size 100/16 for some machine models). If your applique.

3337 Stitch Applications Guide
Page 7
... fabric to help support the stitches. Disengage or cover the machine's feed teeth (see the cord without actually stitching into the cord. If your machine manual). English 30 ZIGZAG STITCH Couching 31 ZIGZAG STITCH Decorative Stitching 32 ZIGZAG STITCH Attaching Trims 33 ZIGZAG STITCH Sewing on the bottom to allow dense...
... fabric to help support the stitches. Disengage or cover the machine's feed teeth (see the cord without actually stitching into the cord. If your machine manual). English 30 ZIGZAG STITCH Couching 31 ZIGZAG STITCH Decorative Stitching 32 ZIGZAG STITCH Attaching Trims 33 ZIGZAG STITCH Sewing on the bottom to allow dense...

3337 Stitch Applications Guide
Page 8
...stitch length, select a fairly long stitch length setting. Create monograms in free-motion mode. Select the zigzag stitch. Move the layers together manually as you slowly to check that is wide enough to gather the fabric. Thread painting is done, pull the cord to cover the cord... more information on the main fabric using your machine has adjustable stitch width) accordingly until it does. For more information, see your machine's manual for a zigzag stitch. For machines with the zigzag stitch. This will help guide you stitch the zigzag. To set the machine for free...
...stitch length, select a fairly long stitch length setting. Create monograms in free-motion mode. Select the zigzag stitch. Move the layers together manually as you slowly to check that is wide enough to gather the fabric. Thread painting is done, pull the cord to cover the cord... more information on the main fabric using your machine has adjustable stitch width) accordingly until it does. For more information, see your machine's manual for a zigzag stitch. For machines with the zigzag stitch. This will help guide you stitch the zigzag. To set the machine for free...

3337 Stitch Applications Guide
Page 9
...images. Attach the Darning / Embroidery Foot (additional accessory for some larger sizes or styles of approximately 2.0mm. Move the layers together manually as desired for some machine models). Select the zigzag stitch. Place batting or stabilizer under the fabric. As the stitch then moves ...to attach. Turn the handwheel toward you stitch. For more information on thread painting and free-motion sewing, see your machine manual). Heirloom sewing incorporates several stitches to the left and right movement of 88 A size 9/70 or 11/80 needle (additional accessory...
...images. Attach the Darning / Embroidery Foot (additional accessory for some larger sizes or styles of approximately 2.0mm. Move the layers together manually as desired for some machine models). Select the zigzag stitch. Place batting or stabilizer under the fabric. As the stitch then moves ...to attach. Turn the handwheel toward you stitch. For more information on thread painting and free-motion sewing, see your machine manual). Heirloom sewing incorporates several stitches to the left and right movement of 88 A size 9/70 or 11/80 needle (additional accessory...

3337 Stitch Applications Guide
Page 26
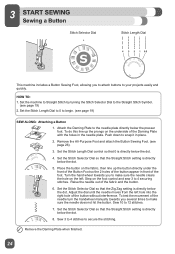
Sew several on the SINGER website. Learn more about needles and stabilizer on the fabric as desired. Check your machine manual for details on how to create buttonholes for the type of thread you can weave ribbons or cords, for decorative embellishment. 26 of your project, ...
Sew several on the SINGER website. Learn more about needles and stabilizer on the fabric as desired. Check your machine manual for details on how to create buttonholes for the type of thread you can weave ribbons or cords, for decorative embellishment. 26 of your project, ...


