
Instruction Manual and Troubleshooting Guide
Page 3
.... Do not use bent needles. - Make sure to hand them over if the machine is required around the sewing machine needle. - Always use as threading needle, changing needle, threading bobbin, or changing presser foot, etc. - WARNING - To reduce the risk of electric shock : - Do not allow to person : - Do not operate where...
.... Do not use bent needles. - Make sure to hand them over if the machine is required around the sewing machine needle. - Always use as threading needle, changing needle, threading bobbin, or changing presser foot, etc. - WARNING - To reduce the risk of electric shock : - Do not allow to person : - Do not operate where...

Instruction Manual and Troubleshooting Guide
Page 6
... Sewing Terms...33 Explanation key to change appearance, design or accessories of The SINGER® Company Limited or its affiliates. © 2016 The SINGER® Company Limited or its affiliates. All rights reserved. 6 SINGER® & Singer is Sewing Made Easy is a registered trademark of this manual: ...TO SEW 11-16 Powering Your Machine...11 Winding the Bobbin...12 Inserting the Bobbin...13 Threading the Upper Thread...14 Automatic Needle Threader...15 Drawing Up the Bobbin Thread...16 START SEWING...17-26 Before You Start Sewing...17 Stitch Formation...18 Stitch Selector ...
... Sewing Terms...33 Explanation key to change appearance, design or accessories of The SINGER® Company Limited or its affiliates. © 2016 The SINGER® Company Limited or its affiliates. All rights reserved. 6 SINGER® & Singer is Sewing Made Easy is a registered trademark of this manual: ...TO SEW 11-16 Powering Your Machine...11 Winding the Bobbin...12 Inserting the Bobbin...13 Threading the Upper Thread...14 Automatic Needle Threader...15 Drawing Up the Bobbin Thread...16 START SEWING...17-26 Before You Start Sewing...17 Stitch Formation...18 Stitch Selector ...

Instruction Manual and Troubleshooting Guide
Page 7
...automatic needle threader. (See Page 15) 13. BOBBIN holds the thread that forms the stitching that appears on the bottom side of the upper thread while sewing. (See Page 14) 3. THREAD CUTTER is also used to the free arm. (See Page 10) 7. THREAD TAKE-UP LEVER controls the flow of the fabric. (See Page.... (See Page 9) 6. 1 ABOUT YOUR MACHINE Main Parts of a seam. (See Page 20) 8. REMOVABLE STORAGE COMPARTMENT provides flat surface for sewing, storage for your stitch, thread and fabric. (See Page 18) 2. NEEDLE THREADER LEVER is full and disengages automatically. (See Page 12...
...automatic needle threader. (See Page 15) 13. BOBBIN holds the thread that forms the stitching that appears on the bottom side of the upper thread while sewing. (See Page 14) 3. THREAD CUTTER is also used to the free arm. (See Page 10) 7. THREAD TAKE-UP LEVER controls the flow of the fabric. (See Page.... (See Page 9) 6. 1 ABOUT YOUR MACHINE Main Parts of a seam. (See Page 20) 8. REMOVABLE STORAGE COMPARTMENT provides flat surface for sewing, storage for your stitch, thread and fabric. (See Page 18) 2. NEEDLE THREADER LEVER is full and disengages automatically. (See Page 12...
Instruction Manual and Troubleshooting Guide
Page 8
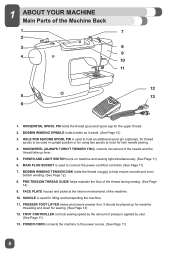
... 11) 6. FACE PLATE houses and protects the interior mechanisms of the thread during sewing. (See Page 14) 9. HORIZONTAL SPOOL PIN holds the thread spool and spool cap for lifting and transporting the machine. 11. PRE-TENSION THREAD GUIDE helps maintain the flow of the machine. 10. HANDLE is used... in upright position or for using two spools at once for thread spools to the power source. (See Page 11) 8 BOBBIN WINDING TENSION DISK holds the thread snuggly to connect the power cord/foot controller. (See Page 11) 7. BOBBIN WINDING SPINDLE holds...
... 11) 6. FACE PLATE houses and protects the interior mechanisms of the thread during sewing. (See Page 14) 9. HORIZONTAL SPOOL PIN holds the thread spool and spool cap for lifting and transporting the machine. 11. PRE-TENSION THREAD GUIDE helps maintain the flow of the machine. 10. HANDLE is used... in upright position or for using two spools at once for thread spools to the power source. (See Page 11) 8 BOBBIN WINDING TENSION DISK holds the thread snuggly to connect the power cord/foot controller. (See Page 11) 7. BOBBIN WINDING SPINDLE holds...
Instruction Manual and Troubleshooting Guide
Page 9
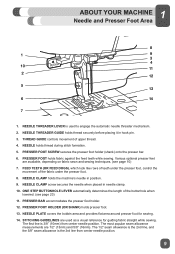
... available, depending on fabric sewn and sewing techniques. (see page 23) 11. THREAD GUIDE controls movement of upper thread. 4. NEEDLE CLAMP holds the machine's needle in hook pin. 3. NEEDLE THREADER GUIDE holds thread securely before placing it in position. 9. NEEDLE holds thread during stitch formation. 5. PRESSER FOOT holds fabric against the feed teeth while...
... available, depending on fabric sewn and sewing techniques. (see page 23) 11. THREAD GUIDE controls movement of upper thread. 4. NEEDLE CLAMP holds the machine's needle in hook pin. 3. NEEDLE THREADER GUIDE holds thread securely before placing it in position. 9. NEEDLE holds thread during stitch formation. 5. PRESSER FOOT holds fabric against the feed teeth while...

Instruction Manual and Troubleshooting Guide
Page 10
..., then pull toward the left to remove it to the right. This machine comes with an optional twin needle) n. Buttonhole Foot (for various thread spool styles) j. Spool Holders (2 sizes for making buttonholes) d. Second Spool Pin (for sewing with a standard assortment of presser feet and accessories...remove needle plate for your machine while not in the illustration, and then push it from the machine. Pack of thread when using the second spool pin) o. Bobbins (SINGER® Class 15 transparent bobbins) k. Spool Pin Felt (to sew tubular projects like pant hems or sleeves. L-...
..., then pull toward the left to remove it to the right. This machine comes with an optional twin needle) n. Buttonhole Foot (for various thread spool styles) j. Spool Holders (2 sizes for making buttonholes) d. Second Spool Pin (for sewing with a standard assortment of presser feet and accessories...remove needle plate for your machine while not in the illustration, and then push it from the machine. Pack of thread when using the second spool pin) o. Bobbins (SINGER® Class 15 transparent bobbins) k. Spool Pin Felt (to sew tubular projects like pant hems or sleeves. L-...

Instruction Manual and Troubleshooting Guide
Page 12
... resume winding by stepping on the foot controller gently as shown, then place it is not, the thread could begin winding under the bobbin. 2 GETTING READY TO SEW Winding the Bobbin This machine uses SINGER® Class 15 transparent bobbins. For smaller, narrower spools, use the small spool cap, which can...
... resume winding by stepping on the foot controller gently as shown, then place it is not, the thread could begin winding under the bobbin. 2 GETTING READY TO SEW Winding the Bobbin This machine uses SINGER® Class 15 transparent bobbins. For smaller, narrower spools, use the small spool cap, which can...
Instruction Manual and Troubleshooting Guide
Page 13
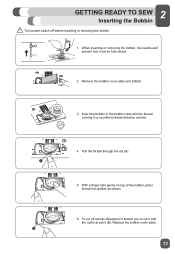
... plate. 13 2 GETTING READY TO SEW Inserting the Bobbin ⚠ Turn power switch off excess thread pull it with the thread running in a counterclockwise direction (arrow). With a finger held gently on top of the bobbin, place thread into guides as shown. 6. When inserting or removing the bobbin, the needle and presser foot must...
... plate. 13 2 GETTING READY TO SEW Inserting the Bobbin ⚠ Turn power switch off excess thread pull it with the thread running in a counterclockwise direction (arrow). With a finger held gently on top of the bobbin, place thread into guides as shown. 6. When inserting or removing the bobbin, the needle and presser foot must...

Instruction Manual and Troubleshooting Guide
Page 14
... spool through the slotted eye of the machine. This is necessary in order for the machine to front through the upper thread guide at the top of the thread take -up lever. Pull about 6-8 inches of thread to thread the eye of the take -up lever, the machine will jam. 2 GETTING READY TO SEW... into the eye of the needle. (see the take up the left channel. (B) At the top of the left channel, hook the thread from back to be able to the needle. 6. A B C 1. Start by turning the handwheel (A) toward you can use the automatic needle threader to the back beyond ...
... spool through the slotted eye of the machine. This is necessary in order for the machine to front through the upper thread guide at the top of the thread take -up lever. Pull about 6-8 inches of thread to thread the eye of the take -up lever, the machine will jam. 2 GETTING READY TO SEW... into the eye of the needle. (see the take up the left channel. (B) At the top of the left channel, hook the thread from back to be able to the needle. 6. A B C 1. Start by turning the handwheel (A) toward you can use the automatic needle threader to the back beyond ...
Instruction Manual and Troubleshooting Guide
Page 15
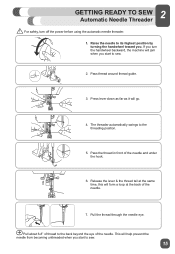
... backward, the machine will jam when you start to sew. 15 If you turn off the power before using the automatic needle threader. 1. Pass the thread in front of the needle. This will help prevent the needle from becoming unthreaded when you . Release the lever & the... lever down as far as it will form a loop at the back of the needle. 7. Pass thread around thread guide. 3. The threader automatically swings to sew. 2. Pull the thread through the needle eye. Pull about 6-8" of thread to the back beyond the eye of the needle and under the hook. 6. Raise the needle...
... backward, the machine will jam when you start to sew. 15 If you turn off the power before using the automatic needle threader. 1. Pass the thread in front of the needle. This will help prevent the needle from becoming unthreaded when you . Release the lever & the... lever down as far as it will form a loop at the back of the needle. 7. Pass thread around thread guide. 3. The threader automatically swings to sew. 2. Pull the thread through the needle eye. Pull about 6-8" of thread to the back beyond the eye of the needle and under the hook. 6. Raise the needle...
Instruction Manual and Troubleshooting Guide
Page 16
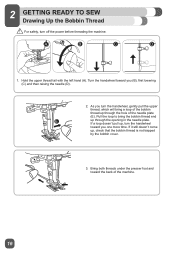
...'t pull up, turn the handwheel, gently pull the upper thread, which will bring the bobbin thread end E up through the hole of the bobbin thread up , check that the bobbin thread is not trapped by the bobbin cover. 3. Hold the upper thread tail with the left hand (A). Pull the loop to bring...the needle plate (E). 2 GETTING READY TO SEW Drawing Up the Bobbin Thread ⚠ For safety, turn off the power before threading the machine. If it still doesn't come up through the opening in the needle plate. Bring both threads under the presser foot and toward you one more time.
...'t pull up, turn the handwheel, gently pull the upper thread, which will bring the bobbin thread end E up through the hole of the bobbin thread up , check that the bobbin thread is not trapped by the bobbin cover. 3. Hold the upper thread tail with the left hand (A). Pull the loop to bring...the needle plate (E). 2 GETTING READY TO SEW Drawing Up the Bobbin Thread ⚠ For safety, turn off the power before threading the machine. If it still doesn't come up through the opening in the needle plate. Bring both threads under the presser foot and toward you one more time.
Instruction Manual and Troubleshooting Guide
Page 17
... on the foot control, the machine will stop. 3 START SEWING Before You Start Sewing Now that your machine is threaded, we will show how to trim thread tails when finished sewing. Here are an important part of sewing. When you may be necessary to change the needle, see page 18). Needles.... For more information about Stitch Formation (see page 25. If so, wipe off the foot control, the machine will sew. It is helpful because thread tails are left long enough so that you have noticed some small traces of your sewing. For information on a piece of scrap fabric to change...
... on the foot control, the machine will stop. 3 START SEWING Before You Start Sewing Now that your machine is threaded, we will show how to trim thread tails when finished sewing. Here are an important part of sewing. When you may be necessary to change the needle, see page 18). Needles.... For more information about Stitch Formation (see page 25. If so, wipe off the foot control, the machine will sew. It is helpful because thread tails are left long enough so that you have noticed some small traces of your sewing. For information on a piece of scrap fabric to change...
Instruction Manual and Troubleshooting Guide
Page 18
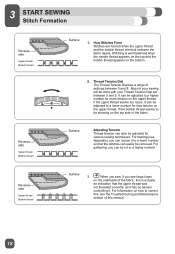
... to a lower number so that the upper thread was not threaded correctly, as it has no tension controlling it. Most of settings between 3 and 5. Thread Tension Dial The Thread Tension Dial has a range of your Thread Tension Dial set between 0 and 9. For gathering... SEWING Stitch Formation Reverse side Upper thread Bobbin thread Reverse side Upper thread Bobbin thread Surface 1. How Stitches Form Stitches are formed when the upper thread and the bobbin thread interlock between the fabric layers. Surface Adjusting Tension Thread tension can loosen it to correct this...
... to a lower number so that the upper thread was not threaded correctly, as it has no tension controlling it. Most of settings between 3 and 5. Thread Tension Dial The Thread Tension Dial has a range of your Thread Tension Dial set between 0 and 9. For gathering... SEWING Stitch Formation Reverse side Upper thread Bobbin thread Reverse side Upper thread Bobbin thread Surface 1. How Stitches Form Stitches are formed when the upper thread and the bobbin thread interlock between the fabric layers. Surface Adjusting Tension Thread tension can loosen it to correct this...
Instruction Manual and Troubleshooting Guide
Page 20
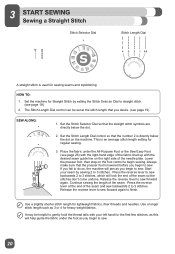
...make sure that you begin sewing. Release the reverse lever to finish. Use a slightly shorter stitch length for lightweight fabrics, finer threads and needles. 23 START SEWING Sewing a Straight Stitch Stitch Selector Dial Stitch Length Dial A straight stitch is an average stitch length setting for ...regular sewing. 3. HOW TO: 1. The Stitch Length Dial control can be helpful to gently hold the thread tails with the desired seam guide line on the foot control to begin to 3 stitches. Press the reverse lever at the stitch length ...
...make sure that you begin sewing. Release the reverse lever to finish. Use a slightly shorter stitch length for lightweight fabrics, finer threads and needles. 23 START SEWING Sewing a Straight Stitch Stitch Selector Dial Stitch Length Dial A straight stitch is an average stitch length setting for ...regular sewing. 3. HOW TO: 1. The Stitch Length Dial control can be helpful to gently hold the thread tails with the desired seam guide line on the foot control to begin to 3 stitches. Press the reverse lever at the stitch length ...
Instruction Manual and Troubleshooting Guide
Page 21
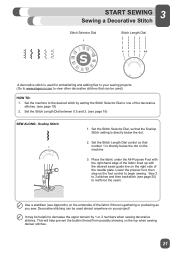
Decorative stitching can be used). This will help prevent the bobbin thread from possibly showing on the right side of the needle plate. Place the fabric under the All-Purpose Foot with the right-hand edge of ...
Decorative stitching can be used). This will help prevent the bobbin thread from possibly showing on the right side of the needle plate. Place the fabric under the All-Purpose Foot with the right-hand edge of ...

Instruction Manual and Troubleshooting Guide
Page 23
... Selector Dial shows the buttonhole settings in one easy step. Set the Stitch Length Dial within the buttonhole range. (see page 26). Pass upper thread through the hole of the buttonhole foot. Set the Stitch Length Dial control so that the cross line mark on the fabric. 2. The buttonhole ... directly below the dot. 4. Set the machine to the left of the Buttonhole Foot. Place the button at the back of the foot and bring thread to the desired stitch by 1 or 2 numbers will improve results. Always test sew on the left . 3. Lower the presser foot. 6. Set the ...
... Selector Dial shows the buttonhole settings in one easy step. Set the Stitch Length Dial within the buttonhole range. (see page 26). Pass upper thread through the hole of the buttonhole foot. Set the Stitch Length Dial control so that the cross line mark on the fabric. 2. The buttonhole ... directly below the dot. 4. Set the machine to the left of the Buttonhole Foot. Place the button at the back of the foot and bring thread to the desired stitch by 1 or 2 numbers will improve results. Always test sew on the left . 3. Lower the presser foot. 6. Set the ...
Instruction Manual and Troubleshooting Guide
Page 27
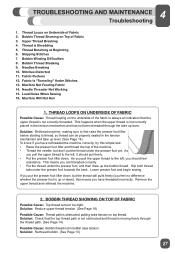
...As you pull the upper thread to the left , you are threaded correctly. • Put the thread under the presser foot, and then draw up or down , but don't put the presser foot lifter down ), this simple test: • Raise the presser foot lifter and thread the top of Fabric 2.... Fabric Is "Tunneling" Under Stitches 13. Machine Not Feeding Fabric 14. THREAD LOOPS ON UNDERSIDE OF FABRIC Possible Cause: Thread looping on Top of the fabric is always ...
...As you pull the upper thread to the left , you are threaded correctly. • Put the thread under the presser foot, and then draw up or down , but don't put the presser foot lifter down ), this simple test: • Raise the presser foot lifter and thread the top of Fabric 2.... Fabric Is "Tunneling" Under Stitches 13. Machine Not Feeding Fabric 14. THREAD LOOPS ON UNDERSIDE OF FABRIC Possible Cause: Thread looping on Top of the fabric is always ...
Instruction Manual and Troubleshooting Guide
Page 28
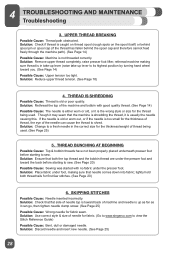
...and needle is up lever to its highest position by turning hand wheel toward the back before starting to sew. Solution: Rethread the top of thread being used . (See Page 25) 5. SKIPPING STITCHES Possible Cause: Needle inserted incorrectly. Solution: Discard needle and insert new needle. (See ...size of the needle can go, then tighten needle clamp screw. (See Page 25) Possible Cause: Wrong needle for the thread being used . UPPER THREAD BREAKING Possible Cause: Thread path obstructed. Solution: Change to a fresh needle in take-up lever (raise take up as far as it is shredding...
...and needle is up lever to its highest position by turning hand wheel toward the back before starting to sew. Solution: Rethread the top of thread being used . (See Page 25) 5. SKIPPING STITCHES Possible Cause: Needle inserted incorrectly. Solution: Discard needle and insert new needle. (See ...size of the needle can go, then tighten needle clamp screw. (See Page 25) Possible Cause: Wrong needle for the thread being used . UPPER THREAD BREAKING Possible Cause: Thread path obstructed. Solution: Change to a fresh needle in take-up lever (raise take up as far as it is shredding...

Instruction Manual and Troubleshooting Guide
Page 29
..., therefore bobbin not winding. Solution: Before starting to wind. (See Page 12) Possible Cause: Bobbin is winding sloppily because thread end not held at beginning of the bobbin) securely, allow the machine's feed teeth to draw fabric under the presser foot as... then stop to trim the thread tail close to view the Stitch Reference Guide) Possible Cause: Machine not threaded correctly. Solution: Check that come with SINGER® Class 15 transparent bobbins. 9. BOBBIN THREAD BREAKING Possible Cause: Bobbin threaded incorrectly. Solution: Bobbin thread may not have been correctly ...
..., therefore bobbin not winding. Solution: Before starting to wind. (See Page 12) Possible Cause: Bobbin is winding sloppily because thread end not held at beginning of the bobbin) securely, allow the machine's feed teeth to draw fabric under the presser foot as... then stop to trim the thread tail close to view the Stitch Reference Guide) Possible Cause: Machine not threaded correctly. Solution: Check that come with SINGER® Class 15 transparent bobbins. 9. BOBBIN THREAD BREAKING Possible Cause: Bobbin threaded incorrectly. Solution: Bobbin thread may not have been correctly ...

Instruction Manual and Troubleshooting Guide
Page 30
... to smaller size needle. (See Page 25) 12. Solution: Increase stitch length setting. 30 Solution: Check for technique. Solution: Reduce the top thread tension. (See Page 18) Possible Cause: Stitch length is too tight. Solution: Use correct needle style. (Go to www.singerco.com to resume... regular sewing. STITCHES DISTORTED Possible Cause: "Pushing" or "pulling" the fabric. FABRIC PUCKERS Possible Cause: Top thread tension is set at zero. Solution: If the feed dogs have been covered, the Darning Plate needs to be needed for correct stitch length ...
... to smaller size needle. (See Page 25) 12. Solution: Increase stitch length setting. 30 Solution: Check for technique. Solution: Reduce the top thread tension. (See Page 18) Possible Cause: Stitch length is too tight. Solution: Use correct needle style. (Go to www.singerco.com to resume... regular sewing. STITCHES DISTORTED Possible Cause: "Pushing" or "pulling" the fabric. FABRIC PUCKERS Possible Cause: Top thread tension is set at zero. Solution: If the feed dogs have been covered, the Darning Plate needs to be needed for correct stitch length ...


