
Instruction Manual
Page 1
GENERAL INSTALLATION INSTRUCTIONS 5 3. MAKING THE ELECTRICAL CONNECTION 7 NOTE: THIS APPLIANCE MUST BE INSTALLED SOLELY AND EXCLUSIVELY BY A QUALIFIED TECHNICIAN. IMPORTANT SAFETY INSTRUCTIONS 4 2. INSTRUCTIONS FOR THE INSTALLER: these are intended for the qualified engineer who is able to install, commission and test the appliance 3 PREPARING THE BUILT-IN OVEN 6 4. Table of Contents 1. ANY TECHNICAL PROCEDURES MUST BE CARRIED OUT BY AN AUTHORIZED TECHNICIAN.
GENERAL INSTALLATION INSTRUCTIONS 5 3. MAKING THE ELECTRICAL CONNECTION 7 NOTE: THIS APPLIANCE MUST BE INSTALLED SOLELY AND EXCLUSIVELY BY A QUALIFIED TECHNICIAN. IMPORTANT SAFETY INSTRUCTIONS 4 2. INSTRUCTIONS FOR THE INSTALLER: these are intended for the qualified engineer who is able to install, commission and test the appliance 3 PREPARING THE BUILT-IN OVEN 6 4. Table of Contents 1. ANY TECHNICAL PROCEDURES MUST BE CARRIED OUT BY AN AUTHORIZED TECHNICIAN.
Instruction Manual
Page 2
.... Use this manual and on to moderate injury. Read all governing codes and ordinances. IMPORTANT SAFETY INSTRUCTIONS READ AND SAVE THESE INSTRUCTIONS - CAUTION indicates a potentially hazardous situation which, if not avoided, may result in a safe place and pass them on the appliance. UNDERSTAND SIGNAL WORDS A signal word - Keep these operating instructions in minor to any future user. DANGER...
.... Use this manual and on to moderate injury. Read all governing codes and ordinances. IMPORTANT SAFETY INSTRUCTIONS READ AND SAVE THESE INSTRUCTIONS - CAUTION indicates a potentially hazardous situation which, if not avoided, may result in a safe place and pass them on the appliance. UNDERSTAND SIGNAL WORDS A signal word - Keep these operating instructions in minor to any future user. DANGER...
Instruction Manual
Page 3
... the oven when the door is connected to or greater than 3 mm, located in compliance with installation information specified on the model/serial ID plate. IMPORTANT: Observe all local codes and ordinances. The model/serial ID plate can be available on the supply line with a contact gap equal to an external electrical power supply, it is required. If this oven. Have a qualified technician install this appliance is opened...
... the oven when the door is connected to or greater than 3 mm, located in compliance with installation information specified on the model/serial ID plate. IMPORTANT: Observe all local codes and ordinances. The model/serial ID plate can be available on the supply line with a contact gap equal to an external electrical power supply, it is required. If this oven. Have a qualified technician install this appliance is opened...
Instruction Manual
Page 4
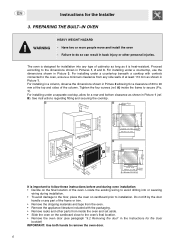
For installing under a countertop beneath a cooktop with the packaging. • Remove racks and other personal injuries. B). See instructions regarding fitting and securing the cooktop. Do not lift by the door handle or any part of 80 to the oven, ensure a minimum clearance from inside the frame to remove the oven door. 6 PREPARING THE BUILT-IN OVEN WARNING HEAVY WEIGHT HAZARD - Proceed according to do so can result in...
For installing under a countertop beneath a cooktop with the packaging. • Remove racks and other personal injuries. B). See instructions regarding fitting and securing the cooktop. Do not lift by the door handle or any part of 80 to the oven, ensure a minimum clearance from inside the frame to remove the oven door. 6 PREPARING THE BUILT-IN OVEN WARNING HEAVY WEIGHT HAZARD - Proceed according to do so can result in...
Instruction Manual
Page 5
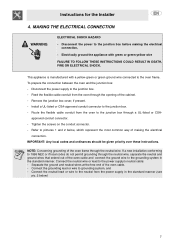
To prepare the connection between the oven and the junction box: - Remove the junction box cover, if present. - Refer to the neutral from the power supply in the standard manner. NOTE: Concerning grounding of the cabinet. - Feed the flexible cable conduit from the oven to the junction box. - Install a UL-listed or CSA-approved conduit connector to the junction box through the neutral wire, separate...
To prepare the connection between the oven and the junction box: - Remove the junction box cover, if present. - Refer to the neutral from the power supply in the standard manner. NOTE: Concerning grounding of the cabinet. - Feed the flexible cable conduit from the oven to the junction box. - Install a UL-listed or CSA-approved conduit connector to the junction box through the neutral wire, separate...

Instruction Manual
Page 6
INSTALLATION AND CANADIAN INSTALLATION - 4-WIRE GROUNDED JUNCTION BOX Refer to the neutral wire in the junction box. Do not connect the frame grounding wire to picture 2, - Connect the red and black wires of the appliance cable to a 20A fuse or circuit breaker. pic.2) - Connect the white wire from the appliance to the power supply cable neutral wire (white wire): - Connect to the matching power supply cables in the junction box. Instructions for joining...
INSTALLATION AND CANADIAN INSTALLATION - 4-WIRE GROUNDED JUNCTION BOX Refer to the neutral wire in the junction box. Do not connect the frame grounding wire to picture 2, - Connect the red and black wires of the appliance cable to a 20A fuse or circuit breaker. pic.2) - Connect the white wire from the appliance to the power supply cable neutral wire (white wire): - Connect to the matching power supply cables in the junction box. Instructions for joining...

