Instruction Manual
Page 1
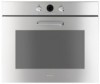
PREPARING THE BUILT-IN OVEN 6 4. Table of Contents 1. MAKING THE ELECTRICAL CONNECTION 7 NOTE: THIS APPLIANCE MUST BE INSTALLED SOLELY AND EXCLUSIVELY BY A QUALIFIED TECHNICIAN. GENERAL INSTALLATION INSTRUCTIONS 5 3. INSTRUCTIONS FOR THE INSTALLER: these are intended for the qualified engineer who is able to install, commission and test the appliance 3 IMPORTANT SAFETY INSTRUCTIONS 4 2. ANY TECHNICAL PROCEDURES MUST BE CARRIED OUT BY AN AUTHORIZED TECHNICIAN.
PREPARING THE BUILT-IN OVEN 6 4. Table of Contents 1. MAKING THE ELECTRICAL CONNECTION 7 NOTE: THIS APPLIANCE MUST BE INSTALLED SOLELY AND EXCLUSIVELY BY A QUALIFIED TECHNICIAN. GENERAL INSTALLATION INSTRUCTIONS 5 3. INSTRUCTIONS FOR THE INSTALLER: these are intended for the qualified engineer who is able to install, commission and test the appliance 3 IMPORTANT SAFETY INSTRUCTIONS 4 2. ANY TECHNICAL PROCEDURES MUST BE CARRIED OUT BY AN AUTHORIZED TECHNICIAN.

Instruction Manual
Page 2
...manual and on to any future user. Read all instructions before installing or using the appliance and always obey all government codes and ordinances. WARNING means you can be killed or seriously injured if you do not follow the instructions. IMPORTANT: Installation and grounding must comply with current safety requirements. Only use...- Improper use only. - IMPORTANT SAFETY INSTRUCTIONS READ AND SAVE THESE INSTRUCTIONS - We have provided many important safety messages throughout this oven. - Read all the instructions before using the oven for the first time. -...
...manual and on to any future user. Read all instructions before installing or using the appliance and always obey all government codes and ordinances. WARNING means you can be killed or seriously injured if you do not follow the instructions. IMPORTANT: Installation and grounding must comply with current safety requirements. Only use...- Improper use only. - IMPORTANT SAFETY INSTRUCTIONS READ AND SAVE THESE INSTRUCTIONS - We have provided many important safety messages throughout this oven. - Read all the instructions before using the oven for the first time. -...
Instruction Manual
Page 3
.... 5 GENERAL INSTALLATION INSTRUCTIONS • Proper installation is the customer's responsibility: - It is not suitable for correct installation. If this appliance is connected to the information indicated on the model/serial ID plate. To ensure that the voltage and dimensions of the supply line correspond to an outside electrical power source, it is mandatory according to the provisions of the installer to repair or replace any part...
.... 5 GENERAL INSTALLATION INSTRUCTIONS • Proper installation is the customer's responsibility: - It is not suitable for correct installation. If this appliance is connected to the information indicated on the model/serial ID plate. To ensure that the voltage and dimensions of the supply line correspond to an outside electrical power source, it is mandatory according to the provisions of the installer to repair or replace any part...

Instruction Manual
Page 4
... in Picture 1 (ref. Use two or more people to the dimensions shown in the Instructions for the Installer 3. A) inside the oven. • Move the oven on the cardboard close to the oven's final location. • Remove the oven door (see paragraph "9.2 Removing the door" in Pictures 1, 2 and 3. For installing under a countertop beneath a cooktop with controls connected to installation. Locate the existing wiring to avoid drilling into any side walls of at the...
... in Picture 1 (ref. Use two or more people to the dimensions shown in the Instructions for the Installer 3. A) inside the oven. • Move the oven on the cardboard close to the oven's final location. • Remove the oven door (see paragraph "9.2 Removing the door" in Pictures 1, 2 and 3. For installing under a countertop beneath a cooktop with controls connected to installation. Locate the existing wiring to avoid drilling into any side walls of at the...
Instruction Manual
Page 5
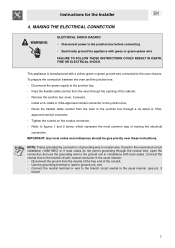
... the electrical connection. approved conduit connector. - If used in compliance with a yellow-green or green ground wire connected to the branch circuit neutral in the usual manner: - Connect the neutral terminal or wire to the oven chassis. MAKING THE ELECTRICAL CONNECTION WARNING ELECTRICAL SHOCK HAZARD - To prepare the connection between the oven and the junction box: - Remove the junction box cover, if present, - Connect the neutral wire to neutral wire. Disconnect power...
... the electrical connection. approved conduit connector. - If used in compliance with a yellow-green or green ground wire connected to the branch circuit neutral in the usual manner: - Connect the neutral terminal or wire to the oven chassis. MAKING THE ELECTRICAL CONNECTION WARNING ELECTRICAL SHOCK HAZARD - To prepare the connection between the oven and the junction box: - Remove the junction box cover, if present, - Connect the neutral wire to neutral wire. Disconnect power...
Instruction Manual
Page 6
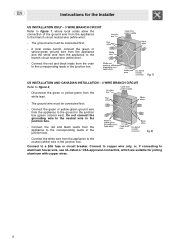
... INSTALLATION ONLY - 3 WIRE BRANCH CIRCUIT Refer to figure 1, where local codes allow the connection of the ground wire from the appliance to the neutral (white) wire in the junction box. If local codes permit, connect the green or yellow-green ground wire from the appliance and the white wire from the white lead. - fig.1) US INSTALLATION AND CANADIAN INSTALLATION - 4 WIRE BRANCH CIRCUIT Refer to a 20A fuse or circuit breaker. Connect...
... INSTALLATION ONLY - 3 WIRE BRANCH CIRCUIT Refer to figure 1, where local codes allow the connection of the ground wire from the appliance to the neutral (white) wire in the junction box. If local codes permit, connect the green or yellow-green ground wire from the appliance and the white wire from the white lead. - fig.1) US INSTALLATION AND CANADIAN INSTALLATION - 4 WIRE BRANCH CIRCUIT Refer to a 20A fuse or circuit breaker. Connect...

