
Instruction Manual
Page 1
MAKING THE ELECTRICAL CONNECTION 7 NOTE: THIS APPLIANCE MUST BE INSTALLED SOLELY AND EXCLUSIVELY BY A QUALIFIED TECHNICIAN. IMPORTANT SAFETY INSTRUCTIONS 4 2. ANY TECHNICAL PROCEDURES MUST BE CARRIED OUT BY AN AUTHORIZED TECHNICIAN. Table of Contents 1. PREPARING THE BUILT-IN OVEN 6 4. INSTRUCTIONS FOR THE INSTALLER: these are intended for the qualified engineer who is able to install, commission and test the appliance 3 GENERAL INSTALLATION INSTRUCTIONS 5 3.
MAKING THE ELECTRICAL CONNECTION 7 NOTE: THIS APPLIANCE MUST BE INSTALLED SOLELY AND EXCLUSIVELY BY A QUALIFIED TECHNICIAN. IMPORTANT SAFETY INSTRUCTIONS 4 2. ANY TECHNICAL PROCEDURES MUST BE CARRIED OUT BY AN AUTHORIZED TECHNICIAN. Table of Contents 1. PREPARING THE BUILT-IN OVEN 6 4. INSTRUCTIONS FOR THE INSTALLER: these are intended for the qualified engineer who is able to install, commission and test the appliance 3 GENERAL INSTALLATION INSTRUCTIONS 5 3.

Instruction Manual
Page 2
... purpose. Improper use the appliance for damages caused by improper use only. - We have provided many important safety messages throughout this oven. - Read all instructions before installing or using the appliance and always obey all safety messages. CAUTION indicates a potentially hazardous situation ...safety requirements. All safety messages will inform you and others are not followed. Observe all the instructions before using the oven for home use of the appliance can be killed or seriously injured if you do not follow the instructions. The ...
... purpose. Improper use the appliance for damages caused by improper use only. - We have provided many important safety messages throughout this oven. - Read all instructions before installing or using the appliance and always obey all safety messages. CAUTION indicates a potentially hazardous situation ...safety requirements. All safety messages will inform you and others are not followed. Observe all the instructions before using the oven for home use of the appliance can be killed or seriously injured if you do not follow the instructions. The ...
Instruction Manual
Page 3
... by a qualified installer, in mobile homes or campers. • Electrical grounding is the responsibility of the installer to the provisions of the oven when the door is opened. • Have your responsibility. latest edition - Grounding is mandatory according to comply with the national ANSI / ...Electrical Requirements" section. To ensure that the voltage and dimensions of the supply line correspond to repair or replace any part of your oven unless it must be available on the supply line with a contact opening distance equal to or greater than 3mm, located in an easily...
... by a qualified installer, in mobile homes or campers. • Electrical grounding is the responsibility of the installer to the provisions of the oven when the door is opened. • Have your responsibility. latest edition - Grounding is mandatory according to comply with the national ANSI / ...Electrical Requirements" section. To ensure that the voltage and dimensions of the supply line correspond to repair or replace any part of your oven unless it must be available on the supply line with a contact opening distance equal to or greater than 3mm, located in an easily...

Instruction Manual
Page 4
... part of 80 to installation. Failure to do so can result in back or other parts from inside the frame to move and install the oven - For installing under a countertop, follow the dimensions given in Picture 2 allowing for the User booklet) IMPORTANT: Use both hands to the dimensions shown ...in Pictures 1, 2 and 3. A) inside the oven. • Move the oven on cardboard prior to 90 mm at least 110 mm as shown in Picture 1. Do not lift by the door handle or any side...
... part of 80 to installation. Failure to do so can result in back or other parts from inside the frame to move and install the oven - For installing under a countertop, follow the dimensions given in Picture 2 allowing for the User booklet) IMPORTANT: Use both hands to the dimensions shown ...in Pictures 1, 2 and 3. A) inside the oven. • Move the oven on cardboard prior to 90 mm at least 110 mm as shown in Picture 1. Do not lift by the door handle or any side...
Instruction Manual
Page 5
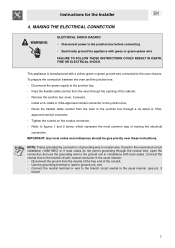
...junction box through a UL-listed or CSA- Route the flexible cable conduit from the oven to the oven chassis. Tighten the screws on the conduit connector, - Disconnect the ground from the oven through the neutral wire, open the connection and use the grounding wire to the ...usual manner: - MAKING THE ELECTRICAL CONNECTION WARNING ELECTRICAL SHOCK HAZARD - Disconnect power to the junction box, - To prepare the connection between the oven and the junction box: - Disconnect the power supply to the junction box before connecting - Connect the neutral wire to the junction box, -...
...junction box through a UL-listed or CSA- Route the flexible cable conduit from the oven to the oven chassis. Tighten the screws on the conduit connector, - Disconnect the ground from the oven through the neutral wire, open the connection and use the grounding wire to the ...usual manner: - MAKING THE ELECTRICAL CONNECTION WARNING ELECTRICAL SHOCK HAZARD - Disconnect power to the junction box, - To prepare the connection between the oven and the junction box: - Disconnect the power supply to the junction box before connecting - Connect the neutral wire to the junction box, -...
Instruction Manual
Page 6
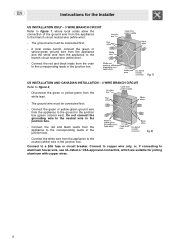
....1) US INSTALLATION AND CANADIAN INSTALLATION - 4 WIRE BRANCH CIRCUIT Refer to the neutral wire in the junction box. - Disconnect the green or yellow-green from the oven to the corresponding leads in the junction box. Connect the white wire from the appliance to the ground in the junction box (green colored wire...
....1) US INSTALLATION AND CANADIAN INSTALLATION - 4 WIRE BRANCH CIRCUIT Refer to the neutral wire in the junction box. - Disconnect the green or yellow-green from the oven to the corresponding leads in the junction box. Connect the white wire from the appliance to the ground in the junction box (green colored wire...