

Limited Warranty
Page 1
... cover customer instruction, installation, set up adjustments. This warranty does not cover Products sold AS IS or WITH ALL FAULTS, or consumables (such as follows: 1. Proof of a service problem, or for frequently asked questions: To locate the servicer or dealer nearest you may not apply to you must be defective, Sony will supply, at no charge, new or rebuilt replacements in...
... cover customer instruction, installation, set up adjustments. This warranty does not cover Products sold AS IS or WITH ALL FAULTS, or consumables (such as follows: 1. Proof of a service problem, or for frequently asked questions: To locate the servicer or dealer nearest you may not apply to you must be defective, Sony will supply, at no charge, new or rebuilt replacements in...
Operating Instructions
Page 1
... your Sony dealer regarding this product is not working properly, please call 1-877-602-2008 for Peace of the unit. Refer to us at the rear of Mind Warranty Replacement service. 2-633-249-11(1) CD/DVD Player Operating Instructions For customers in the U.S.A Owner's Record The model and serial numbers are located at : Customer Information Service 115 Gordon Baker Road, Toronto, Ontario, M2H 3R6 DVP-NS9100ES © 2005 Sony Corporation...
... your Sony dealer regarding this product is not working properly, please call 1-877-602-2008 for Peace of the unit. Refer to us at the rear of Mind Warranty Replacement service. 2-633-249-11(1) CD/DVD Player Operating Instructions For customers in the U.S.A Owner's Record The model and serial numbers are located at : Customer Information Service 115 Gordon Baker Road, Toronto, Ontario, M2H 3R6 DVP-NS9100ES © 2005 Sony Corporation...

Operating Instructions
Page 4
... Control Menu Display 13 Hookups Hooking Up the Player 16 Step 1: Unpacking 16 Step 2: Preparing the Remote 16 Step 3: Connecting the Video/HDMI Cords 18 Step 4: Connecting the Audio Cords 21 Step 5: Connecting the Power Cord 33 Step 6: Quick Setup 33 Playing Discs Playing Discs 37 Resuming Playback From the Point Where You Stopped the Disc (Multi-disc Resume 39 Using the DVD's Menu 40 Selecting "ORIGINAL" or "PLAY LIST" on a DVD-RW 40 Selecting a Playback Area for a Super Audio CD 41 Playing VIDEO CDs With PBC Functions (PBC Playback 42 Various Play Mode Functions (Program Play...
... Control Menu Display 13 Hookups Hooking Up the Player 16 Step 1: Unpacking 16 Step 2: Preparing the Remote 16 Step 3: Connecting the Video/HDMI Cords 18 Step 4: Connecting the Audio Cords 21 Step 5: Connecting the Power Cord 33 Step 6: Quick Setup 33 Playing Discs Playing Discs 37 Resuming Playback From the Point Where You Stopped the Disc (Multi-disc Resume 39 Using the DVD's Menu 40 Selecting "ORIGINAL" or "PLAY LIST" on a DVD-RW 40 Selecting a Playback Area for a Super Audio CD 41 Playing VIDEO CDs With PBC Functions (PBC Playback 42 Various Play Mode Functions (Program Play...

Operating Instructions
Page 7
... technologies This product is a coding technology that conform to the Compact Disc (CD) standard, playback on this copyright protection technology must be aware that has the adhesive of the recording device and authoring software. Use of CD-Extras • DVD-ROMs • DVD Audios Also, the player cannot play if it . • DVD-Rs recorded in VR mode (Video Recording format) • Copy-Once programs recorded on CPRM* compatible DVD-Rs. * CPRM; Content Protection...
... technologies This product is a coding technology that conform to the Compact Disc (CD) standard, playback on this copyright protection technology must be aware that has the adhesive of the recording device and authoring software. Use of CD-Extras • DVD-ROMs • DVD Audios Also, the player cannot play if it . • DVD-Rs recorded in VR mode (Video Recording format) • Copy-Once programs recorded on CPRM* compatible DVD-Rs. * CPRM; Content Protection...

Operating Instructions
Page 10
... panel display When playing back a DVD VIDEO/DVD-RW Lights up when the Lights up when using HDMI* connection (18) player outputs progressive signals (78) Lights up when you can change the angle (57) Lights up when playing the multi-channel playback on DVD VIDEOs Current audio signal (56) Lights up when connected to i.LINK components and when the i.LINK connection is used (when the i.LINK indicator lights up on the player) (28) Disc type Current title and chapter (53) Playing time (53) Current play mode (43) When playing back a VIDEO CD...
... panel display When playing back a DVD VIDEO/DVD-RW Lights up when the Lights up when using HDMI* connection (18) player outputs progressive signals (78) Lights up when you can change the angle (57) Lights up when playing the multi-channel playback on DVD VIDEOs Current audio signal (56) Lights up when connected to i.LINK components and when the i.LINK connection is used (when the i.LINK indicator lights up on the player) (28) Disc type Current title and chapter (53) Playing time (53) Current play mode (43) When playing back a VIDEO CD...

Operating Instructions
Page 11
... panel display (DIMMER function) Press DIMMER on the player repeatedly to i.LINK components and when the i.LINK connection is used (when the i.LINK indicator lights up on the player) (28) Current play mode (43) Disc type Album (54) Track (54) Lights up when playing MP3 audio tracks (63)** Playing time (54) * This player is based on the display. When playing back a DATA CD (MP3 audio) Lights up when Lights up when the player using HDMI* outputs progressive signals (78) connection (18) Lights up when connected...
... panel display (DIMMER function) Press DIMMER on the player repeatedly to i.LINK components and when the i.LINK connection is used (when the i.LINK indicator lights up on the player) (28) Current play mode (43) Disc type Album (54) Track (54) Lights up when playing MP3 audio tracks (63)** Playing time (54) * This player is based on the display. When playing back a DATA CD (MP3 audio) Lights up when Lights up when the player using HDMI* outputs progressive signals (78) connection (18) Lights up when connected...

Operating Instructions
Page 14
...) Selects the playback area on this player. 14 ANGLE (page 57) Changes the angle. List of Control Menu items Item Item Name, Function, Relevant Disc Type TITLE (page 49)/SCENE (page 50)/TRACK (page 49) Selects the title, scene, or track to be played. Displays the DVD/Super Audio CD/CD text, or the DATA CD's track name and volume label (page 52). AUDIO (page 55) Changes the audio setting. Changes the subtitle language. FILE (page 50) Selects...
...) Selects the playback area on this player. 14 ANGLE (page 57) Changes the angle. List of Control Menu items Item Item Name, Function, Relevant Disc Type TITLE (page 49)/SCENE (page 50)/TRACK (page 49) Selects the title, scene, or track to be played. Displays the DVD/Super Audio CD/CD text, or the DATA CD's track name and volume label (page 52). AUDIO (page 55) Changes the audio setting. Changes the subtitle language. FILE (page 50) Selects...

Operating Instructions
Page 18
... 2 (green) (blue) (red) to COMPONENT VIDEO OUT CD/DVD player to HDMI OUT to CONTROL S IN/ Control S cord IR IN (page 20) (not supplied) to a TV, projector, or AV amplifier (receiver) equipped with a CONTROL S jack S VIDEO cord (not supplied) l : Signal flow TV, projector or AV amplifier (receiver) 18 TV, projector or AV amplifier (receiver) Select pattern D when connecting to S VIDEO OUT 1 or 2 HDMI cord (not supplied) TV or other equipment with HDMI input. In...
... 2 (green) (blue) (red) to COMPONENT VIDEO OUT CD/DVD player to HDMI OUT to CONTROL S IN/ Control S cord IR IN (page 20) (not supplied) to a TV, projector, or AV amplifier (receiver) equipped with a CONTROL S jack S VIDEO cord (not supplied) l : Signal flow TV, projector or AV amplifier (receiver) 18 TV, projector or AV amplifier (receiver) Select pattern D when connecting to S VIDEO OUT 1 or 2 HDMI cord (not supplied) TV or other equipment with HDMI input. In...
Operating Instructions
Page 20
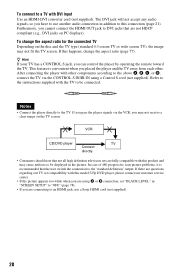
... the VCR, you may not receive a clear image on PC displays). Refer to the instructions supplied with this product and may not fit the TV screen. If there are questions regarding our TV set "BLACK LEVEL" in "SCREEN SETUP" to "OFF" (page 78). • If you are connecting to an HDMI jack, use another audio connection in the picture. After connecting the player with other . VCR CD/DVD player TV Connect directly •...
... the VCR, you may not receive a clear image on PC displays). Refer to the instructions supplied with this product and may not fit the TV screen. If there are questions regarding our TV set "BLACK LEVEL" in "SCREEN SETUP" to "OFF" (page 78). • If you are connecting to an HDMI jack, use another audio connection in the picture. After connecting the player with other . VCR CD/DVD player TV Connect directly •...

Operating Instructions
Page 24
... player directly to an MD deck or DAT deck, use B-1 . to coaxial or optical digital input to AUDIO OUT L/R 1 or 2 (white) (red) to DIGITAL OUT (COAXIAL or OPTICAL) Optical digital cord (not supplied) Remove plug cap before connecting. CD/DVD player Coaxial digital cord (not supplied) Stereo audio cord (not supplied) (white) or (red) to audio input [Speakers] Stereo amplifier (receiver) Front (L) MD deck/DAT deck Front (R) l: Signal flow z Hint To realize better surround sound effects, make...
... player directly to an MD deck or DAT deck, use B-1 . to coaxial or optical digital input to AUDIO OUT L/R 1 or 2 (white) (red) to DIGITAL OUT (COAXIAL or OPTICAL) Optical digital cord (not supplied) Remove plug cap before connecting. CD/DVD player Coaxial digital cord (not supplied) Stereo audio cord (not supplied) (white) or (red) to audio input [Speakers] Stereo amplifier (receiver) Front (L) MD deck/DAT deck Front (R) l: Signal flow z Hint To realize better surround sound effects, make...
Operating Instructions
Page 26
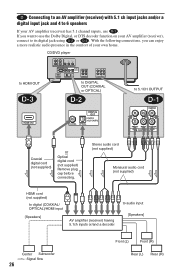
... using D-2 or D-3 . CD/DVD player to HDMI OUT to DIGITAL OUT (COAXIAL or OPTICAL) to audio input [Speakers] Center Subwoofer l: Signal flow 26 Front (L) Front (R) Rear (L) Rear (R) If you can enjoy a more realistic audio presence in the comfort of your own home. With the following connections, you want to use the Dolby Digital, or DTS decoder function on your AV amplifier (receiver) has 5.1 channel inputs, use D-1 . Stereo audio cord (not supplied) Monaural audio cord (not supplied) HDMI cord...
... using D-2 or D-3 . CD/DVD player to HDMI OUT to DIGITAL OUT (COAXIAL or OPTICAL) to audio input [Speakers] Center Subwoofer l: Signal flow 26 Front (L) Front (R) Rear (L) Rear (R) If you can enjoy a more realistic audio presence in the comfort of your own home. With the following connections, you want to use the Dolby Digital, or DTS decoder function on your AV amplifier (receiver) has 5.1 channel inputs, use D-1 . Stereo audio cord (not supplied) Monaural audio cord (not supplied) HDMI cord...
Operating Instructions
Page 30
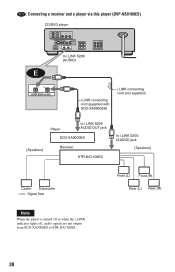
E-3 : Connecting a receiver and a player via this player (DVP-NS9100ES) CD/DVD player to i.LINK S200 (AUDIO) i.LINK connecting cord (supplied with SCD-XA9000ES) i.LINK connecting cord (not supplied) Player to i.LINK S200 AUDIO OUT jack SCD-XA9000ES [Speakers] Receiver STR-DA7100ES to i.LINK S200 (AUDIO) jack [Speakers] Center Subwoofer l: Signal flow Front (L) Front (R) Rear (L) Rear (R) Note When the player is turned off or when the i.LINK indicator lights off, audio signals are not output from SCD-XA9000ES to STR-DA7100ES. 30
E-3 : Connecting a receiver and a player via this player (DVP-NS9100ES) CD/DVD player to i.LINK S200 (AUDIO) i.LINK connecting cord (supplied with SCD-XA9000ES) i.LINK connecting cord (not supplied) Player to i.LINK S200 AUDIO OUT jack SCD-XA9000ES [Speakers] Receiver STR-DA7100ES to i.LINK S200 (AUDIO) jack [Speakers] Center Subwoofer l: Signal flow Front (L) Front (R) Rear (L) Rear (R) Note When the player is turned off or when the i.LINK indicator lights off, audio signals are not output from SCD-XA9000ES to STR-DA7100ES. 30
Operating Instructions
Page 31
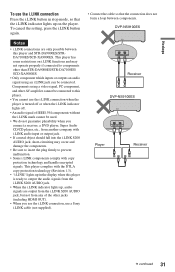
... button in the display when this player is ready to this player and STR-DA9000ES/STRDA7100ES/SCD-XA9000ES. Components using an i.LINK jack can be connected to output the audio signals from the i.LINK S200 AUDIO jack. • When the i.LINK indicator lights up on the player. DVP-NS9100ES Receiver DVP-NS9100ES Player Receiver c continued 31 To cancel the setting, press the i.LINK button again. This player has some restrictions on i.LINK functions and...
... button in the display when this player is ready to this player and STR-DA9000ES/STRDA7100ES/SCD-XA9000ES. Components using an i.LINK jack can be connected to output the audio signals from the i.LINK S200 AUDIO jack. • When the i.LINK indicator lights up on the player. DVP-NS9100ES Receiver DVP-NS9100ES Player Receiver c continued 31 To cancel the setting, press the i.LINK button again. This player has some restrictions on i.LINK functions and...
Operating Instructions
Page 32
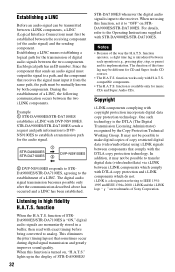
... read with exact timing before being converted to make digital copies of copy restricted digital data (video/audio/data) using this function is turned on STRDA9000ES/STR-DA7100ES. For details, refer to a path, and the component that sometimes occur during digital signal transmission and greatly improves sound quality. function operates, a slight time lag is available only for music CDs and Super Audio CDs. Since the component that sends an audio signal must output the signal to the Operating Instructions...
... read with exact timing before being converted to make digital copies of copy restricted digital data (video/audio/data) using this function is turned on STRDA9000ES/STR-DA7100ES. For details, refer to a path, and the component that sometimes occur during digital signal transmission and greatly improves sound quality. function operates, a slight time lag is available only for music CDs and Super Audio CDs. Since the component that sends an audio signal must output the signal to the Operating Instructions...

Operating Instructions
Page 34
.... SCREEN SETUP TV TYPE: 16:9 HDMI RESOLUTION: AUTO SCREEN SAVER: ON BACKGROUND: JACKET PICTURE BLACK LEVEL: ON BLACK LEVEL(COMPONENT OUT): OFF COMPONENT OUT: INTERLACE 4:3 OUTPUT: INTERLACE PROGRESSIVE 9 Press X/x to select the type of jack used to display the menu and subtitles as well. 6 Press ENTER. The Setup Display for selecting the type of signals you wish to send to an amplifier (receiver), then press ENTER. The player uses the language selected here to connect your amplifier (receiver) appears. The Setup Display for "DOLBY DIGITAL" appears...
.... SCREEN SETUP TV TYPE: 16:9 HDMI RESOLUTION: AUTO SCREEN SAVER: ON BACKGROUND: JACKET PICTURE BLACK LEVEL: ON BLACK LEVEL(COMPONENT OUT): OFF COMPONENT OUT: INTERLACE 4:3 OUTPUT: INTERLACE PROGRESSIVE 9 Press X/x to select the type of jack used to display the menu and subtitles as well. 6 Press ENTER. The Setup Display for selecting the type of signals you wish to send to an amplifier (receiver), then press ENTER. The player uses the language selected here to connect your amplifier (receiver) appears. The Setup Display for "DOLBY DIGITAL" appears...

Operating Instructions
Page 80
...sound according to "96kHz/24bit." 80 AUDIO SETUP AUDIO ATT: AUDIO DRC: AUDIO FILTER: DOWNMIX: DIGITAL OUT: AUDIO(HDMI): OFF STANDARD SHARP DOLBY SURROUND AUTO Jack affected by the "AUDIO SETUP" item Item AUDIO OUT L/R 1/2 AUDIO ATT a AUDIO DRC - DOLBY DIGITAL - AUDIO (HDMI) - 5.1CH OUTPUT a a a - - - - - - HDMI OUT i.LINK S200 (AUDIO) - - - - - - a** a - * When a component that cannot receive the selected signal is connected to the HDMI OUT jack, the setting may be automatically changed to the setting that can be received. ** Depending on the disc, 48 kHz/16 bit PCM...
...sound according to "96kHz/24bit." 80 AUDIO SETUP AUDIO ATT: AUDIO DRC: AUDIO FILTER: DOWNMIX: DIGITAL OUT: AUDIO(HDMI): OFF STANDARD SHARP DOLBY SURROUND AUTO Jack affected by the "AUDIO SETUP" item Item AUDIO OUT L/R 1/2 AUDIO ATT a AUDIO DRC - DOLBY DIGITAL - AUDIO (HDMI) - 5.1CH OUTPUT a a a - - - - - - HDMI OUT i.LINK S200 (AUDIO) - - - - - - a** a - * When a component that cannot receive the selected signal is connected to the HDMI OUT jack, the setting may be automatically changed to the setting that can be received. ** Depending on the disc, 48 kHz/16 bit PCM...

Operating Instructions
Page 86
... is used for video output, changing the "HDMI RESOLUTION" setting in progressive format. In this case set "AUDIO(HDMI)" in "TV TYPE" under "SCREEN SET UP." , The aspect ratio of the following difficulties while using a video jack other options. If the picture still does not appear, repeat the steps and try connecting your player to your TV's S VIDEO input (page 18). , You have set in "AUDIO SETUP" to "PCM" (page 82). , Set "AUDIO DRC" to some DVD programs could affect picture quality. Power The power is not turned...
... is used for video output, changing the "HDMI RESOLUTION" setting in progressive format. In this case set "AUDIO(HDMI)" in "TV TYPE" under "SCREEN SET UP." , The aspect ratio of the following difficulties while using a video jack other options. If the picture still does not appear, repeat the steps and try connecting your player to your TV's S VIDEO input (page 18). , You have set in "AUDIO SETUP" to "PCM" (page 82). , Set "AUDIO DRC" to some DVD programs could affect picture quality. Power The power is not turned...

Operating Instructions
Page 87
... . , Set "AUDIO (HDMI)" in "AUDIO SETUP" to "ON" (page 81). The title of MP3 files are not usable when you use the i.LINK connection. No sound is output from the HDMI OUT jack , The HDMI OUT jack is connected to a DVI device (DVI jacks do not accept audio signals). , The HDMI OUT jack does not output Super Audio CD sound. , The VIDEO OFF function is set to "AUDIO (MP3)" (page 66). Operation The remote does not function. , The batteries...
... . , Set "AUDIO (HDMI)" in "AUDIO SETUP" to "ON" (page 81). The title of MP3 files are not usable when you use the i.LINK connection. No sound is output from the HDMI OUT jack , The HDMI OUT jack is connected to a DVI device (DVI jacks do not accept audio signals). , The HDMI OUT jack does not output Super Audio CD sound. , The VIDEO OFF function is set to "AUDIO (MP3)" (page 66). Operation The remote does not function. , The batteries...

Operating Instructions
Page 88
... Lock is set the VIDEO OFF function to operate abnormally, unplug the player. The subtitle language cannot be changed or turned off . , The DIMMER function is set (page 38). The angles cannot be changed. , Try using the DVD's menu instead of the direct selection button on the remote (page 40). , Multi-angles are not recorded on the front panel display (page 10). , The DVD prohibits changing of the operations above. The player starts playing the disc automatically. , The disc features an auto playback function. , "AUTO PLAY...
... Lock is set the VIDEO OFF function to operate abnormally, unplug the player. The subtitle language cannot be changed or turned off . , The DIMMER function is set (page 38). The angles cannot be changed. , Try using the DVD's menu instead of the direct selection button on the remote (page 40). , Multi-angles are not recorded on the front panel display (page 10). , The DVD prohibits changing of the operations above. The player starts playing the disc automatically. , The disc features an auto playback function. , "AUTO PLAY...

Operating Instructions
Page 95
... 78 Batteries 16 BLACK LEVEL 78 BLACK LEVEL (COMPONENT OUT) 78 C CD 37 CHAPTER 14, 49 Chapter 10, 89 CHAPTER VIEWER 51 Child Lock 38 COMMAND MODE 17 COMPONENT OUT 78 Connecting 18 Continuous play DATA CD 62 DVD 37 Super Audio CD/CD/ VIDEO CD 37 Control Menu 13 CUSTOM 75 CUSTOM SETUP 79 D DATA CD 6, 62 DATE 14, 65 DIGITAL OUT 81 DIMMER 11 Disc Memo 68 DISC MEMO INPUT 68 Display Control Menu Display 13 Front panel display...
... 78 Batteries 16 BLACK LEVEL 78 BLACK LEVEL (COMPONENT OUT) 78 C CD 37 CHAPTER 14, 49 Chapter 10, 89 CHAPTER VIEWER 51 Child Lock 38 COMMAND MODE 17 COMPONENT OUT 78 Connecting 18 Continuous play DATA CD 62 DVD 37 Super Audio CD/CD/ VIDEO CD 37 Control Menu 13 CUSTOM 75 CUSTOM SETUP 79 D DATA CD 6, 62 DATE 14, 65 DIGITAL OUT 81 DIMMER 11 Disc Memo 68 DISC MEMO INPUT 68 Display Control Menu Display 13 Front panel display...


