
Operating Instructions
Page 2
...4 Remote Commander and Control Panel Keys 5 Preparation Connecting the Projector 7 Connecting a Computer 7 Connecting a Video equipment .... 8 Others Indicators 25 Messages List 26 Troubleshooting 27 Replacing the Lamp 29 Cleaning the Air Filter 31 Specifications 32 Projection Distance 37 Dimensions 42 Index 45 Projecting/Adjusting an Image Projecting an Image 9 Adjusting the Projected image ... 10 Turning Off the Power 13 Adjustments and Settings Using a Menu Using a MENU 14 The Picture Menu 15 The Screen Menu 16 The Function Menu 20 The Operation Menu 21 The Connection...
...4 Remote Commander and Control Panel Keys 5 Preparation Connecting the Projector 7 Connecting a Computer 7 Connecting a Video equipment .... 8 Others Indicators 25 Messages List 26 Troubleshooting 27 Replacing the Lamp 29 Cleaning the Air Filter 31 Specifications 32 Projection Distance 37 Dimensions 42 Index 45 Projecting/Adjusting an Image Projecting an Image 9 Adjusting the Projected image ... 10 Turning Off the Power 13 Adjustments and Settings Using a Menu Using a MENU 14 The Picture Menu 15 The Screen Menu 16 The Function Menu 20 The Operation Menu 21 The Connection...
Operating Instructions
Page 6
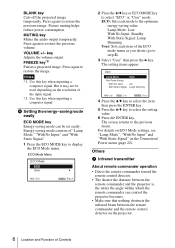
... transmitter About remote commander operation • Direct the remote commander toward the remote control detector. • The shorter the distance between the remote commander and the remote control detector on the projector. 6 Location and Function of "Lamp Mode," "With No Input," and "With Static Signal." 1 Press the ECO MODE key to restore the previous volume. Press again to display the ECO Mode menu. User Lamp Mode Auto Power Saving With No Input With Static Signal High Off Lamp Dimming :Sel :Set RETURN...
... transmitter About remote commander operation • Direct the remote commander toward the remote control detector. • The shorter the distance between the remote commander and the remote control detector on the projector. 6 Location and Function of "Lamp Mode," "With No Input," and "With Static Signal." 1 Press the ECO MODE key to restore the previous volume. Press again to display the ECO Mode menu. User Lamp Mode Auto Power Saving With No Input With Static Signal High Off Lamp Dimming :Sel :Set RETURN...
Operating Instructions
Page 9
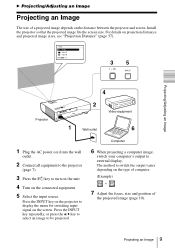
... projecting a computer image, switch your computer's output to turn on the unit. 4 Turn on the connected equipment. 5 Select the input source. Press the INPUT key on the projector to display the menu for switching input signal on the type of computer. (Example) + 7 Adjust the focus, size and position of a projected image depends on projection distances and projected image sizes, see "Projection Distance" (page 37). The method to be projected. Input Video Input-A Input-B Sel 35 Projecting/Adjusting an Image Projector 4 2 Video equipment 1 Wall outlet 6 1 Plug the AC power cord...
... projecting a computer image, switch your computer's output to turn on the unit. 4 Turn on the connected equipment. 5 Select the input source. Press the INPUT key on the projector to display the menu for switching input signal on the type of computer. (Example) + 7 Adjust the focus, size and position of a projected image depends on projection distances and projected image sizes, see "Projection Distance" (page 37). The method to be projected. Input Video Input-A Input-B Sel 35 Projecting/Adjusting an Image Projector 4 2 Video equipment 1 Wall outlet 6 1 Plug the AC power cord...

Operating Instructions
Page 12
..., the narrower the top of projected image while a signal is set APA in the Installation menu. 2 Use the V/v/B/b the keys to cancel adjusting during the setting. The lower the value, the narrower the bottom. Correcting trapezoidal distortion of the projected image (Keystone feature) *1 Keystone feature*2 may not work automatically when the screen is an electronic correction, the image may be deteriorated. *2: VPL-DX140/DX120/DW120 only. You...
..., the narrower the top of projected image while a signal is set APA in the Installation menu. 2 Use the V/v/B/b the keys to cancel adjusting during the setting. The lower the value, the narrower the bottom. Correcting trapezoidal distortion of the projected image (Keystone feature) *1 Keystone feature*2 may not work automatically when the screen is an electronic correction, the image may be deteriorated. *2: VPL-DX140/DX120/DW120 only. You...
Operating Instructions
Page 14
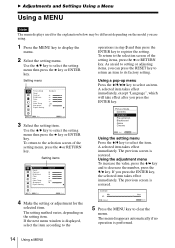
... setting item. Setting menu Picture Picture Mode Reset Contrast Brightness Color Hue Color Temp. Using the adjustment menu To increase the value, press the V/b key and to the selection screen of the setting menu, press the B or RETURN key. The previous screen is restored. The menu disappears automatically if no operation is displayed, select the item according to the Adjust Back 5 Press the MENU key to register the setting. Setting items Picture Picture Mode Reset Contrast Brightness Color Hue Color Temp. Using...
... setting item. Setting menu Picture Picture Mode Reset Contrast Brightness Color Hue Color Temp. Using the adjustment menu To increase the value, press the V/b key and to the selection screen of the setting menu, press the B or RETURN key. The previous screen is restored. The menu disappears automatically if no operation is displayed, select the item according to the Adjust Back 5 Press the MENU key to register the setting. Setting items Picture Picture Mode Reset Contrast Brightness Color Hue Color Temp. Using...

Operating Instructions
Page 20
... functions when a computer signal is used for setting various functions of the projector. The Function Menu The Function menu is input via the RGB input connector (INPUT A). 20 The Function Menu When replacing the lamp, resets the lamp timer (page 29). CC1/CC2/CC3/CC4/Text1/Text2/Text3/Text4: Select the closed caption service (captions or text). Items Volume Smart APA CC Display Lamp Timer Reset Item descriptions The higher...
... functions when a computer signal is used for setting various functions of the projector. The Function Menu The Function menu is input via the RGB input connector (INPUT A). 20 The Function Menu When replacing the lamp, resets the lamp timer (page 29). CC1/CC2/CC3/CC4/Text1/Text2/Text3/Text4: Select the closed caption service (captions or text). Items Volume Smart APA CC Display Lamp Timer Reset Item descriptions The higher...
Operating Instructions
Page 21
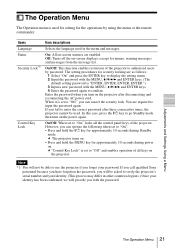
... Sony personnel because you have forgotten the password, you fail to authorized users by using the menu or the remote commander. The setting procedures for security locking are enabled. c The projector turns on -screen statuses are as follows: 1 Select "On" and press the ENTER key to display the setting menu. 2 Input the password with the MENU, V/v/B/b and ENTER keys. (The default setting password is "ENTER, ENTER, ENTER, ENTER.") 3 Input a new password with the password. The Operation Menu The Operation menu...
... Sony personnel because you have forgotten the password, you fail to authorized users by using the menu or the remote commander. The setting procedures for security locking are enabled. c The projector turns on -screen statuses are as follows: 1 Select "On" and press the ENTER key to display the setting menu. 2 Input the password with the MENU, V/v/B/b and ENTER keys. (The default setting password is "ENTER, ENTER, ENTER, ENTER.") 3 Input a new password with the password. The Operation Menu The Operation menu...
Operating Instructions
Page 22
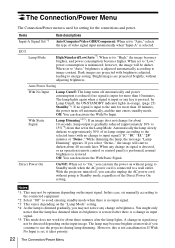
... "Auto," brightness is adjusted automatically according to darken about 40 seconds later. The Connection/Power Menu The Connection/Power menu is used for setting for about three minutes after there is a change in orange. (page 25) Standby*2: If no signal is input for more than 10 minutes, the power turns off automatically, and the unit enters standby mode. however, the image will start to image content. Dark images are projected brightly, without going to Standby mode...
... "Auto," brightness is adjusted automatically according to darken about 40 seconds later. The Connection/Power Menu The Connection/Power menu is used for setting for about three minutes after there is a change in orange. (page 25) Standby*2: If no signal is input for more than 10 minutes, the power turns off automatically, and the unit enters standby mode. however, the image will start to image content. Dark images are projected brightly, without going to Standby mode...

Operating Instructions
Page 25
... qualified Sony personnel. Symptoms are indicated by number of flashes. After checking that the ON/STANDBY indicator goes out, plug the power cord to cool then turn on the projector. Others Indicators 25 ON/STANDBY indicator Status Lights in red Flashes in green Lights in green Lights in orange Flashes in red Flashes twice Flashes six times Other number of flashes Meaning/Remedies The projector is in red Symptoms are indicated by number of flashes. The projector's power is on the power again. Check the items below . Turn off . Address the problem...
... qualified Sony personnel. Symptoms are indicated by number of flashes. After checking that the ON/STANDBY indicator goes out, plug the power cord to cool then turn on the projector. Others Indicators 25 ON/STANDBY indicator Status Lights in red Flashes in green Lights in green Lights in orange Flashes in red Flashes twice Flashes six times Other number of flashes Meaning/Remedies The projector is in red Symptoms are indicated by number of flashes. The projector's power is on the power again. Check the items below . Turn off . Address the problem...
Operating Instructions
Page 26
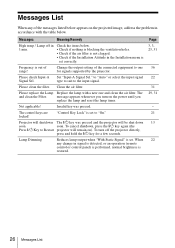
... the messages listed below appears on the projected image, address the problem in the Installation menu is out of the connected equipment to "On." Page 3, 3, 23, 31 36 22 31 29, 31 - 21 13 22 26 Messages List Clean the air filter. Invalid key was pressed and the projector will remain on the power until you replace the lamp and reset the lamp timer. Not applicable! Please check Input-A Signal Sel. Projector will...
... the messages listed below appears on the projected image, address the problem in the Installation menu is out of the connected equipment to "On." Page 3, 3, 23, 31 36 22 31 29, 31 - 21 13 22 26 Messages List Clean the air filter. Invalid key was pressed and the projector will remain on the power until you replace the lamp and reset the lamp timer. Not applicable! Please check Input-A Signal Sel. Projector will...
Operating Instructions
Page 27
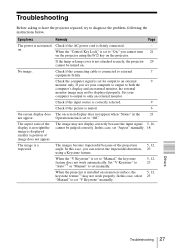
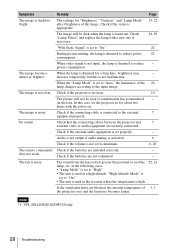
... set "Aspect" manually. 18 The image is set for output to "Manual," the keystone feature does not work properly. Troubleshooting Before asking to have the projector repaired, try to external 7 equipment firmly. Others Troubleshooting 27 In this case, you cannot turn 21 on the projector using a Keystone feature. Set "V Keystone" to "Auto"*1 or "Manual" to set to an external 9 monitor only. Symptoms Remedy Page The power is not turned Check if the AC power cord...
... set "Aspect" manually. 18 The image is set for output to "Manual," the keystone feature does not work properly. Troubleshooting Before asking to have the projector repaired, try to external 7 equipment firmly. Others Troubleshooting 27 In this case, you cannot turn 21 on the projector using a Keystone feature. Set "V Keystone" to "Auto"*1 or "Manual" to set to an external 9 monitor only. Symptoms Remedy Page The power is not turned Check if the AC power cord...
Operating Instructions
Page 28
... "Lamp Mode" is set to "Auto," the luminance of the 22 lamp changes according to the input image. on . Check that the connecting cables between the projector and 7 external video or audio equipment are not exhausted. - does not work. The fan is dimmed to "On." 22 During picture muting, the lamp is burnt out. If the ventilation holes are installed correctly. - Note *1: VPL-DX140/DX120/DW120 only. 28 Troubleshooting When video signal is...
... "Lamp Mode" is set to "Auto," the luminance of the 22 lamp changes according to the input image. on . Check that the connecting cables between the projector and 7 external video or audio equipment are not exhausted. - does not work. The fan is dimmed to "On." 22 During picture muting, the lamp is burnt out. If the ventilation holes are installed correctly. - Note *1: VPL-DX140/DX120/DW120 only. 28 Troubleshooting When video signal is...
Operating Instructions
Page 29
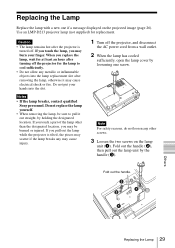
... designated location, you may cause injury. 1 Turn off . Replacing the Lamp Replace the lamp with a new one screw. Notes • If the lamp breaks, contact qualified Sony personnel. If you replace the lamp, wait for replacement. When you pull out the lamp while the projector is turned off the projector, and disconnect the AC power cord from a wall outlet. 2 When the lamp has cooled sufficiently, open the lamp cover by loosening one if a message displayed...
... designated location, you may cause injury. 1 Turn off . Replacing the Lamp Replace the lamp with a new one screw. Notes • If the lamp breaks, contact qualified Sony personnel. If you replace the lamp, wait for replacement. When you pull out the lamp while the projector is turned off the projector, and disconnect the AC power cord from a wall outlet. 2 When the lamp has cooled sufficiently, open the lamp cover by loosening one if a message displayed...
Operating Instructions
Page 30
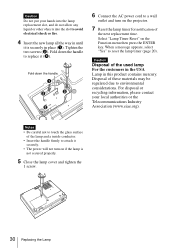
... the new lamp all the way in until it is not secured properly. 5 Close the lamp cover and tighten the 1 screw. 30 Replacing the Lamp Notes • Be careful not to touch the glass surface of the lamp and a inside conductor. • Insert the handle firmly to replace it securely. • The power will not turn on the projector. 7 Reset the lamp timer for notification...
... the new lamp all the way in until it is not secured properly. 5 Close the lamp cover and tighten the 1 screw. 30 Replacing the Lamp Notes • Be careful not to touch the glass surface of the lamp and a inside conductor. • Insert the handle firmly to replace it securely. • The power will not turn on the projector. 7 Reset the lamp timer for notification...

Operating Instructions
Page 34
Projector Lamp LMP-D213 (for replacement) Notes *1: For details, refer to "Acceptable Input Signals*1" on page 36. *2: Information on accessories in this manual is operating properly before use. Always verify that the unit is current as of the unit, including the optional accessories, are available in the supplied Quick Reference Manual. Design and specifications of September 2012. *3: Not all countries and area...
Projector Lamp LMP-D213 (for replacement) Notes *1: For details, refer to "Acceptable Input Signals*1" on page 36. *2: Information on accessories in this manual is operating properly before use. Always verify that the unit is current as of the unit, including the optional accessories, are available in the supplied Quick Reference Manual. Design and specifications of September 2012. *3: Not all countries and area...
Operating Instructions
Page 45
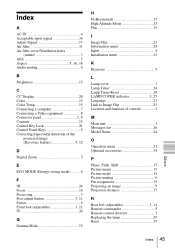
... AC IN 4 Acceptable input signal 36 Adjust Signal 17 Air filter 31 Air filter cover/Ventilation holes (intake 3 APA 5 Aspect 5, 16, 18 Audio muting 6 B Brightness 15 C CC Display 20 Color 15 Color Temp 15 Connecting a computer 7 Connecting a Video equipment 8 Connector panel 3, 4 Contrast 15 Control Key Lock 21 Control Panel Keys 5 Correcting trapezoidal distortion of the projected image (Keystone feature 5, 12 D Digital Zoom 5 E ECO MODE (Energy-saving mode) .........6 F fH 24 Focus 10 Focus ring 3 Foot adjust button 3, 11 Freeze 6 Front foot (adjustable 3, 11 fV 24...
... AC IN 4 Acceptable input signal 36 Adjust Signal 17 Air filter 31 Air filter cover/Ventilation holes (intake 3 APA 5 Aspect 5, 16, 18 Audio muting 6 B Brightness 15 C CC Display 20 Color 15 Color Temp 15 Connecting a computer 7 Connecting a Video equipment 8 Connector panel 3, 4 Contrast 15 Control Key Lock 21 Control Panel Keys 5 Correcting trapezoidal distortion of the projected image (Keystone feature 5, 12 D Digital Zoom 5 E ECO MODE (Energy-saving mode) .........6 F fH 24 Focus 10 Focus ring 3 Foot adjust button 3, 11 Freeze 6 Front foot (adjustable 3, 11 fV 24...
Quick Reference Manual
Page 29
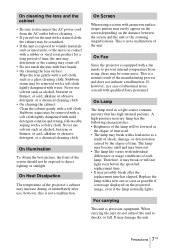
... the projected image, even if the lamp normally lights. Therefore, it may break or will be removed with a soft cloth lightly dampened with an uneven surface, stripes pattern may be lowered as a light source contains mercury that has high internal pressure. On Screen When using a screen with mild detergent solution and wrung, followed by the elapse of time used as the elapse of time. Replace the lamp...
... the projected image, even if the lamp normally lights. Therefore, it may break or will be removed with a soft cloth lightly dampened with an uneven surface, stripes pattern may be lowered as a light source contains mercury that has high internal pressure. On Screen When using a screen with mild detergent solution and wrung, followed by the elapse of time used as the elapse of time. Replace the lamp...
Quick Reference Manual
Page 37
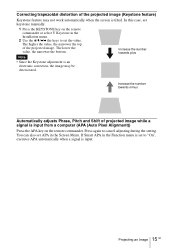
... a signal is set APA in the Installation menu. 2 Use the V/v/B/b the keys to cancel adjusting during the setting. If Smart APA in the Function menu is input. Press again to set keystone manually. 1 Press the KEYSTONE key on the remote commander. Projecting an Image 15 GB Correcting trapezoidal distortion of the projected image (Keystone feature) Keystone feature may be deteriorated. In this case, set the value. Increase the number towards minus Automatically adjusts Phase...
... a signal is set APA in the Installation menu. 2 Use the V/v/B/b the keys to cancel adjusting during the setting. If Smart APA in the Function menu is input. Press again to set keystone manually. 1 Press the KEYSTONE key on the remote commander. Projecting an Image 15 GB Correcting trapezoidal distortion of the projected image (Keystone feature) Keystone feature may be deteriorated. In this case, set the value. Increase the number towards minus Automatically adjusts Phase...

Quick Reference Manual
Page 39
... then turn on the projector. Indicators 17 GB ON/STANDBY indicator Status Lights in red Flashes in green Lights in green Lights in orange Flashes in red Flashes twice Flashes six times Other number of flashes. After checking that the ON/STANDBY indicator goes out, plug the power cord to operate after the projector is turned off the power and wait for lamp to cool then turn on the power again. In this case, replace the lamp with qualified Sony personnel. Address the problem in With No Input (Lamp Cutoff...
... then turn on the projector. Indicators 17 GB ON/STANDBY indicator Status Lights in red Flashes in green Lights in green Lights in orange Flashes in red Flashes twice Flashes six times Other number of flashes. After checking that the ON/STANDBY indicator goes out, plug the power cord to operate after the projector is turned off the power and wait for lamp to cool then turn on the power again. In this case, replace the lamp with qualified Sony personnel. Address the problem in With No Input (Lamp Cutoff...

Quick Reference Manual
Page 40
..., open the lamp cover by the handle (3). If you touch a part of the lamp other screws. 3 Loosen the two screws on the projected image. Note For safety reasons, do not loosen any may cause electrical shock or fire. Fold out the handle (2), then pull out the lamp unit by loosening one if a message displayed on the lamp unit (1). Use an LMP-D213 projector lamp (not supplied) for...
..., open the lamp cover by the handle (3). If you touch a part of the lamp other screws. 3 Loosen the two screws on the projected image. Note For safety reasons, do not loosen any may cause electrical shock or fire. Fold out the handle (2), then pull out the lamp unit by loosening one if a message displayed on the lamp unit (1). Use an LMP-D213 projector lamp (not supplied) for...


