

Operating Instructions
Page 1
Please check with your local Sony Authorized Dealer. © 2012 Sony Corporation 4-432-154-13 (1) Data Projector Operating Instructions Before operating the unit, please read this manual and supplied Quick Reference Manual thoroughly and retain it for future reference. VPL-DX140/DX120/DX100 VPL-DW120 Not all models are available in all countries and area.
Please check with your local Sony Authorized Dealer. © 2012 Sony Corporation 4-432-154-13 (1) Data Projector Operating Instructions Before operating the unit, please read this manual and supplied Quick Reference Manual thoroughly and retain it for future reference. VPL-DX140/DX120/DX100 VPL-DW120 Not all models are available in all countries and area.
Operating Instructions
Page 2
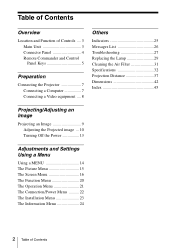
Table of Contents Overview Location and Function of Controls .... 3 Main Unit 3 Connector Panel 4 Remote Commander and Control Panel Keys 5 Preparation Connecting the Projector 7 Connecting a Computer 7 Connecting a Video equipment .... 8 Others Indicators 25 Messages List 26 Troubleshooting 27 Replacing the Lamp 29 Cleaning the Air Filter 31 Specifications 32 Projection ...
Table of Contents Overview Location and Function of Controls .... 3 Main Unit 3 Connector Panel 4 Remote Commander and Control Panel Keys 5 Preparation Connecting the Projector 7 Connecting a Computer 7 Connecting a Video equipment .... 8 Others Indicators 25 Messages List 26 Troubleshooting 27 Replacing the Lamp 29 Cleaning the Air Filter 31 Specifications 32 Projection ...
Operating Instructions
Page 6
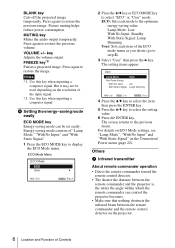
... operation • Direct the remote commander toward the remote control detector. • The shorter the distance between the remote commander and the projector is, the wider the angle within which the remote commander can be used depending on the resolution of "Lamp Mode," "With No Input... value. 6 Press the ENTER key. VOLUME +/- f Setting the energy-saving mode easily ECO MODE key Energy-saving mode can control the projector becomes. • Make sure that nothing obstructs the infrared beam between the remote commander and the remote control detector on the Connection/ Power menu...
... operation • Direct the remote commander toward the remote control detector. • The shorter the distance between the remote commander and the projector is, the wider the angle within which the remote commander can be used depending on the resolution of "Lamp Mode," "With No Input... value. 6 Press the ENTER key. VOLUME +/- f Setting the energy-saving mode easily ECO MODE key Energy-saving mode can control the projector becomes. • Make sure that nothing obstructs the infrared beam between the remote commander and the remote control detector on the Connection/ Power menu...

Operating Instructions
Page 7
... by the plug, not the cable itself. • For more information, refer also to 1024 × 768 pixels (VPL-DX140/ DX120/DX100) or 1280 × 800 pixels (VPL-DW120) for the external monitor. Connecting the Projector 7 INPUT A For connecting a computer with an HDMI output connector. Connecting a Computer Connection with DSD (Direct Stream Digital) Signal...
... by the plug, not the cable itself. • For more information, refer also to 1024 × 768 pixels (VPL-DX140/ DX120/DX100) or 1280 × 800 pixels (VPL-DW120) for the external monitor. Connecting the Projector 7 INPUT A For connecting a computer with an HDMI output connector. Connecting a Computer Connection with DSD (Direct Stream Digital) Signal...
Operating Instructions
Page 8
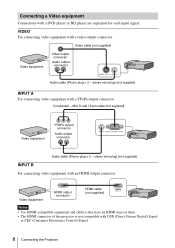
...not supplied) INPUT A For connecting video equipment with DSD (Direct Stream Digital) Signal or CEC (Consumer Electronics Control) Signal. 8 Connecting the Projector Component - Video equipment HDMI output connector HDMI cable (not supplied) Notes • Use HDMI-compatible equipment and cable(s) that have an HDMI logo... on them. • The HDMI connector of this projector is not compatible with a YPBPR output connector. Connecting a Video equipment Connections with a DVD player or BD player are explained for ...
...not supplied) INPUT A For connecting video equipment with DSD (Direct Stream Digital) Signal or CEC (Consumer Electronics Control) Signal. 8 Connecting the Projector Component - Video equipment HDMI output connector HDMI cable (not supplied) Notes • Use HDMI-compatible equipment and cable(s) that have an HDMI logo... on them. • The HDMI connector of this projector is not compatible with a YPBPR output connector. Connecting a Video equipment Connections with a DVD player or BD player are explained for ...
Operating Instructions
Page 9
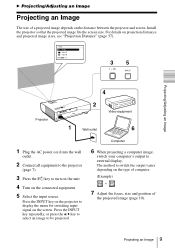
... your computer's output to be projected. Input Video Input-A Input-B Sel 35 Projecting/Adjusting an Image Projector 4 2 Video equipment 1 Wall outlet 6 1 Plug the AC power cord into the wall outlet. 2 Connect all equipment to the projector (page 7). 3 Press the ?/1 key to switch the output varies depending on the type of computer. (... of the projected image (page 10). Press the INPUT key repeatedly, or press the V/v key to select an image to external display. Install the projector so that the projected image fits the screen size. For details on the distance between the...
... your computer's output to be projected. Input Video Input-A Input-B Sel 35 Projecting/Adjusting an Image Projector 4 2 Video equipment 1 Wall outlet 6 1 Plug the AC power cord into the wall outlet. 2 Connect all equipment to the projector (page 7). 3 Press the ?/1 key to switch the output varies depending on the type of computer. (... of the projected image (page 10). Press the INPUT key repeatedly, or press the V/v key to select an image to external display. Install the projector so that the projected image fits the screen size. For details on the distance between the...
Operating Instructions
Page 11
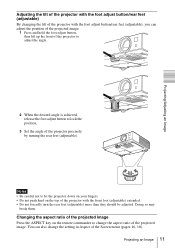
You can adjust the position of the projected image. 1 Press and hold the foot adjust button, then lift up the front of the projector to adjust the angle. 2 When the desired angle is achieved, release the foot adjust button to change the setting in Aspect of the Screen menu (...pages 16, 18). Projecting an Image 11 Changing the aspect ratio of the projected image Press the ASPECT key on the top of the projector with the foot adjust button/rear feet (adjustable), you can also change the aspect ratio of the projected image. Notes • Be careful not to...
You can adjust the position of the projected image. 1 Press and hold the foot adjust button, then lift up the front of the projector to adjust the angle. 2 When the desired angle is achieved, release the foot adjust button to change the setting in Aspect of the Screen menu (...pages 16, 18). Projecting an Image 11 Changing the aspect ratio of the projected image Press the ASPECT key on the top of the projector with the foot adjust button/rear feet (adjustable), you can also change the aspect ratio of the projected image. Notes • Be careful not to...
Operating Instructions
Page 13
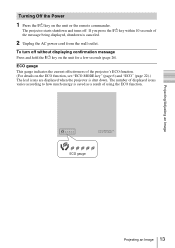
...page 26). To turn off . If you press the ?/1 key within 10 seconds of using the ECO function. ECO gauge Projecting an Image 13 The projector starts shutdown and turns off without displaying confirmation message Press and hold the ?/1 key on the unit or the remote commander. The number of displayed... much energy is saved as a result of the message being displayed, shutdown is shut down. ECO gauge This gauge indicates the current effectiveness of the projector's ECO function. (For details on the ECO function, see "ECO MODE key" (page 6) and "ECO" (page 22).) The leaf icons are displayed ...
...page 26). To turn off . If you press the ?/1 key within 10 seconds of using the ECO function. ECO gauge Projecting an Image 13 The projector starts shutdown and turns off without displaying confirmation message Press and hold the ?/1 key on the unit or the remote commander. The number of displayed... much energy is saved as a result of the message being displayed, shutdown is shut down. ECO gauge This gauge indicates the current effectiveness of the projector's ECO function. (For details on the ECO function, see "ECO MODE key" (page 6) and "ECO" (page 22).) The leaf icons are displayed ...
Operating Instructions
Page 17
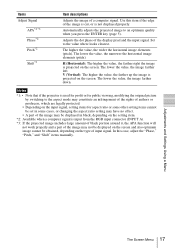
... Adjust Signal APA*2 *3 Phase*2 Pitch*2 Shift*2 Item descriptions Adjusts the image of the display pixel and the input signal. Notes *1: • Note that if the projector is used for profit or for public viewing, modifying the original picture by switching to the aspect mode may constitute an infringement of the rights...
... Adjust Signal APA*2 *3 Phase*2 Pitch*2 Shift*2 Item descriptions Adjusts the image of the display pixel and the input signal. Notes *1: • Note that if the projector is used for profit or for public viewing, modifying the original picture by switching to the aspect mode may constitute an infringement of the rights...

Operating Instructions
Page 20
... when a computer signal is input.*1 Off: Closed caption does not appear. The Function Menu The Function menu is used for setting various functions of the projector. CC1/CC2/CC3/CC4/Text1/Text2/Text3/Text4: Select the closed caption service (captions or text). Items Volume Smart APA CC Display Lamp Timer Reset...
... when a computer signal is input.*1 Off: Closed caption does not appear. The Function Menu The Function menu is used for setting various functions of the projector. CC1/CC2/CC3/CC4/Text1/Text2/Text3/Text4: Select the closed caption service (captions or text). Items Volume Smart APA CC Display Lamp Timer Reset...
Operating Instructions
Page 21
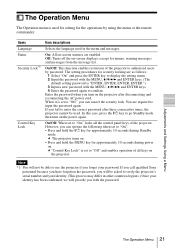
...procedures for approximately 10 seconds during Standby mode. Off: Turns off the on-screen displays, except for approximately 10 seconds during power on the projector. On: All on-screen statuses are required to "On," locks all keys on . If you turn on . • Press and ... with the MENU, V/v/B/b and ENTER keys. 4 Enter the password again to confirm. On/Off: This function enables restriction of the projector. You are enabled. If you call qualified Sony personnel because you have forgotten the password, you can operate the following when set to input the password again.
...procedures for approximately 10 seconds during Standby mode. Off: Turns off the on-screen displays, except for approximately 10 seconds during power on the projector. On: All on-screen statuses are required to "On," locks all keys on . If you turn on . • Press and ... with the MENU, V/v/B/b and ENTER keys. 4 Enter the password again to confirm. On/Off: This function enables restriction of the projector. You are enabled. If you call qualified Sony personnel because you have forgotten the password, you can operate the following when set to input the password again.
Operating Instructions
Page 22
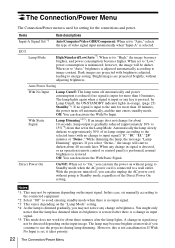
.... When set to "Auto," brightness is used for setting for the connections and power. When any key is pressed. With the projector turned off, you continue to use the projector during lamp dimming. The lamp may not be optimum depending on the input image. The Connection/Power Menu The Connection/Power menu...
.... When set to "Auto," brightness is used for setting for the connections and power. When any key is pressed. With the projector turned off, you continue to use the projector during lamp dimming. The lamp may not be optimum depending on the input image. The Connection/Power Menu The Connection/Power menu...
Operating Instructions
Page 23
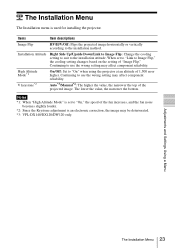
...on the setting of the fan increases, and the fan noise becomes slightly louder. *2: Since the Keystone adjustment is used for installing the projector. Continuing to "On," the speed of "Image Flip." The lower the value, the narrower the bottom. Adjustments and Settings Using a... Menu The Installation Menu 23 The Installation Menu The Installation menu is an electronic correction, the image may be deteriorated. *3: VPL-DX140/DX120/DW120 only. Items Item descriptions Image Flip HV/H/V/Off: Flips the projected image horizontally or vertically according to the installation ...
...on the setting of the fan increases, and the fan noise becomes slightly louder. *2: Since the Keystone adjustment is used for installing the projector. Continuing to "On," the speed of "Image Flip." The lower the value, the narrower the bottom. Adjustments and Settings Using a... Menu The Installation Menu 23 The Installation Menu The Installation menu is an electronic correction, the image may be deteriorated. *3: VPL-DX140/DX120/DW120 only. Items Item descriptions Image Flip HV/H/V/Off: Flips the projected image horizontally or vertically according to the installation ...
Operating Instructions
Page 24
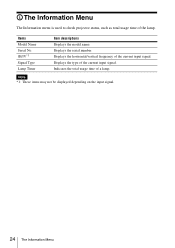
Displays the horizontal/vertical frequency of the current input signal. Note *1: These items may not be displayed depending on the input signal. 24 The Information Menu Displays the type of the current input signal. Indicates the total usage time of the lamp. Displays the serial number. fH/fV*1 Signal Type Lamp Timer Item descriptions Displays the model name. The Information Menu The Information menu is used to check projector status, such as total usage time of a lamp. Items Model Name Serial No.
Displays the horizontal/vertical frequency of the current input signal. Note *1: These items may not be displayed depending on the input signal. 24 The Information Menu Displays the type of the current input signal. Indicates the total usage time of the lamp. Displays the serial number. fH/fV*1 Signal Type Lamp Timer Item descriptions Displays the model name. The Information Menu The Information menu is used to check projector status, such as total usage time of a lamp. Items Model Name Serial No.

Operating Instructions
Page 25
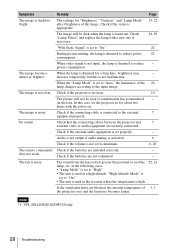
.... Check the items below . In this case, replace the lamp with qualified Sony personnel. If a symptom persists, despite having been turned on. • The lamp cools after the projector is on the projector. Consult with the following . Flashes twice The lamp cover is not attached securely...of flashes. If the symptom is in accordance with qualified Sony personnel. Address the problem in abnormal status. If the projector exhibits abnormal status, address the problem in the Installation menu is unusually high. The projector's power is turned off the power and wait for ...
.... Check the items below . In this case, replace the lamp with qualified Sony personnel. If a symptom persists, despite having been turned on. • The lamp cools after the projector is on the projector. Consult with the following . Flashes twice The lamp cover is not attached securely...of flashes. If the symptom is in accordance with qualified Sony personnel. Address the problem in abnormal status. If the projector exhibits abnormal status, address the problem in the Installation menu is unusually high. The projector's power is turned off the power and wait for ...
Operating Instructions
Page 26
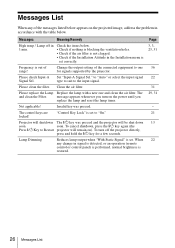
... control or control panel) is performed, normal brightness is set to one and clean the air filter. Projector will shutdown The ?/1 key was pressed. Invalid key was pressed and the projector will remain on the power until you replace the lamp and reset the lamp timer. Lamp Dimming Reduces ...signal. Page 3, 3, 23, 31 36 22 31 29, 31 - 21 13 22 26 Messages List Lamp off the projector directly, press and hold the ?/1 key for signals supported by the projector. Check the items below . Messages List When any change in 1 min. Please check Input-A Signal Sel. Please replace ...
... control or control panel) is performed, normal brightness is set to one and clean the air filter. Projector will shutdown The ?/1 key was pressed. Invalid key was pressed and the projector will remain on the power until you replace the lamp and reset the lamp timer. Lamp Dimming Reduces ...signal. Page 3, 3, 23, 31 36 22 31 29, 31 - 21 13 22 26 Messages List Lamp off the projector directly, press and hold the ?/1 key for signals supported by the projector. Check the items below . Messages List When any change in 1 min. Please check Input-A Signal Sel. Please replace ...
Operating Instructions
Page 27
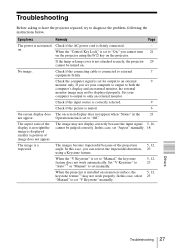
...source is correctly selected. 9 Check if the picture is not attached securely, the projector 29 cannot be turned on the projector using a Keystone feature. Troubleshooting Before asking to have the projector repaired, try to both the computer's display and an external monitor, the external monitor..., select 23 "Manual" to external 7 equipment firmly. If you cannot turn 21 on . When the "V Keystone" is installed on the projector. The aspect ratio of the projection 5, 12, angle. The images become trapezoidal because of the display is not right/the image is firmly...
...source is correctly selected. 9 Check if the picture is not attached securely, the projector 29 cannot be turned on the projector using a Keystone feature. Troubleshooting Before asking to have the projector repaired, try to both the computer's display and an external monitor, the external monitor..., select 23 "Manual" to external 7 equipment firmly. If you cannot turn 21 on . When the "V Keystone" is installed on the projector. The aspect ratio of the projection 5, 12, angle. The images become trapezoidal because of the display is not right/the image is firmly...
Operating Instructions
Page 28
... one if necessary. 24, 29 "With Static Signal" is not malfunction. Check if the projector is in focus. 10 The picture will be clear if condensation has accumulated - on . No sound. Note *1: VPL-DX140/DX120/DW120 only. 28 Troubleshooting When the "Lamp Mode" is set to "On." ...7 equipment properly. Check if the external audio equipment is dimmed for "Brightness," "Contrast," and "Lamp Mode" affect brightness of 3, 3 the projector rises and the fan noise becomes larger. The image becomes When the lamp is set to minimum. 6, 20 The remote commander Check if the ...
... one if necessary. 24, 29 "With Static Signal" is not malfunction. Check if the projector is in focus. 10 The picture will be clear if condensation has accumulated - on . No sound. Note *1: VPL-DX140/DX120/DW120 only. 28 Troubleshooting When the "Lamp Mode" is set to "On." ...7 equipment properly. Check if the external audio equipment is dimmed for "Brightness," "Contrast," and "Lamp Mode" affect brightness of 3, 3 the projector rises and the fan noise becomes larger. The image becomes When the lamp is set to minimum. 6, 20 The remote commander Check if the ...
Operating Instructions
Page 29
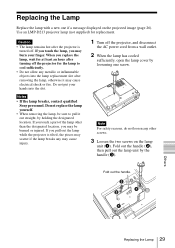
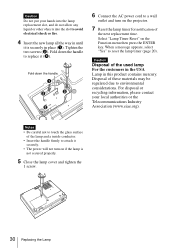
... the lamp, you replace the lamp, wait for at least an hour after turning off the projector for replacement. Notes • If the lamp breaks, contact qualified Sony personnel. Use an LMP-D213 projector lamp (not supplied) for the lamp to pull it may be sure to cool sufficiently. •...; Do not allow any may burn your hands into the lamp replacement slot after the projector is tilted, the pieces may scatter...
... the lamp, you replace the lamp, wait for at least an hour after turning off the projector for replacement. Notes • If the lamp breaks, contact qualified Sony personnel. Use an LMP-D213 projector lamp (not supplied) for the lamp to pull it may be sure to cool sufficiently. •...; Do not allow any may burn your hands into the lamp replacement slot after the projector is tilted, the pieces may scatter...
Operating Instructions
Page 30
... the lamp replacement slot, and do not allow any liquid or other objects into the slot to environmental considerations. Select "Lamp Timer Reset" on the projector. 7 Reset the lamp timer for notification of these materials may be regulated due to avoid electrical shock or fire. 4 Insert the new lamp all the...
... the lamp replacement slot, and do not allow any liquid or other objects into the slot to environmental considerations. Select "Lamp Timer Reset" on the projector. 7 Reset the lamp timer for notification of these materials may be regulated due to avoid electrical shock or fire. 4 Insert the new lamp all the...


