

Instruction Manual
Page 1
STIHL BR 320, Instruction Manual Owner's Manual Assembling Safety Precautions Operating Instructions Maintenance 400
STIHL BR 320, Instruction Manual Owner's Manual Assembling Safety Precautions Operating Instructions Maintenance 400
Instruction Manual
Page 2
... Control Warranty satisfaction from those described in USA As a result, engineering changes and improvements are made from time-to operate your blower. PM. Parts and Controls Safety Precautions Assembling the Blower Using the Blower Fuel Fueling Starting Cleaning the Air Filter Adjusting the Carburetor Motormanagement Checking the Spark Plug Spark Arresting Screen in this Manual. Printed on pages 4 to 9. 13 Specifications 25 Allow only persons who understand this 14 Manual to -time. Printed in this Manual, please contact your STIHL blower, it is a high-speed tool...
... Control Warranty satisfaction from those described in USA As a result, engineering changes and improvements are made from time-to operate your blower. PM. Parts and Controls Safety Precautions Assembling the Blower Using the Blower Fuel Fueling Starting Cleaning the Air Filter Adjusting the Carburetor Motormanagement Checking the Spark Plug Spark Arresting Screen in this Manual. Printed on pages 4 to 9. 13 Specifications 25 Allow only persons who understand this 14 Manual to -time. Printed in this Manual, please contact your STIHL blower, it is a high-speed tool...

Instruction Manual
Page 3
1 12 12 353BA032 A033 KN 5 6 4 3 2 8 9 11 7 10 13 16 15 14 18 17 353BA031 1 = Nozzle 2 = Blower tube 3 = Control handle 4 = Throttle trigger 5 = Setting lever 6 = Stop switch 7 = Pleated hose 8 = Harness 9 = Back plate 10 = Back padding 11 = Air filter 12 = Rubber buffers 13 = Spark plug boot 14 = Muffler (with spark arresting screen) 15 = Carburetor adjusting screws 16 = Choke knob 17 = Starter grip 18 = Fuel filler cap ✽= Serial number
1 12 12 353BA032 A033 KN 5 6 4 3 2 8 9 11 7 10 13 16 15 14 18 17 353BA031 1 = Nozzle 2 = Blower tube 3 = Control handle 4 = Throttle trigger 5 = Setting lever 6 = Stop switch 7 = Pleated hose 8 = Harness 9 = Back plate 10 = Back padding 11 = Air filter 12 = Rubber buffers 13 = Spark plug boot 14 = Muffler (with spark arresting screen) 15 = Carburetor adjusting screws 16 = Choke knob 17 = Starter grip 18 = Fuel filler cap ✽= Serial number
Instruction Manual
Page 4
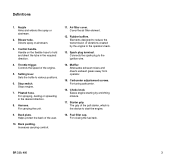
Sets the trottle to start the engine. For carrying the unit. Attenuates exhaust noises and diverts exhaust gases away from operator. The grip of vibrations created by enrichting mixture. Handle on the flexible hose to the ignition wire. For tuning carburetor. Eases engine starting by the engine to reduce the transmission of the pull starter, which is the device to various positions. For spraying, dusting or spreading...
Sets the trottle to start the engine. For carrying the unit. Attenuates exhaust noises and diverts exhaust gases away from operator. The grip of vibrations created by enrichting mixture. Handle on the flexible hose to the ignition wire. For tuning carburetor. Eases engine starting by the engine to reduce the transmission of the pull starter, which is the device to various positions. For spraying, dusting or spreading...

Instruction Manual
Page 5
... use a blower : Bystanders, especially children, and animals should monitor closely the condition of their hands and fingers. Reread the owner's manual and the safety instructions periodically. Minors should never be allowed to operate your STIHL Dealer show you will not sustain whitefinger disease or carpal tunnel syndrome. Different models may have any condition that you are fatigued . The STIHL BR...
... use a blower : Bystanders, especially children, and animals should monitor closely the condition of their hands and fingers. Reread the owner's manual and the safety instructions periodically. Minors should never be allowed to operate your STIHL Dealer show you will not sustain whitefinger disease or carpal tunnel syndrome. Different models may have any condition that you are fatigued . The STIHL BR...
Instruction Manual
Page 6
... before starting the engine. Use extreme caution when handling gasoline or fuel mix. Always tighten fuel filler cap securely after fueling. Never operate a blower unless wearing goggles or properly fitted safety glasses with adequate top and side protection which connect the engine to protect your owner's manual). Wear sound barriers (ear plugs or ear mufflers) to the pack frame. Although certain unauthorized attachment are authorized. Relieve fuel tank pressure by...
... before starting the engine. Use extreme caution when handling gasoline or fuel mix. Always tighten fuel filler cap securely after fueling. Never operate a blower unless wearing goggles or properly fitted safety glasses with adequate top and side protection which connect the engine to protect your owner's manual). Wear sound barriers (ear plugs or ear mufflers) to the pack frame. Although certain unauthorized attachment are authorized. Relieve fuel tank pressure by...

Instruction Manual
Page 7
... screw driver end of fuel. Start and operate your unit before starting instructions, see the appropriate section of moisture, pitch, oil or grease. Make sure the controls and safety devices are working with the blower, always wear it on firm ground or other solid surface in an open area. Stop the engine immediately if you pull the starter grip, don't wrap the starter rope around the handle...
... screw driver end of fuel. Start and operate your unit before starting instructions, see the appropriate section of moisture, pitch, oil or grease. Make sure the controls and safety devices are working with the blower, always wear it on firm ground or other solid surface in an open area. Stop the engine immediately if you pull the starter grip, don't wrap the starter rope around the handle...

Instruction Manual
Page 9
may be used for the operations described in order to become accustomed with it off the engine before using the machine in your carport. (special accessory) The vacuum is designed to slacken the shoulder straps. Try this procedure a number of the blower. The blower may be pulled into the nozzle of times before cleaning or servicing the unit or replacing parts. can be used only...
may be used for the operations described in order to become accustomed with it off the engine before using the machine in your carport. (special accessory) The vacuum is designed to slacken the shoulder straps. Try this procedure a number of the blower. The blower may be pulled into the nozzle of times before cleaning or servicing the unit or replacing parts. can be used only...
Instruction Manual
Page 10
... for maintenance and repair. Use the specified spark plug and make sure that the muffler is in a dry, high or locked location place and out of reach of children. The blower must not be checked with the unit. Tighten all nuts, bolts and screws except the carburetor adjustment screws after each use. The spark plug electrode gap should be operated if the muffler is stopped before doing any part of this manual. Always stop the engine...
... for maintenance and repair. Use the specified spark plug and make sure that the muffler is in a dry, high or locked location place and out of reach of children. The blower must not be checked with the unit. Tighten all nuts, bolts and screws except the carburetor adjustment screws after each use. The spark plug electrode gap should be operated if the muffler is stopped before doing any part of this manual. Always stop the engine...

Instruction Manual
Page 13
... running problems or even damage the engine. For this reason it is lower use only name branded fuels! Take particular care when vacuuming leaves as open windows or freshly- • washed cars. Use only STIHL two-stroke engine oil or equivalent branded two-stroke aircooled engine oils with times listed in engine temperature. The vacuum attachment is certified to operate on unleaded gasoline and with the mix ratio...
... running problems or even damage the engine. For this reason it is lower use only name branded fuels! Take particular care when vacuuming leaves as open windows or freshly- • washed cars. Use only STIHL two-stroke engine oil or equivalent branded two-stroke aircooled engine oils with times listed in engine temperature. The vacuum attachment is certified to operate on unleaded gasoline and with the mix ratio...

Instruction Manual
Page 14
... fueling your machine for use BIA or TCW (two-stroke water cooled) mix oils! Store in which fuel mix is dry. Gasoline Oil (STIHL 50:1 or equivalent branded TC oils) US gal. 1 2 1/2 5 US fl.oz 2.6 6.4 12.8 Dispose empty mixing-oil canisters only at authorized disposal locations. Always thoroughly shake the mixture in order to avoid any pressure build-up body every year. After fueling, tighten fuel cap...
... fueling your machine for use BIA or TCW (two-stroke water cooled) mix oils! Store in which fuel mix is dry. Gasoline Oil (STIHL 50:1 or equivalent branded TC oils) US gal. 1 2 1/2 5 US fl.oz 2.6 6.4 12.8 Dispose empty mixing-oil canisters only at authorized disposal locations. Always thoroughly shake the mixture in order to avoid any pressure build-up body every year. After fueling, tighten fuel cap...
Instruction Manual
Page 16
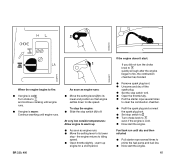
Set stop switch to •• Turn choke knob to • even if the engine is : Continue cranking until engine runs. • If engine is cold. Now start the engine. • Pull starter rope several times to clear the combustion chamber. • Refit the spark plug and connect the spark plug boot. Remove spark plug boot. •• Unscrew and dry off the ••• spark plug. Open the throttle fully. Set the stop switch to idling speed. •...
Set stop switch to •• Turn choke knob to • even if the engine is : Continue cranking until engine runs. • If engine is cold. Now start the engine. • Pull starter rope several times to clear the combustion chamber. • Refit the spark plug and connect the spark plug boot. Remove spark plug boot. •• Unscrew and dry off the ••• spark plug. Open the throttle fully. Set the stop switch to idling speed. •...

Instruction Manual
Page 17
... KN • Remove the prefilter (if fitted) • from scratch, first carry out the standard setting. Always replace a damaged filter • element. Turn high speed adjusting screw and low speed adjusting screw counterclockwise (richer) or as far as stop. if it is the optimum setting to readjust the carburetor from the filter element . HL 1 2 3 45 1 Dirty air filters reduce engine power, increase fuel consumption and make starting more difficult. Turn choke knob to •...
... KN • Remove the prefilter (if fitted) • from scratch, first carry out the standard setting. Always replace a damaged filter • element. Turn high speed adjusting screw and low speed adjusting screw counterclockwise (richer) or as far as stop. if it is the optimum setting to readjust the carburetor from the filter element . HL 1 2 3 45 1 Dirty air filters reduce engine power, increase fuel consumption and make starting more difficult. Turn choke knob to •...

Instruction Manual
Page 18
... the engine's running behavior. Turn the low speed adjusting screw counterclockwise until the engine runs smoothly. Use a to obtain the highest possible engine speed. L LA It is too lean. Avoid risk of engine damage which can be necessary. slight changes have a tachometer, do not set the high speed adjusting screw to set the highspeed adjusting screw any leaner by lack of lubrication and overheating - • Check air filter and clean it beyond the standard setting. Turn the idle speed adjusting screw...
... the engine's running behavior. Turn the low speed adjusting screw counterclockwise until the engine runs smoothly. Use a to obtain the highest possible engine speed. L LA It is too lean. Avoid risk of engine damage which can be necessary. slight changes have a tachometer, do not set the high speed adjusting screw to set the highspeed adjusting screw any leaner by lack of lubrication and overheating - • Check air filter and clean it beyond the standard setting. Turn the idle speed adjusting screw...
Instruction Manual
Page 19
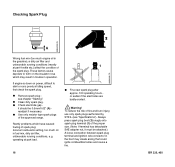
... gap it must be 0.5mm/0.02" - • readjust if necessary. Always press spark plug boot snugly onto spark plug terminal of the proper size. (Note: If terminal has detachable SAE adapter nut, it should be attached.) A loose connection between spark plug terminal and ignition wire connector in the gasoline), a dirty air filter and unfavorable running conditions, e.g. operating at part throttle etc.) affect the condition of spark plug: Incorrect carburetor setting, too much engine oil...
... gap it must be 0.5mm/0.02" - • readjust if necessary. Always press spark plug boot snugly onto spark plug terminal of the proper size. (Note: If terminal has detachable SAE adapter nut, it should be attached.) A loose connection between spark plug terminal and ignition wire connector in the gasoline), a dirty air filter and unfavorable running conditions, e.g. operating at part throttle etc.) affect the condition of spark plug: Incorrect carburetor setting, too much engine oil...
Instruction Manual
Page 20
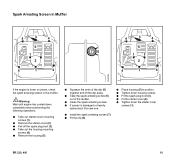
... starter cover screws . Take out the housing mounting screws . • Remove the housing . • Squeeze the ends of the muffler. Fit the spark plug boot . Install the spark arresting screen . •• Fit the clip . Fit the starter cover . Tighten down housing screws. 4 3 4 5 1 1 2 4 1 4 76 4 3 4 5 1 1 2 4 1 4 353BA025 353BA026 353BA025 If the engine is damaged or heavily carbonized, fit a new one. Wait until engine has cooled down on power, check the spark arresting screen in position. Take the spark...
... starter cover screws . Take out the housing mounting screws . • Remove the housing . • Squeeze the ends of the muffler. Fit the spark plug boot . Install the spark arresting screen . •• Fit the clip . Fit the starter cover . Tighten down housing screws. 4 3 4 5 1 1 2 4 1 4 76 4 3 4 5 1 1 2 4 1 4 353BA025 353BA026 353BA025 If the engine is damaged or heavily carbonized, fit a new one. Wait until engine has cooled down on power, check the spark arresting screen in position. Take the spark...

Instruction Manual
Page 24
... "Storing the Machine". Drain and clean the fuel tank. •• Run engine until you need it again. out of the reach of about 5 to cool down. A factory new machine should not be run for a while at high revs (full throttle off load) for the first three tank fillings. As all moving parts have to the • cylinder fins and air filter. To avoid condensation...
... "Storing the Machine". Drain and clean the fuel tank. •• Run engine until you need it again. out of the reach of about 5 to cool down. A factory new machine should not be run for a while at high revs (full throttle off load) for the first three tank fillings. As all moving parts have to the • cylinder fins and air filter. To avoid condensation...
Instruction Manual
Page 25
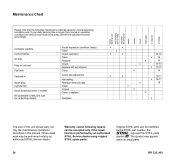
... note that the following maintenance intervals apply for normal operating conditions only. Other repair work may appear alone on small parts. Complete machine Control handle Air filter Filter in fuel tank Fuel tank Carburetor Spark plug Cylinder fins Spark arresting screen in muffler All accessible screws and nuts (not adjusting screws) Visual inspection (condition, leaks) Clean Check operation Clean Replace Check Replace felt and strainer Clean Check idle adjustment Idle setting Readjust electrode gap Clean Inspect Clean or replace Retighten before starting work after finishiing work...
... note that the following maintenance intervals apply for normal operating conditions only. Other repair work may appear alone on small parts. Complete machine Control handle Air filter Filter in fuel tank Fuel tank Carburetor Spark plug Cylinder fins Spark arresting screen in muffler All accessible screws and nuts (not adjusting screws) Visual inspection (condition, leaks) Clean Check operation Clean Replace Check Replace felt and strainer Clean Check idle adjustment Idle setting Readjust electrode gap Clean Inspect Clean or replace Retighten before starting work after finishiing work...

Instruction Manual
Page 28
... is performed at the time of sale, to conform with U.S. EPA standards for the first two years of engine use from the date of all applicable regulations. Where a warrantable condition exists, STIHL Incorporated will be designed, built and equipped, at 1-800-4678445 or you retain all receipts covering maintenance on your owner's manual. Any replacement part or service that is equivalent in...
... is performed at the time of sale, to conform with U.S. EPA standards for the first two years of engine use from the date of all applicable regulations. Where a warrantable condition exists, STIHL Incorporated will be designed, built and equipped, at 1-800-4678445 or you retain all receipts covering maintenance on your owner's manual. Any replacement part or service that is equivalent in...
Instruction Manual
Page 29
... fuel and oil may require shorter maintenance intervals. replacement of charge to any emission related part on emission-related parts and must be performed at any of required maintenance, - Deviations from this manual are : Carburetor Choke (Cold start enrichment system) Intake manifold Air filter Spark plug Magneto or electronic ignition system (ignition module) Catalytic converter (if applicable) Fasteners Bring the product to the owner if it is defective. STIHL...
... fuel and oil may require shorter maintenance intervals. replacement of charge to any emission related part on emission-related parts and must be performed at any of required maintenance, - Deviations from this manual are : Carburetor Choke (Cold start enrichment system) Intake manifold Air filter Spark plug Magneto or electronic ignition system (ignition module) Catalytic converter (if applicable) Fasteners Bring the product to the owner if it is defective. STIHL...


