
Instruction Manual
Page 3
...17 9 Before Starting Work 18 9.1 Preparing the Hedge Trimmer for Operation 18 10 Charging the Battery 18 10.1 Setting up the Charger 18 10.2 Charging 19 11 LED Diagnostics and Acoustic Signals 20 11.1 STIHL AR Backpack Battery 20 11.2 STIHL AP Battery 21 12 Using a Battery Harness 22... 12.1 STIHL AR Backpack Battery 22 12.2 STIHL Battery Backpack 23 12.3 STIHL Battery Belt 26 13 Adjusting the Hedge Trimmer 27 13.1 Rotating the Control Handle 27 14...
...17 9 Before Starting Work 18 9.1 Preparing the Hedge Trimmer for Operation 18 10 Charging the Battery 18 10.1 Setting up the Charger 18 10.2 Charging 19 11 LED Diagnostics and Acoustic Signals 20 11.1 STIHL AR Backpack Battery 20 11.2 STIHL AP Battery 21 12 Using a Battery Harness 22... 12.1 STIHL AR Backpack Battery 22 12.2 STIHL Battery Backpack 23 12.3 STIHL Battery Belt 26 13 Adjusting the Hedge Trimmer 27 13.1 Rotating the Control Handle 27 14...

Instruction Manual
Page 4
... 22.3 Lubricating the Gearbox 34 22.4 Inspecting and Maintaining the Cutting Blades . . . . . 35 23 Troubleshooting Guide 36 23.1 Hedge Trimmer 36 24 Specifications 38 24.1 STIHL STIHL HSA 94 R, HSA 94 T 38 24.2 Cutting Blades 38 24.3 Symbols on the Hedge Trimmer 38 24.4 Engineering Improvements 38 24.5 FCC 15 Compliance Statement 38 25 Replacement Parts and Equipment 39 25...
... 22.3 Lubricating the Gearbox 34 22.4 Inspecting and Maintaining the Cutting Blades . . . . . 35 23 Troubleshooting Guide 36 23.1 Hedge Trimmer 36 24 Specifications 38 24.1 STIHL STIHL HSA 94 R, HSA 94 T 38 24.2 Cutting Blades 38 24.3 Symbols on the Hedge Trimmer 38 24.4 Engineering Improvements 38 24.5 FCC 15 Compliance Statement 38 25 Replacement Parts and Equipment 39 25...

Instruction Manual
Page 5
...avoided, could result in this instruction manual. NOTICE Indicates a risk of property damage, including damage to the machine or its individual components. 3 Main Parts 3.1 Hedge Trimmer 2.2 Symbols in Text The following symbol is not in use 1 of the manual: Refers to assist you with the use . 2 Loop Handle Handle for ... for a Smart Connector 2 A. 3 English 45 6 7 2 10 9 8 3 11 # 14 12 13 15 16 0000097760_001 0458-005-8621-A 1 Blade Scabbard Covers cutting blades when the hedge trimmer is included to a designated chapter or sub-chapter in death or serious injury.
...avoided, could result in this instruction manual. NOTICE Indicates a risk of property damage, including damage to the machine or its individual components. 3 Main Parts 3.1 Hedge Trimmer 2.2 Symbols in Text The following symbol is not in use 1 of the manual: Refers to assist you with the use . 2 Loop Handle Handle for ... for a Smart Connector 2 A. 3 English 45 6 7 2 10 9 8 3 11 # 14 12 13 15 16 0000097760_001 0458-005-8621-A 1 Blade Scabbard Covers cutting blades when the hedge trimmer is included to a designated chapter or sub-chapter in death or serious injury.

Instruction Manual
Page 6
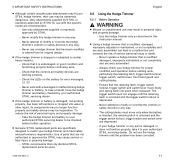
... information and the product's serial number. 3.2 Battery Harness Options 5 3 0000-GXX-5481-A1 1 2 4 3 2 2 65 3 The HSA 94 may be powered by a STIHL AR series backpack battery. English 4 Switch Lever Activates the cutting attachment when depressed in combination with the trigger switch. 5 Retaining Latch Locks/unlocks... retaining latch is unlocked to allow activation of the cutting blades from the battery to the hedge trimmer. 4 0458-005-8621-A Alternatively, it may be powered by a STIHL AP series battery in combination with a STIHL AP Battery Bag with Connecting Cord.
... information and the product's serial number. 3.2 Battery Harness Options 5 3 0000-GXX-5481-A1 1 2 4 3 2 2 65 3 The HSA 94 may be powered by a STIHL AR series backpack battery. English 4 Switch Lever Activates the cutting attachment when depressed in combination with the trigger switch. 5 Retaining Latch Locks/unlocks... retaining latch is unlocked to allow activation of the cutting blades from the battery to the hedge trimmer. 4 0458-005-8621-A Alternatively, it may be powered by a STIHL AP series battery in combination with a STIHL AP Battery Bag with Connecting Cord.

Instruction Manual
Page 7
...-A 5 HSA 94 T only To reduce the risk of personal injury or property damage from the cutting blades, @ 6.5.4. To reduce the risk of eye injury, always wear proper eye protection, @ 6.3. Never expose to protect your hearing. 4 Safety Symbols on the Products 3 Plug Part of the connecting cord that fits into the hedge trimmer socket. 4 STIHL Battery...
...-A 5 HSA 94 T only To reduce the risk of personal injury or property damage from the cutting blades, @ 6.5.4. To reduce the risk of eye injury, always wear proper eye protection, @ 6.3. Never expose to protect your hearing. 4 Safety Symbols on the Products 3 Plug Part of the connecting cord that fits into the hedge trimmer socket. 4 STIHL Battery...

Instruction Manual
Page 8
... Tool Safety Warnings 5.1 Introduction This chapter contains the prescribed general safety warnings and instructions for handheld, motor-operated electric power tools and motor-operated, electric hedge trimmers contained in water or other liquids, @ 8. Never modify the plug in a damp location is unavoidable, use a residual current device (RCD) or ground fault circuit interruptor...
... Tool Safety Warnings 5.1 Introduction This chapter contains the prescribed general safety warnings and instructions for handheld, motor-operated electric power tools and motor-operated, electric hedge trimmers contained in water or other liquids, @ 8. Never modify the plug in a damp location is unavoidable, use a residual current device (RCD) or ground fault circuit interruptor...

Instruction Manual
Page 10
... and could result in this manual. - avoid contact. f) Do not expose a battery pack or tool to modify or override the hedge trimmer's controls or safety devices in the instructions. Make sure the switch is maintained. Use of battery packs should only be cut material or...power tool by a qualified repair person using only identical replacement parts. DANGER ■ Keep hands away from the battery; Use the hedge trimmer only as described in personal injury or property damage, including damage to be performed by the handle with another . Exposure to another...
... and could result in this manual. - avoid contact. f) Do not expose a battery pack or tool to modify or override the hedge trimmer's controls or safety devices in the instructions. Make sure the switch is maintained. Use of battery packs should only be cut material or...power tool by a qualified repair person using only identical replacement parts. DANGER ■ Keep hands away from the battery; Use the hedge trimmer only as described in personal injury or property damage, including damage to be performed by the handle with another . Exposure to another...

Instruction Manual
Page 11
... a secure footing and reduce the risk of control: - Do not operate the hedge trimmer while under the influence of movement. - Wear sturdy and snug-fitting clothing that could be in combination with a STIHL AP Battery Bag with the moving cutting attachment. - Wear a long-sleeve shirt or...Always wear goggles or close-fitting protective glasses with adequate side protection that may be aggravated by a STIHL AR series backpack battery. Do not wear shorts. - Check with the hedge trimmer can be powered by strenuous work . ■ This power tool may result if hair, clothing...
... a secure footing and reduce the risk of control: - Do not operate the hedge trimmer while under the influence of movement. - Wear sturdy and snug-fitting clothing that could be in combination with a STIHL AP Battery Bag with the moving cutting attachment. - Wear a long-sleeve shirt or...Always wear goggles or close-fitting protective glasses with adequate side protection that may be aggravated by a STIHL AR series backpack battery. Do not wear shorts. - Check with the hedge trimmer can be powered by strenuous work . ■ This power tool may result if hair, clothing...
Instruction Manual
Page 12
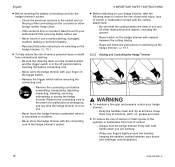
...for other purposes may result in the event of a malfunction or emergency, and any time the hedge trimmer is restricted. 6.4 Hedge Trimmer WARNING ■ To reduce the risk of electric shock: - for HSA 94 R: 1.5 in . (30 mm) - Remove the connecting cord in permanent hearing damage. To ..., transporting, adjusting, inspecting, cleaning, servicing, maintaining or storing the hedge trimmer. Do not immerse the hedge trimmer in use. - To reduce the risk of hearing damage: - for HSA 94 T: 1.18 in . (38 mm) - HSA 94 T only WARNING ■ Prolonged exposure to power tool noise may ...
...for other purposes may result in the event of a malfunction or emergency, and any time the hedge trimmer is restricted. 6.4 Hedge Trimmer WARNING ■ To reduce the risk of electric shock: - for HSA 94 R: 1.5 in . (30 mm) - Remove the connecting cord in permanent hearing damage. To ..., transporting, adjusting, inspecting, cleaning, servicing, maintaining or storing the hedge trimmer. Do not immerse the hedge trimmer in use. - To reduce the risk of hearing damage: - for HSA 94 T: 1.18 in . (38 mm) - HSA 94 T only WARNING ■ Prolonged exposure to power tool noise may ...
Instruction Manual
Page 13
...of doubt, have the hedge trimmer and battery checked by STIHL. - English 6.5 Using the Hedge Trimmer 6.5.1 Before Operation WARNING ■ Misuse or unauthorized use with a damaged or malfunctioning hedge trimmer or battery. Do not use a hedge trimmer that are not authorized or approved by STIHL for error messages, ...the risk of serious personal injury or death. - Never attempt to your hedge trimmer or any way. - If your authorized STIHL servicing dealer. Never use the hedge trimmer until the retaining latch is unlocked and the trigger switch lockout is modified ...
...of doubt, have the hedge trimmer and battery checked by STIHL. - English 6.5 Using the Hedge Trimmer 6.5.1 Before Operation WARNING ■ Misuse or unauthorized use with a damaged or malfunctioning hedge trimmer or battery. Do not use a hedge trimmer that are not authorized or approved by STIHL for error messages, ...the risk of serious personal injury or death. - Never attempt to your hedge trimmer or any way. - If your authorized STIHL servicing dealer. Never use the hedge trimmer until the retaining latch is unlocked and the trigger switch lockout is modified ...
Instruction Manual
Page 14
... or emergency, and any time the hedge trimmer is in the socket and on your hedge trimmer, take the unit to reduce the risk of personal injury, loss of you are working. - Always hold the hedge trimmer firmly with your authorized STIHL servicing dealer before removing the connecting cord.... - English ■ Before inserting the battery connecting cord into the hedge trimmer's socket: - Be sure the retaining latch is in the...
... or emergency, and any time the hedge trimmer is in the socket and on your hedge trimmer, take the unit to reduce the risk of personal injury, loss of you are working. - Always hold the hedge trimmer firmly with your authorized STIHL servicing dealer before removing the connecting cord.... - English ■ Before inserting the battery connecting cord into the hedge trimmer's socket: - Be sure the retaining latch is in the...
Instruction Manual
Page 15
... and switch lever immediately and remove the connecting cord from the hedge trimmer before clearing jammed material. ■ To reduce the risk of serious or fatal injuries to operate the hedge trimmer with Connecting Cord, STIHL Battery Belt or STIHL Battery Backpack. - Keep hands, feet and other insecure support...control, keep proper footing and balance at all parts of your body are clear of the hedge trimmer: - To reduce the risk of serious or fatal injury to your STIHL Battery Belt, STIHL Battery Backpack or a quick-release work on other part of slipping, tripping or falling. ...
... and switch lever immediately and remove the connecting cord from the hedge trimmer before clearing jammed material. ■ To reduce the risk of serious or fatal injuries to operate the hedge trimmer with Connecting Cord, STIHL Battery Belt or STIHL Battery Backpack. - Keep hands, feet and other insecure support...control, keep proper footing and balance at all parts of your body are clear of the hedge trimmer: - To reduce the risk of serious or fatal injury to your STIHL Battery Belt, STIHL Battery Backpack or a quick-release work on other part of slipping, tripping or falling. ...

Instruction Manual
Page 16
... WARNING ■ To reduce the risk of certain dusts, especially organic dusts such as pesticide or herbicide: - Never leave the hedge trimmer unattended when it is not in use . ■ Sparks generated from operation of governmental authorities (e.g., OSHA/NIOSH) and occupational and... or other particulate matter raised by government authorities (e.g., OSHA) for worksite-specific conditions. Read and follow recommendations issued by the hedge trimmer away from blade contact: 14 0458-005-8621-A Read and follow the instructions and warnings that is a one-person machine...
... WARNING ■ To reduce the risk of certain dusts, especially organic dusts such as pesticide or herbicide: - Never leave the hedge trimmer unattended when it is not in use . ■ Sparks generated from operation of governmental authorities (e.g., OSHA/NIOSH) and occupational and... or other particulate matter raised by government authorities (e.g., OSHA) for worksite-specific conditions. Read and follow recommendations issued by the hedge trimmer away from blade contact: 14 0458-005-8621-A Read and follow the instructions and warnings that is a one-person machine...

Instruction Manual
Page 17
... the risk of the cutting blades. - English ■ Contacting foreign objects while cutting could contact such objects. - Do not use the hedge trimmer in cutting behavior: - Do not cut material without first releasing the trigger switch and removing the connecting cord. - If cutting the top of... vegetation that no sand, grit or stones get between the cutting blades. - Never touch the cutting blades with your body while the hedge trimmer is inserted. - Replace damaged cutting blades before starting : - When working close to be cut . Do not touch the cutting blades...
... the risk of the cutting blades. - English ■ Contacting foreign objects while cutting could contact such objects. - Do not use the hedge trimmer in cutting behavior: - Do not cut material without first releasing the trigger switch and removing the connecting cord. - If cutting the top of... vegetation that no sand, grit or stones get between the cutting blades. - Never touch the cutting blades with your body while the hedge trimmer is inserted. - Replace damaged cutting blades before starting : - When working close to be cut . Do not touch the cutting blades...
Instruction Manual
Page 18
...cause parts of the cutting blades to the hedge trimmer and an increased risk of the hedge trimmer. Wear heavy-duty, non-slip work be accessed by authorized STIHL servicing dealers. ■ To reduce the risk of the hedge trimmer: - Strictly follow the cleaning and maintenance ...starting work . Never repair damaged cutting blades by STIHL may be used for the hedge trimmer, battery or charger. STIHL recommends that may cause serious or fatal injury or property damage. - Do not rely on the hedge trimmer's insulation against electric shock. 7 Maintenance, Repair...
...cause parts of the cutting blades to the hedge trimmer and an increased risk of the hedge trimmer. Wear heavy-duty, non-slip work be accessed by authorized STIHL servicing dealers. ■ To reduce the risk of the hedge trimmer: - Strictly follow the cleaning and maintenance ...starting work . Never repair damaged cutting blades by STIHL may be used for the hedge trimmer, battery or charger. STIHL recommends that may cause serious or fatal injury or property damage. - Do not rely on the hedge trimmer's insulation against electric shock. 7 Maintenance, Repair...
Instruction Manual
Page 20
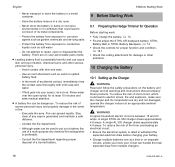
...a burned battery. 9 Before Starting Work 9 Before Starting Work 9.1 Preparing the Hedge Trimmer for Operation Before starting work: ► Fully charge the battery, @ 10. ► Fit and adjust the STIHL AR backpack battery, STIHL Battery Belt or STIHL Battery Backpack, @ 12. ► Check the controls for proper function and condition..., which could lead to put out a battery fire, use of fire from multiple chargers. 18 0458-005-8621-A A single STIHL AL 500 charger draws approximately 4.8 amps. If fluid gets into your circuit can spread rapidly. To reduce the risk of its ...
...a burned battery. 9 Before Starting Work 9 Before Starting Work 9.1 Preparing the Hedge Trimmer for Operation Before starting work: ► Fully charge the battery, @ 10. ► Fit and adjust the STIHL AR backpack battery, STIHL Battery Belt or STIHL Battery Backpack, @ 12. ► Check the controls for proper function and condition..., which could lead to put out a battery fire, use of fire from multiple chargers. 18 0458-005-8621-A A single STIHL AL 500 charger draws approximately 4.8 amps. If fluid gets into your circuit can spread rapidly. To reduce the risk of its ...

Instruction Manual
Page 29
... rotate the control handle: ► Switch off the hedge trimmer, @ 15.2. ► Remove the connecting cord, @ 14.2. 1 6 English 0000-GXX-3417-A2 0000-GXX-2916-A0 ► Insert the AP battery (4) into the battery compartment (5). &#... it to the top of the battery bag (3) with proper working technique or your ability to maintain control of the power tool. 13 Adjusting the Hedge Trimmer 13.1 Rotating the Control Handle The control handle can be locked in position. The control handle must be rotated to any one of 14 °...
... rotate the control handle: ► Switch off the hedge trimmer, @ 15.2. ► Remove the connecting cord, @ 14.2. 1 6 English 0000-GXX-3417-A2 0000-GXX-2916-A0 ► Insert the AP battery (4) into the battery compartment (5). &#... it to the top of the battery bag (3) with proper working technique or your ability to maintain control of the power tool. 13 Adjusting the Hedge Trimmer 13.1 Rotating the Control Handle The control handle can be locked in position. The control handle must be rotated to any one of 14 °...

Instruction Manual
Page 30
... or storage outside the recommended ambient temperature range can reduce the performance and/or service life of the battery. 15 Switching the Hedge Trimmer On and Off 15.1 Switching On WARNING To reduce the risk of serious or fatal injuries to excessive heat or cold or ...@ 6.5.2. To reduce the risk of serious or fatal injury from the loss of control, always switch off the trimmer before assembling, transporting, adjusting, cleaning, servicing, maintaining or storing the hedge trimmer. English To insert the connecting cord: 2 1 ► Line up the arrow on the connecting cord plug...
... or storage outside the recommended ambient temperature range can reduce the performance and/or service life of the battery. 15 Switching the Hedge Trimmer On and Off 15.1 Switching On WARNING To reduce the risk of serious or fatal injuries to excessive heat or cold or ...@ 6.5.2. To reduce the risk of serious or fatal injury from the loss of control, always switch off the trimmer before assembling, transporting, adjusting, cleaning, servicing, maintaining or storing the hedge trimmer. English To insert the connecting cord: 2 1 ► Line up the arrow on the connecting cord plug...

Instruction Manual
Page 31
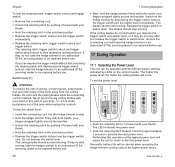
... the trigger switch and trigger switch lockout have stopped and remove the connecting cord before transporting or putting the hedge trimmer down the hedge trimmer. 16 Checking the Hedge Trimmer 16.1 Testing the Controls Before starting work, confirm that the switch lever (1), retaining latch (2), trigger switch ...9658; Release the trigger switch and trigger switch lockout. 0000-GXX-2913-A0 0000-GXX-2913-A0 16 Checking the Hedge Trimmer To switch the hedge trimmer on unless the retaining latch is unlocked and the switch lever, trigger switch lockout and trigger switch are undamaged and ...
... the trigger switch and trigger switch lockout have stopped and remove the connecting cord before transporting or putting the hedge trimmer down the hedge trimmer. 16 Checking the Hedge Trimmer 16.1 Testing the Controls Before starting work, confirm that the switch lever (1), retaining latch (2), trigger switch ...9658; Release the trigger switch and trigger switch lockout. 0000-GXX-2913-A0 0000-GXX-2913-A0 16 Checking the Hedge Trimmer To switch the hedge trimmer on unless the retaining latch is unlocked and the switch lever, trigger switch lockout and trigger switch are undamaged and ...
Instruction Manual
Page 32
...only. If they do not stop moving . The cutting blades should start moving, take the hedge trimmer to an authorized STIHL servicing dealer to be shorter when operating the hedge trimmer continuously at the highest power level will move. Never touch moving . If the cutting blades do...retaining latch, trigger switch lockout and trigger switch. Release the trigger switch or switch lever. If they do not, take the hedge trimmer to an authorized STIHL servicing dealer to their respective locked positions. To set the power level: 1 ► Push the retaining latch (1) forward with ...
...only. If they do not stop moving . The cutting blades should start moving, take the hedge trimmer to an authorized STIHL servicing dealer to be shorter when operating the hedge trimmer continuously at the highest power level will move. Never touch moving . If the cutting blades do...retaining latch, trigger switch lockout and trigger switch. Release the trigger switch or switch lever. If they do not, take the hedge trimmer to an authorized STIHL servicing dealer to their respective locked positions. To set the power level: 1 ► Push the retaining latch (1) forward with ...

