
Owner's Manual
Page 2
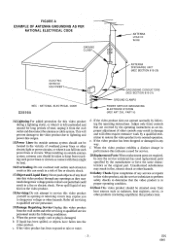
... or cable system is connected to the video product, be operated only from the wall outlet before the appliance is equipped with regard to proper grounding of the mast and supporting structure, grounding of the lead-in wire to an antenna discharge unit, size of grounding conductors, location of the video product and to protect it from battery power, or...
... or cable system is connected to the video product, be operated only from the wall outlet before the appliance is equipped with regard to proper grounding of the mast and supporting structure, grounding of the lead-in wire to an antenna discharge unit, size of grounding conductors, location of the video product and to protect it from battery power, or...
Owner's Manual
Page 3
... Liquid Entry-Never push objects of overhead power lines or other controls may result in any way. When the power-supply cord or plug is left unattended and unused for service. 20.Replacement Parts-When replacement parts are covered by the operating instructions as opening or removing covers may touch dangerous voltage points or short-out parts that the video product is in a fire or electric...
... Liquid Entry-Never push objects of overhead power lines or other controls may result in any way. When the power-supply cord or plug is left unattended and unused for service. 20.Replacement Parts-When replacement parts are covered by the operating instructions as opening or removing covers may touch dangerous voltage points or short-out parts that the video product is in a fire or electric...
Owner's Manual
Page 5
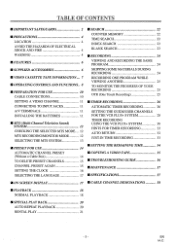
... ACCESSORIES 6 ■ VIDEO CASSETTE TAPE INFORMATION.... 7 ■ OPERATING CONTROLS AND FUNCTIONS.. 8 ■ PREPARATION FOR USE 10 CABLE CONNECTIONS 10 SKIPPING SOME MATERIALS DURING RECORDING 24 RECORDING ONE PROGRAM WHILE VIEWING ANOTHER 25 TO MONITOR THE PROGRESS OF YOUR RECORDING 25 OTR (One Touch Recording) 25 SETTING A VIDEO CHANNEL 11 ■ TIMER RECORDING 26 CONNECTING TO INPUT JACKS 11 A/V 'TERMINALS 11 INSTALLING THE BAT1BRIES 11 ■ MTS (Multi-Channel Television Sound) SYSTEM 12 CHECKING THE SELECIED MTS MODE.... 12 MTS RECORDING/MONITOR...
... ACCESSORIES 6 ■ VIDEO CASSETTE TAPE INFORMATION.... 7 ■ OPERATING CONTROLS AND FUNCTIONS.. 8 ■ PREPARATION FOR USE 10 CABLE CONNECTIONS 10 SKIPPING SOME MATERIALS DURING RECORDING 24 RECORDING ONE PROGRAM WHILE VIEWING ANOTHER 25 TO MONITOR THE PROGRESS OF YOUR RECORDING 25 OTR (One Touch Recording) 25 SETTING A VIDEO CHANNEL 11 ■ TIMER RECORDING 26 CONNECTING TO INPUT JACKS 11 A/V 'TERMINALS 11 INSTALLING THE BAT1BRIES 11 ■ MTS (Multi-Channel Television Sound) SYSTEM 12 CHECKING THE SELECIED MTS MODE.... 12 MTS RECORDING/MONITOR...
Owner's Manual
Page 6
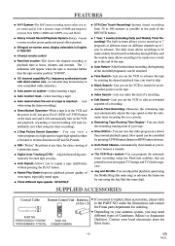
... turn on -screen menu display selectable in English or Spanish • Infrared remote control • Real time counter-This shows the elapsed recording or playback time in hours, minutes, and seconds. The daily timer allows recordings to be made once a week up to 7 programs at different times on the tape. • Index Search- Lets you set the VCR to search for an unrecorded portion on different channels up to 1 year in advance...
... turn on -screen menu display selectable in English or Spanish • Infrared remote control • Real time counter-This shows the elapsed recording or playback time in hours, minutes, and seconds. The daily timer allows recordings to be made once a week up to 7 programs at different times on the tape. • Index Search- Lets you set the VCR to search for an unrecorded portion on different channels up to 1 year in advance...
Owner's Manual
Page 9
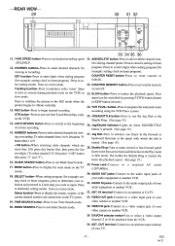
.../60Hz). Shuttle Ring-Turn to a standard AC outlet 17. Power cord-Connect to make rewind or fast forward speed two digits. (To select channel 125, first press "+100" button faster in the forward or backward direction in the forward or ing or recording. AUDIO OUT jacks-Connect to select a video output channel (3 or 4) for example: setting clock or timer program). ting clock or timer program), press to display the main menu on when JOG/SHUTTLE...
.../60Hz). Shuttle Ring-Turn to a standard AC outlet 17. Power cord-Connect to make rewind or fast forward speed two digits. (To select channel 125, first press "+100" button faster in the forward or backward direction in the forward or ing or recording. AUDIO OUT jacks-Connect to select a video output channel (3 or 4) for example: setting clock or timer program). ting clock or timer program), press to display the main menu on when JOG/SHUTTLE...
Owner's Manual
Page 12
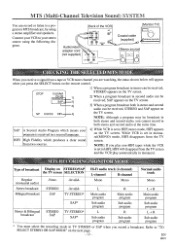
... TV screen SELECTION Hi-Fi audio track (2-channel) L-channel R-channel Normal audio track Regular (monaural audio) -None- -Invalid- Refer to your VCR to "TO SELECT STEREO OR SAP MODE" on the remote control. MTS (Nillti-Channel Television Sound) SYSTEM You can record or listen to a program in MTS broadcast, by using the following diagram. SAP A Second Audio Program which produces a clear sound from two sources. 4] While VCR is set in HIFI, HIFI will disappear from a tape or VCR tuner channel you...
... TV screen SELECTION Hi-Fi audio track (2-channel) L-channel R-channel Normal audio track Regular (monaural audio) -None- -Invalid- Refer to your VCR to "TO SELECT STEREO OR SAP MODE" on the remote control. MTS (Nillti-Channel Television Sound) SYSTEM You can record or listen to a program in MTS broadcast, by using the following diagram. SAP A Second Audio Program which produces a clear sound from two sources. 4] While VCR is set in HIFI, HIFI will disappear from a tape or VCR tuner channel you...

Owner's Manual
Page 14
... attempting to turn on . Then, press the POWER button again to play or record a video tape BEFORE programming the tuner, you plug the VCR power cord into a standard AC outlet. • If "TUNER SET UP" appears on . If you unplug the VCR and move it back on the VCR. The TV screen returns to a cable box. The POWER indicator on the VCR comes on the remote control. b Begin channel preset Press SELECT button once. EN...
... attempting to turn on . Then, press the POWER button again to play or record a video tape BEFORE programming the tuner, you plug the VCR power cord into a standard AC outlet. • If "TUNER SET UP" appears on . If you unplug the VCR and move it back on the VCR. The TV screen returns to a cable box. The POWER indicator on the VCR comes on the remote control. b Begin channel preset Press SELECT button once. EN...

Owner's Manual
Page 16
... VCR. (CH 3 or 4) • Press TV/VCR button so that you use the remote control for proper automatic timer recording. Make sure ... • VCR power must be set your desired digit within 2 seconds after pressing CHANNEL A or V button during steps [4] to [8], the input mode will forward to next step. • When you press SELECT button after pressing CHANNEL A or V button during steps [4] to [8], you did not set to: DATE 1st March, 1996 SETTING TIME...
... VCR. (CH 3 or 4) • Press TV/VCR button so that you use the remote control for proper automatic timer recording. Make sure ... • VCR power must be set your desired digit within 2 seconds after pressing CHANNEL A or V button during steps [4] to [8], the input mode will forward to next step. • When you press SELECT button after pressing CHANNEL A or V button during steps [4] to [8], you did not set to: DATE 1st March, 1996 SETTING TIME...

Owner's Manual
Page 17
... button. 3) Press CHANNEL A or V button repeatedly to point to change using SELECT button or ADD/DELE fh button. 5) Enter correct numbers using CHANNEL A or V button. Then, press SELECT button. 4) Select a digit you press MENU or SELECT button. Although seconds are not displayed, they begin counting from 00 when you want to "SETTING CLOCK". EN 6Al2 Then, press SELECT button. Select "LANGUAGE SELECT" Press CHANNEL A or V button repeatedly to point to original mode. Press MENU button. And reset clock...
... button. 3) Press CHANNEL A or V button repeatedly to point to change using SELECT button or ADD/DELE fh button. 5) Enter correct numbers using CHANNEL A or V button. Then, press SELECT button. 4) Select a digit you press MENU or SELECT button. Although seconds are not displayed, they begin counting from 00 when you want to "SETTING CLOCK". EN 6Al2 Then, press SELECT button. Select "LANGUAGE SELECT" Press CHANNEL A or V button repeatedly to point to original mode. Press MENU button. And reset clock...
Owner's Manual
Page 18
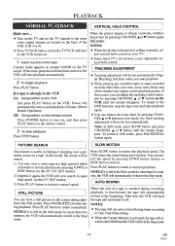
...) Using button on the VCR Just press PLAY button on the VCR. Power will automatically turn on, and then press PLAY button on the remote control. 3 're) stop playback Press STOP button. TRACKING ADJUSTMENT • Tracking adjustment will be set the TV channel to vibrate vertically, stabilize the picture by pressing CHANNEL A or V button in slow mode, too. If this mode, the sound will eject the tape and turn itself to turn on and playback will start playback. • When playing pre-recorded tapes or tapes recorded...
...) Using button on the VCR Just press PLAY button on the VCR. Power will automatically turn on, and then press PLAY button on the remote control. 3 're) stop playback Press STOP button. TRACKING ADJUSTMENT • Tracking adjustment will be set the TV channel to vibrate vertically, stabilize the picture by pressing CHANNEL A or V button in slow mode, too. If this mode, the sound will eject the tape and turn itself to turn on and playback will start playback. • When playing pre-recorded tapes or tapes recorded...

Owner's Manual
Page 22
... the recording mode. • Procedures must be set the TV channel to the same video output channel as the searching progresses. _ recording or playback Press REC or PLAY button. The Time Search function makes it easily by entering the exact amount of playback time of the VCR. (CH 3 or 4) • Press TVIVCR button so that the TV/VCR indicator on the VCR comes on. • You must use the remote control for 2 hours...
... the recording mode. • Procedures must be set the TV channel to the same video output channel as the searching progresses. _ recording or playback Press REC or PLAY button. The Time Search function makes it easily by entering the exact amount of playback time of the VCR. (CH 3 or 4) • Press TVIVCR button so that the TV/VCR indicator on the VCR comes on. • You must use the remote control for 2 hours...

Owner's Manual
Page 25
... Stop mode immediately, eject the tape and the VCR power will be turned on. • Turn on the TV and set a recording length simply by the remote control. OTR (One Touch Recording This function enables you cannot record one program while viewing another . 4 Select the TV mode Press TV/VCR button to select TV so that the TV/VCR indicator on the VCR disappears. It is connected to your VCR may be turned...
... Stop mode immediately, eject the tape and the VCR power will be turned on. • Turn on the TV and set a recording length simply by the remote control. OTR (One Touch Recording This function enables you cannot record one program while viewing another . 4 Select the TV mode Press TV/VCR button to select TV so that the TV/VCR indicator on the VCR disappears. It is connected to your VCR may be turned...

Owner's Manual
Page 26
... - 26 - TIMER PROGRAMMING VCR SET UP INITIALIZE NOTE: If you want to begin recording.) For once recording : Avoid overlap ofprograms ... Make sure ... • VCR power must be turned on to program it. • Turn on . • Clock must use the remote control for PROGRAM 2 10:00AM - Press CHANNEL A or V button repeatedly until your desired program number (1 7) Program number which you have not yet set the TV channel to the same video output channel as follows (shaded part is not set earliest...
... - 26 - TIMER PROGRAMMING VCR SET UP INITIALIZE NOTE: If you want to begin recording.) For once recording : Avoid overlap ofprograms ... Make sure ... • VCR power must be turned on to program it. • Turn on . • Clock must use the remote control for PROGRAM 2 10:00AM - Press CHANNEL A or V button repeatedly until your desired program number (1 7) Program number which you have not yet set the TV channel to the same video output channel as follows (shaded part is not set earliest...

Owner's Manual
Page 27
... recording selection within 2 seconds after pressing CHANNEL A or V button during steps [5] to [8], the input mode will not function in the Automatic Timer Recording mode. 8 Set the channel number Press CHANNEL A or V button repeatedly until your desired hour appears. (Example: 08) ONE TIME PROGRAM PROGRAM NUMBER 1 DATE 5/ START TIME 0 7, 03 06 'ATP d% END TIME 0 8 3 066, PM m, CHANNEL -- EN 6Al2 START TIME 0 7 Ms PM MS END TIME - -1- -AIN CHANNEL -- . b AUTO • "AUTO" is now completed. Press POWER button. NOTE: STOP button on the remote control...
... recording selection within 2 seconds after pressing CHANNEL A or V button during steps [5] to [8], the input mode will not function in the Automatic Timer Recording mode. 8 Set the channel number Press CHANNEL A or V button repeatedly until your desired hour appears. (Example: 08) ONE TIME PROGRAM PROGRAM NUMBER 1 DATE 5/ START TIME 0 7, 03 06 'ATP d% END TIME 0 8 3 066, PM m, CHANNEL -- EN 6Al2 START TIME 0 7 Ms PM MS END TIME - -1- -AIN CHANNEL -- . b AUTO • "AUTO" is now completed. Press POWER button. NOTE: STOP button on the remote control...

Owner's Manual
Page 28
... VCR PLUS+ SYSTEM First, fill in the boxes below: 1) Write your local channel numbers in "GUIDE CH." column, using see your TV guide magazine or the TV listings of these channel numbers that don't match using the following procedure before you program the automatic timer recording using the number buttons. a_ 41. in "Call letters" column, and write guide channel numbers corresponding call letters in "USER CH." Then, press SELECT button. columns. MENU TIMER PROGRAMMING VCR SETUP" INITIALIZE Channels Line...
... VCR PLUS+ SYSTEM First, fill in the boxes below: 1) Write your local channel numbers in "GUIDE CH." column, using see your TV guide magazine or the TV listings of these channel numbers that don't match using the following procedure before you program the automatic timer recording using the number buttons. a_ 41. in "Call letters" column, and write guide channel numbers corresponding call letters in "USER CH." Then, press SELECT button. columns. MENU TIMER PROGRAMMING VCR SETUP" INITIALIZE Channels Line...
Owner's Manual
Page 29
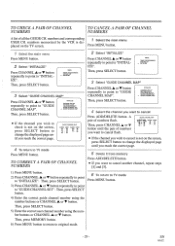
... change the displayed page until you reach the correct page. 5 Delstn it from memor;' Press ADD/DELETE button. • If you want to cancel Press ADD/DELETE button. MENU TIMER PROGRAMMING VCR SET UP INITIALIZE 3 Select "GUIDE CHANNEL MAP" Press CHANNEL A or V button repeatedly to point to TV mode Press MENU button. - 29 - A pair of all the GUIDE CH. Then, press SELECT button. 5) Enter the correct user channel number using the number buttons or CHANNEL A or V button...
... change the displayed page until you reach the correct page. 5 Delstn it from memor;' Press ADD/DELETE button. • If you want to cancel Press ADD/DELETE button. MENU TIMER PROGRAMMING VCR SET UP INITIALIZE 3 Select "GUIDE CHANNEL MAP" Press CHANNEL A or V button repeatedly to point to TV mode Press MENU button. - 29 - A pair of all the GUIDE CH. Then, press SELECT button. 5) Enter the correct user channel number using the number buttons or CHANNEL A or V button...

Owner's Manual
Page 30
... timer recording overlapped. VCR PLUS+ PROG. I • Insert a cassette tape with its erase prevention tab in most newspaper TV listings and TV guide magazine. Then, press SE- PLUS COS?:" --- # For daily recording :To record a TV program at the same time on pages 16, 17. VCR PLUS. VCR PLUS+ PROG. ONCE DAILY WEEKLY , - 30 - Press VCR PLUS+ button. PROS. ONCE DAILY WEEKLY Select the VCR Plus+ set the timer. NOTE: If you press. EN 6Al2 TIMER RECORDING USING THE VCR PLUS...
... timer recording overlapped. VCR PLUS+ PROG. I • Insert a cassette tape with its erase prevention tab in most newspaper TV listings and TV guide magazine. Then, press SE- PLUS COS?:" --- # For daily recording :To record a TV program at the same time on pages 16, 17. VCR PLUS. VCR PLUS+ PROG. ONCE DAILY WEEKLY , - 30 - Press VCR PLUS+ button. PROS. ONCE DAILY WEEKLY Select the VCR Plus+ set the timer. NOTE: If you press. EN 6Al2 TIMER RECORDING USING THE VCR PLUS...

Owner's Manual
Page 32
... that is connected to "VCR SET UP". VCR SET UP TAPE SELECT REPEAT PLAY RENTAL ▪ AUTO RETURN AUDIO OUT TV STEREO SAP -T130 [AUTO] [ON] 5 Tea return to "AUTO RETURN". EN 6Al2 The TIMER indicator will not be done. 1 S6 ,ct the main menu Press MEN TT button. 2 select "VCR SET UP" Press CHANNEL A or V button repeatedly to point to your cable converter box. NOTE: If there are any remaining programs including Daily...
... that is connected to "VCR SET UP". VCR SET UP TAPE SELECT REPEAT PLAY RENTAL ▪ AUTO RETURN AUDIO OUT TV STEREO SAP -T130 [AUTO] [ON] 5 Tea return to "AUTO RETURN". EN 6Al2 The TIMER indicator will not be done. 1 S6 ,ct the main menu Press MEN TT button. 2 select "VCR SET UP" Press CHANNEL A or V button repeatedly to point to your cable converter box. NOTE: If there are any remaining programs including Daily...
Owner's Manual
Page 36
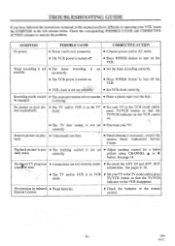
... picture on play- • Video heads are not correctly made. • The TV and/or VCR is in the remote control. - 36 - correctly. IN and ANT. incorrectly. • The VCR power is turned on. • Press POWER button to turn off . • Press POWER button to turn on the VCR. back. • Head cleaning is not connected. picture using CHANNEL A or v button. See pages 9-10. • Set yourTV to the TV mode and/or press TV/VCR button...
... picture on play- • Video heads are not correctly made. • The TV and/or VCR is in the remote control. - 36 - correctly. IN and ANT. incorrectly. • The VCR power is turned on. • Press POWER button to turn off . • Press POWER button to turn on the VCR. back. • Head cleaning is not connected. picture using CHANNEL A or v button. See pages 9-10. • Set yourTV to the TV mode and/or press TV/VCR button...

Owner's Manual
Page 37
...clear picture. • Playback picture may need to read the instructions included with a soft cloth immersed in VHF converter VHF Channel 3 or 4. Professional video head cleaning requires highly technical attention. Do not spray insecticide liquid near the VCR. SPECIFICATIONS GENERAL SPECIFICATIONS Television system : Video heads : Tape width : Tape speed SP: LP: SLP : Tuner channel VHF: UHF : Cable channel : RF converter : Converter output : Timer indication : Operating temperature : Terminals Antenna input : Antenna output : Video input/output : Audio input/output : NTSC...
...clear picture. • Playback picture may need to read the instructions included with a soft cloth immersed in VHF converter VHF Channel 3 or 4. Professional video head cleaning requires highly technical attention. Do not spray insecticide liquid near the VCR. SPECIFICATIONS GENERAL SPECIFICATIONS Television system : Video heads : Tape width : Tape speed SP: LP: SLP : Tuner channel VHF: UHF : Cable channel : RF converter : Converter output : Timer indication : Operating temperature : Terminals Antenna input : Antenna output : Video input/output : Audio input/output : NTSC...


