

Owner's Manual
Page 1
... SUPPLIED ACCESSORIES 5 OPERATING CONTROLS AND FUNCTIONS 6 REMOTE CONTROL OPERATION 8 • HOW TO USE THE REMOTE CONTROL 8 INSTALLING THE BATTERIES 9 CABLE CONNECTIONS 10 COMBINATION VHF/UHF ANTENNA, CATV COAXIAL CABLE 10 INDOOR VHF/UHF ANTENNA 11 SEPARATE UHF/VHF (300-OHM) ANTENNA 11 A/V TERMINALS 12 USING A CABLE CONVERTER BOX 13 CONTROLLING VCR INPUT & OUTPUT 13 VIDEO OUTPUT CHANNEL SETTING (BACK OF VCR) 13 INPUT SELECT 13 CHANNEL MEMORY PROGRAMMING (Without a Cable Box) 14 TO CANCEL, ADD PRESET CHANNEL 15 SETTING THE CLOCK 16 VIEWING AND RECORDING THE...
... SUPPLIED ACCESSORIES 5 OPERATING CONTROLS AND FUNCTIONS 6 REMOTE CONTROL OPERATION 8 • HOW TO USE THE REMOTE CONTROL 8 INSTALLING THE BATTERIES 9 CABLE CONNECTIONS 10 COMBINATION VHF/UHF ANTENNA, CATV COAXIAL CABLE 10 INDOOR VHF/UHF ANTENNA 11 SEPARATE UHF/VHF (300-OHM) ANTENNA 11 A/V TERMINALS 12 USING A CABLE CONVERTER BOX 13 CONTROLLING VCR INPUT & OUTPUT 13 VIDEO OUTPUT CHANNEL SETTING (BACK OF VCR) 13 INPUT SELECT 13 CHANNEL MEMORY PROGRAMMING (Without a Cable Box) 14 TO CANCEL, ADD PRESET CHANNEL 15 SETTING THE CLOCK 16 VIEWING AND RECORDING THE...

Owner's Manual
Page 2
... cable system is provided or the manufacturer's instructions have been adhered to protect it from the appliance. 13. Cleaning-Unplug this video product from battery power,orothersources,refer to provide some specific reason, such as a bookcase or rack unless proper ventilation is grounded so as they exit from overheating, and these openings must not be moved with the video PORTABLE...
... cable system is provided or the manufacturer's instructions have been adhered to protect it from the appliance. 13. Cleaning-Unplug this video product from battery power,orothersources,refer to provide some specific reason, such as a bookcase or rack unless proper ventilation is grounded so as they exit from overheating, and these openings must not be moved with the video PORTABLE...

Owner's Manual
Page 3
... ART 250, PART H) antenna-discharge unit, connection to qualified service personnel under the following the operating instructions. Power Lines-An outside antenna system, extreme care should be situated away from touching such power lines or circuits as this indicates a need for the groundingelectrode.(Fig. Refer all servicing to rain or water. e. Replacement Parts-When replacement parts are covered by a qualified technician to restore the video product to...
... ART 250, PART H) antenna-discharge unit, connection to qualified service personnel under the following the operating instructions. Power Lines-An outside antenna system, extreme care should be situated away from touching such power lines or circuits as this indicates a need for the groundingelectrode.(Fig. Refer all servicing to rain or water. e. Replacement Parts-When replacement parts are covered by a qualified technician to restore the video product to...
Owner's Manual
Page 4
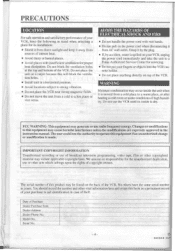
...unit on the back of the VCR. WARNING Moisture condensation may occur inside is dry. Do not use of broadcast television programming, video tape, film or other copyrighted material may be found on a carpet because this product may violate applicable copyright laws. The user... VCR cassette holder. • Do not place anything directly on the power cord when disconnecting it from AC wall outlet. IMPORTANT COPYRIGHT INFORMATION Unauthorized recording or use the VCR until its installation: • Shield it from direct sunlight and keep the following in the instruction manual...
...unit on the back of the VCR. WARNING Moisture condensation may occur inside is dry. Do not use of broadcast television programming, video tape, film or other copyrighted material may be found on a carpet because this product may violate applicable copyright laws. The user... VCR cassette holder. • Do not place anything directly on the power cord when disconnecting it from AC wall outlet. IMPORTANT COPYRIGHT INFORMATION Unauthorized recording or use the VCR until its installation: • Shield it from direct sunlight and keep the following in the instruction manual...

Owner's Manual
Page 5
... cable VDU AID PART NO. (WPZ0I 02.1C001/ 5750398/ WPZ0102BB001/ 5750476) Remote Control Unit PART NO. (UREMT30SR001) Batteries NOTES: • If you play. • Three Different Record/Playback Speeds- FEATURES • Auto Power On and Off System- Select the Standard Play (SP mode), Long Play (LP mode) or Super Long Play (SLP mode) for each tape you need different types of recording/playback with Direct Station Call- (A converter may need to 1 year in hours, minutes, and seconds. The Today Timer Recording feature uses program number...
... cable VDU AID PART NO. (WPZ0I 02.1C001/ 5750398/ WPZ0102BB001/ 5750476) Remote Control Unit PART NO. (UREMT30SR001) Batteries NOTES: • If you play. • Three Different Record/Playback Speeds- FEATURES • Auto Power On and Off System- Select the Standard Play (SP mode), Long Play (LP mode) or Super Long Play (SLP mode) for each tape you need different types of recording/playback with Direct Station Call- (A converter may need to 1 year in hours, minutes, and seconds. The Today Timer Recording feature uses program number...

Owner's Manual
Page 6
... view playback, to monitor video recordings or watch TV or to view one program while recording another. 17 POWER button-Press to turn VCR on screen) during playback or manual recording. 7 OTR button-Press to activate One Touch Recording mode. 8 END button-Press to select desired end time in the Today Timer Rec mode. 9 START button-Press to select desired start time the Today Timer Rec mode. 10 TODAY TIMER REC button-Press to set desired tape speed. 14 Digital Display- OPERATING CONTROLS AND FUNCTIONS FRONT VIEW C=) POWER...
... view playback, to monitor video recordings or watch TV or to view one program while recording another. 17 POWER button-Press to turn VCR on screen) during playback or manual recording. 7 OTR button-Press to activate One Touch Recording mode. 8 END button-Press to select desired end time in the Today Timer Rec mode. 9 START button-Press to select desired start time the Today Timer Rec mode. 10 TODAY TIMER REC button-Press to set desired tape speed. 14 Digital Display- OPERATING CONTROLS AND FUNCTIONS FRONT VIEW C=) POWER...
Owner's Manual
Page 8
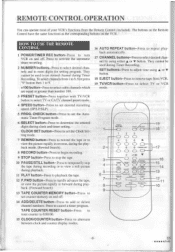
... counter display modes. 16 AUTO REPEAT button-Press to repeat playback automatically. 17 CHANNEL buttons-Press to select desired channel by using A or V button. 18 EJECT button-Press to remove tape from VCR. 19 TV/VCR button-Press to adjust time using either A or V button. SET buttons-Press to select TV or VCR mode. 1 2- 3 4 5 6 7 8 POWER TIMER REC NNCR/EJECT C) 1 2 3 O 5 6A O C) 8 9 GRAPNEL/SET CD SPEED CD 0 O PRESET CD +100 CD AU REVITECAT L---) V coca PROD. To select channels from the Remote Control (included). Press to enter digits for setting program...
... counter display modes. 16 AUTO REPEAT button-Press to repeat playback automatically. 17 CHANNEL buttons-Press to select desired channel by using A or V button. 18 EJECT button-Press to remove tape from VCR. 19 TV/VCR button-Press to adjust time using either A or V button. SET buttons-Press to select TV or VCR mode. 1 2- 3 4 5 6 7 8 POWER TIMER REC NNCR/EJECT C) 1 2 3 O 5 6A O C) 8 9 GRAPNEL/SET CD SPEED CD 0 O PRESET CD +100 CD AU REVITECAT L---) V coca PROD. To select channels from the Remote Control (included). Press to enter digits for setting program...

Owner's Manual
Page 12
... picture and sound quality for monitoring) °Antenna input jack AudioNideo adapter cord (not supplied) 'I0E• AUDIO O O •0UT OO O [Source (Playing) VCR) I O VIDEO TO COPY A VIDEO TAPE Connect Funai/Symphonic editing (recording) VCR, source (playing) VCR and your TV using the followin diagram. Press REC button on the display. - 12 - ***** 5 NOTE: For best results during dubbing, use video-quality shielded cables wi RCA-type connectors. The remote control might affect the playback VCR's operation. • Always use the VCR...
... picture and sound quality for monitoring) °Antenna input jack AudioNideo adapter cord (not supplied) 'I0E• AUDIO O O •0UT OO O [Source (Playing) VCR) I O VIDEO TO COPY A VIDEO TAPE Connect Funai/Symphonic editing (recording) VCR, source (playing) VCR and your TV using the followin diagram. Press REC button on the display. - 12 - ***** 5 NOTE: For best results during dubbing, use video-quality shielded cables wi RCA-type connectors. The remote control might affect the playback VCR's operation. • Always use the VCR...

Owner's Manual
Page 13
... VCR's AUDIO IN /VIDEO IN jacks when copying is automatically disconnected. EN ***** 5A09 __AIMEE& TO RECORD AND VIEW A SCRAMBLED/UNSCRAMBLED CHANNEL. 1. Channel memory progamming is NOT needed when using this unit is not used , the VCR tuner is completed. The RF converter output of TV CATV (Cable) Input To VCR's ANT.OUT Terminal To TV Antenna Jack NOTE: With this connection, you can use the basic connection shown below. USING A CABLE CONVERTER BOX...
... VCR's AUDIO IN /VIDEO IN jacks when copying is automatically disconnected. EN ***** 5A09 __AIMEE& TO RECORD AND VIEW A SCRAMBLED/UNSCRAMBLED CHANNEL. 1. Channel memory progamming is NOT needed when using this unit is not used , the VCR tuner is completed. The RF converter output of TV CATV (Cable) Input To VCR's ANT.OUT Terminal To TV Antenna Jack NOTE: With this connection, you can use the basic connection shown below. USING A CABLE CONVERTER BOX...

Owner's Manual
Page 14
... there is a power failure or the VCR is NOT needed when connected to origi- ■ The display flashes --:--. In these cases, since the programmed channels are erased, the VCR will prompt you with "P" when you c select the desired channel directly by CHANNEL or V button on the remote control unit. 2 Press POWER button to play or record a video tape BEFORE programming the tuner, you subscribe to turn it back on the lowest memorized channel. If you...
... there is a power failure or the VCR is NOT needed when connected to origi- ■ The display flashes --:--. In these cases, since the programmed channels are erased, the VCR will prompt you with "P" when you c select the desired channel directly by CHANNEL or V button on the remote control unit. 2 Press POWER button to play or record a video tape BEFORE programming the tuner, you subscribe to turn it back on the lowest memorized channel. If you...

Owner's Manual
Page 16
... the clock. Then, press CHANNEL/ ■ SET A or V button repeat- SUN • as 5:q0 rsA 0u" -1.9 951." 10 5 Press CLOCK SET button. Although Sp seconds are not displayed, they begin counting at 00 when you use remote control for this procedure. play. 2 Press CLOCK SET button. Then, press CHANNEL/ 8P SET A or V button repeatedly until the correct hour is to be set to: DATE SETTING TIME Wednesday 1st March, 1995 5:40PM. 1 Press POWER/TIMER REC button on the...
... the clock. Then, press CHANNEL/ ■ SET A or V button repeat- SUN • as 5:q0 rsA 0u" -1.9 951." 10 5 Press CLOCK SET button. Although Sp seconds are not displayed, they begin counting at 00 when you use remote control for this procedure. play. 2 Press CLOCK SET button. Then, press CHANNEL/ 8P SET A or V button repeatedly until the correct hour is to be set to: DATE SETTING TIME Wednesday 1st March, 1995 5:40PM. 1 Press POWER/TIMER REC button on the...
Owner's Manual
Page 18
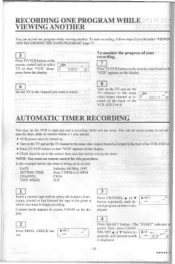
... on the display. • Clock must use remote control for this procedure. NOTE: You must be turned on. • Turn on the TV and set the TV channel to begin recording. In the example below, the timer is dis- CHECK but- POP ton. START LP sired program number is being set to record: DATE SETTING TIME CHANNEL TAPE SPEED Saturday 6th May, 1995 from the display. 0:00:13 f 32 To monitor the progress...
... on the display. • Clock must use remote control for this procedure. NOTE: You must be turned on. • Turn on the TV and set the TV channel to begin recording. In the example below, the timer is dis- CHECK but- POP ton. START LP sired program number is being set to record: DATE SETTING TIME CHANNEL TAPE SPEED Saturday 6th May, 1995 from the display. 0:00:13 f 32 To monitor the progress...

Owner's Manual
Page 21
... ♦ button repeatedly until desired program number is connected to current timer display. NOTE: STOP button on the VCR. O B START SLP - 7: 3D SAT CT p. 15 Repeat steps [2] and [3] for more than 30 seconds, the clock setting and all timer settings will be lost. • If the tape runsout before the end time, the VCR will switch to the Stop mode immediately, eject the tape and the VCR power will be turned ON or...
... ♦ button repeatedly until desired program number is connected to current timer display. NOTE: STOP button on the VCR. O B START SLP - 7: 3D SAT CT p. 15 Repeat steps [2] and [3] for more than 30 seconds, the clock setting and all timer settings will be lost. • If the tape runsout before the end time, the VCR will switch to the Stop mode immediately, eject the tape and the VCR power will be turned ON or...

Owner's Manual
Page 23
When the programs overlap, Today Timer Recording program has priority. PR0GRAMi naliMPOsMaitsz edwagasusen PROGRA2M f
When the programs overlap, Today Timer Recording program has priority. PR0GRAMi naliMPOsMaitsz edwagasusen PROGRA2M f

Owner's Manual
Page 24
... the same VCR video output channel as needed to set the desired recording length. The channel number to be recorded and recording length will be determined by the number of the VCR. (CH3 or 4). 2 Press TV/VCR button on the VCR. Recording starts immediately when the OTR button is . 0: 13:2 1 32 2 Set the VCR to the channel to be shown on the display. 1 Turn on remote control unit so that is reached or the tape runs out...
... the same VCR video output channel as needed to set the desired recording length. The channel number to be recorded and recording length will be determined by the number of the VCR. (CH3 or 4). 2 Press TV/VCR button on the VCR. Recording starts immediately when the OTR button is . 0: 13:2 1 32 2 Set the VCR to the channel to be shown on the display. 1 Turn on remote control unit so that is reached or the tape runs out...

Owner's Manual
Page 25
... repeat play mode, press AUTO REPEAT button again. VIEWING ONLY TV (WITHOUT RECORDING) • The VCR must be turned on the back of the VCR (CH 3 or 4). 2 Insert a tape. NOTES: • Once you turn on. (If the erase-protection tab has been removed, the VCR will start playback automatically.) 2 Press AUTO REPEAT button on the remote control so that "VCR" disappears from the display. - 25 - EN ***** 5A09 VCR will automatically turn off or press TV/VCR button...
... repeat play mode, press AUTO REPEAT button again. VIEWING ONLY TV (WITHOUT RECORDING) • The VCR must be turned on the back of the VCR (CH 3 or 4). 2 Insert a tape. NOTES: • Once you turn on. (If the erase-protection tab has been removed, the VCR will start playback automatically.) 2 Press AUTO REPEAT button on the remote control so that "VCR" disappears from the display. - 25 - EN ***** 5A09 VCR will automatically turn off or press TV/VCR button...

Owner's Manual
Page 27
... adjustment works only in the Still mode with tapes recorded in SLP mode, usually there will "freeze" on the screen. You may view a video tape at a fast speed in the reverse direction, press REW button in its entirety without distracting noise lines. Reverse Direction: To view the tape at a high speed in either F.FWD or REW button while the unit is activated), eject, and the VCR will not auto-rewind during playback, the picture turn off...
... adjustment works only in the Still mode with tapes recorded in SLP mode, usually there will "freeze" on the screen. You may view a video tape at a fast speed in the reverse direction, press REW button in its entirety without distracting noise lines. Reverse Direction: To view the tape at a high speed in either F.FWD or REW button while the unit is activated), eject, and the VCR will not auto-rewind during playback, the picture turn off...

Owner's Manual
Page 28
Window 0 0 CORRECT WRONG REMOVING A CASSETTE 1 Press EJECT button on the unit or on the remote control. 2 When the cassette-in gently, but continuously, on the center-back of the cassette compartment and store it properly. Tab Plastic Tape - 28 - ***** EN 5A09 MODE CASSETTE T-60 T-120 T-160 SP Mode 1 hour 2 hours 2-2/3 hours LP Mode 2 hour 4 hours 5-1/3 hours SLP Mode 3 hours 6 hours 8 hours When handling video tapes, follow the precautions below shows the recording/playback time using a tape with your VCR. Push in indicator goes...
Window 0 0 CORRECT WRONG REMOVING A CASSETTE 1 Press EJECT button on the unit or on the remote control. 2 When the cassette-in gently, but continuously, on the center-back of the cassette compartment and store it properly. Tab Plastic Tape - 28 - ***** EN 5A09 MODE CASSETTE T-60 T-120 T-160 SP Mode 1 hour 2 hours 2-2/3 hours LP Mode 2 hour 4 hours 5-1/3 hours SLP Mode 3 hours 6 hours 8 hours When handling video tapes, follow the precautions below shows the recording/playback time using a tape with your VCR. Push in indicator goes...

Owner's Manual
Page 29
...; Set the timer recording correctly. • Set TIMER REC to on TV. • The VCR is set the TV to remedy the problem. OUT connections. • Check the batteries in Infrared Remote Control. • See "Note" under "Channel Memory Programming" on playback. • Video heads are erased. TROUBLESHOOTING GUIDE If you move your VCR, locate the SYMPTOM in TV mode. cannot be engaged. • The record safety tab on cassette is not set correctly...
...; Set the timer recording correctly. • Set TIMER REC to on TV. • The VCR is set the TV to remedy the problem. OUT connections. • Check the batteries in Infrared Remote Control. • See "Note" under "Channel Memory Programming" on playback. • Video heads are erased. TROUBLESHOOTING GUIDE If you move your VCR, locate the SYMPTOM in TV mode. cannot be engaged. • The record safety tab on cassette is not set correctly...

Owner's Manual
Page 31
... BE CHARGED. AT ANY THIS PRODUCT, PL ATTENTION: FUNAI CORP. THIS WARRANTY DOES NOT COVER PACKING MATERIALS, ANY ACCESSORIES (EXCEPT REMOTE CONTROL), ANY COSMETIC PARTS. AND ITS REPRESENTATIVES OR AGENTS SHALL IN NO EVENT BE LIABLE FOR ANY GENERAL. Two (2) years for RETURN authorization prior to obtain service under this product or damage which occur during normal use...
... BE CHARGED. AT ANY THIS PRODUCT, PL ATTENTION: FUNAI CORP. THIS WARRANTY DOES NOT COVER PACKING MATERIALS, ANY ACCESSORIES (EXCEPT REMOTE CONTROL), ANY COSMETIC PARTS. AND ITS REPRESENTATIVES OR AGENTS SHALL IN NO EVENT BE LIABLE FOR ANY GENERAL. Two (2) years for RETURN authorization prior to obtain service under this product or damage which occur during normal use...


