

Owner's Manual
Page 1
OWNER'S MANUAL VIDEO CASSETTE RECORDER SV211E Sqmphonic 0 0 o0 0 CS) IF YOU NEED ADDITIONAL ASSISTANCE FOR SETUP OR OPERATING AFTER READING OWNER'S MANUAL, PLEASE CALL TOLL FREE: 1-800-242-7158 (EASTERN TIME 9:... 10 INDOOR VHF/UHF ANTENNA 11 SEPARATE UHF/VHF (300-OHM) ANTENNA 11 A/V TERMINALS 12 USING A CABLE CONVERTER BOX 13 CONTROLLING VCR INPUT & OUTPUT 13 VIDEO OUTPUT CHANNEL SETTING (BACK OF VCR) 13 INPUT SELECT 13 CHANNEL MEMORY PROGRAMMING (Without a Cable Box) 14 TO CANCEL, ADD PRESET CHANNEL 15 SETTING THE CLOCK...
OWNER'S MANUAL VIDEO CASSETTE RECORDER SV211E Sqmphonic 0 0 o0 0 CS) IF YOU NEED ADDITIONAL ASSISTANCE FOR SETUP OR OPERATING AFTER READING OWNER'S MANUAL, PLEASE CALL TOLL FREE: 1-800-242-7158 (EASTERN TIME 9:... 10 INDOOR VHF/UHF ANTENNA 11 SEPARATE UHF/VHF (300-OHM) ANTENNA 11 A/V TERMINALS 12 USING A CABLE CONVERTER BOX 13 CONTROLLING VCR INPUT & OUTPUT 13 VIDEO OUTPUT CHANNEL SETTING (BACK OF VCR) 13 INPUT SELECT 13 CHANNEL MEMORY PROGRAMMING (Without a Cable Box) 14 TO CANCEL, ADD PRESET CHANNEL 15 SETTING THE CLOCK...
Owner's Manual
Page 4
...may cause harmful interference unless the modifications are expressly approved in a horizontal position. • Avoid locations subject to strong vibration. • Do not place the VCR near strong magnetic fields. • Do not move the unit from a cold to a hot place or vice versa. Model No. .. 11 - 4 ...You should record the number and other vital information here and retain this equipment if an unauthorized change or modification is spilled on your VCR, unplug the power cord immediately and take the unit to operate this book as yours. The user could lose the authority to a...
...may cause harmful interference unless the modifications are expressly approved in a horizontal position. • Avoid locations subject to strong vibration. • Do not place the VCR near strong magnetic fields. • Do not move the unit from a cold to a hot place or vice versa. Model No. .. 11 - 4 ...You should record the number and other vital information here and retain this equipment if an unauthorized change or modification is spilled on your VCR, unplug the power cord immediately and take the unit to operate this book as yours. The user could lose the authority to a...

Owner's Manual
Page 5
...DTR)- under the illustrations and contact the Funai parts department for ordering. • Depending on different channels up to 1 year in the VCR and the power is possible at any time, for these accessories, please refer to use most of the tape. • Today Timer ...allows recording to be necessary to view scrambled cable channels.) • Infrared Remote Control-Allows you to the PART NO. Automatically turns the VCR on the VCR and playback, rewinding or fast-forwarding will show a clear picture. • 181 Channel Capability PLL Frequency Synthesizer Tuner with a T-160 ...
...DTR)- under the illustrations and contact the Funai parts department for ordering. • Depending on different channels up to 1 year in the VCR and the power is possible at any time, for these accessories, please refer to use most of the tape. • Today Timer ...allows recording to be necessary to view scrambled cable channels.) • Infrared Remote Control-Allows you to the PART NO. Automatically turns the VCR on the VCR and playback, rewinding or fast-forwarding will show a clear picture. • 181 Channel Capability PLL Frequency Synthesizer Tuner with a T-160 ...

Owner's Manual
Page 6
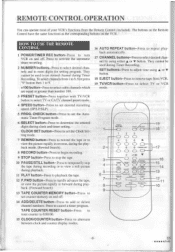
...Today Timer Rec mode. 10 TODAY TIMER REC button-Press to view video in reverse at a faster than normal speed. Press PLAY button to return VCR to normal playback speed. 6 PAUSE/STILL button-Press to temporarily stop tape motion. Press to activate the automatic timer recording. - 6 - *****...faster than normal speed. button-Press to rewind tape or to select the signal source that your TV will receive. Press PLAY button to return VCR to normal playback speed. 4 PLAY button-Press to begin manual recording. 12 CHANNEL buttons- TRACKING function-Press A or to minimize video `...
...Today Timer Rec mode. 10 TODAY TIMER REC button-Press to view video in reverse at a faster than normal speed. Press PLAY button to return VCR to normal playback speed. 6 PAUSE/STILL button-Press to temporarily stop tape motion. Press to activate the automatic timer recording. - 6 - *****...faster than normal speed. button-Press to rewind tape or to select the signal source that your TV will receive. Press PLAY button to return VCR to normal playback speed. 4 PLAY button-Press to begin manual recording. 12 CHANNEL buttons- TRACKING function-Press A or to minimize video `...

Owner's Manual
Page 7
EN ***** 5A09 IN terminal-For connection to video output jack of your audio equipment or another VCR. - 7 - REAR VIEW AND TERMINALS- 18 19 20 2 ILL OPH0M0000[10[10 1 AUDIO 0 ...to the audio input jack of your audio equipment or another VCR. 20 AUDIO IN jack-For connection to audio output jack of your video camera or another VCR. 25 VIDEO OUT jack-For connection to the video in ...TV. 23 CH3/CH4 selector switch-Use to select the video output channel (3 or 4) for playback from the VCR. 24 VIDEO IN jack-For connection to an antenna or CATV. 22 ANT. OUT terminal-For connection to an...
EN ***** 5A09 IN terminal-For connection to video output jack of your audio equipment or another VCR. - 7 - REAR VIEW AND TERMINALS- 18 19 20 2 ILL OPH0M0000[10[10 1 AUDIO 0 ...to the audio input jack of your audio equipment or another VCR. 20 AUDIO IN jack-For connection to audio output jack of your video camera or another VCR. 25 VIDEO OUT jack-For connection to the video in ...TV. 23 CH3/CH4 selector switch-Use to select the video output channel (3 or 4) for playback from the VCR. 24 VIDEO IN jack-For connection to an antenna or CATV. 22 ANT. OUT terminal-For connection to an...
Owner's Manual
Page 8
... "0" button then 1 to 9. +100 button-Press to select cable channels which are equal or greater than number 100. 3 PRESET button-Press together with TV/VCR button to select TV or CATV channel preset mode. 4 SPEED button-Press to set the Automatic Timer Program mode. 6 SELECT button-Press to determine the... to repeat playback automatically. 17 CHANNEL buttons-Press to select desired channel by using A or V button. 18 EJECT button-Press to remove tape from VCR. 19 TV/VCR button-Press to set desired channel during playback. (Forward Search) 13 TAPE COUNTER MEMORY button-Press to select TV or...
... "0" button then 1 to 9. +100 button-Press to select cable channels which are equal or greater than number 100. 3 PRESET button-Press together with TV/VCR button to select TV or CATV channel preset mode. 4 SPEED button-Press to set the Automatic Timer Program mode. 6 SELECT button-Press to determine the... to repeat playback automatically. 17 CHANNEL buttons-Press to select desired channel by using A or V button. 18 EJECT button-Press to remove tape from VCR. 19 TV/VCR button-Press to set desired channel during playback. (Forward Search) 13 TAPE COUNTER MEMORY button-Press to select TV or...
Owner's Manual
Page 10
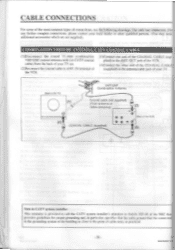
... complex connections, please contact your local dealer or other end of the COAXIAL CABLE (supplied) to the antenna/cable jack of the VCR. (3)Connect one connection. COMBINATION VHF/UIIF ANTENNA, CATV COAXIAL CABLE (l)Disconnect the round 75-ohm combination VHF/UHF coaxial antenna cable ...) .• • 4r:• Coaxial cable (not supplied) (From antenna or cable company) (2) COAXIAL CABLE (supplied) O 0 O 0 ANI IN 0 (Back of the VCR] OU rall (3) Note to CATV system installer This reminder is provided to call the CATV system installer's attention to Article 820-40 of the NEC...
... complex connections, please contact your local dealer or other end of the COAXIAL CABLE (supplied) to the antenna/cable jack of the VCR. (3)Connect one connection. COMBINATION VHF/UIIF ANTENNA, CATV COAXIAL CABLE (l)Disconnect the round 75-ohm combination VHF/UHF coaxial antenna cable ...) .• • 4r:• Coaxial cable (not supplied) (From antenna or cable company) (2) COAXIAL CABLE (supplied) O 0 O 0 ANI IN 0 (Back of the VCR] OU rall (3) Note to CATV system installer This reminder is provided to call the CATV system installer's attention to Article 820-40 of the NEC...

Owner's Manual
Page 11
... (1)Disconnect the indoor UHF/VHF antenna cable from the back of your TV set . (2)Reconnect the cable to the ANT. OUT terminal of the VCR. (4)Connect the other end of the COAXIAL CABLE (supplied) to the ANT. SEPARVAHT(F7E-5OH/MU)H(F30-O0HAMN) TENNA (1)Disconnect the VHF coaxial ... set . (2)Reconnect those cables to a UHF/VHF combiner (not supplied). (3)Connect end of the COAXIAL CABLE (supplied) to the ANT. IN terminal of the VCR. (4)Connect one end of the COAXIAL CABLE (supplied) to a UHF/VHF separator (not supplied). (6)Connect the separator's coaxial end to the TV's VHF jack,...
... (1)Disconnect the indoor UHF/VHF antenna cable from the back of your TV set . (2)Reconnect the cable to the ANT. OUT terminal of the VCR. (4)Connect the other end of the COAXIAL CABLE (supplied) to the ANT. SEPARVAHT(F7E-5OH/MU)H(F30-O0HAMN) TENNA (1)Disconnect the VHF coaxial ... set . (2)Reconnect those cables to a UHF/VHF combiner (not supplied). (3)Connect end of the COAXIAL CABLE (supplied) to the ANT. IN terminal of the VCR. (4)Connect one end of the COAXIAL CABLE (supplied) to a UHF/VHF separator (not supplied). (6)Connect the separator's coaxial end to the TV's VHF jack,...

Owner's Manual
Page 12
...;Antenna input jack AudioNideo adapter cord (not supplied) 'I0E• AUDIO O O •0UT OO O [Source (Playing) VCR) I O VIDEO TO COPY A VIDEO TAPE Connect Funai/Symphonic editing (recording) VCR, source (playing) VCR and your TV. Funai/Symphonic [Editing (Recording) VCR] .00 • • Coaxial cable (supplied) [TV set it to the same output charm as the Funai...
...;Antenna input jack AudioNideo adapter cord (not supplied) 'I0E• AUDIO O O •0UT OO O [Source (Playing) VCR) I O VIDEO TO COPY A VIDEO TAPE Connect Funai/Symphonic editing (recording) VCR, source (playing) VCR and your TV. Funai/Symphonic [Editing (Recording) VCR] .00 • • Coaxial cable (supplied) [TV set it to the same output charm as the Funai...

Owner's Manual
Page 13
...the channel to be sure to shipment from the factory. of TV CATV (Cable) Input To VCR's ANT.OUT Terminal To TV Antenna Jack NOTE: With this unit is automatically disconnected. Press TV/VCR button so that you cannot record one program while viewing another. Cable TV Converter Box IN ...2. TO RECORD AND VIEW A SCRAMBLED/UNSCRAMBLED CHANNEL. 1. INPUT SELECT NOTE: When the AUDIO IN/VIDEO IN jacks are used for normal broadcasts in the VCR position, your cable service supplies you with a cable converter box, you can use the basic connection shown below. This means that...
...the channel to be sure to shipment from the factory. of TV CATV (Cable) Input To VCR's ANT.OUT Terminal To TV Antenna Jack NOTE: With this unit is automatically disconnected. Press TV/VCR button so that you cannot record one program while viewing another. Cable TV Converter Box IN ...2. TO RECORD AND VIEW A SCRAMBLED/UNSCRAMBLED CHANNEL. 1. INPUT SELECT NOTE: When the AUDIO IN/VIDEO IN jacks are used for normal broadcasts in the VCR position, your cable service supplies you with a cable converter box, you can use the basic connection shown below. This means that...

Owner's Manual
Page 14
...the active channels in your area. If you turn it on. • You must first press POWER button to turn ■ on the VCR. CHANNEL MEMORY PROGRAMMING (Without a Cable Box) Channel memory programming is unplugged for channel designations. You can program the tuner to scan only ...from.CH2/ CATV mode: from CHL) To preset channel memory again 1 Turn on this page. 1 4 Plug the VCR power cord into a standard AC outlet. nel. - 14 - ***** 5 The VCR distinguishes between standard TV channels and cable channels. See page 62 for more than 30 seconds. After scanning, the tuner ...
...the active channels in your area. If you turn it on. • You must first press POWER button to turn ■ on the VCR. CHANNEL MEMORY PROGRAMMING (Without a Cable Box) Channel memory programming is unplugged for channel designations. You can program the tuner to scan only ...from.CH2/ CATV mode: from CHL) To preset channel memory again 1 Turn on this page. 1 4 Plug the VCR power cord into a standard AC outlet. nel. - 14 - ***** 5 The VCR distinguishes between standard TV channels and cable channels. See page 62 for more than 30 seconds. After scanning, the tuner ...

Owner's Manual
Page 16
... I • OH - 5:130.N.Lt. 10 3 Press CLOCK SET button. SUN • as 5:q0 rsA 0u" -1.9 951." 10 5 Press CLOCK SET button. the "M" appears on the VCR so that you press it back in. - 16 - ***** Th plug it . • 45° 03.8 1 TEc„ )0 vco, c„ 113;0 1: 5:1-10. 10 NOTES: • When...
... I • OH - 5:130.N.Lt. 10 3 Press CLOCK SET button. SUN • as 5:q0 rsA 0u" -1.9 951." 10 5 Press CLOCK SET button. the "M" appears on the VCR so that you press it back in. - 16 - ***** Th plug it . • 45° 03.8 1 TEc„ )0 vco, c„ 113;0 1: 5:1-10. 10 NOTES: • When...

Owner's Manual
Page 17
...:00 c" 0 2 Select the channel to begin recording. EN **** 5C02 The red "O" indicator lights on D:03: lb 32 Note: To prevent tape damage, avoid leaving the VCR in place, if necessary, rewind or fast forward the tape to the point at ■® cR counter 0:00:00 on the remote control or... the CHANNEL A or 'V button. VCR 0:31:56 32 - 17 - giDEITI I Press REC button. vcP go0:00 32 3 Press SPEED button to resume recording. ► O LP 0:03: I3 32 7 Press ...
...:00 c" 0 2 Select the channel to begin recording. EN **** 5C02 The red "O" indicator lights on D:03: lb 32 Note: To prevent tape damage, avoid leaving the VCR in place, if necessary, rewind or fast forward the tape to the point at ■® cR counter 0:00:00 on the remote control or... the CHANNEL A or 'V button. VCR 0:31:56 32 - 17 - giDEITI I Press REC button. vcP go0:00 32 3 Press SPEED button to resume recording. ► O LP 0:03: I3 32 7 Press ...
Owner's Manual
Page 18
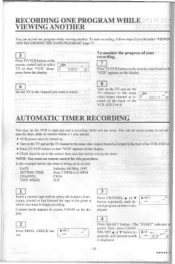
... or 4) as button repeatedly until desired month Tv ""' 32 is displayed. - 18 - ***** POP ton. START LP sired program number is being set the VCR to begin recording. You can record one program while viewing another. Counter mode appears at which you want to start and end a recording while you ... on the TV and set the TV channel to the same video output channel as located on the back of the VCR. (CH3 or • Press TV/VCR button so that "VCR" appears on the TV and set to the correct time and date before setting the timer. peatedly until de- played. 4 Press...
... or 4) as button repeatedly until desired month Tv ""' 32 is displayed. - 18 - ***** POP ton. START LP sired program number is being set the VCR to begin recording. You can record one program while viewing another. Counter mode appears at which you want to start and end a recording while you ... on the TV and set the TV channel to the same video output channel as located on the back of the VCR. (CH3 or • Press TV/VCR button so that "VCR" appears on the TV and set to the correct time and date before setting the timer. peatedly until de- played. 4 Press...

Owner's Manual
Page 19
... Press SELECT button. Then, press CHANNEL/ SET A or V button repeatedly until desired minute is displayed. 6:311. 16 12 Press SELECT button. • "^R' . I ma START LP VCR 3:30; 32 8 Press SELECT button. (The "END" indicator appears) Then, press CHANNEL/ SET A or V button repeatedly until desired tape speed ltd END is displayed. gy...
... Press SELECT button. Then, press CHANNEL/ SET A or V button repeatedly until desired minute is displayed. 6:311. 16 12 Press SELECT button. • "^R' . I ma START LP VCR 3:30; 32 8 Press SELECT button. (The "END" indicator appears) Then, press CHANNEL/ SET A or V button repeatedly until desired tape speed ltd END is displayed. gy...

Owner's Manual
Page 20
... [6] onwards. SID T"" D.S.I35'' 2 Press CHANNEUSET A or V button repeatedly until desired program number is START SLP p. ton. erased. 4 Press PROG.CHECK but- TO CANCEL A PROGRAM • VCR power must be turned ON. The display returns to cr.a original mode. EN ***** 5A09 SID WED cm 5:53 32 - 20 - C , START SAT DATECH 05.05... every week, follow steps [1] to [4] on page 18, then step [5] below . 5 Press CHANNEUSET A or V button repeatedly until all of the week is flashes. < • WEEKIY^VCR 32 Continue with page 19 step [6] onwards.
... [6] onwards. SID T"" D.S.I35'' 2 Press CHANNEUSET A or V button repeatedly until desired program number is START SLP p. ton. erased. 4 Press PROG.CHECK but- TO CANCEL A PROGRAM • VCR power must be turned ON. The display returns to cr.a original mode. EN ***** 5A09 SID WED cm 5:53 32 - 20 - C , START SAT DATECH 05.05... every week, follow steps [1] to [4] on page 18, then step [5] below . 5 Press CHANNEUSET A or V button repeatedly until all of the week is flashes. < • WEEKIY^VCR 32 Continue with page 19 step [6] onwards.

Owner's Manual
Page 21
... timer settings will be lost. • If the tape runsout before the end time, the VCR will switch to the Stop mode immediately, eject the tape and the VCR power will be turned ON or OFF when the VCR is connected to current timer display. EN ***** 5A09 MR START SAI CU "1:30 3 Press... button repeatedly. SAT C14 2:31.3) . HINTS • If there is a power failure or the VCR is unplugged for next program number. 4 Press PROG.CHECK button to return to your VCR may be turned off. NOTE: STOP button on the VCR. rtha ' NED 5 : 50 - 21 - The "121" indicator will not function in the ...
... timer settings will be lost. • If the tape runsout before the end time, the VCR will switch to the Stop mode immediately, eject the tape and the VCR power will be turned ON or OFF when the VCR is connected to current timer display. EN ***** 5A09 MR START SAI CU "1:30 3 Press... button repeatedly. SAT C14 2:31.3) . HINTS • If there is a power failure or the VCR is unplugged for next program number. 4 Press PROG.CHECK button to return to your VCR may be turned off. NOTE: STOP button on the VCR. rtha ' NED 5 : 50 - 21 - The "121" indicator will not function in the ...

Owner's Manual
Page 22
...[5]. 7 Press TODAY TIMER REC button to return to original Lo mode. Press SPEED button until your desired tape speed is displayed. This turns the VCR power off, and the "Rl" indicator lights up on the display. Press START button repeat- Press END button repeatedly or hold it down until your...current time. 63 WED 8:1:15 - 22 - The program number "8" is being set to the count mode. 2 Press TODAY TIMER REC button on the VCR. It is displayed. In the example below, the Today Timer is displayed with its safety tab in place. (If necessary, rewind or fast forward the...
...[5]. 7 Press TODAY TIMER REC button to return to original Lo mode. Press SPEED button until your desired tape speed is displayed. This turns the VCR power off, and the "Rl" indicator lights up on the display. Press START button repeat- Press END button repeatedly or hold it down until your...current time. 63 WED 8:1:15 - 22 - The program number "8" is being set to the count mode. 2 Press TODAY TIMER REC button on the VCR. It is displayed. In the example below, the Today Timer is displayed with its safety tab in place. (If necessary, rewind or fast forward the...

Owner's Manual
Page 23
PR0GRAMi naliMPOsMaitsz edwagasusen PROGRA2M f When the programs overlap, Today Timer Recording program has priority.
PR0GRAMi naliMPOsMaitsz edwagasusen PROGRA2M f When the programs overlap, Today Timer Recording program has priority.

Owner's Manual
Page 24
...; The recording length time remaining is indicated on the display as located on the back of the VCR. (CH3 or 4). 2 Press TV/VCR button on remote control unit so that "VCR" appears on the VCR. NOTE: The VCR will be determined by the number of the tape). • When OTR button is . 0: 13:2 1 32 2 ... the desired recording length. According to the table, simply press OTR button as many times as needed to set the TV channel to the same VCR video output channel as the recording is started. • Recording stops when 0:00 is reached. • Please note that in the SLP mode maximum ...
...; The recording length time remaining is indicated on the display as located on the back of the VCR. (CH3 or 4). 2 Press TV/VCR button on remote control unit so that "VCR" appears on the VCR. NOTE: The VCR will be determined by the number of the tape). • When OTR button is . 0: 13:2 1 32 2 ... the desired recording length. According to the table, simply press OTR button as many times as needed to set the TV channel to the same VCR video output channel as the recording is started. • Recording stops when 0:00 is reached. • Please note that in the SLP mode maximum ...

