
SD Supported Media
Page 1
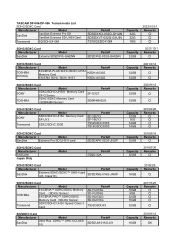
TASCAM DP-004/DP-006 Tested media List SDHC/SDXC Card Manufacturer Model SanDisk SanDisk Extreme Pro SD SanDisk Extreme SD UHS-ICard Transcend SD/SDHC410M Parts# SDSDXXO-032G-GHJIN SDSDXVT-032G-GHJIN TS16GSDC410M Capacity 32G 32G 16G 2022/10/31 Remarks ○ ○ ○ SDHC/SDXC Card Manufacturer Model SanDisk Extreme SDSDXV5-GHENN Parts# SDSDXVE-032G-GHENN Capacity 32GB 2021...
TASCAM DP-004/DP-006 Tested media List SDHC/SDXC Card Manufacturer Model SanDisk SanDisk Extreme Pro SD SanDisk Extreme SD UHS-ICard Transcend SD/SDHC410M Parts# SDSDXXO-032G-GHJIN SDSDXVT-032G-GHJIN TS16GSDC410M Capacity 32G 32G 16G 2022/10/31 Remarks ○ ○ ○ SDHC/SDXC Card Manufacturer Model SanDisk Extreme SDSDXV5-GHENN Parts# SDSDXVE-032G-GHENN Capacity 32GB 2021...

SD Supported Media
Page 2
...J35 SDSDUP-032G-J35 SDSDUP-016G-J35 SDSDUP-008G-J35 SDSDB-032G-J35U SDSDB-016G-J35U RP-SDUC32GJK RP-SDUC16GJK TASCAM DP-006 Tested media List SD/SDHC Card Manufacturer Model Parts# SanDisk Extreme Pro SDHC (UHS-I/Class10) SDSDXPA-032G-J35 Read : 95MB/s Write : 90MB/s SDSDXPA-016G-J35 Extreme SDHC SDSDXS-...-J35 Extreme Pro SDHC UHS-I SDSDXP1-032G-J95 SDSDXP1-008G-J95 Extreme SDHC UHS-I (Class10) SDSDX-032G-J95 SDSDX-016G-J95 SDSDX-008G-J95 SDSDX-004G-J95 Extreme (Class10) 30MB/s SDSDX3-032G-J31A SDSDX3-016G-J31A SDSDX3-008G-J31A SDSDX3-004G-J31A Extreme HD Video 20MB/S ...
...J35 SDSDUP-032G-J35 SDSDUP-016G-J35 SDSDUP-008G-J35 SDSDB-032G-J35U SDSDB-016G-J35U RP-SDUC32GJK RP-SDUC16GJK TASCAM DP-006 Tested media List SD/SDHC Card Manufacturer Model Parts# SanDisk Extreme Pro SDHC (UHS-I/Class10) SDSDXPA-032G-J35 Read : 95MB/s Write : 90MB/s SDSDXPA-016G-J35 Extreme SDHC SDSDXS-...-J35 Extreme Pro SDHC UHS-I SDSDXP1-032G-J95 SDSDXP1-008G-J95 Extreme SDHC UHS-I (Class10) SDSDX-032G-J95 SDSDX-016G-J95 SDSDX-008G-J95 SDSDX-004G-J95 Extreme (Class10) 30MB/s SDSDX3-032G-J31A SDSDX3-016G-J31A SDSDX3-008G-J31A SDSDX3-004G-J31A Extreme HD Video 20MB/S ...

SD Supported Media
Page 4
Over time, these specific cards may become unavailable. At that is currently available which remains within the maximum capacity limit. Super Value (Class4) SDHC Multi Use (Class2) SD Multi Use LSD8GBASVDJP LSD4GBASVDJP LSD8GBACJP LSD4GBACJP LSD2GBACJP 8GB OK 4GB OK 8GB NG 4GB OK 2GB OK Notice: The above cards were tested successfully with the most similar specifications that time, it would be best to contact the CF/SD card manufacturer directly and have them suggest the model with this model.
Over time, these specific cards may become unavailable. At that is currently available which remains within the maximum capacity limit. Super Value (Class4) SDHC Multi Use (Class2) SD Multi Use LSD8GBASVDJP LSD4GBASVDJP LSD8GBACJP LSD4GBACJP LSD2GBACJP 8GB OK 4GB OK 8GB NG 4GB OK 2GB OK Notice: The above cards were tested successfully with the most similar specifications that time, it would be best to contact the CF/SD card manufacturer directly and have them suggest the model with this model.
Owners Manual English
Page 2
...amplifiers) that you can cause hear- The wide blade or the third prong are provided for replacement of eyesight. Do not expose this should not be located close enough to the AC outlet so that produce heat. 9 Do not defeat the safety purpose of time. 14 Refer all instructions. 5 Do not use... 2 TASCAM DP-004 •• Do not place any heat sources such as power-supply cord or plug is...operable. •• An apparatus with Class I construction shall be connected to an AC outlet with a protective grounding connection. •• Batteries (battery pack or batteries installed...
...amplifiers) that you can cause hear- The wide blade or the third prong are provided for replacement of eyesight. Do not expose this should not be located close enough to the AC outlet so that produce heat. 9 Do not defeat the safety purpose of time. 14 Refer all instructions. 5 Do not use... 2 TASCAM DP-004 •• Do not place any heat sources such as power-supply cord or plug is...operable. •• An apparatus with Class I construction shall be connected to an AC outlet with a protective grounding connection. •• Batteries (battery pack or batteries installed...
Owners Manual English
Page 3
... installation. TO THE USER This equipment has been tested and found to comply with the instruction manual, may cause undesired operation. These limits are designed to operate this equipment does cause harmful interference to radio or television reception, which the receiver is subject to radio communications. Telephone number : 1-323-726-0303 This device complies with Part 15 of Conformity Model Number : DP-004 Trade Name : TASCAM Responsible...
... installation. TO THE USER This equipment has been tested and found to comply with the instruction manual, may cause undesired operation. These limits are designed to operate this equipment does cause harmful interference to radio or television reception, which the receiver is subject to radio communications. Telephone number : 1-323-726-0303 This device complies with Part 15 of Conformity Model Number : DP-004 Trade Name : TASCAM Responsible...
Owners Manual English
Page 5
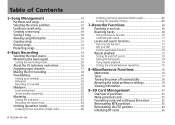
... the power 35 Installing batteries 35 Connecting an AC adapter (sold separately 36 Start-up & shutdown 36 Starting up the unit 36 Shutting down 37 Formatting SD cards 38 Display screens 39 Home Screen 39 Screen Organization 40 Using the screens 41 Editing names 43 Recorder modes 44 Connecting with other equipment 45 Rear panel connections 45 Right side panel connections 45 Left side panel connections 46 Setting the contrast 46 TASCAM DP-004 5
... the power 35 Installing batteries 35 Connecting an AC adapter (sold separately 36 Start-up & shutdown 36 Starting up the unit 36 Shutting down 37 Formatting SD cards 38 Display screens 39 Home Screen 39 Screen Organization 40 Using the screens 41 Editing names 43 Recorder modes 44 Connecting with other equipment 45 Rear panel connections 45 Right side panel connections 45 Left side panel connections 46 Setting the contrast 46 TASCAM DP-004 5
Owners Manual English
Page 6
... Erasing songs 52 Protecting songs 53 6-Basic Recording 54 Selecting the input source 54 Monitoring the input signal 55 Setting the monitoring mode 55 About the OL indicators and meters 56 Assigning input channels 57 Making the first recording 58 Overdubbing 60 Setting up to overdub 61 Rehearsal 61 Recording an overdub 62 Mixdown 62 Level and balance 62 Stereo position (panning 62 Mastering 62 Setting the end point...
... Erasing songs 52 Protecting songs 53 6-Basic Recording 54 Selecting the input source 54 Monitoring the input signal 55 Setting the monitoring mode 55 About the OL indicators and meters 56 Assigning input channels 57 Making the first recording 58 Overdubbing 60 Setting up to overdub 61 Rehearsal 61 Recording an overdub 62 Mixdown 62 Level and balance 62 Stereo position (panning 62 Mastering 62 Setting the end point...

Owners Manual English
Page 12
CAUTION The volume adjustment dial is ON. POWER indicator Headphones 12 TASCAM DP-004 If you do so, the unit cannot shut down properly and all unsaved settings and recorded data will be powered by a PS-P520 power adapter (sold separately) (see "Connecting an AC adapter" on the display. Lost data cannot be restored. • The included alkaline batteries are for example. Sudden...
CAUTION The volume adjustment dial is ON. POWER indicator Headphones 12 TASCAM DP-004 If you do so, the unit cannot shut down properly and all unsaved settings and recorded data will be powered by a PS-P520 power adapter (sold separately) (see "Connecting an AC adapter" on the display. Lost data cannot be restored. • The included alkaline batteries are for example. Sudden...
Owners Manual English
Page 15
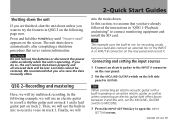
... part on track 1 and a lead guitar part on track 2. TIP This example uses the built-in "QSG 1-Playback and mixing" to connect monitoring equipment and install the SD card. Then, we will try the features in mic to record a voice on track 3. QSG 2-Recording and mastering Here, we will be restored. We recommend that saves various information. TASCAM DP-004 15 Shutting...
... part on track 1 and a lead guitar part on track 2. TIP This example uses the built-in "QSG 1-Playback and mixing" to connect monitoring equipment and install the SD card. Then, we will try the features in mic to record a voice on track 3. QSG 2-Recording and mastering Here, we will be restored. We recommend that saves various information. TASCAM DP-004 15 Shutting...

Owners Manual English
Page 17
... to load SONG001 to STEREO, input signals from INPUT A and INPUT B channels are output separately on the INPUT SETTING screen is too low after adjusting it according to open the SONG menu screen. 3 Use the DATA wheel to select LOAD and press F4 (¥) to the loudness of the subject being recorded. Set to record your song. 1 With the transport stopped and the Home Screen TASCAM DP-004 17 If you are...
... to load SONG001 to STEREO, input signals from INPUT A and INPUT B channels are output separately on the INPUT SETTING screen is too low after adjusting it according to open the SONG menu screen. 3 Use the DATA wheel to select LOAD and press F4 (¥) to the loudness of the subject being recorded. Set to record your song. 1 With the transport stopped and the Home Screen TASCAM DP-004 17 If you are...

Owners Manual English
Page 18
... to change track recording sources. Adjusting the input level and monitoring Use the INPUT A channel LEVEL knob to track 1 in this example. OL indicator When you play the guitar, its input level is too loud. Therefore, the guitar is already set to record to tracks 1 and 3 and MIC B is ready to record to the Home Screen. In this case, lower the output level on the screen. 18 TASCAM DP-004 The SONG menu screen reopens...
... to change track recording sources. Adjusting the input level and monitoring Use the INPUT A channel LEVEL knob to track 1 in this example. OL indicator When you play the guitar, its input level is too loud. Therefore, the guitar is already set to record to tracks 1 and 3 and MIC B is ready to record to the Home Screen. In this case, lower the output level on the screen. 18 TASCAM DP-004 The SONG menu screen reopens...

Owners Manual English
Page 21
... set the stereo position of the track signal. • If you are satisfied with the recorded sound, follow the procedures above again from the beginning. In the initial setting, INPUT A is assigned as the recording source for tracks 1 and 3, and INPUT B is assigned as the recording source for each track are not satisfied with this recording continue to the next section. TASCAM DP-004...
... set the stereo position of the track signal. • If you are satisfied with the recorded sound, follow the procedures above again from the beginning. In the initial setting, INPUT A is assigned as the recording source for tracks 1 and 3, and INPUT B is assigned as the recording source for each track are not satisfied with this recording continue to the next section. TASCAM DP-004...

Owners Manual English
Page 29
... assigned channel becomes the recording signal source for INPUT A and INPUT B. (See "Making the first recording" on every track in recording standby mode (the key flashes). If you press the PLAY (¥) key while holding the STOP ( ·) key to open the HISTORY screen where you can select the input source. (See "Selecting the input source" on page 54.) 8 INPUT A and INPUT B LEVEL knobs and OL indicators Use these knobs to adjust...
... assigned channel becomes the recording signal source for INPUT A and INPUT B. (See "Making the first recording" on every track in recording standby mode (the key flashes). If you press the PLAY (¥) key while holding the STOP ( ·) key to open the HISTORY screen where you can select the input source. (See "Selecting the input source" on page 54.) 8 INPUT A and INPUT B LEVEL knobs and OL indicators Use these knobs to adjust...
Owners Manual English
Page 37
... do not wear headphones connected to the unit when switching power on or off after conducting the necessary procedures on . Lost data cannot be lost. If you turn the power back on the computer to the unit. TASCAM DP-004 37 Also, do so, the unit cannot shut down the unit regardless of any speakers or amplifiers connected to unmount the unit...
... do not wear headphones connected to the unit when switching power on or off after conducting the necessary procedures on . Lost data cannot be lost. If you turn the power back on the computer to the unit. TASCAM DP-004 37 Also, do so, the unit cannot shut down the unit regardless of any speakers or amplifiers connected to unmount the unit...

Owners Manual English
Page 54
... to set the input sources for the INPUT A and INPUT B channels. 54 TASCAM DP-004 2 Use the F3 (§) and F4 (¶) keys to select the IN A or IN B setting, and turn the DATA wheel to open the INPUT SETTING screen. Mic, line and guitar signals can be selected as input sources. The built-in microphones (front panel MIC A and MIC B) and external input signals (input through the INPUT A channel. IN A selection choices OFF: input OFF INT.MIC A-Low: built-in MIC A (low sensitivity) INT.MIC A-Mid...
... to set the input sources for the INPUT A and INPUT B channels. 54 TASCAM DP-004 2 Use the F3 (§) and F4 (¶) keys to select the IN A or IN B setting, and turn the DATA wheel to open the INPUT SETTING screen. Mic, line and guitar signals can be selected as input sources. The built-in microphones (front panel MIC A and MIC B) and external input signals (input through the INPUT A channel. IN A selection choices OFF: input OFF INT.MIC A-Low: built-in MIC A (low sensitivity) INT.MIC A-Mid...

Owners Manual English
Page 58
... assigned as the recording source for tracks 1 and 3, and INPUT B is assigned as the recording source for each track (1-4) is shown. Monitoring headphones should also be connected. 1 Press the REC key of two tracks can be recorded simultaneously. 6-Basic Recording 1 Press ASSIGN to open the INPUT ASSIGN screen. 4 When finished making settings, press the HOME key to return to IN A or IN B. 58 TASCAM DP-004...
... assigned as the recording source for tracks 1 and 3, and INPUT B is assigned as the recording source for each track (1-4) is shown. Monitoring headphones should also be connected. 1 Press the REC key of two tracks can be recorded simultaneously. 6-Basic Recording 1 Press ASSIGN to open the INPUT ASSIGN screen. 4 When finished making settings, press the HOME key to return to IN A or IN B. 58 TASCAM DP-004...

Owners Manual English
Page 77
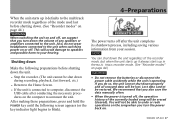
... set the INPUT A input source to GUITAR/LINE (see "Selecting the input source" on page 54). 3 When the transport is stopped and the Home Screen is open, press MENU to open the TUNER screen. 8-Miscellaneous Functions • When the metronome is operating, you can adjust the LEVEL, but the string pitch is too low. The value of the A note between 435 and 445 Hz. Tuner Use the built-in tune...
... set the INPUT A input source to GUITAR/LINE (see "Selecting the input source" on page 54). 3 When the transport is stopped and the Home Screen is open, press MENU to open the TUNER screen. 8-Miscellaneous Functions • When the metronome is operating, you can adjust the LEVEL, but the string pitch is too low. The value of the A note between 435 and 445 Hz. Tuner Use the built-in tune...

Tested Media List
Page 2
... 8GB OK LSD4GBASVDJP 4GB OK SDHC (Multi Use Class 2) LSD4GBACJP 4GB OK SD (Multi Use Class 2) LSD2GBACJP 2GB OK Notice: The above cards were tested successfully with the most similar specifications that time, it would be best to contact the CF/SD card manufacturer directly and have them suggest the model with this model. At that is currently available which remains...
... 8GB OK LSD4GBASVDJP 4GB OK SDHC (Multi Use Class 2) LSD4GBACJP 4GB OK SD (Multi Use Class 2) LSD2GBACJP 2GB OK Notice: The above cards were tested successfully with the most similar specifications that time, it would be best to contact the CF/SD card manufacturer directly and have them suggest the model with this model. At that is currently available which remains...

Update Instructions
Page 1
... update is insufficient. 1 Download the most recent version of your DP-004 before conducting a firmware update. 1 Turn the unit's power ON. 2 Press the MENU key to open the MENU screen, select "INFORMATION" and press the F4 (¥) key. 3 When the INFORMATION screen appears, press F4 (NEXT) three times so the screen changes to F/W (4/4) to update the unit's firmware if the version shown is an example. The program has been set...
... update is insufficient. 1 Download the most recent version of your DP-004 before conducting a firmware update. 1 Turn the unit's power ON. 2 Press the MENU key to open the MENU screen, select "INFORMATION" and press the F4 (¥) key. 3 When the INFORMATION screen appears, press F4 (NEXT) three times so the screen changes to F/W (4/4) to update the unit's firmware if the version shown is an example. The program has been set...

version 1.01 release notes
Page 1
... to the INPUT SETTING screen so you can record a low output guitar with a computer. DP-004 Release Notes Updates Always use the previous selection item. [Inputs set to GUITAR/LINE M and LINE Mid] V1.01 fixes A bug that you planned to update to check for the latest firmware. V1.02 fixes •• The following the correct procedures, remove the USB cable and turn the unit power OFF. 5 While...
... to the INPUT SETTING screen so you can record a low output guitar with a computer. DP-004 Release Notes Updates Always use the previous selection item. [Inputs set to GUITAR/LINE M and LINE Mid] V1.01 fixes A bug that you planned to update to check for the latest firmware. V1.02 fixes •• The following the correct procedures, remove the USB cable and turn the unit power OFF. 5 While...
