
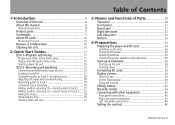
SD Supported Media
Page 1
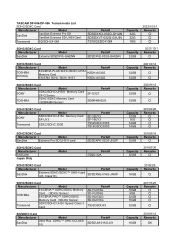
TASCAM DP-004/DP-006 Tested media List SDHC/SDXC Card Manufacturer Model SanDisk SanDisk Extreme Pro SD SanDisk Extreme SD UHS-ICard Transcend SD/SDHC410M Parts# SDSDXXO-032G-.../SDXC Card Manufacturer Model SanDisk Extreme Pro SD UHS-II card Parts# SDSDXPK-032G-JNJIP Capacity 32GB 2018/9/19 Remarks ○ SDHC/SDXC Card Manufacturer TASCAM Japan Only Model Parts# TSQD-32A Capacity 32GB 2018/5/30 Remarks ○ SDHC/SDXC Card Manufacturer Model Parts# SanDisk Extreme SDHC/SDXC™ UHS-I card...
TASCAM DP-004/DP-006 Tested media List SDHC/SDXC Card Manufacturer Model SanDisk SanDisk Extreme Pro SD SanDisk Extreme SD UHS-ICard Transcend SD/SDHC410M Parts# SDSDXXO-032G-.../SDXC Card Manufacturer Model SanDisk Extreme Pro SD UHS-II card Parts# SDSDXPK-032G-JNJIP Capacity 32GB 2018/9/19 Remarks ○ SDHC/SDXC Card Manufacturer TASCAM Japan Only Model Parts# TSQD-32A Capacity 32GB 2018/5/30 Remarks ○ SDHC/SDXC Card Manufacturer Model Parts# SanDisk Extreme SDHC/SDXC™ UHS-I card...
Owners Manual English
Page 2
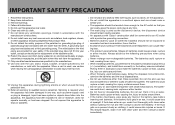
...) that you can cause hear- Batteries could rupture or leak, causing fire or injury. •• When installing batteries, pay attention to drips or splashes. 2 TASCAM DP-004 •• Do not place any objects filled with the manufacturer's instructions. 8 Do not install near water. 6 Clean only with clean water without rubbing the...
...) that you can cause hear- Batteries could rupture or leak, causing fire or injury. •• When installing batteries, pay attention to drips or splashes. 2 TASCAM DP-004 •• Do not place any objects filled with the manufacturer's instructions. 8 Do not install near water. 6 Clean only with clean water without rubbing the...
Owners Manual English
Page 3
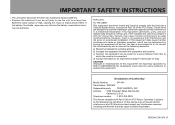
...any fluid on a circuit different from that to which can radiate radio frequency energy and, if not installed and used in a residential installation. A. TASCAM DP-004 3 c) Connect the equipment into an outlet on the battery case before insert- b) Increase the separation between the equipment and receiver. ing new batteries....installation. FOR U.S.A. TO THE USER This equipment has been tested and found to comply with Part 15 of Conformity Model Number : DP-004 Trade Name : TASCAM Responsible party : TEAC AMERICA, INC. a) Reorient or relocate the receiving antenna.
...any fluid on a circuit different from that to which can radiate radio frequency energy and, if not installed and used in a residential installation. A. TASCAM DP-004 3 c) Connect the equipment into an outlet on the battery case before insert- b) Increase the separation between the equipment and receiver. ing new batteries....installation. FOR U.S.A. TO THE USER This equipment has been tested and found to comply with Part 15 of Conformity Model Number : DP-004 Trade Name : TASCAM Responsible party : TEAC AMERICA, INC. a) Reorient or relocate the receiving antenna.
Owners Manual English
Page 4
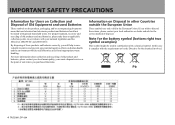
... and ask for the correct method of old products and used electrical and electronic products and batteries should not be mixed with a chemical symbol. Pb 4 TASCAM DP-004 For proper treatment, recovery and recycling of disposal. By disposing of these products and batteries correctly, you wish to save valuable resources and prevent any...
... and ask for the correct method of old products and used electrical and electronic products and batteries should not be mixed with a chemical symbol. Pb 4 TASCAM DP-004 For proper treatment, recovery and recycling of disposal. By disposing of these products and batteries correctly, you wish to save valuable resources and prevent any...
Owners Manual English
Page 5
... modes 44 Connecting with other equipment 45 Rear panel connections 45 Right side panel connections 45 Left side panel connections 46 Setting the contrast 46 TASCAM DP-004 5
... modes 44 Connecting with other equipment 45 Rear panel connections 45 Right side panel connections 45 Left side panel connections 46 Setting the contrast 46 TASCAM DP-004 5
Owners Manual English
Page 6
... 81 Write-protected cards 81 Formatting cards and setting partition sizes 82 Reformatting MTR partitions 83 Reformatting the FAT partition 84 Initializing SD cards 85 6 TASCAM DP-004
... 81 Write-protected cards 81 Formatting cards and setting partition sizes 82 Reformatting MTR partitions 83 Reformatting the FAT partition 84 Initializing SD cards 85 6 TASCAM DP-004
Owners Manual English
Page 8
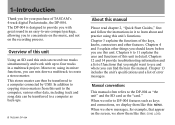
.... When we display them like this: MENU. This stereo master can then be transferred to a computer as back-ups. 8 TASCAM DP-004 About this manual Please read chapter 2, "Quick Start Guides," first and follow the instructions in an easy-to-use compact package,... using this unit's functions. Chapters 4 and 5 explain other features. Chapter 13 includes the unit's specifications and a list of TASCAM's 4-track digital Pocketstudio, the DP-004. Manual conventions This manual often refers to a computer connected by USB. When we show messages, for your purchase of error messages...
.... When we display them like this: MENU. This stereo master can then be transferred to a computer as back-ups. 8 TASCAM DP-004 About this manual Please read chapter 2, "Quick Start Guides," first and follow the instructions in an easy-to-use compact package,... using this unit's functions. Chapters 4 and 5 explain other features. Chapter 13 includes the unit's specifications and a list of TASCAM's 4-track digital Pocketstudio, the DP-004. Manual conventions This manual often refers to a computer connected by USB. When we show messages, for your purchase of error messages...
Owners Manual English
Page 9
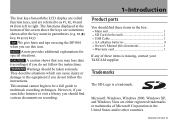
WARNING Warnings should be a full guide to right. Trademarks The SD Logo is missing, contact your TASCAM supplier. F4 (¥) key, F2 (EXEC) key). This manual cannot begin to be taken seriously. Microsoft, Windows, Windows 2000, Windows XP, and Windows ...follow the instructions. TIP We give hints and tips on recording. 1-Introduction Product parts You should find various documents on using the DP-004 when you do not follow the instructions. TASCAM DP-004 9 However, if you search the Internet or visit a library you should find these items in the box: •• ...
WARNING Warnings should be a full guide to right. Trademarks The SD Logo is missing, contact your TASCAM supplier. F4 (¥) key, F2 (EXEC) key). This manual cannot begin to be taken seriously. Microsoft, Windows, Windows 2000, Windows XP, and Windows ...follow the instructions. TIP We give hints and tips on recording. 1-Introduction Product parts You should find various documents on using the DP-004 when you do not follow the instructions. TASCAM DP-004 9 However, if you search the Internet or visit a library you should find these items in the box: •• ...

Owners Manual English
Page 10
...have been tested with a soft dry cloth. Beware of Apple Inc. Other company names and product names in the air could damage the surface. 10 TASCAM DP-004 Do not use SD cards are trademarks of condensation If the unit is a danger of their respective owners. A list of SD cards that are ...at least 512 MB in extremely humid places. •• Do not let them get wet. •• Do not put things on the TASCAM web site (www.tascam.com). Precautions for use any benzene, paint thinner, ethyl alcohol or other chemical agents to a warm place, or used . vapor in this ...
...have been tested with a soft dry cloth. Beware of Apple Inc. Other company names and product names in the air could damage the surface. 10 TASCAM DP-004 Do not use SD cards are trademarks of condensation If the unit is a danger of their respective owners. A list of SD cards that are ...at least 512 MB in extremely humid places. •• Do not let them get wet. •• Do not put things on the TASCAM web site (www.tascam.com). Precautions for use any benzene, paint thinner, ethyl alcohol or other chemical agents to a warm place, or used . vapor in this ...
Owners Manual English
Page 11
... Card into the slot. A screen prompting you to format it is ON. The SD card with this unit, it appears if you remove the card. TASCAM DP-004 11 Lost data cannot be lost.
... Card into the slot. A screen prompting you to format it is ON. The SD card with this unit, it appears if you remove the card. TASCAM DP-004 11 Lost data cannot be lost.

Owners Manual English
Page 12
...P520 power adapter (sold separately) (see "Connecting an AC adapter" on screen (or the POWER key indicator lights green). POWER indicator Headphones 12 TASCAM DP-004 TIP You can cause hearing damage and speaker damage, for confirming operation of the unit and might not last very long. 3 Close the battery ...will be lost. Sudden bursts of loud sounds can also attach an amplifier or speakers with built-in the direction of the arrow until TASCAM appears on page 36). CAUTION The volume adjustment dial is ON. CAUTION • Do not remove the batteries or disconnect the power ...
...P520 power adapter (sold separately) (see "Connecting an AC adapter" on screen (or the POWER key indicator lights green). POWER indicator Headphones 12 TASCAM DP-004 TIP You can cause hearing damage and speaker damage, for confirming operation of the unit and might not last very long. 3 Close the battery ...will be lost. Sudden bursts of loud sounds can also attach an amplifier or speakers with built-in the direction of the arrow until TASCAM appears on page 36). CAUTION The volume adjustment dial is ON. CAUTION • Do not remove the batteries or disconnect the power ...

Owners Manual English
Page 13
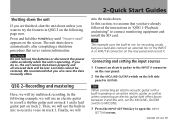
... the Home Screen. 2 Rotate the DATA wheel to select SONG, and press the F4 (¥) key to select DEMOSONG, and press the F2 (EXEC) key. TASCAM DP-004 13 The MENU screen is open the SONG screen. 2-Quick Start Guides Playing and mixing the demo song Before the unit is shipped, a demo song...
... the Home Screen. 2 Rotate the DATA wheel to select SONG, and press the F4 (¥) key to select DEMOSONG, and press the F2 (EXEC) key. TASCAM DP-004 13 The MENU screen is open the SONG screen. 2-Quick Start Guides Playing and mixing the demo song Before the unit is shipped, a demo song...

Owners Manual English
Page 14
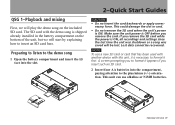
Use the LEVEL knobs to adjust the stereo position of all four tracks at the same time. The standard position is around 2-3 o'clock. Use the VOLUME dial to adjust the final monitoring level. 7 Use the PAN knobs to adjust the balance between tracks 1-4. The MASTER LEVEL knob adjusts the volume of tracks 1-4. 14 TASCAM DP-004 2-Quick Start Guides 6 To hear the demo song, press the ¥ key and use the LEVEL knobs for tracks 1-4, the MASTER LEVEL knob and the VOLUME dial.
Use the LEVEL knobs to adjust the stereo position of all four tracks at the same time. The standard position is around 2-3 o'clock. Use the VOLUME dial to adjust the final monitoring level. 7 Use the PAN knobs to adjust the balance between tracks 1-4. The MASTER LEVEL knob adjusts the volume of tracks 1-4. 14 TASCAM DP-004 2-Quick Start Guides 6 To hear the demo song, press the ¥ key and use the LEVEL knobs for tracks 1-4, the MASTER LEVEL knob and the VOLUME dial.
Owners Manual English
Page 15
... part on track 1 and a lead guitar part on the following example, we will try the features in "QSG 1-Playback and mixing" to try multitrack recording. TASCAM DP-004 15 Finally, we will use an electric guitar to open the INPUT SETTING screen. Then, we will use the built-in mic for recording vocals...
... part on track 1 and a lead guitar part on the following example, we will try the features in "QSG 1-Playback and mixing" to try multitrack recording. TASCAM DP-004 15 Finally, we will use an electric guitar to open the INPUT SETTING screen. Then, we will use the built-in mic for recording vocals...

Owners Manual English
Page 16
The IN A and IN B items are used to set the IN B input source to INT.MIC B-Low, INT.MIC B-Mid or INT.MIC B-High. At first, the input source for INPUT B. 16 TASCAM DP-004 Use the DATA wheel to set the input sources for IN B (INPUT B channel). This sets MIC B, which is the built-in mic on the right side of the front panel as the input source for IN A (INPUT A channel) is already selected. 4 Use the DATA wheel to change the IN A input source to GUITAR/LINE. 6. 2-Quick Start Guides 5 Press the F4 (¶) key to select the current input for the INPUT A and INPUT B channels.
The IN A and IN B items are used to set the IN B input source to INT.MIC B-Low, INT.MIC B-Mid or INT.MIC B-High. At first, the input source for INPUT B. 16 TASCAM DP-004 Use the DATA wheel to set the input sources for IN B (INPUT B channel). This sets MIC B, which is the built-in mic on the right side of the front panel as the input source for IN A (INPUT A channel) is already selected. 4 Use the DATA wheel to change the IN A input source to GUITAR/LINE. 6. 2-Quick Start Guides 5 Press the F4 (¶) key to select the current input for the INPUT A and INPUT B channels.

Owners Manual English
Page 17
... being recorded. If the input level is too low after adjusting it according to record your song. 1 With the transport stopped and the Home Screen TASCAM DP-004 17 Set to INT. MIC B-Mid. Set to MONOx2, input signals from both the left and right channels. 2-Quick Start Guides open, press the MENU...
... being recorded. If the input level is too low after adjusting it according to record your song. 1 With the transport stopped and the Home Screen TASCAM DP-004 17 Set to INT. MIC B-Mid. Set to MONOx2, input signals from both the left and right channels. 2-Quick Start Guides open, press the MENU...

Owners Manual English
Page 18
... the Home Screen. Therefore, the guitar is already set to record to tracks 1 and 3 and MIC B is shown by the A meter on the screen. 18 TASCAM DP-004 Set the LEVEL knob so that does not have any recordings in mic (MIC B) the input source for the INPUT B channel. In this example. 2-Quick...
... the Home Screen. Therefore, the guitar is already set to record to tracks 1 and 3 and MIC B is shown by the A meter on the screen. 18 TASCAM DP-004 Set the LEVEL knob so that does not have any recordings in mic (MIC B) the input source for the INPUT B channel. In this example. 2-Quick...

Owners Manual English
Page 19
NOTE When the input source is a built-in mic, the signal from the built-in mic cannot be able to is not lit. TASCAM DP-004 19 NOTE If you change the MODE item on the screen moves. The key blinks showing that it is assigned to hear the guitar sound ...
NOTE When the input source is a built-in mic, the signal from the built-in mic cannot be able to is not lit. TASCAM DP-004 19 NOTE If you change the MODE item on the screen moves. The key blinks showing that it is assigned to hear the guitar sound ...

Owners Manual English
Page 20
... the playback level. You are finished, press the stop (ª) key to stop recording. 2 Press the playback (Á) key to play the recorded track. 20 TASCAM DP-004 3 Use the track 1 LEVEL knob and the MASTER LEVEL knob to your guitar! 4 Press the TRACK 1 REC key again. The track 1 REC key stops blinking...
... the playback level. You are finished, press the stop (ª) key to stop recording. 2 Press the playback (Á) key to play the recorded track. 20 TASCAM DP-004 3 Use the track 1 LEVEL knob and the MASTER LEVEL knob to your guitar! 4 Press the TRACK 1 REC key again. The track 1 REC key stops blinking...

Owners Manual English
Page 21
... INPUT B) that are the recording sources for tracks 2 and 4. 2 Press the F4 (¶) key to select TRACK 2 to the next section. If you are shown. TASCAM DP-004 21 In the initial setting, INPUT A is assigned as the recording source for tracks 1 and 3, and INPUT B is assigned as the recording source for each...
... INPUT B) that are the recording sources for tracks 2 and 4. 2 Press the F4 (¶) key to select TRACK 2 to the next section. If you are shown. TASCAM DP-004 21 In the initial setting, INPUT A is assigned as the recording source for tracks 1 and 3, and INPUT B is assigned as the recording source for each...
