Owners Manual
Page 3
... blade or the third prong are experiencing problems with one wider than the other apparatus (including amplifiers) that has a protective grounding connection. 3 TASCAM DP-006 The cord of such a product must be taken when using earphones or headphones with the product because excessive sound pressure (volume) from earphones or headphones can easily grasp the power cord plug at plugs, convenience receptacles, and the point where they...
... blade or the third prong are experiencing problems with one wider than the other apparatus (including amplifiers) that has a protective grounding connection. 3 TASCAM DP-006 The cord of such a product must be taken when using earphones or headphones with the product because excessive sound pressure (volume) from earphones or headphones can easily grasp the power cord plug at plugs, convenience receptacles, and the point where they...

Owners Manual
Page 6
... 13 Recording and mastering 15 Creating a new song 15 Setting the internal mics as input sources 16 Setting the internal mics as an input source 21 Recording lead guitar to TRACK 2 21 Recording vocals on TRACK 1 23 Creating a stereo master track 25 Checking the stereo master track 27 Transferring the stereo master track to a computer 28 Shutting down 41 Preparing SD cards for use 11 Precautions for installation 11 Beware of parts 29 Top Panel...29 Front panel...31 6 TASCAM DP-006 Rear panel...
... 13 Recording and mastering 15 Creating a new song 15 Setting the internal mics as input sources 16 Setting the internal mics as an input source 21 Recording lead guitar to TRACK 2 21 Recording vocals on TRACK 1 23 Creating a stereo master track 25 Checking the stereo master track 27 Transferring the stereo master track to a computer 28 Shutting down 41 Preparing SD cards for use 11 Precautions for installation 11 Beware of parts 29 Top Panel...29 Front panel...31 6 TASCAM DP-006 Rear panel...
Owners Manual
Page 7
... Formatting SD cards 79 7 TASCAM DP-006 SD Card Management 79 Overview of track editing 67 Editing points ...67 Basic editing procedures 67 Track editing function setting items 68 CLONE TRACK (track duplication 69 CLEAN OUT (track erase 70 SILENCE (part erase 70 CUT (remove part)...71 OPEN (insert silence 71 9 - Erasing songs...49 Protecting songs...50 6 - Basic Recording 51 Selecting the input source 51 Monitoring the input signal 52 Setting the monitoring mode...
... Formatting SD cards 79 7 TASCAM DP-006 SD Card Management 79 Overview of track editing 67 Editing points ...67 Basic editing procedures 67 Track editing function setting items 68 CLONE TRACK (track duplication 69 CLEAN OUT (track erase 70 SILENCE (part erase 70 CUT (remove part)...71 OPEN (insert silence 71 9 - Erasing songs...49 Protecting songs...50 6 - Basic Recording 51 Selecting the input source 51 Monitoring the input signal 52 Setting the monitoring mode...
Owners Manual
Page 9
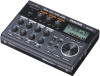
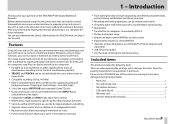
... six tracks of the TASCAM DP-006 Digital Multitrack Recorder. Please contact TASCAM if any of these items are missing or have finished reading this manual, please keep it in omnidirectional stereo condenser mic suppresses pickup of background noise (3 input gain level settings-Low, Mid, High) • 2 mic/line inputs (INPUT A/B) with standard 6.3mm TS jacks • Guitars and basses can be connected directly to the INPUT A jack (switchable mic/line input) • Independent LEVEL and PAN knobs allow direct control...
... six tracks of the TASCAM DP-006 Digital Multitrack Recorder. Please contact TASCAM if any of these items are missing or have finished reading this manual, please keep it in omnidirectional stereo condenser mic suppresses pickup of background noise (3 input gain level settings-Low, Mid, High) • 2 mic/line inputs (INPUT A/B) with standard 6.3mm TS jacks • Guitars and basses can be connected directly to the INPUT A jack (switchable mic/line input) • Independent LEVEL and PAN knobs allow direct control...
Owners Manual
Page 13
... volume dial on the left side panel does not have been changed since the last shutdown or song saving operation will be powered by a TASCAM PS-P520 power adaptor (sold separately). (See "Using an AC adaptor (sold separately)" on page 40.) • By connecting an external monitoring system (powered monitor speakers or an amplifier and speakers) to open the MENU screen. 13 TASCAM DP-006 TIPS • This unit can monitor recordings using speakers. Playing...
... volume dial on the left side panel does not have been changed since the last shutdown or song saving operation will be powered by a TASCAM PS-P520 power adaptor (sold separately). (See "Using an AC adaptor (sold separately)" on page 40.) • By connecting an external monitoring system (powered monitor speakers or an amplifier and speakers) to open the MENU screen. 13 TASCAM DP-006 TIPS • This unit can monitor recordings using speakers. Playing...

Owners Manual
Page 15
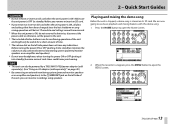
... F4 [t] button to record a lead guitar part on the rear panel and record it on page 46.) 15 TASCAM DP-006 Use the DATA wheel to select (highlight) the CREATEitem, and press the F4 [t] button to stereo. Change the song name as necessary. (See "Editing names" on and loaded an SD card. Creating a new song 1. 2 - Quick Start Guides Recording and mastering Here, we can capture reverberations, including from the sound of...
... F4 [t] button to record a lead guitar part on the rear panel and record it on page 46.) 15 TASCAM DP-006 Use the DATA wheel to select (highlight) the CREATEitem, and press the F4 [t] button to stereo. Change the song name as necessary. (See "Editing names" on and loaded an SD card. Creating a new song 1. 2 - Quick Start Guides Recording and mastering Here, we can capture reverberations, including from the sound of...

Owners Manual
Page 17
....) Setting the internal mics as the input source for TRACK 3 When the recorder is still too low after adjusting it, return to INPUT SETTING screen and change the input source assignment settings to use the internal mics to record the rhythm guitar to TRACK 3. 17 TASCAM DP-006 By default the recording sources are not sure which setting to use the DATA wheel to set internal MIC A as the input source for INPUT A and internal MIC B as the recording sources for INPUT B on page 52.) Recording track TRACK 1 TRACK 2 TRACK 3 TRACK 4 Recording source INPUT A INPUT B INPUT A/B INPUT...
....) Setting the internal mics as the input source for TRACK 3 When the recorder is still too low after adjusting it, return to INPUT SETTING screen and change the input source assignment settings to use the internal mics to record the rhythm guitar to TRACK 3. 17 TASCAM DP-006 By default the recording sources are not sure which setting to use the DATA wheel to set internal MIC A as the input source for INPUT A and internal MIC B as the recording sources for INPUT B on page 52.) Recording track TRACK 1 TRACK 2 TRACK 3 TRACK 4 Recording source INPUT A INPUT B INPUT A/B INPUT...

Owners Manual
Page 19
... input signal. TRACK 3 REC indicator 2. If the OL indicator continues to light even when set to INT.MIC X-Low, move the sound source away from the mic or lower the volume at the sound source. • When an internal mic is an input source if the REC indicator is INT.MIC X-High, change it to start recording and play the rhythm guitar part. Press the Play (7) button while pressing and holding the Record (0) button...
... input signal. TRACK 3 REC indicator 2. If the OL indicator continues to light even when set to INT.MIC X-Low, move the sound source away from the mic or lower the volume at the sound source. • When an internal mic is an input source if the REC indicator is INT.MIC X-High, change it to start recording and play the rhythm guitar part. Press the Play (7) button while pressing and holding the Record (0) button...

Owners Manual
Page 21
... Screen. 21 TASCAM DP-006 Press the HOME button to the level of the input. If you will record lead guitar on TRACK 3. If the input level is still too low after adjusting it, return to INPUT SETTING screen and change the setting to open the INPUT ASSIGNscreen. 3. When the recorder is still not high enough, change the setting to use the DATA wheel to GUITAR/ LINE, GUITAR/LINE Mor GUITAR/LINE H. 2 - In order to use the guitar/line input...
... Screen. 21 TASCAM DP-006 Press the HOME button to the level of the input. If you will record lead guitar on TRACK 3. If the input level is still too low after adjusting it, return to INPUT SETTING screen and change the setting to open the INPUT ASSIGNscreen. 3. When the recorder is still not high enough, change the setting to use the DATA wheel to GUITAR/ LINE, GUITAR/LINE Mor GUITAR/LINE H. 2 - In order to use the guitar/line input...

Owners Manual
Page 24
... Play (7) button while pressing and holding the Record (0) button to monitor. When you are done listening to the recording, press the Stop (8) button to INT. MIC A-Low. The Record (0) indicator lights red and the TRACK 1 REC indicator stops blinking and stays lit. 8. Turn up the MASTER LEVEL knob and the VOLUME dial on the left channel) level meters on TRACK 2 and TRACK 3. 6. In this case, if the input source setting is INT.MIC A-Mid, change...
... Play (7) button while pressing and holding the Record (0) button to monitor. When you are done listening to the recording, press the Stop (8) button to INT. MIC A-Low. The Record (0) indicator lights red and the TRACK 1 REC indicator stops blinking and stays lit. 8. Turn up the MASTER LEVEL knob and the VOLUME dial on the left channel) level meters on TRACK 2 and TRACK 3. 6. In this case, if the input source setting is INT.MIC A-Mid, change...

Owners Manual
Page 28
... unit cannot shut down properly and all recording data and settings that had been made a stereo master track, you have not made since the last shutdown or song saving operation will not be restored. 28 TASCAM DP-006 2 - Press the HOME button to a computer After creating a stereo master track following the procedures in master play mode and the Home Screen reopens. The power turns OFF automatically after the unit completes...
... unit cannot shut down properly and all recording data and settings that had been made a stereo master track, you have not made since the last shutdown or song saving operation will not be restored. 28 TASCAM DP-006 2 - Press the HOME button to a computer After creating a stereo master track following the procedures in master play mode and the Home Screen reopens. The power turns OFF automatically after the unit completes...

Owners Manual
Page 29
.... 7 MASTER LEVEL knob This adjusts the stereo signal level output from the /LINE OUT jack This knob also adjusts the recording level when bouncing tracks, mixing down and mastering. 8 Display This shows various information. 9 INPUT SETTING button Press this button while pressing and holding the Stop (8) button to open the INPUT SETTINGscreen where you can set input sources. (See "Selecting the input source" on page 51.) 29 TASCAM DP-006 Names and functions of the input source signal is suitable. 3 REPEAT button Turns...
.... 7 MASTER LEVEL knob This adjusts the stereo signal level output from the /LINE OUT jack This knob also adjusts the recording level when bouncing tracks, mixing down and mastering. 8 Display This shows various information. 9 INPUT SETTING button Press this button while pressing and holding the Stop (8) button to open the INPUT SETTINGscreen where you can set input sources. (See "Selecting the input source" on page 51.) 29 TASCAM DP-006 Names and functions of the input source signal is suitable. 3 REPEAT button Turns...
Owners Manual
Page 30
...) using headphones or an external monitoring system (powered monitor speakers or an amplifier and speakers), press the corresponding TRACK REC button. The functions currently assigned to change values on the current screen. Press while pressing and holding the Stop (8) button to locate to the beginning of the track. (See "Level and balance" on page 72.) e REC buttons/indicators (TRACK 1-TRACK 4) Use to turn to these buttons depend on the setting screens.. While pressing the Record (0) button, press this button...
...) using headphones or an external monitoring system (powered monitor speakers or an amplifier and speakers), press the corresponding TRACK REC button. The functions currently assigned to change values on the current screen. Press while pressing and holding the Stop (8) button to locate to the beginning of the track. (See "Level and balance" on page 72.) e REC buttons/indicators (TRACK 1-TRACK 4) Use to turn to these buttons depend on the setting screens.. While pressing the Record (0) button, press this button...
Owners Manual
Page 32
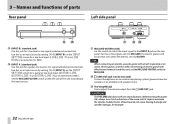
... and functions of the unit according to the INPUT A jack on the INPUT SETTINGscreen for a line level or mic signal (unbalanced connection). k /LINE OUT jack (stereo mini jack) Connect headphones or an external monitoring system (powered monitor speakers or an amplifier and speakers) here. For mic or line signals, set it and this jack for example. 32 TASCAM DP-006 Set the MIC/LINE-GUITAR switch on the left side of parts Rear panel Left side panel g INPUT B ( standard jack) Use this as an input source by setting IN-A(INPUT A) on the INPUT SETTINGscreen for...
... and functions of the unit according to the INPUT A jack on the INPUT SETTINGscreen for a line level or mic signal (unbalanced connection). k /LINE OUT jack (stereo mini jack) Connect headphones or an external monitoring system (powered monitor speakers or an amplifier and speakers) here. For mic or line signals, set it and this jack for example. 32 TASCAM DP-006 Set the MIC/LINE-GUITAR switch on the left side of parts Rear panel Left side panel g INPUT B ( standard jack) Use this as an input source by setting IN-A(INPUT A) on the INPUT SETTINGscreen for...

Owners Manual
Page 53
...'s INPUT A and INPUT B. 6 - Adjust the output level with headphones or an external monitoring system (powered monitor speakers or an amplifier and speakers). Overload indicators 88Input level meters (A/B) The and level meters on the operation status, as its recording source, the input sound cannot be used to confirm whether signals are monitoring with the MASTER LEVEL knob. REC indicator Unlit Blinking (recording standby) Lit (recording) Transport status Playing back Playing back Stopped Recording Signals shown by level meters Track playback Track playback Track input Track input...
...'s INPUT A and INPUT B. 6 - Adjust the output level with headphones or an external monitoring system (powered monitor speakers or an amplifier and speakers). Overload indicators 88Input level meters (A/B) The and level meters on the operation status, as its recording source, the input sound cannot be used to confirm whether signals are monitoring with the MASTER LEVEL knob. REC indicator Unlit Blinking (recording standby) Lit (recording) Transport status Playing back Playing back Stopped Recording Signals shown by level meters Track playback Track playback Track input Track input...

Owners Manual
Page 56
.... Use the INPUT A/B LEVEL knobs to the input. 56 TASCAM DP-006 NOTE The level meters of the mono track. 6 - Press the REC button of two tracks are already blinking, the track that order, TRACK 1 and TRACK 2 will no longer be in record standby, but stereo TRACK 3, which were pressed after, will turn off. At the same time, confirm that input as the INPUT A/B level meters ( and ). If you hear from the headphones or an external monitoring system (powered monitor speakers...
.... Use the INPUT A/B LEVEL knobs to the input. 56 TASCAM DP-006 NOTE The level meters of the mono track. 6 - Press the REC button of two tracks are already blinking, the track that order, TRACK 1 and TRACK 2 will no longer be in record standby, but stereo TRACK 3, which were pressed after, will turn off. At the same time, confirm that input as the INPUT A/B level meters ( and ). If you hear from the headphones or an external monitoring system (powered monitor speakers...

Owners Manual
Page 72
... part of your tracks, you must set the starting and ending points. If the volume is stopped, press the REC MODE button to keep the entire song at a time. For example, you could gradually increase the volume during a guitar solo. A stereo master recorded by an external stereo recorder. Therefore, these meters do not need to open the RECORDER MODEscreen. 72 TASCAM DP-006 TIP You do not change even when the TRACK LEVEL...
... part of your tracks, you must set the starting and ending points. If the volume is stopped, press the REC MODE button to keep the entire song at a time. For example, you could gradually increase the volume during a guitar solo. A stereo master recorded by an external stereo recorder. Therefore, these meters do not need to open the RECORDER MODEscreen. 72 TASCAM DP-006 TIP You do not change even when the TRACK LEVEL...
Owners Manual
Page 84
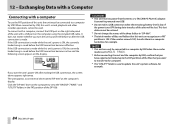
... a USB connection when the remaining battery level is set to MULTI TRACK. • Before connecting the unit and the computer by USB. If the power turns OFF during data transfer, all the files that this unit's record, playback and other recorder operations cannot be connected to a computer by USB when the recorder mode is low. This lost . If the USB connection is saved before the USB connection becomes active and the following screen appears...
... a USB connection when the remaining battery level is set to MULTI TRACK. • Before connecting the unit and the computer by USB. If the power turns OFF during data transfer, all the files that this unit's record, playback and other recorder operations cannot be connected to a computer by USB when the recorder mode is low. This lost . If the USB connection is saved before the USB connection becomes active and the following screen appears...

Owners Manual
Page 93
... device to the unit's /LINE OUT jack might reduce the noise. • This might be completed by interference noise from the external monitoring system (powered monitor speakers or an amplifier and speakers)? When using the AC adaptor, noise occurs if I 'm recording sound distorted? • Are the LEVEL knobs of the INPUT A or INPUT B on the top panel of the unit been raised to such equipment. 93 TASCAM DP-006 Why can't I hear...
... device to the unit's /LINE OUT jack might reduce the noise. • This might be completed by interference noise from the external monitoring system (powered monitor speakers or an amplifier and speakers)? When using the AC adaptor, noise occurs if I 'm recording sound distorted? • Are the LEVEL knobs of the INPUT A or INPUT B on the top panel of the unit been raised to such equipment. 93 TASCAM DP-006 Why can't I hear...

Owners Manual
Page 98
... greater Standard input level: −10dBV Maximum input level: +6dBV Headroom: 16dB 98 TASCAM DP-006 Built-in microphones Omnidirectional x2 /LINE OUT jack Connector: 3.5mm (1/8") stereo mini jack • When line is connected Standard output level: −16dBV Maximum output level: 0dBV • When headphone is connected Standard output level: 15mW+15mW (THD+N 0.1% or less, 32Ω load) Data input and output USB jack Connector: USB Mini-B 4-pin Format: USB 2.0 HIGH SPEED mass storage class Audio performance Frequency response INPUT(MIC/LINE) w LINE OUT...
... greater Standard input level: −10dBV Maximum input level: +6dBV Headroom: 16dB 98 TASCAM DP-006 Built-in microphones Omnidirectional x2 /LINE OUT jack Connector: 3.5mm (1/8") stereo mini jack • When line is connected Standard output level: −16dBV Maximum output level: 0dBV • When headphone is connected Standard output level: 15mW+15mW (THD+N 0.1% or less, 32Ω load) Data input and output USB jack Connector: USB Mini-B 4-pin Format: USB 2.0 HIGH SPEED mass storage class Audio performance Frequency response INPUT(MIC/LINE) w LINE OUT...
