Owners Manual
Page 2
CET APPAREIL NUMÉRIQUE DE LA CLASSE B EST CONFORME À LA NORME NMB-003 DU CANADA. 2 TASCAM DP-006 IMPORTANT SAFETY PRECAUTIONS 88For U.S.A TO THE USER This equipment has been tested and found to comply with the instruction manual, may cause ... against harmful interference in accordance with the limits for your records. c) Connect the equipment into an outlet on the rear panel. Telephone number : 1-323-726-0303 This device complies with Part 15 of Conformity Model Number : DP-006 Trade Name : TASCAM Responsible party : TEAC AMERICA, INC. Declaration of the FCC...
CET APPAREIL NUMÉRIQUE DE LA CLASSE B EST CONFORME À LA NORME NMB-003 DU CANADA. 2 TASCAM DP-006 IMPORTANT SAFETY PRECAUTIONS 88For U.S.A TO THE USER This equipment has been tested and found to comply with the instruction manual, may cause ... against harmful interference in accordance with the limits for your records. c) Connect the equipment into an outlet on the rear panel. Telephone number : 1-323-726-0303 This device complies with Part 15 of Conformity Model Number : DP-006 Trade Name : TASCAM Responsible party : TEAC AMERICA, INC. Declaration of the FCC...

Owners Manual
Page 6
... the stereo master track 27 Transferring the stereo master track to a computer 28 Shutting down 41 Preparing SD cards for use 42 Recorder modes...42 Connecting with other equipment 43 Rear panel connections 43 Left side panel connections 43 Right side panel connections 44 Adjusting the ...10 About SD cards...11 Precautions for use 11 Precautions for installation 11 Beware of parts 29 Top Panel...29 Front panel...31 6 TASCAM DP-006 Rear panel...32 Left side panel...32 Right side panel...33 Bottom panel...33 Home Screen ...34 Menu structure...36 Screen operations...37 4 ...
... the stereo master track 27 Transferring the stereo master track to a computer 28 Shutting down 41 Preparing SD cards for use 42 Recorder modes...42 Connecting with other equipment 43 Rear panel connections 43 Left side panel connections 43 Right side panel connections 44 Adjusting the ...10 About SD cards...11 Precautions for use 11 Precautions for installation 11 Beware of parts 29 Top Panel...29 Front panel...31 6 TASCAM DP-006 Rear panel...32 Left side panel...32 Right side panel...33 Bottom panel...33 Home Screen ...34 Menu structure...36 Screen operations...37 4 ...
Owners Manual
Page 7
... (track duplication 69 CLEAN OUT (track erase 70 SILENCE (part erase 70 CUT (remove part)...71 OPEN (insert silence 71 9 - Recorder Functions 61 Punching in and out 61 Bouncing tracks...61 Using the bounce function 62 Confirming the result 63 Locate and search functions 64 Direct... SD cards 79 7 TASCAM DP-006 Mixdown and mastering 72 Mixdown...72 Level and balance 72 Stereo position (panning 72 Creating stereo master tracks 72 Setting the starting and ending points 72 Creating a stereo master track 72 Checking stereo master tracks 74 10 - Basic Recording 51 Selecting the input ...
... (track duplication 69 CLEAN OUT (track erase 70 SILENCE (part erase 70 CUT (remove part)...71 OPEN (insert silence 71 9 - Recorder Functions 61 Punching in and out 61 Bouncing tracks...61 Using the bounce function 62 Confirming the result 63 Locate and search functions 64 Direct... SD cards 79 7 TASCAM DP-006 Mixdown and mastering 72 Mixdown...72 Level and balance 72 Stereo position (panning 72 Creating stereo master tracks 72 Setting the starting and ending points 72 Creating a stereo master track 72 Checking stereo master tracks 74 10 - Basic Recording 51 Selecting the input ...
Owners Manual
Page 9
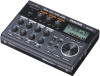
... Included items This product includes the following items. Take care when opening the package not to six independent tracks • Bounce function allows recording of the TASCAM DP-006 Digital Multitrack Recorder. Introduction Thank you like for repeat playback and editing • Separate stereo master track in the future. This stereo master track can be...
... Included items This product includes the following items. Take care when opening the package not to six independent tracks • Bounce function allows recording of the TASCAM DP-006 Digital Multitrack Recorder. Introduction Thank you like for repeat playback and editing • Separate stereo master track in the future. This stereo master track can be...

Owners Manual
Page 10
..., and further, assumes no circumstances will TEAC Corporation be free from infringement of any illegal copying performed using the recorder. 10 TASCAM DP-006 NOTE These provide additional explanations and describe special cases. Introduction Conventions used in this manual In this manual, we ... The four buttons beneath the LCD display are tips about your rights, contact your unauthorized recording, reproduction or distribution thereof may result in quotation marks like this : "DP-006" • The currently selected MTR partition is called function buttons and are uncertain about...
..., and further, assumes no circumstances will TEAC Corporation be free from infringement of any illegal copying performed using the recorder. 10 TASCAM DP-006 NOTE These provide additional explanations and describe special cases. Introduction Conventions used in this manual In this manual, we ... The four buttons beneath the LCD display are tips about your rights, contact your unauthorized recording, reproduction or distribution thereof may result in quotation marks like this : "DP-006" • The currently selected MTR partition is called function buttons and are uncertain about...
Owners Manual
Page 11
... unit on. SD cards that meet SD/SDHC standards and are delicate media. In order to a sudden temperature change, condensation could damage the surface. 11 TASCAM DP-006 Should this unit on top of a power amplifier or other chemical agents to 35º C (41º-95º F). • Do not install in the... of places. Beware of SD cards that generates heat. Introduction About SD cards This unit uses SD cards for use with this site or contact TASCAM customer support. Precautions for recording and playback. 1 - Do not wipe with a soft dry cloth.
... unit on. SD cards that meet SD/SDHC standards and are delicate media. In order to a sudden temperature change, condensation could damage the surface. 11 TASCAM DP-006 Should this unit on top of a power amplifier or other chemical agents to 35º C (41º-95º F). • Do not install in the... of places. Beware of SD cards that generates heat. Introduction About SD cards This unit uses SD cards for use with this site or contact TASCAM customer support. Precautions for recording and playback. 1 - Do not wipe with a soft dry cloth.
Owners Manual
Page 13
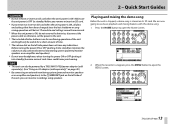
...cannot be powered by a TASCAM PS-P520 power adaptor (sold separately). (See "Using an AC adaptor (sold separately)" on page 40.) • By connecting an external monitoring system (powered monitor speakers or an amplifier and speakers) to open the Home Screen. 2. When the recorder is ON. Before turning ...open the MENU screen. 13 TASCAM DP-006 Press the HOME button to use basic playback and mixing features with this demo song. 1. Make sure the unit power is OFF (in standby) before you remove or insert an SD card. • If you can monitor recordings using speakers. Playing and ...
...cannot be powered by a TASCAM PS-P520 power adaptor (sold separately). (See "Using an AC adaptor (sold separately)" on page 40.) • By connecting an external monitoring system (powered monitor speakers or an amplifier and speakers) to open the Home Screen. 2. When the recorder is ON. Before turning ...open the MENU screen. 13 TASCAM DP-006 Press the HOME button to use basic playback and mixing features with this demo song. 1. Make sure the unit power is OFF (in standby) before you remove or insert an SD card. • If you can monitor recordings using speakers. Playing and ...

Owners Manual
Page 15
...and press the F4 [t] button to open the SONGscreen. 3. When the recorder is stopped, press the MENU button to this unit, turned it is given the name (title) "SONG***" (where *** is created, it on page 46.) 15 TASCAM DP-006 Change the song name as necessary. (See "Editing names" on and loaded... an SD card. Next, we will use an electric guitar to record a lead guitar part on track 3 (by using the built-in stereo microphone pair ...
...and press the F4 [t] button to open the SONGscreen. 3. When the recorder is stopped, press the MENU button to this unit, turned it is given the name (title) "SONG***" (where *** is created, it on page 46.) 15 TASCAM DP-006 Change the song name as necessary. (See "Editing names" on and loaded... an SD card. Next, we will use an electric guitar to record a lead guitar part on track 3 (by using the built-in stereo microphone pair ...

Owners Manual
Page 16
... source for IN A(INPUT A) is selected (highlighted). 3. 2 - Quick Start Guides 5. At first, the current input source for IN B(INPUT B). 16 TASCAM DP-006 In order to use the built-in MIC A to record the guitar to stereo TRACK 3, use the DATA wheel to set the input source for IN A(INPUT A) to save the currently...
... source for IN A(INPUT A) is selected (highlighted). 3. 2 - Quick Start Guides 5. At first, the current input source for IN B(INPUT B). 16 TASCAM DP-006 In order to use the built-in MIC A to record the guitar to stereo TRACK 3, use the DATA wheel to set the input source for IN A(INPUT A) to save the currently...

Owners Manual
Page 17
... to TRACK 3. If the input level is still not high enough, change the setting to TRACK 3. 17 TASCAM DP-006 By default the recording sources are not sure which setting to use the internal mics to record the rhythm guitar to INT.MIC X-High. • Set the MODEitem on the INPUT SETTINGto monitor the input...
... to TRACK 3. If the input level is still not high enough, change the setting to TRACK 3. 17 TASCAM DP-006 By default the recording sources are not sure which setting to use the internal mics to record the rhythm guitar to INT.MIC X-High. • Set the MODEitem on the INPUT SETTINGto monitor the input...

Owners Manual
Page 18
... the LEVEL knobs so that the loudest sounds do not cause the INPUT A and B OL indicators to put the track into recording standby. 2 - Press the TRACK 3 REC button to light. 18 TASCAM DP-006 OL indicator When you play the guitar, the (INPUT A), (INPUT B) and (TRACK 3), (left channel) and (right channel) level meters on...
... the LEVEL knobs so that the loudest sounds do not cause the INPUT A and B OL indicators to put the track into recording standby. 2 - Press the TRACK 3 REC button to light. 18 TASCAM DP-006 OL indicator When you play the guitar, the (INPUT A), (INPUT B) and (TRACK 3), (left channel) and (right channel) level meters on...

Owners Manual
Page 19
...Using internal mics to record rhythm guitar to INT.MIC X-Midor INT. The REC indicator becomes unlit. 19 TASCAM DP-006 In this case, if... the input source setting is INT.MIC X-High, change it to TRACK 3 1. When you are done playing, press the Stop (8) button to light even when the LEVEL knob is turned down, the mic signal itself is unlit for the track with that mic as its recording... monitor through speakers, feedback could occur. Press the TRACK 3 REC button to start recording and play the rhythm guitar part. 2 - If the OL indicator continues to light...
...Using internal mics to record rhythm guitar to INT.MIC X-Midor INT. The REC indicator becomes unlit. 19 TASCAM DP-006 In this case, if... the input source setting is INT.MIC X-High, change it to TRACK 3 1. When you are done playing, press the Stop (8) button to light even when the LEVEL knob is turned down, the mic signal itself is unlit for the track with that mic as its recording... monitor through speakers, feedback could occur. Press the TRACK 3 REC button to start recording and play the rhythm guitar part. 2 - If the OL indicator continues to light...

Owners Manual
Page 20
... to the recording, press the Stop (8) button to play the recorded TRACK 3. 3. Quick Start Guides Listening to adjust the monitoring level. To go to adjust the final monitoring volume. Set the MIC/LINE-GUITAR switch on the left side of the unit to MIC/LINE. 20 TASCAM DP-006 TIP When ...function, press the m [RTZ] button while pressing and holding the Stop (8) button. 2. Use the TRACK 3 LEVEL knob and MASTER LEVEL knob to the recording 1. Use the VOLUME dial on the rear panel. TIP Use the TRACK 3 PAN (BAL) knob to set the MIC/LINE-GUITAR switch to GUITAR. Guitar...
... to the recording, press the Stop (8) button to play the recorded TRACK 3. 3. Quick Start Guides Listening to adjust the monitoring level. To go to adjust the final monitoring volume. Set the MIC/LINE-GUITAR switch on the left side of the unit to MIC/LINE. 20 TASCAM DP-006 TIP When ...function, press the m [RTZ] button while pressing and holding the Stop (8) button. 2. Use the TRACK 3 LEVEL knob and MASTER LEVEL knob to the recording 1. Use the VOLUME dial on the rear panel. TIP Use the TRACK 3 PAN (BAL) knob to set the MIC/LINE-GUITAR switch to GUITAR. Guitar...

Owners Manual
Page 21
...the INPUT SETTING button to use the DATA wheel to set the input source for TRACK 2. 1. If you will record lead guitar on TRACK 3. Set according to reopen the Home Screen. 21 TASCAM DP-006 Press the HOME button to the level of the input. If the input level is still too low after... adjusting it, return to INPUT SETTING screen and change the input gain. If the input level is still not high enough, change the recording source for IN A(INPUT...
...the INPUT SETTING button to use the DATA wheel to set the input source for TRACK 2. 1. If you will record lead guitar on TRACK 3. Set according to reopen the Home Screen. 21 TASCAM DP-006 Press the HOME button to the level of the input. If the input level is still too low after... adjusting it, return to INPUT SETTING screen and change the input gain. If the input level is still not high enough, change the recording source for IN A(INPUT...

Owners Manual
Page 22
Quick Start Guides 2. When you play back the recorded TRACK 3. After returning to the beginning of the guitar being input along with the TRACK 3 playback sound through the headphones. 22 TASCAM DP-006 Use the F4 [b] button to play the guitar, the input level is shown by the (INPUT A), (TRACK 2) and (left channel) level meters...
Quick Start Guides 2. When you play back the recorded TRACK 3. After returning to the beginning of the guitar being input along with the TRACK 3 playback sound through the headphones. 22 TASCAM DP-006 Use the F4 [b] button to play the guitar, the input level is shown by the (INPUT A), (TRACK 2) and (left channel) level meters...

Owners Manual
Page 23
... 1 REC indicator 3. Set the LEVEL knob so that the loudest sounds do not cause the INPUT A OL indicator to GUITAR/LINE Mor GUITAR/LINE. The Record (0) indicator lights and the TRACK 2 REC indicator stops blinking and stays lit. 10. Press the TRACK 2 REC button to adjust the monitoring levels and balance... the LEVEL knob is turned down, the guitar signal itself is GUITAR/LINE M, change it to stop playback. 9. When you are done listening to the recording, press the Stop (8) button to stop recording. 11. OL indicator 23 TASCAM DP-006 Quick Start Guides 7. 2 -
... 1 REC indicator 3. Set the LEVEL knob so that the loudest sounds do not cause the INPUT A OL indicator to GUITAR/LINE Mor GUITAR/LINE. The Record (0) indicator lights and the TRACK 2 REC indicator stops blinking and stays lit. 10. Press the TRACK 2 REC button to adjust the monitoring levels and balance... the LEVEL knob is turned down, the guitar signal itself is GUITAR/LINE M, change it to stop playback. 9. When you are done listening to the recording, press the Stop (8) button to stop recording. 11. OL indicator 23 TASCAM DP-006 Quick Start Guides 7. 2 -

Owners Manual
Page 24
... if the REC indicator of the song (00h00m00s00f ), press the Play (7) button while pressing and holding the Record (0) button to start of the unit to the start recording, and sing along with the already recorded lead and rhythm guitar parts. After returning to hear the mic signal through the headphones. After returning to... sing the vocal part. As necessary, use headphones to turn off the REC indicator (ending recording standby). 24 TASCAM DP-006 In this case, if the input source setting is INT.MIC A-Mid, change it to adjust the monitoring levels and balance. MIC A-Low. If the ...
... if the REC indicator of the song (00h00m00s00f ), press the Play (7) button while pressing and holding the Record (0) button to start of the unit to the start recording, and sing along with the already recorded lead and rhythm guitar parts. After returning to hear the mic signal through the headphones. After returning to... sing the vocal part. As necessary, use headphones to turn off the REC indicator (ending recording standby). 24 TASCAM DP-006 In this case, if the input source setting is INT.MIC A-Mid, change it to adjust the monitoring levels and balance. MIC A-Low. If the ...

Owners Manual
Page 25
.... Watch the (left channel) and (right channel) meters on the display as the starting point for making the stereo master track. 25 TASCAM DP-006 Creating a stereo master track After you finish recording, the next step is to mix down the tracks and make these adjustments. 4. The point when you pressed the F3 [IN...
.... Watch the (left channel) and (right channel) meters on the display as the starting point for making the stereo master track. 25 TASCAM DP-006 Creating a stereo master track After you finish recording, the next step is to mix down the tracks and make these adjustments. 4. The point when you pressed the F3 [IN...

Owners Manual
Page 26
... and OUT points, press the Stop (8) button to stop playback of the song. 26 TASCAM DP-006 Quick Start Guides 5. A SET OUT!pop-up message appears. 7. Set the OUT point. When you want to open the RECORDER MODEscreen. 8. 2 - When the recorder is stopped. 6. The point when you pressed the F4 [OUT] button will be set...
... and OUT points, press the Stop (8) button to stop playback of the song. 26 TASCAM DP-006 Quick Start Guides 5. A SET OUT!pop-up message appears. 7. Set the OUT point. When you want to open the RECORDER MODEscreen. 8. 2 - When the recorder is stopped. 6. The point when you pressed the F4 [OUT] button will be set...

Owners Manual
Page 27
...master track that you record the master track. 2. After a Master Rec!pop-up message will appear and you will not be able to change the unit to check it. 1. Press the Play (7) button while pressing and holding the Record (0) button to select (highlight) MASTER PLAY. 27 TASCAM DP-006 Use the DATA ...wheel to start recording the stereo master track from the IN point. NOTE When in master...
...master track that you record the master track. 2. After a Master Rec!pop-up message will appear and you will not be able to change the unit to check it. 1. Press the Play (7) button while pressing and holding the Record (0) button to select (highlight) MASTER PLAY. 27 TASCAM DP-006 Use the DATA ...wheel to start recording the stereo master track from the IN point. NOTE When in master...
