
CD-RW890 Manual
Page 4
...4 Connections 5 Discs 6 Remote Control Unit 7 Unit Functions and Remote Control 8 Playback Basic Operation 10 Basics of temperature than ordinary CD players. < Relative humidity should be between 5°C and 35°C (41°F and 95°F). Avoid placing it and... tray. < Do not attempt to clean the unit with the disc loaded may cause a malfunction. Read this manual carefully to get into the unit, contact your unit carefully. Moving this unit with chemical solvents as printed on ...unit during operation, always leave sufficient space around the unit for choosing TEAC.
...4 Connections 5 Discs 6 Remote Control Unit 7 Unit Functions and Remote Control 8 Playback Basic Operation 10 Basics of temperature than ordinary CD players. < Relative humidity should be between 5°C and 35°C (41°F and 95°F). Avoid placing it and... tray. < Do not attempt to clean the unit with the disc loaded may cause a malfunction. Read this manual carefully to get into the unit, contact your unit carefully. Moving this unit with chemical solvents as printed on ...unit during operation, always leave sufficient space around the unit for choosing TEAC.

CD-RW890 Manual
Page 9
...a Numeric buttons Use these buttons to search for a part of track number assignment. are displayed. D OPEN/CLOSE (L) Use this button to finalize a CD-R/CD-RW disc. h SHUFFLE Use this button to open and close the disc tray. O FINALIZE Use this button for digital synchronized recording. c Search (m/,) Use...RECORD Use this button to select a source to enter record pause mode. L INPUT SELECT Use this button to be recorded. M AUTO/MANUAL Use this button to check the programmed contents. During recording, use this button to stop playback or recording. g PROGRAM CHECK Use this...
...a Numeric buttons Use these buttons to search for a part of track number assignment. are displayed. D OPEN/CLOSE (L) Use this button to finalize a CD-R/CD-RW disc. h SHUFFLE Use this button to open and close the disc tray. O FINALIZE Use this button for digital synchronized recording. c Search (m/,) Use...RECORD Use this button to select a source to enter record pause mode. L INPUT SELECT Use this button to be recorded. M AUTO/MANUAL Use this button to check the programmed contents. During recording, use this button to stop playback or recording. g PROGRAM CHECK Use this...

CD-RW890 Manual
Page 17
..., the sound is contained at the beginning or in length on the specified level. Make sure "NO TOC" and "CD-R" (or "CD-RW") indicator lights on the disc tray with another setting. When the AUTO/MANUAL button is pressed once, the current increment level is pressed, the display changes as...< When the auto track function is pressed within 10 seconds from the beginning of the track. < When track numbers are added to the CD standards. Press the AUTO/MANUAL button repeatedly to the track/time display. When a 100th track is finished, "PMA WRITE" blinks for a few seconds, and then the ...
..., the sound is contained at the beginning or in length on the specified level. Make sure "NO TOC" and "CD-R" (or "CD-RW") indicator lights on the disc tray with another setting. When the AUTO/MANUAL button is pressed once, the current increment level is pressed, the display changes as...< When the auto track function is pressed within 10 seconds from the beginning of the track. < When track numbers are added to the CD standards. Press the AUTO/MANUAL button repeatedly to the track/time display. When a 100th track is finished, "PMA WRITE" blinks for a few seconds, and then the ...

CD-RW890 Manual
Page 18
... ANALOG. < The setting is stored until "WAITING" disappears from external devices via ANALOG, track numbers may be added unintentionally. < The AUTO/MANUAL button cannot be properly added even if the auto track function is activated. To add a track number in step 2 . Wait a few seconds.... < When you record digital broadcasts or other sources without track numbers, track numbers are added based on . This instruction manual describes "silence" as CD, MD, and DAT. If track numbers are not properly added When you record classical music or other sources with interference via...
... ANALOG. < The setting is stored until "WAITING" disappears from external devices via ANALOG, track numbers may be added unintentionally. < The AUTO/MANUAL button cannot be properly added even if the auto track function is activated. To add a track number in step 2 . Wait a few seconds.... < When you record digital broadcasts or other sources without track numbers, track numbers are added based on . This instruction manual describes "silence" as CD, MD, and DAT. If track numbers are not properly added When you record classical music or other sources with interference via...
CD-RW890 Manual
Page 19
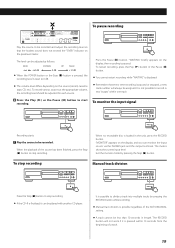
...and you can monitor the input source via the PHONES jack and the output terminals. "MONITOR" appears on the source (record, cassette tape, CD, etc.). To stop recording Manual track division Press the Stop (H) button to stop recording. DOWN UP MAX. -∞ −60 dB 0 dB +12 dB < When... each source. Exit the monitor mode by pressing the RECORD button while recording. < Manual track division is paused or stopped, a new track number will not work if it can be played with another CD player. To monitor the input signal Recording starts. 7 Play the source to record ...
...and you can monitor the input source via the PHONES jack and the output terminals. "MONITOR" appears on the source (record, cassette tape, CD, etc.). To stop recording Manual track division Press the Stop (H) button to stop recording. DOWN UP MAX. -∞ −60 dB 0 dB +12 dB < When... each source. Exit the monitor mode by pressing the RECORD button while recording. < Manual track division is paused or stopped, a new track number will not work if it can be played with another CD player. To monitor the input signal Recording starts. 7 Play the source to record ...

CD-RW890 Manual
Page 20
... (H) button to -60 dB (-50 dB when recording via ANALOG). The setting automatically returns to MANUAL, the auto track function will be used during synchronous recording, recording stops. For CD, MD, or DAT, synchronous recording starts when a digital signal is detected, which is set to... MANUAL after recording. < The SYNC 1/ALL button cannot be cancelled. 3 Select the mode of a track. Synchronous ...
... (H) button to -60 dB (-50 dB when recording via ANALOG). The setting automatically returns to MANUAL, the auto track function will be used during synchronous recording, recording stops. For CD, MD, or DAT, synchronous recording starts when a digital signal is detected, which is set to... MANUAL after recording. < The SYNC 1/ALL button cannot be cancelled. 3 Select the mode of a track. Synchronous ...

CD-RW890 Manual
Page 27
...not be mixed with the requirement set by the Directive for the chemical involved. 27 Specifications Media type CD-RW and CD-R for Digital audio (record and playback) CD (playback only) Frequency converter input sampling frequency 32 kHz, 44.1 kHz, 48 kHz Recording sampling frequency ...kg (9 15/16 lbs) Standard Accessories Remote control unit (RC-1275) x 1 Battery (AA, R6, SUM-3) x 2 RCA cable x 2 Optical digital cable x 1 Owner's manual x 1 Warranty card x 1 < Design and specifications are subject to change without notice. < Weight and dimensions are only valid in the European Union.
...not be mixed with the requirement set by the Directive for the chemical involved. 27 Specifications Media type CD-RW and CD-R for Digital audio (record and playback) CD (playback only) Frequency converter input sampling frequency 32 kHz, 44.1 kHz, 48 kHz Recording sampling frequency ...kg (9 15/16 lbs) Standard Accessories Remote control unit (RC-1275) x 1 Battery (AA, R6, SUM-3) x 2 RCA cable x 2 Optical digital cable x 1 Owner's manual x 1 Warranty card x 1 < Design and specifications are subject to change without notice. < Weight and dimensions are only valid in the European Union.

