
Datasheet
Page 1
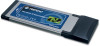
... wireless b, wireless g and wireless n networks • Quick and intuitive installation process • 8x the speed and 4x the coverage of wireless g* • Maximum throughput maintained with Automatic and Dynamic Data Rate Switching • Windows-based wireless technology with a simple graphical user interface • Stream videos, download files and play games and talk online all at the same time, without decreasing wireless performance. TEW-642EC rev:01.20.2009 wireless Wireless N Express card TEW-642EC(V1.0R) Wireless...
... wireless b, wireless g and wireless n networks • Quick and intuitive installation process • 8x the speed and 4x the coverage of wireless g* • Maximum throughput maintained with Automatic and Dynamic Data Rate Switching • Windows-based wireless technology with a simple graphical user interface • Stream videos, download files and play games and talk online all at the same time, without decreasing wireless performance. TEW-642EC rev:01.20.2009 wireless Wireless N Express card TEW-642EC(V1.0R) Wireless...

Datasheet
Page 2
... Reserved. Copyright © TRENDnet. Wireless N Express card TEW-642EC(V1.0R) SPECIFICATIONS Hardware Interface Standards LED Indicators Power Consumption Supported OS Dimensions (LxWxH) Weight Temperature Humidity Wireless Module Technique Antenna Frequency Media Access Protocol Data Rate (auto fallback) Output Power Receiving Sensitivity Encryption Channels • ExpressCard/34 • IEEE 802.11b, IEEE 802.11g and IEEE 802.11n (draft 2.0) • Power, Link • Max. 550mA @3.3V • Windows 2000, XP, Vista 32bit...
... Reserved. Copyright © TRENDnet. Wireless N Express card TEW-642EC(V1.0R) SPECIFICATIONS Hardware Interface Standards LED Indicators Power Consumption Supported OS Dimensions (LxWxH) Weight Temperature Humidity Wireless Module Technique Antenna Frequency Media Access Protocol Data Rate (auto fallback) Output Power Receiving Sensitivity Encryption Channels • ExpressCard/34 • IEEE 802.11b, IEEE 802.11g and IEEE 802.11n (draft 2.0) • Power, Link • Max. 550mA @3.3V • Windows 2000, XP, Vista 32bit...
User's Guide
Page 2
... this document is protected under international copyright laws, with respect to change without obligation of the manufacturer to time in this publication and to make changes from time to notify any person of their respective owners and are acknowledged. 2 The manufacturer makes no representations or warranties with all photographs, illustrations and software, is subject to the contents hereof and specifically...
... this document is protected under international copyright laws, with respect to change without obligation of the manufacturer to time in this publication and to make changes from time to notify any person of their respective owners and are acknowledged. 2 The manufacturer makes no representations or warranties with all photographs, illustrations and software, is subject to the contents hereof and specifically...

User's Guide
Page 3
... in a particular installation. This device complies with Part 15 of the FCC Rules. This transmitter must not be determined by one of some specific channels and/or operational frequency bands are country dependent and are designed to radio communications. FCC Caution: Any changes or modifications not expressly approved by the end user. 3 End users must accept any other antenna or transmitter...
... in a particular installation. This device complies with Part 15 of the FCC Rules. This transmitter must not be determined by one of some specific channels and/or operational frequency bands are country dependent and are designed to radio communications. FCC Caution: Any changes or modifications not expressly approved by the end user. 3 End users must accept any other antenna or transmitter...
User's Guide
Page 5
Maintenance Uninstalling the Driver 25 Uninstall the Client Utility 25 Upgrading the Wireless Utility 25 Glossary 26 5 Getting Started About Your Card 6 Package Content 7 System Requirement 8 LED Definition 7 Wireless Utility and Card Hardware Installation 8 Using the Utility to Configure Your Network 9 Link Information 10 Site Survey 11 Profile 12 Chapter 2 - Table of Contents Federal Communications Commission (FCC) Interference statement 3 CE Mark Warning 4 Chapter 1 -
Maintenance Uninstalling the Driver 25 Uninstall the Client Utility 25 Upgrading the Wireless Utility 25 Glossary 26 5 Getting Started About Your Card 6 Package Content 7 System Requirement 8 LED Definition 7 Wireless Utility and Card Hardware Installation 8 Using the Utility to Configure Your Network 9 Link Information 10 Site Survey 11 Profile 12 Chapter 2 - Table of Contents Federal Communications Commission (FCC) Interference statement 3 CE Mark Warning 4 Chapter 1 -

User's Guide
Page 6
... LED on the Card Power LED Link/ACT 6 Getting Started This chapter introduces the Card and prepares you to 300 Mbps Offers 64-bit and 128-bit WEP (Wired Equivalent Privacy) data encryption for network security. Supports IEEE802.1x and WPA/WPA2 (Wi-Fi Protected Access). Multiple antennas design. Driver support for Windows XP/2000 and Vista. 2.2 Package Content The WLAN Card Installation and Manual CD Quick Start Guide...
... LED on the Card Power LED Link/ACT 6 Getting Started This chapter introduces the Card and prepares you to 300 Mbps Offers 64-bit and 128-bit WEP (Wired Equivalent Privacy) data encryption for network security. Supports IEEE802.1x and WPA/WPA2 (Wi-Fi Protected Access). Multiple antennas design. Driver support for Windows XP/2000 and Vista. 2.2 Package Content The WLAN Card Installation and Manual CD Quick Start Guide...
User's Guide
Page 7
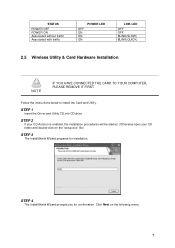
... be started. (Otherwise open your CD folder and double-click on the following menu. 7 STEP 4 The InstallShield Wizard prompts you for installation. Click Next on the "setup.exe" file) STEP 3 The InstallShield Wizard prepares for confirmation. Follow the instructions below to install the Card and Utility. STATUS POWER OFF POWER ON Associated without traffic Associated with traffic OFF ON ON ON POWER LED LINK LED OFF OFF BLINK(SLOW) BLINK(QUICK) 2.5 Wireless Utility & Card Hardware Installation NOTE...
... be started. (Otherwise open your CD folder and double-click on the following menu. 7 STEP 4 The InstallShield Wizard prompts you for installation. Click Next on the "setup.exe" file) STEP 3 The InstallShield Wizard prepares for confirmation. Follow the instructions below to install the Card and Utility. STATUS POWER OFF POWER ON Associated without traffic Associated with traffic OFF ON ON ON POWER LED LINK LED OFF OFF BLINK(SLOW) BLINK(QUICK) 2.5 Wireless Utility & Card Hardware Installation NOTE...

User's Guide
Page 14
The Wireless Client Utility window as shown below will automatically appear in the IEEE 802.11 Wireless Client Utility. 14 2.6 Using the Utility to Configure Your Network The following are explanations on how to open the Wireless Client Utility. After completing the installation procedure, a new icon as shown below will appear. Hold your mouse pointer over the icon, and double click the left mouse button to configure and use any of the management functions available in the lower right tray bar. The user can now use the Utility program.
The Wireless Client Utility window as shown below will automatically appear in the IEEE 802.11 Wireless Client Utility. 14 2.6 Using the Utility to Configure Your Network The following are explanations on how to open the Wireless Client Utility. After completing the installation procedure, a new icon as shown below will appear. Hold your mouse pointer over the icon, and double click the left mouse button to configure and use any of the management functions available in the lower right tray bar. The user can now use the Utility program.

User's Guide
Page 15
... (access point) Ad Hoc Wireless Mode Displays the wireless mode. 802.11g, 11b or 11n Link Speed Displays the current transmit rate in Mbps. SSID Displays the wireless network name. Wireless Network Status Profile Name The name of wireless signal. Set up the configuration name on the Link Information screen. Channel 15 Network Type The type of the access point the wireless card is connected to . Signal Strength Shows the strength of the current selected configuration profile. 2.7.1 Link Information Click the Link...
... (access point) Ad Hoc Wireless Mode Displays the wireless mode. 802.11g, 11b or 11n Link Speed Displays the current transmit rate in Mbps. SSID Displays the wireless network name. Wireless Network Status Profile Name The name of wireless signal. Set up the configuration name on the Link Information screen. Channel 15 Network Type The type of the access point the wireless card is connected to . Signal Strength Shows the strength of the current selected configuration profile. 2.7.1 Link Information Click the Link...
User's Guide
Page 16
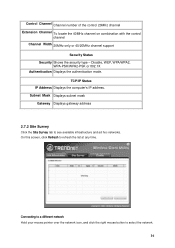
... Status IP Address Displays the computer's IP address. Control Channel Channel number of the control 20MHz channel Extension Channel To locate the 40MHz channel on combination with the control channel Channel Width 20MHz only or 40/20MHz channel support Security Status Security Shows the security type - Subnet Mask Displays subnet mask Gateway Displays gateway address 2.7.2 Site Survey Click the Site Survey tab to refresh the list at any time. Disable, WEP, WPA/WPA2, WPA-PSK/WPA2-PSK or 802.1X Authentication Displays the authentication mode. Connecting...
... Status IP Address Displays the computer's IP address. Control Channel Channel number of the control 20MHz channel Extension Channel To locate the 40MHz channel on combination with the control channel Channel Width 20MHz only or 40/20MHz channel support Security Status Security Shows the security type - Subnet Mask Displays subnet mask Gateway Displays gateway address 2.7.2 Site Survey Click the Site Survey tab to refresh the list at any time. Disable, WEP, WPA/WPA2, WPA-PSK/WPA2-PSK or 802.1X Authentication Displays the authentication mode. Connecting...
User's Guide
Page 17
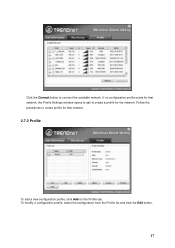
Follow the procedures to create profile for that network, the Profile Settings window opens to ask to connect the available network. To modify a configuration profile, select the configuration from the Profile list and click the Edit button. 17 If no configuration profile exists for that network. 2.7.3 Profile To add a new configuration profile, click Add on the Profile tab. Click the Connect button to create a profile for the network.
Follow the procedures to create profile for that network, the Profile Settings window opens to ask to connect the available network. To modify a configuration profile, select the configuration from the Profile list and click the Edit button. 17 If no configuration profile exists for that network. 2.7.3 Profile To add a new configuration profile, click Add on the Profile tab. Click the Connect button to create a profile for the network.
User's Guide
Page 19
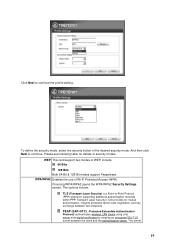
... authentication server. The options include: TLS (Transport Layer Security) is a Point-to continue. WEP This card support two modes of Wi-Fi Protected Access (WPA). Choosing WPA/WPA2 opens the WPA/WPA2 Security Settings screen. PEAP (EAP-GTC) (Protected Extensible Authentication Protocol) authenticates wireless LAN clients using only server-side digital certificates by creating an encrypted SSL/TLS tunnel between two endpoints. Transport Layer Security (TLS) provides for details of the desired security mode. WPA/WPA2 Enables the use...
... authentication server. The options include: TLS (Transport Layer Security) is a Point-to continue. WEP This card support two modes of Wi-Fi Protected Access (WPA). Choosing WPA/WPA2 opens the WPA/WPA2 Security Settings screen. PEAP (EAP-GTC) (Protected Extensible Authentication Protocol) authenticates wireless LAN clients using only server-side digital certificates by creating an encrypted SSL/TLS tunnel between two endpoints. Transport Layer Security (TLS) provides for details of the desired security mode. WPA/WPA2 Enables the use...

User's Guide
Page 20
... hoc mode. The following . The options include: TLS PEAP TTLS Advanced Settings After Security Settings finished, the Advanced Settings screen will be set. Power management is disabled in the WPA/WPA2 Passphrase on the Advanced Settings screen. Check with the IT manager TTLS (Tunneled Transport Layer Security) An EAP variant that provides mutual authentication using a certificate for server authentication, and via a secure TLS tunnel for the client WPA-PSK/WPA2-PSK Enables WPA/WPA2 Passphrase security...
... hoc mode. The following . The options include: TLS PEAP TTLS Advanced Settings After Security Settings finished, the Advanced Settings screen will be set. Power management is disabled in the WPA/WPA2 Passphrase on the Advanced Settings screen. Check with the IT manager TTLS (Tunneled Transport Layer Security) An EAP variant that provides mutual authentication using a certificate for server authentication, and via a secure TLS tunnel for the client WPA-PSK/WPA2-PSK Enables WPA/WPA2 Passphrase security...
User's Guide
Page 23
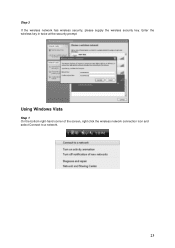
Using Windows Vista Step 1 On the bottom right-hand corner of the screen, right click the wireless network connection icon and select Connect to a network. 23 Step 3 If the wireless network has wireless security, please supply the wireless security key. Enter the wireless key in twice at the security prompt.
Using Windows Vista Step 1 On the bottom right-hand corner of the screen, right click the wireless network connection icon and select Connect to a network. 23 Step 3 If the wireless network has wireless security, please supply the wireless security key. Enter the wireless key in twice at the security prompt.

User's Guide
Page 25
... Card driver from your computer. Select 300Mbps Wireless N Express Card, and click the Uninstall button 3.3 Upgrading the Wireless Utility To perform the upgrade, follow the steps below to install the new utility. 25 Click OK to confirm that you are going to uninstall the driver 3.2 Uninstall the Client Utility Follow the steps below to Start -> Control Panel Step 2. Step 4. Chapter 3 - Under Hardware tab, click Device Manager. Step 2. To remove the driver...
... Card driver from your computer. Select 300Mbps Wireless N Express Card, and click the Uninstall button 3.3 Upgrading the Wireless Utility To perform the upgrade, follow the steps below to install the new utility. 25 Click OK to confirm that you are going to uninstall the driver 3.2 Uninstall the Client Utility Follow the steps below to Start -> Control Panel Step 2. Step 4. Chapter 3 - Under Hardware tab, click Device Manager. Step 2. To remove the driver...

User's Guide
Page 26
... EAP-compatible RADIUS server, an access point helps a wireless station and a RADIUS server perform authentication. EAP AUTHENTICATION EAP (Extensible Authentication Protocol) is a mechanism for protecting confidentiality, integrity, and authenticity of wireless stations and encryption key management. CHANNEL A radio frequency used below, look for both the authentication of data. Glossary For unfamiliar terms used by a wireless device is fragmented into smaller packets. AD-HOC (IBSS) Ad-hoc mode does not require an AP or a wired network.
... EAP-compatible RADIUS server, an access point helps a wireless station and a RADIUS server perform authentication. EAP AUTHENTICATION EAP (Extensible Authentication Protocol) is a mechanism for protecting confidentiality, integrity, and authenticity of wireless stations and encryption key management. CHANNEL A radio frequency used below, look for both the authentication of data. Glossary For unfamiliar terms used by a wireless device is fragmented into smaller packets. AD-HOC (IBSS) Ad-hoc mode does not require an AP or a wired network.

User's Guide
Page 27
... another as the passwords match, clients will be granted access to place, it is responsible for data encryption and decryption. As long as they move between the TEW-642EC and the AP or other . SSID The SSID (Service Set Identity) is a subset of the IEEE 802.11 i security specification draft. Both the wireless stations and the access points must have an external RADIUS server, use the same WEP key for choosing...
... another as the passwords match, clients will be granted access to place, it is responsible for data encryption and decryption. As long as they move between the TEW-642EC and the AP or other . SSID The SSID (Service Set Identity) is a subset of the IEEE 802.11 i security specification draft. Both the wireless stations and the access points must have an external RADIUS server, use the same WEP key for choosing...

Quick Installation Guide
Page 4
DO NOT install the Adapter in the computer until instructed to Install Important! Insert the Utility & Driver CD-ROM into free Express Card slot of notebook PC . 3. How to do so. Insert Adapter firmly into your computer's CD-ROM Drive and then click Install Driver & Utility. 2. Windows Vista 1. Click Locate and install driver software (recommended). 4. 2. Click Next. 2 English
DO NOT install the Adapter in the computer until instructed to Install Important! Insert the Utility & Driver CD-ROM into free Express Card slot of notebook PC . 3. How to do so. Insert Adapter firmly into your computer's CD-ROM Drive and then click Install Driver & Utility. 2. Windows Vista 1. Click Locate and install driver software (recommended). 4. 2. Click Next. 2 English

Quick Installation Guide
Page 11
Click Site Survey. 3. For detailed information regarding the TEW-642PC configuration and advanced settings, please refer to the User's Guide included on the Utility & Driver CDROM or TRENDnet's website at www.trendnet.com. 9 English 4. Click Close. Click the SSID that matches your system tray. 2. Wireless configuration is now complete. Windows XP/2000 1. Double-click the Wireless icon in your wireless access point and then click Connect.
Click Site Survey. 3. For detailed information regarding the TEW-642PC configuration and advanced settings, please refer to the User's Guide included on the Utility & Driver CDROM or TRENDnet's website at www.trendnet.com. 9 English 4. Click Close. Click the SSID that matches your system tray. 2. Wireless configuration is now complete. Windows XP/2000 1. Double-click the Wireless icon in your wireless access point and then click Connect.

Quick Installation Guide
Page 12
... device manager to make sure the adapter is the letter assigned to your CD-ROM Drive, and then press the ENTER key on your wireless router or access point's Network Name (SSID). Please refer to the User's Guide for security key in "D:\autorun.exe" is installed properly. A1: If the window does not appear automatically, click Start, click Run, and type D:\autorun where "D" in order to my access point. Q3: Windows is not connecting to access a secured wireless access point...
... device manager to make sure the adapter is the letter assigned to your CD-ROM Drive, and then press the ENTER key on your wireless router or access point's Network Name (SSID). Please refer to the User's Guide for security key in "D:\autorun.exe" is installed properly. A1: If the window does not appear automatically, click Start, click Run, and type D:\autorun where "D" in order to my access point. Q3: Windows is not connecting to access a secured wireless access point...


